Print this article Font size 16
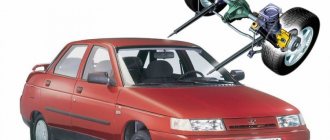
Without good and reliable brakes, it is impossible to drive a car safely. Therefore, monitoring the condition of this unit is the direct responsibility of every car owner. Replacing brake fluid on a VAZ 2110 is not difficult, but to do this you must go through several steps.
Max and min TJ level
Device
Cars of the Lada Samara series received a hydraulic drive that operates on two circuits. The connection of these circuits is cross-connected - this design is used in almost all cars with front-wheel drive. The operation can be explained simply: one circuit includes one rear and one front wheel from different sides. The brake system is equipped with a working fluid level indicator, while the driver is “helped” by pressing the corresponding pedal by a vacuum booster.
The system has two main nodes:
- Front brakes. Disc mechanisms are installed at the front, the operation of which is carried out by calipers with a single piston. The mechanisms are equipped with wear alarms and ventilation.
- Rear brakes. The VAZ 2110 car received standard drum mechanisms; their main elements are pads. These elements are activated by hydraulic pistons.
It is also worth mentioning the brake master cylinder (MBC) and the vacuum booster, which form a common unit. The amplifier is a non-separable structure, so if it breaks, it must be completely replaced. The VAZ 2110 manual contains a detailed diagram where all elements of the brake system are indicated and listed. Almost all mechanisms can fail, but most often the owner of the “ten” has to repair the rear mechanisms. The operating manual also indicates how often the condition of the brakes should be checked.
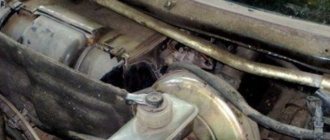
Replacement of tubes and rear cylinder
Dismantling and subsequent replacement are carried out as follows:
- The VAZ 2110 must be lifted with a jack, and then the wheel must be removed (the one under which the grease appears);
After repairs, it is necessary to replenish the brake fluid supply.
Important! If a defect appears in one wheel, then it is worth checking the second one, since the mechanism worked under increased loads.
We work independently
It is possible to carry out all the steps to rid the VAZ-2110 brake system of air yourself. This fairly simple method also allows you to complete all the assigned tasks alone:
- the brake fluid reservoir cap is replaced with an old clutch reservoir cap with a hole pre-drilled in it into which a car nipple is inserted;
- the compressor sets the pressure to 1.5-2 atmospheres and supplies it to the installed nipple on the tank lid;
- the second hose is put on the fitting through which the brakes are pumped, and its other end is lowered into a container (for example, a bottle);
- When air stops coming out of the hose, the fitting can be closed.
This operation is repeated on all wheels of the car. It is worth noting that in camping conditions the compressor can be replaced even with a regular bicycle pump, which will be somewhat more difficult than working with a compressor, but with due diligence it is also effective.
Air in the brake system after repair or replacement of fluid makes the brakes “wobbly”. To remove air from the brake system using the traditional method, you will need an assistant. The article answers the questions: what is the brake bleeding scheme, and is it possible to bleed the system alone?
Bleeding VAZ brakes with an assistant
To effectively remove air from the brake system, you should remember the sequence. For example, in order to bleed the brakes of a VAZ 2110, it is worth considering that we are talking about a diagonal circuit diagram, that is, the bleeding sequence should be diagonal: first the right rear wheel, then the left front, left rear and, finally, the right front.
Procedure for bleeding the brakes:
- Add brake fluid to the “MAX” mark.
- If the rear wheels are suspended, first unlock the rear brake pressure regulator by inserting a screwdriver between the plate and the piston. After pumping it needs to be removed.
- Clean the air release valve on the brake mechanism from dirt.
- Remove the protective cap from the air release valve. Place the rubber hose over the valve head and immerse the end of the hose in a clean, transparent container that is partially filled with brake fluid.
- The assistant must sharply press the brake pedal 4–5 times (with an interval of 1–2 s between presses). Press the brake pedal one last time and leave it pressed.
- Unscrew the air release valve 0.5–0.75 turns. Air bubbles will be visible in the liquid flowing from the hose. When the fluid stops flowing from the hose, close the air release valve and release the brake pedal.
- We monitor the level of brake fluid in the reservoir and top up if necessary.
- Repeat the operation (steps 5-7) until the emission of bubbles in the flowing liquid stops.
- Remove the hose, wipe the air release valve fitting and put the protective cap on it.
Let's move on to pumping the brake mechanisms of other wheels.
How to properly bleed your brakes alone
You will need a device for bleeding the brakes (AERATOR), the price of which is 70 rubles, or you can make it yourself.
To make an aerator you will need:
- brake reservoir cap for “classic” (black, without sensor), 10 rub.
- car nipple.
- drill or round file.
You need to drill a hole about 14mm in the lid. Then we insert the nipple into the tension. Ready.
To bleed the brakes alone. you need to: Connect the valve on the tank to the wheel valve. We jack up the car in the same way and remove the wheels. We unscrew the brake bleeder fitting, and the created air pressure will expel all the brake fluid. One tire has enough air to spare. At the end of the work, the tire must be inflated.
By the way, air can be supplied to the tank in any convenient way, for example, using a tire inflation pump, or a compressor.
Features of the method:
- It is undesirable to put more than 1 atm pressure into the tank.
- If you use a pump and a very tight adapter for the nipple, the pressure may rise sharply above the permissible level.
Therefore, if you are using a spare wheel, make sure that the excess pressure will be maintained for at least 3-4 minutes, and if you are using a pump, then ensure that the excess pressure does not exceed 1 atmosphere in 2-3 minutes.
Drops of fuel oil may fall from the float cover.
- After the rear wheels are suspended, it is necessary to unlock the rear brake pressure regulator. To do this, you will need to install a screwdriver in the gap between the piston and the plate. At the end of the work, of course, it will need to be removed.
- We clean the air release valve of the rear right brake mechanism, removing dirt and dust from it. Then you need to unscrew the rubber cap from the valve.
- Install a rubber hose onto the valve fitting (it is good if it is transparent, as it will be possible to monitor the condition of the brake fluid). Place the end of the hose into a clean, transparent container prepared in advance.
- The assistant, while in the cabin, must press the brake pedal at intervals of 1-2 seconds 4-5 times. The last time you need to fix the pedal in the pressed position.
- Unscrew the air outlet valve 0.5-0.75 turns. At the same time, used brake fluid . At this moment, the pedal must be pressed all the way. Once the liquid stops flowing out, you can tighten the outlet valve.
- In this case, it is important to monitor the fluid level in the tank, since it should not be allowed to fall below the minimum level. In this case, you need to add a new fuel fluid. Repeat this procedure until clean liquid begins to flow out of the system.
- The brake fluid of the left front brake mechanism is replaced in the same way , after which the fuel fluid in the 2nd circuit is replaced. First, we replace the TJ in the left rear, and then in the right front.
- To test the system, you need to press the brake pedal several times. In this case, you should feel a smooth stroke and slight resistance of the pedal with each press. If the pedal periodically fails or sticks, there is a lot of air in the brake system and it needs bleeding.
- After replacing the brake fluid, you need to replace the protective caps.
- Add TJ to the tank, screw on the cap.
Replacement of TZ
The first thing you should think about when changing brake fluid is your own safety. The fact is that the hydraulic composition includes chemical components that have a high degree of toxicity. If brake fluid gets on your skin, chemical burns will be inevitable.
Plus, the liquid poses a potential danger to wiring, since it corrodes its protective casings without any problems. If it was not possible to avoid contact with car parts, immediately try to wipe the liquid off with rags. There is no need to rinse with water. If skin burns occur, wash with water and go to hospital immediately.
Let's hope that there will be no problems with your safety issues and that you will work carefully. And to work you will need a set of tools:
- Spanners;
- Durable rubber hose;
- Any transparent container with a volume of 3 liters or more.
Well, now you can proceed directly to the procedure for replacing the brake fluid on your VAZ 2110.
- Unscrew the brake fluid reservoir cap. It is located on the left on the domestic “ten”.
- Place the cap on a clean rag as there may be particles of brake fluid on it. Be sure to wear gloves.
- Drain the fluid from the hydraulic cylinders located behind. This is due to the distribution pattern of brake fluid throughout the vehicle. The front wheels are connected first, so if the car is in a normal position, the fuel fluid will not drain from the rear cylinders.
- For convenience, lift the rear wheels with a jack and turn off the locking regulator, that is, the sorcerer in the people. A screwdriver is inserted between the sorcerer's piston and the plate, which will not allow the element to move.
- Clean off any dirt that has accumulated on the hydraulic cylinder valves at the rear and remove the cap from one of them. It is made of rubber.
- This will release the fitting onto which the pre-prepared hose is attached. It is recommended to use a transparent rubber hose, as this will allow you to monitor the drainage of the liquid.
- The other end of the hose is placed in a transparent container.
- Have someone in your garage do the bleeding while you hold the brake fluid container.
- Bleeding is done by sharply pressing the brake pedal. The pedal should be pressed all the way about 6 times in a row. After 6 presses, the pedal rests on the floor and is held.
- Now unscrew the cylinder air valve half a turn. Due to this, the liquid will begin to be squeezed out of the container and enter the container through the hose.
- As soon as the entire circuit is cleared of brake fluid, the brake pedal itself will fall to the lower position.
- Wait until the liquid has completely drained, then be sure to tighten the outlet valve.
- A similar process is repeated on the second rear wheel, after which the front wheels are pumped out.
- The procedure for draining the hydraulic solution from the front wheels is similar to working with the rear wheels. At the same time, check the condition of the hydraulic cylinders. They may need repairs.
- Determining the serviceability of a hydraulic cylinder is not difficult. If the working stroke of the rod is smooth, there are no distortions or sudden jumps, then everything works well and replacement is not needed.
- If there are problems with the hydraulic cylinder, the easiest way is to replace them with new ones. But it can be repaired. Act according to the situation.
- Filling with new hydraulic solution is carried out by pumping each wheel separately.
- Once you have filled and bled all 4 wheels, be sure to fill the brake fluid reservoir to the maximum level. For this purpose, the corresponding MAX symbol is marked on the body.
- The last step is to check the functionality of the new brake fluid inside the system. If the replacement of the hydraulic solution was carried out correctly and without disturbances, the braking force will be distributed evenly, the pedal will clearly respond to pressing without delay and without increased sensitivity.
- If the pads do not respond to braking at the same time, you will simply skid when you press the brake pedal. Therefore, this should not be allowed under any circumstances.
Replacing brake fluid on a domestic VAZ 2110 car is not difficult, even without the help of specialized service stations.
For a successful DIY procedure, you will need:
- Compliance with personal safety rules;
- Availability of an assistant;
- High-quality brake fluid;
- Actions according to the instructions and operating instructions for the VAZ 2110.
Put all this together, and you can easily change the hydraulic fluid in your car's brake system yourself.
Loading …
Completion of work
At this time, there must be an assistant in the vehicle interior who will carry out the pumping process. To do this, he will need to press the brake pedal with sudden movements. In this case, it should be squeezed to the lowest position 5-6 times. After the required number of presses, the pedal must be locked in its lowest position.
The cylinder air valve should then be unscrewed 1/2 turn. This will cause the fluid to squeeze out and flow through the hose. After the brake circuit is completely released, the operating pedal in the passenger compartment will fall to the floor. After waiting until the hydraulic solution has completely flowed out, the outlet valve fitting must be tightened. A similar bleeding procedure should be repeated on the other rear wheel, and then move on to the front.
The front wheels will be drained in the same way as the rear wheels. After pumping out the remaining solution, you need to fill in new brake fluid. Before this, you need to check whether the hydraulic cylinders in the system require repair. If the movement of the working parts of the rod is smooth and without the presence of sharp twitches, then their repair is not required.
Otherwise, it is necessary to eliminate such malfunctions of the brake system or replace the hydraulic cylinder. The system should also be filled in stages, bleeding each wheel. After one side has been pumped, the solution should be added to the tank until it stops. Having pumped all the wheels, you must continue adding to the tank to the level mark indicated on its body.
After completing the repair, they check the functionality and operating efficiency of the brakes. If everything has been done correctly, the braking forces should be distributed evenly without causing delay in response. Different pad response speeds will lead to skidding during braking; this should be avoided.
Without good and reliable brakes, it is impossible to drive a car safely. Therefore, monitoring the condition of this unit is the direct responsibility of every car owner. Replacing brake fluid on a VAZ 2110 is not difficult, but to do this you must go through several steps.
Max and min TJ level
Approximate sequence of steps for pumping brakes on a VAZ-2112
The car itself is placed on an overpass or in a pit. Pumping is carried out “diagonally”, starting from the rear wheels. Example: first the rear right cylinder, then the front left one, etc.
Rear and front brake cylinder
There is a fitting on each brake cylinder. We clean it, then remove the plug-cap. This will allow you to put the tube on top (see photo).
Photo 1 shows the rear brake cylinder, photo 2 shows the disc brake cylinder.
Procedure:
- On any car, including the VAZ-2112, you can bleed the brakes only with the tank cap closed. We find the expansion tank and tighten the cap tighter.
DOT fluid tank
- In step 1, if necessary, top up to the MAX mark. DOT-4 fluid is suitable.
- We put a hose on the fitting. Place the second end of the hose in a container.
- The assistant presses the pedal 4-5 times at intervals of a second. The pedal remains pressed.
- Using an 8 key, unscrew the fitting half a turn. The DOT fluid comes out along with the air, the pedal sinks to the floor.
- The fitting is tightened and the pedal is released. If the fluid level is now below the MIN mark, add it to the MAX mark.
- Steps 4-6 are carried out until bubbles can be seen in the drained liquid.
- Move on to the next cylinder.
At the final step, all four plugs must be returned to their place.
Tricks and subtleties
Perhaps we don’t have an overpass, but only a lift. This means that the rear wheels will be hanging out. And then you need to do the following: before pumping, install a slot between the bracket and the pressure regulator.
Brake pressure regulator
After bleeding the rear cylinder, the screwdriver or slot is removed.
It is advisable to use a spanner “8” key, not a flat one. The tube is then put on the fitting following the key. The material of the tube, that is, the hose, must be transparent. This also applies to the drainage container.
Common mistake
Let's assume that two cylinders were pumped, and when the second was pumped, there were no more bubbles. Then the third cylinder is pumped, and the job is considered done. This is where the mistake lies: all four cylinders need to be pumped. On another it is impossible!
How to properly level up if there are no helpers?
In theory, you can bleed the brakes on a VAZ-2112 alone. There is no ABS system here, but with it everything would be simpler - there is an electric pump. And instead of a pump we will use special equipment.
Brake bleeding device
Here you need an aerator or just a lid with a nipple. You can buy it or make it yourself - a classic tank cap and a nipple for a tubeless tire are suitable.
Procedure:
- The aerator cap is screwed onto the neck.
- One of the wheels is hung up and the structure is assembled, as in the photo.
Air from the tire enters the tank
- Carry out steps 5-6 (see above), pumping one cylinder after another.
In theory, everything looks simple. But in practice, you need to monitor whether the fluid has gone below the MIN mark. To top up, do this:
Unscrew the coupling from the wheel nipple; Carefully unscrew the lid, fill the tank, and so on.
The air pressure entering the tank should not exceed two atmospheres. That's why we connected the hose to the tire and not to the pump
It is important!
There are other methods that allow you to bleed the brakes without an assistant. For example, a gas stop is installed between the pedal and the seat, or the liquid is drawn out with a syringe by opening the lid on the tank.
Our brand
General recommendations in all cases of work when changing the fluid on a car with your own hands:
- Do not allow the chemical to come into contact with your hands, inside the body, or on wires or paintwork;
- it is necessary to use exactly the chemical specified by the manufacturer of the car brand;
- Store leftovers in containers tightly closed.
So, as an example, let’s look at the operation of replacing the brake fluid on a VAZ 2110 car. We’ll describe what you need to have on hand below:
- set of wrenches;
- screwdriver;
- capacity;
- hose.
How much liquid we need is indicated by the car's passport. For VAZ 2110 this is 0.55 liters. Let's get started.
- Open the system reservoir.
- We lift the rear of the car, unlock the rear brake pressure regulator - insert a screwdriver between the piston and the plate.
- We release the air release valve of the right rear brake from the rubber cap, insert a hose, the end of which is connected to a container.
- The partner must sharply press the pedal 5 times, and leave it pressed the last time.
- At the same time, we unscrew the valve with a wrench - just make three quarters of a turn, the spent medium should begin to flow out. After the leak stops, tighten the valve, and your partner should not release the pedal until the fitting is tightened.
- It is necessary to add new medium as soon as the tank is empty to the bottom mark. When clear liquid flows out, the operation stops.
- We repeat everything completely on the left front brake mechanism.
- Then we repeat the manipulations again for the second circuit - first we move to the left rear mechanism, and at the end - to the right front.
- We install the caps back, remove the screwdriver from the pressure regulator, and check the efficiency of the system.
This is how the brake fluid is replaced on a VAZ 2110. Dividing the system into two independent circuits for greater safety should not be a surprise - just remember the driving school lessons.
Replacement for the VAZ 2114 is carried out in exactly the same way. If we talk about the Lada Kalina, then there are no differences either. Changing Kalina's fluid is done according to the same instructions. The only thing worth paying attention to is how much brake fluid Kalina needs for a complete replacement. The volume here is 0.45 liters.
On the Lada Priora we act identically. Replacing Priora also does not cause any particular difficulties. The volume of the new medium is also 0.45 liters. For all these cars, it is recommended to use DOT 3. The replacement frequency for front-wheel drive VAZs is from 2 to 3 years or from 50 to 60 thousand km. mileage
Bleeding brakes on VAZ 2110, VAZ 2111, VAZ 2112
Welcome! Bleeding the brakes is a mandatory thing after replacing any unit in the hydraulic brake drive; by the way, this even applies to simply replacing the brake fluid (If it had to be completely drained), after which the brake system also needs to be bled, but few people know how to do this correctly, Therefore, especially for such people, we wrote a detailed article where we described everything down to the smallest detail, so, as they say, read and understand.
Note! In order to bleed the brakes, you will need to take with you: An assistant, since it will be much easier to bleed the brakes with him than alone, and you will also need to stock up on a small container (0.5 liter bottle, from some kind of lemonade) into which a little new brake fluid will be poured, but more on that a little later, and you will also need to take with you a hose of suitable length and diameter, but more on that later, in general, before immediately starting work and preparing the tools, first Read the article in full and only then prepare your things for work!
When should you bleed your brakes? They require bleeding only if there is a depressurization somewhere in the brake system, and as we know from school, depressurization is a phenomenon when a tear occurs somewhere in the system, a breakdown that spoils the entire tightness of the system and in connection with this disrupts the operation of this system, for example, the tightness in the brake system may disappear if any brake hose is torn or after the fluid in the brake reservoir completely flows out of it and the reservoir remains open.
Note! By the way, it is not difficult to understand that the system has become depressurized, or in other words, air has gotten into it, firstly, the brakes in your car after air gets into the system will immediately begin to work worse, that is, the brake pedal travel will increase, but at the same time it will become easier to press than this happened earlier and the car will become much worse at braking, although this only depends on how depressurized your system is; if a lot of air gets into it, then the brakes can easily fail completely and, as they say, there will be no brakes at all!
Signs of brake fluid loss of quality
- Increasing the length of the path to a complete stop of the car;
- Pressing the brake pedal requires force;
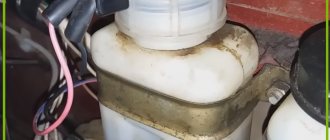
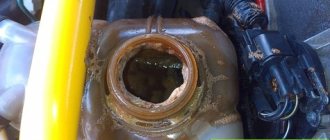
- The pillbox in the expansion tank changed color from light to dark;
- At the place where the tank is installed, traces of lubricant leakage are visible, the level is below normal;
- The yellow indicator on the dashboard indicates the fluid level sensor in the system.
If one or more signs are detected, stop the car, turn off the engine, and inspect the brake circuit and master cylinder. If traces of depressurization of the circuit are visible, then call a tow truck to deliver the car to a service center. Subsequent operation of the technical device is unsafe.
Today we will teach you how to replace brake fluid on cars of the tenth family and tell you some nuances that must be taken into account.
Note! You will need the following tools: a basic set of wrenches, an empty transparent container, a small hose, a large medical syringe or a rubber bulb.
When to change?
Are you familiar with the term “hygroscopicity”? This word applies to many areas, but mainly the concept has found its application to various fluids, including brake fluids. Over time, it absorbs moisture, which means the car begins to brake worse, and the brake fluid boils many times faster.
In a normal situation, the liquid boils at a temperature of 250 degrees, although it cannot boil at all. Many elements of the brake system are responsible for the braking process, including fluid, as it puts pressure on the brake cylinder, which presses the pads to the brake disc. This fluid usually does not compress, that is, pressing the pedal simply causes pressure on the cylinders, trying to come out. Boiling will result in the following:
- firstly, brake hoses may not withstand temperatures of 250 degrees, especially low-quality hoses;
- secondly, the car’s braking will become much worse.
How the brake system of the VAZ 2110 works
How does the brake system of the VAZ 2110 work? The braking circuit of the VAZ 2110 car is equipped with a hydraulic drive, which includes two circuits.
Like most vehicles that are classified as all-wheel drive, the brake circuits have activation specific to these vehicles. One circuit combines one clutch to the wheels, which are located on both parts of the suspension.
They are located on both sides. The car has front brakes and rear brakes.
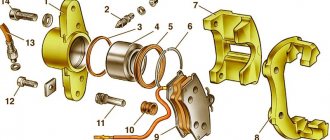
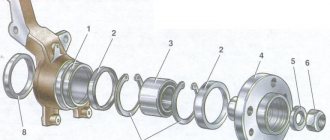
1 – master cylinder of the hydraulic brake drive2 – pipeline of the “right front – left rear brake” circuit3 – flexible hose of the front brake4 – master cylinder reservoir5 – vacuum booster6 – pipeline of the circuit “left front – right rear brake”7 – rear wheel brake mechanism8 – elastic lever pressure regulator drive9 – flexible rear brake hose10 – pressure regulator11 – pressure regulator drive lever12 – brake pedal
13 – front wheel brake mechanism
The design of the brake system of a VAZ car
On the front suspension there are:
- vacuum type amplifier;
- critical level indicator;
- disc brakes, which are equipped with ventilation;
- caliper assemblies having pistons;
- pad wear monitoring system;
On the rear suspension there are:
- brake drum;
- pads, the action of which is controlled by hydraulic pistons;
- master brake cylinder.
The brake cylinder is designed for automatic control. It is necessary to control the distance separating the block and the brake drum. The main brake cylinder is secured with two studs to a vacuum type booster.
The expansion tank is mounted in the upper part of the GTZ. A sensor equipped with an electronic device is installed in the lid; it is necessary to monitor the liquid level.
This allows you to determine when it will need to be replaced.
The piston has a ring for sealing. In the braking device it is in contact with the rod. VUT 2110 is located between the unit responsible for the pedal and the main control center. It is secured with two studs. The design of the amplifier is non-separable; if it fails, it is recommended to replace it with a new one.
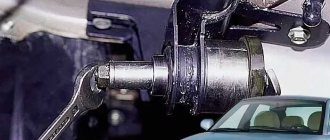
What is the purpose of the brake pressure regulator?
Most VAZ 2110 owners are familiar with this device under the name “sorcerer”. At the same time, it is not clear to everyone why it is needed. The brake pressure regulator is located on the rear suspension of the car. It is equipped with a lever that has a movable position; when the springs are loaded, it changes its static position.
The resulting voltage is distributed to the system piston. After pressing the pedal, the piston helps reduce the load in the rear wheel decks.
If the braking system is working properly, all loads are distributed evenly. For an adequate response of the regulator, a setting is required that prevents untimely wheel locking.
A balanced braking system is needed to match the timing of the car's wheels locking.
Tuning the brake system on the VAZ 2110
Floating bracket device
The disc brake is equipped with a floating caliper, which, in turn, is equipped with a movement unit and a cylinder, they are secured using bolts. Installation or replacement of the bracket is carried out in the holes of the guide pads; this also contains liquid. Using springs, the pads are pressed against the connectors of the guides. This avoids spontaneous braking.
An electronic signaling device is installed in the inner block. It also monitors the condition of the pads. If replacement is required, the system will notify the owner.
The design of the brake cylinder of the VAZ 2110 caliper has a piston. It is equipped with a sealing ring. This allows you to fix the location of the pads at the desired distance from the disc. The elasticity of the ring allows this to be achieved.
If necessary, replace the sealing ring.
The brake system of the VAZ 2110 includes a parking brake. The operation of the mechanical drive is ensured by cables. The lever provides tension on the cable; it is located in the cabin. In turn, the cable is attached to the equalizer; each wheel on the rear suspension is equipped with it.
Master brake cylinder
Now let's talk about the master brake cylinder on a VAZ 2110 car. If you do not want to allow the brakes to fail while driving, they should be checked periodically, and if problems arise, take appropriate action immediately.
A common reason for replacing the master brake cylinder of a VAZ 2110 is precisely the fact that the brakes are lost.
Symptoms of a problem
Of course, brakes can completely lose their effectiveness for various reasons, but now we are talking specifically about the master cylinder. If the reason lies therein, then it can be determined by the following signs:
- The master cylinder shows signs of brake fluid leakage;
- The pedal has an idle motion, that is, when it is pressed, no force is created;
- The brake pedal simply won't press.
Replacement
To repair the master brake cylinder of a VAZ 2110, you will need to first disassemble it and then install a new element.
The most difficult process is disassembly. Therefore, let's talk about it in more detail.
Carefully disconnect the master cylinder from the pipeline. Disconnect the block, which is equipped with wiring, from the emergency brake fluid indicator. The connection to the “ten” is made by terminals. Cover the pipe and assembly openings with something to prevent brake fluid from leaking. It will pollute the interior space, which is undesirable. Now remove the cylinder along with the reservoir. To do this, simply unscrew the fastening nuts that connect the element to the vacuum booster. After removing the brake fluid level sensor, drain the brake fluid present from the cylinder and the cylinder itself. If there is no serious need, you should not remove the tank. But for complete assembly, the tank is removed and then installed in place in strict order. Before reassembly, each element is washed with purified brake fluid.
How to properly bleed the brakes on a VAZ 2110 yourself
Self-bleeding the brakes of a VAZ 2110, 8 valves or 16 – it doesn’t matter (as well as the type of power supply, carburetor or injector), is available in three ways:
- exposure to pressure;
- exposure to rarefaction;
- by gravity.
Self-pumping under pressure
On the VAZ 2110, bleeding the brakes under the influence of external pressure is possible using additional equipment.
You will need:
A device for bleeding the brakes for one person (a cap with a nipple to create pressure in the system). Can be used as a special device such as a pump, compressor, inflated wheel (chamber)
- compressor, pump or tank with compressed air (a spare tire will do);
- air supply hose;
- nipple for tubeless wheel;
- TZ tank cap without sensor (from Zhiguli);
- drill of a diameter corresponding to the fitting diameter of the nipple.
Before you bleed the brakes on a VAZ 2110 yourself, you need to take the reservoir cap and drill a hole in it. The nipple should be inserted into it so that it sits there tightly. This cap must be screwed onto the GTZ tank, after adding fluid to the maximum.
Then you need:
- Get to the brake fitting, remove the cap from it, put on a 8 or 10 key and a hose, immersing its end in a container (as described above).
- Connect the air supply hose to the nipple in the reservoir cap.
- Apply pressure to the tank through the nipple by pressing the compressor gun, pumping the pump or putting the hose on the spare tire.
- Unscrew the fitting to bleed air bubbles from the brake circuit.
- Wait until the fuel fluid flows through the hose in an even stream without bubbles.
- Tighten the fitting and stop the pressure supply.
- Repeat steps 3-6 for the remaining wheels.
Bleeding the brakes with vacuum
Instead of excess pressure, vacuum can be used to bleed the brakes of the VAZ 2110. To do this, you will need a large syringe (from 100 cubic meters) and a hose to connect it to the fitting.
The procedure is as follows:
- Open the reservoir on the GTZ and fill in the maximum amount of liquid.
- Place the key on the fitting and connect the fitting to the syringe with a hose.
- Open the fitting and pull the syringe plunger towards you, creating a vacuum in the brake circuit.
- After filling the syringe, close the fitting and drain the fuel fluid into the container.
- Repeat the manipulations from steps 2-4 until the liquid begins to flow into the syringe in an even stream without bubbles.
- Repeat steps 2-5 for all wheels, following the order of bleeding the VAZ 2110 brakes.
This method is less efficient and consumes more fuel fluid, so it is used when pumping with pressure is not possible. It should be remembered that it is not worth reusing the pumped-out fuel fluid, due to the presence of contaminants from the circuit and atmospheric moisture in it.
Bleeding VAZ 2110 brakes by gravity
Bleeding brakes 2110 by gravity is the simplest, but most expensive method in terms of using brake fluid. All you need is hoses, drainage containers and a DOT-4 bottle. Pumping is carried out in this order:
A dropper with which it is convenient to bleed the brakes yourself
- Open the GTZ tank.
- Place the hoses on the fittings and insert their free ends into the containers under the drain.
- Unscrew the fittings on the brake cylinders.
- Start pouring fresh fuel oil into the GTZ tank, while simultaneously observing the streams from the fittings.
- When the liquid begins to flow through the hoses smoothly and without bubbles, tighten the bleeder fittings one by one.
If, as a result of pumping, the liquid in the tank does not reach the Max level, you need to top it up. If there is too much TJ, the excess must be pumped out with a syringe. It is not recommended to reuse the fuel fluid drained from the fittings; it must be disposed of.
How to bleed the brakes of a VAZ 2110 without removing the wheels
It is not necessary to remove the wheels to bleed the brake system. This is necessary to facilitate access to the fittings, but you can do without this item if:
- drive the car into a pit or overpass;
- raise it on a lift;
- use a high jack.
Since you can pump the front brakes on a VAZ 2110 purely by turning them out, this operation can be performed on any flat surface. To access the fitting for the left wheel, you need to turn the steering wheel all the way to the right, and for the right wheel, turn it all the way to the left. The gap between the wheel and the arch will be quite enough.
A pit, overpass or lift is needed to access the rear wheel fittings. You can use a jack to raise the rear end and straighten the strut spring to its highest position. The wheel will lower relative to the arch and the resulting gap will be enough to reach the fitting by hand. But since it is more convenient to unscrew 4 bolts, it is better not to “reinvent the wheel” and pump the brakes by removing the wheel.
Replacing coolant on a VAZ car
Replacing the coolant in the engine of a VAZ 2110 or 2111 is actually quite simple. You just need to follow the order in which this operation is performed:
1. You should try to park the car as level as possible. If there is no horizontal platform nearby, then the front of the machine should be positioned higher than its rear.
2. Before starting work, the machine must be de-energized. To do this, simply disconnect the negative cable from the battery.
3. As is often the case with AvtoVAZ’s “creations,” in order to get to one part you will have to remove another. In our case, in order to drain the liquid from the cylinder block, you will need to dismantle the ignition module with its bracket.
4. To create pressure in the cooling system, which will accelerate the outflow of the drained liquid, you need to open the expansion tank by removing the plug.
5. Having gained access to the fluid drain plug from the engine block, you should unscrew it, first placing a container under the engine. Draining the coolant should be done carefully to prevent this chemical from spilling around the vehicle. The plug and drain hole should be wiped with a clean rag after completion of the operation.
6. The next step is to drain the liquid from the radiator, so the container needs to be moved under the radiator. The procedure is similar to draining the liquid from the block: you need to remove the plug and let the liquid flow into the container.
7. After the car’s cooling system is empty, the block and radiator plugs must be screwed into their rightful place.
8. If we are talking about a motor with a fuel injection system, then you will need to disconnect the clamp and remove the hose that supplies antifreeze at the point of its connection with the throttle pipe heating fitting.
9. If the coolant is drained from a carburetor engine, then unscrew the hose from its connection with the carburetor heating fitting. These actions will avoid the formation of the notorious air pockets, which will subsequently prevent the liquid from evenly filling the system. It is through the hole formed as a result of disconnecting the hose from the heating fitting that air will escape, displaced by the liquid poured into the system.
10. Then the system itself is filled with coolant. You need to pour it into the expansion tank until its level is equal to the upper limit of the fastening belt that holds this tank. After this, the expansion tank plug is screwed into place.
11. We return the hose that we unscrewed before pouring the liquid into place, screwing it to the heating fitting.
12. After this, you need to return the ignition module, which was removed to gain access to the fluid drain plug from the cylinder block, back into place.
13. We connect the ground to the battery.
14. After this, you can start the engine and warm it up to operating temperature. Sometimes heating helps to push through the formed air pockets, after which the liquid leaves the tank. If this happens, you need to turn off the car and add coolant to the required level.
Very often, inexperienced drivers “boil” the engine, allowing the engine to overheat. This happens if, when driving in low gear, the cooling fan activation system does not work. If the driver monitors the engine temperature gauge while driving, he will notice that the needle of this device has gone into the red zone. This signals danger, which means you need to take emergency measures.
Despite the possible heat outside and in the cabin itself, you need to immediately turn on the heater. If it blows hot from the heater, it means the fan has failed, and if it blows cold, then the cause of overheating lies in the air lock mentioned above. In the first case, you cannot turn off the engine until, thanks to the operation of the “stove,” the engine temperature decreases. In the second case, you can turn it off, but you need to wait until the engine cools down and open the cap on the expansion tank. Then you need to again disconnect the same hose that was discussed in paragraphs 8 and 9 of our instructions and, by adding liquid, allow air to escape.
Video about replacing coolant on Renault Logan:
Why do you need a pressure regulator?
Not every owner of a domestic “ten” will understand why the brake pressure regulator on a VAZ 2110 needs to be replaced. Simply, this name is not familiar to everyone. A popular designation for a regulator is a sorcerer.
This very sorcerer is located on the rear suspension of your car. It has a lever with a movable position. Depending on the moment of load on the spring, its position changes.
The voltage generated during actuation is directed and distributed to the brake piston. Pressing the piston pedal reduces the load on the rear pads. If the brake system is working properly, the loads are distributed evenly.
In order for the unit to function efficiently and without errors, it is necessary to adjust the brake pressure regulator on your VAZ 2110. This way you can prevent untimely wheel locking.
Types and properties of fuel fluid
Any brake fluid has 93-98% of the main composition and from 2 to 7% of additives, which, in fact, are the key component for imparting the declared characteristics. In general, if you look at it this way, the properties of brake fluid depend on the combination of its components. Depending on the composition of the base, TJ is divided into 3 groups.
Types of brake fluids:
- Mineral (mineral oil LHM). They consist of alcohol and castor oil.
- Glycolic. Developed on the basis of polyglycols and their esters.
- Silicone. Manufactured from silicon-organic polymer products.
Regardless of the type and composition, all brake fluids are divided into two classifications.
TJ classification:
- By viscosity.
- By boiling point:
- for “dry” liquid (without water);
- “wet”, which contains 3.5% water.
If the boiling point exceeds the permissible norm, then there is a risk of a vapor lock forming in the system (as a result of moisture evaporation), which can lead to breakdown and failure of the brake pedal.
Replacing the brake cylinder VAZ 2113
When to change brake fluid?