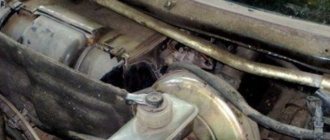
When the piston jams in the brake cylinder, one of the wheels of the VAZ 2110 can turn very difficult. In this case, you need to drive into a pit or overpass and check the main components of the brake system. If, after another check on a pit or lift, you find that brake fluid is leaking from the caliper, then you should take care of it immediately. You have two ways out of this situation: restoring and repairing the brake caliper or replacing it. The brake cylinder may need to be replaced directly.
Front caliper device for VAZ 2110
Content
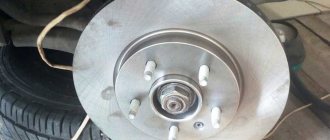
Braking of the front wheel is created by a disc type device. The brake discs are permanently attached to the hub.
The mechanism that stops the rotation of the wheel includes:
- caliper VAZ 2110;
- pad guide;
- working cylinder with piston, sealing ring;
- brake pads;
- guide bushings, fingers;
- mounting bolts, washers.
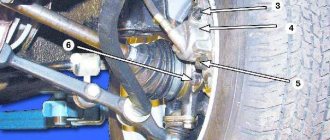
The fixed part is mounted on the steering knuckle and hangs over the working disk. Contains channels into which fingers are inserted. The brake cylinder is bolted to the caliper, creating a caliper, with spring-loaded pads located inside. There are car versions where the VAZ 2110 caliper is equipped with a control indicator, the inner pad contains a wear sensor. The moving part is bolted to the guide pins.
Front caliper design for VAZ 2110: 1 - wheel cylinder; 2 — fitting for bleeding the brake drive; 3 - sealing ring; 4 - piston; 5 — protective cap; 6 — retaining ring; 7 — caliper; 8 — pad guide; 9 — brake pads; 10 — protective cover; 11 — guide pin; 12 — guide pin fastening bolt; 13 — brake hose; 14 — bolt securing the cylinder to the caliper.
The mechanism is hydraulically controlled through a flexible hose connecting the cylinder fitting to a metal pipeline. A protective cover is placed on the finger, preventing contamination of the channels. It is a thin-walled, corrugated rubber tube. It is fixed with the edges by the protrusions of the guide and the finger, compressed and unclenched during operation.
The guides are filled with special lubricant. Brake pad linings undergo wear during operation. The elastic sealing ring automatically adjusts the gap, compensating for abrasion of the linings. An additional bleeder fitting, covered with a boot, is installed on the cylinder body.
Possible malfunctions of the front caliper of the VAZ 2110
The VAZ 2110 non-ventilated caliper is used in an aggressive environment and is exposed to temperatures, water, and dust. Contamination, acidification of parts, rupture of casings, and wear of fingers occur. The result is extraneous knocking noises in the device, possible piston jamming, skewed pads, squeaking brakes, and increased braking distance. It is necessary to periodically maintain structural elements, clean surfaces, and add lubricant to the caliper guides. A neglectful attitude will cause an emergency, repairing the VAZ 2110 caliper.
Main causes of malfunction
The VAZ 2110 caliper is structurally an element that holds the brake pads and is responsible for the degree of their pressure on the brake discs. It is also responsible for uniform wear of the brake pads and guarantees the driver reliable braking in extreme situations.
Thus, the importance of the caliper in the operation of the car is difficult to overestimate
If by this time you have a completely reasonable question, what can happen to the caliper on a VAZ 2110 (2112), we will be happy to answer you. The main cause of malfunctions is “acidification” of the moving elements, coating them with an oxide film, clogging due to the destruction of protective boots or the use of improper lubricant, namely:
- acidification of the main piston mechanism;
- acidification of guides.
Piston mechanism and caliper guides VAZ 2110
A clear sign of problems that the caliper can cause on VAZ cars is uneven wear of the brake pads and an increased braking distance. In this case, the VAZ pads must be changed, and the caliper mechanism itself must be subjected to comprehensive diagnostics:
- check the condition of the piston, its degree of freedom, the presence of moisture, metal oxide, oxide formations and build-ups, the condition of the protective boots;
- Similarly, check the condition of the guides, make sure that there are no uncharacteristic scuffs, abrasions or deformations of the rod on the surface.
We must also not forget about regularly replacing the brake fluid in the system. This should be done approximately every 40 thousand km. mileage of VAZ-2110.
Since brake fluid is hygroscopic, it easily absorbs moisture, thereby oxidizing the piston mechanism and causing it to fail. The piston stroke becomes difficult and uneven wear of the brake pads and wheel wedge occurs.
Preventive Maintenance
At a car company, before the daily departure, a mechanic inspects the car. Few car enthusiasts do the same. Motivation will appear after receiving an answer to the question of how much the front caliper of a VAZ 2110 costs. Online stores indicate prices of 2000 - 2500 rubles without delivery costs. A complete repair kit for the VAZ 2110 front caliper costs three times less. A repair kit for quickly wearing rubber parts costs 140 rubles.
The next forty thousand kilometers on the car’s speedometer is an indicator of mandatory caliper maintenance. You should stock up on time, spare parts, tools, special and universal WD-40 lubricants.
Step-by-step instruction:
- Place the car on a horizontal surface.
- Block the rear wheels with special blocks.
- Loosen the wheel bolts.
- Raise the front end on a jack. If work is carried out in a garage, provide an insurance support.
- Unscrew the fasteners and remove the wheel. If there is no support, put it under the front end.
- Turn the steering wheel towards the VAZ 2110 caliper being repaired for easy access.
- Release the brake hose from the fork.
- Bend the corner of the washer.
- Armed with an open-end or combination wrench, unscrew the upper mounting bolt and loosen the lower one. Use a ratchet wrench.
- Move caliper 2110 with cylinder to the side.
- Remove the finger with the protective cover and inspect it. If the protection is destroyed, there are traces of acidification, dirt, liquid - clean and lubricate the channel. Severe contamination, jamming, and wear of the guides lead to the replacement of the pad guide. Security is more expensive.
- The condition of the channels is satisfactory - remove the old grease. When cleaning rubbing parts, it is not advisable to use degreasing compounds. Use special napkins, soft fabrics soaked in liquid oil.
- Take a new pin, lubricate it, insert it into the channel, rotate it around the axis, evenly distributing the lubricant. Extract.
- Put on the cover, assemble the structure, secure the edges of the boot.
- Prevent lubricant from getting on the disc or pads.
- Screw on the caliper without fully tightening the bolt.
- Do the same manipulations with the bottom side.
- Tighten the fasteners and bend the locking washers.
- Insert into place and tighten the brake hose fitting.
- Test the brakes.
Replacing brake pads
- Follow the first 9 steps of the previous instructions.
- Open the brake fluid reservoir cap. If the tank is filled under the plug, use a syringe to reduce the level.
- Inserting a powerful flat-head screwdriver between the pads and the disc, increase the clearances by retracting the piston.
- Move the moving part to the side.
- If there is a control sensor, disconnect the connector.
- Remove the old pads, clean the seats, insert new ones.
- Check the mobility of the fingers, the condition of the protection, and the disc.
- Reassemble in reverse order.
- Operate the brake pedal until the pads adjust the gap.
Replacing the caliper cylinder of a VAZ 2110
- Carry out preparatory activities in accordance with the eight starting points of the first list.
- Unscrew, lift up, and temporarily plug the flexible hose.
- Use a hexagonal L-shaped wrench to loosen the cylinder. Treat rusted fasteners with WD-40.
- Release the fastening, unscrew the bolts that secure the VAZ 2110 caliper bracket.
- Disconnect the old cylinder and attach the replacement one.
- Using a clamp, press the piston.
- Assemble the mechanism.
- Connect the hose.
- Bleed the brakes and check the fluid level.
Scheme for pumping brakes on a VAZ-2110
The brake system of the VAZ-2110 has two circuits operating in a diagonal pattern. This dictates the procedure for removing air from the system. When performing work, it is necessary to follow the following pumping sequence:
- Right rear wheel.
- Front left.
- Rear left.
- Front right.
The procedure for bleeding the brake system of the VAZ-2110 and modifications.
Necessary materials
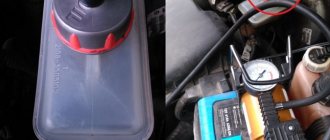
Before you start bleeding, you need to stock up on brake fluid for topping up.
We stock up on brake fluid of a certain brand, and if the brand is not known to us, we prepare for its complete replacement.
It is important to remember that the liquid must be the same brand that was used previously. If we are not sure what kind of brake fluid is poured into the VAZ-2110 system, it is better to play it safe and replace it completely
Otherwise, when mixing fluids of different types, clots may form in the system, which will damage the brakes.
Also for work you will need a transparent container half filled with liquid, a hose for the fitting about 40-50 cm long, and a socket wrench with a cut out segment (union wrench).
Bleeding the brakes with an assistant
An assistant will be needed. Go.
- Open the lid of the fluid reservoir and add it to the maximum allowable mark. Add brake fluid to the reservoir.
- Clean the wheel brake mechanism and remove the protective rubber cap. Remove the protective cap from the fitting of the right rear wheel.
- If the car is installed on a lift (the wheels are in a suspended position), we block the rear brake pressure regulator. To do this, simply insert any plate or suitable screwdriver between the piston and the support heel. Block the "sorcerer" if necessary.
- We put the hose on the fitting, lower the second end of the hose into a container with liquid. We put the hose on the fitting, connect it to the container and pour brake fluid into it.
- We ask the assistant to smoothly and slowly press the brake pedal five to seven times, maintaining an interval of 2-3 seconds. The pedal is fixed in the lower position.
- At this time, we unscrew the fitting half a turn and release liquid with air bubbles into the vessel.
- We tighten the fitting, after which the assistant releases the pedal.
- Check the brake fluid level in the reservoir and add if necessary.
- We repeat the process until no more air bubbles are released.
- Remove the hose, wipe the fitting and put on the cap. We bleed the remaining brake mechanisms in order of priority.
Next, we bleed the brake mechanisms of the remaining wheels, according to the bleeding order.
We pump the brakes ourselves, without an assistant
If you couldn’t find an assistant, no problem.
To bleed the brakes alone, you will need a reservoir cap, a hose and a tubeless tire nipple.
We'll bleed it ourselves, but to do this you need to stock up on an old-style brake reservoir cap, without a fluid level indicator. You will also need a regular nipple from a car camera and a 14mm drill. Drill a hole in the center of the cover and insert the nipple. The device is ready. Let's move on to pumping:
- Add liquid to the tank to the maximum.
- We close the tank with our lid with a nipple. Screw the cap and gasket onto the tank.
- We take the spare tire and connect the spare tire nipple to the reservoir nipple with a hose. Thus, pressure on the liquid in the system is ensured. The pressure reserve in the wheel is more than enough to completely pump the system. In this case, it is undesirable to exceed the pressure of one atmosphere. Instead of a spare tire, you can use a pump or compressor, but still monitor the pressure. We attach the other end of the hose to the camera nipple.
- The procedure and procedure for bleeding is no different from removing air from the system with the help of an assistant. In addition, you also need to carefully monitor the fluid level so that the system does not trap air. For convenience, you can embed a faucet from the pneumatic system into the hose.
At the end of the work, check the fluid level in the tank; the pedal should be tight with minimal free play. Good luck, strong brakes and happy travels!
Modification of the VAZ 2110 caliper
Trying to eliminate the causes of breakdowns and increase the reliability of the braking system, craftsmen make changes to the design. We often hear questions about what to do if the calipers of the VAZ 2110 are knocking. How to change the caliper 2110. How to improve the operation of the mechanism. Similar components of domestic and foreign cars are compared.
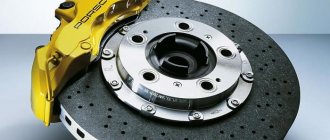
The VAZ 2110 is equipped with 13” (inch) discs, type p 13. Brembo produces brake discs p 14”. The VAZ 2110 caliper bracket allows you to use this size in conjunction with pads with a larger lining area made by Fiat. The contact surface increases, the braking distance decreases.
Plastic rings are used on the fingers of foreign cars, reducing knocking in the mechanism. Home craftsmen make transverse grooves and select rubber rings. The modified design is designed to eliminate the beating of the bracket.
It is necessary to take into account the compatibility of the ring material with the lubricant used to prevent jamming. In an effort to improve the design of the braking system, it is logical to use the medical motto - do no harm.
Vacuum booster
The braking system of a car certainly cannot be called perfect, so it has to be supplemented with devices that help improve efficiency. One of them is a vacuum booster.
Application and purpose
Today, a vacuum amplifier is in great demand because it is highly efficient. Its tasks are extensive, but the amplifier copes with them all perfectly:
- The degree of resistance of the brake pedal increases;
- Reduces the load on the brake system;
- Acts as a highly efficient auxiliary unit;
- Has a positive effect on the service life of the brake system, etc.
This element has the following components:
- Dense body, for the manufacture of which a high-strength polymer is used;
- The diaphragm, which is also called the collecting node;
- Monitoring or control specialized valve;
- Pusher. It allows you to return the engine elements to their original position when there is no power;
- Main piston rod of the brake system cylinder (main);
- Switch return spring.
The body of this spring has two cellular divisions, which are divided into vacuum and atmospheric. Cells are often called chambers.
- The vacuum chamber is a cell directly connected to the brake master cylinder.
- The atmospheric chamber is a cell located opposite the brake pedal. Its open part of the body rests on the brake pedal.
It is also worth noting the diaphragm, which performs two very important tasks:
- Corrects the position of the piston in space;
- Pumps brake fluid to the main brake cylinders.
Installing a vacuum booster involves a serious change in the sensitivity of the pedal, so it is strongly recommended not to apply a large and sudden force to it in the “first couple”. Pressing should be done carefully and smoothly.
Malfunctions and ways to check them
It is possible that you may need to replace the vacuum booster on your VAZ 2110. The cause may be various malfunctions, the characteristic symptoms of which are as follows:
- When you press the brake pedal, a hissing noise occurs, and at the same time, the engine speed often increases;
- The car starts to shake;
- Spark plugs stop working efficiently;
- Fuel consumption increases noticeably.
Before replacing the vacuum booster on a VAZ 2110, it should be checked. This procedure is performed as follows:
- As with normal bleeding of brakes, with the engine not running, press the gas pedal several times;
- After 5 or 6 presses, keep the pedal in the down position, resting it on the floor, and start the engine;
- After starting, the pedal itself will move forward a little.
There is also a high probability of damage to the diaphragm, which forms a hole over time. You can purchase a diaphragm with a repair kit, the cost of which is no more than 500 rubles.
Replacement
To replace an element, you need to understand the main issue - how to remove the vacuum booster from a VAZ 2110. Directly replacing the old element with a new one will not be difficult, just like the reassembly process.
Therefore, we will tell you about the main thing - dismantling the amplifier. Let's start with the fact that the procedure is not complicated, but it requires accuracy and sequence of steps. If you follow the recommendations, the work will take little time and will not take much effort.
- Disconnect the block with wires, which includes brake fluid level sensors in its design.
- Hold the booster check valve with one hand and carefully disconnect the hose with the other. It is advisable to disconnect the hose with a strong hand, since this will require a lot of force.
- Remove the two bolts connecting the booster and master cylinder.
- Carefully remove the cylinder from the amplifier.
- There is no point in disconnecting the brake lines.
- Give access to the dashboard, which will allow you to unscrew the nuts holding the brake pedal bracket. There should be 4 of them.
- It is recommended to dismantle the bracket and amplifier through the engine compartment, since there is enough free space for such manipulations.
- Remove the pin lock plate. To do this, pry the finger with a screwdriver and squeeze it out.
- Now you can easily disable the brake pedal and booster.
- To disconnect the amplifier and bracket, you will have to unscrew the two nuts on the mount.
- A new one is installed in place of the dismantled old vacuum amplifier, and the reassembly procedure is performed in strict sequence of the dismantling process.