The direction of the light stream that the car's head optics emits is directly related to the mass of the cargo that the car is carrying. If there is a lot of it, the rear part of the body sags, the headlights begin to rise up, poorly illuminating the road and blinding oncoming drivers. As a result, the motorist has uncertain control of the situation, where an accident is not far away. The necessary change in the angle of light flow is provided by the headlight hydraulic corrector. And you can do this without leaving your car. According to European standards, the corrector must be on all cars manufactured after 1999. What is this device and how does it work?
The headlights must be correct
What is a headlight hydrocorrector?
Light control is carried out from the cabin by changing the position of a special switch. Similar devices are installed on classic VAZ 2105-2107 models, front-wheel drive 2108-2109, and more modern 2110-2115. Structurally, an auto-corrector operating on hydraulics is a series of connections where the main cylinder, controlled by an adjusting bolt from the passenger compartment, is connected to the worker through a tube. The last one is on the headlight. The entire structure is non-demountable.
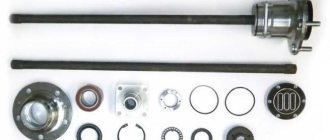
Headlight hydraulic corrector: complete set
Headlight hydraulic corrector device
What to do if the screen on your phone is cracked.
What to do if your laptop screen is broken It’s easy to guess that the operating principle of this device is based on the use of partial pressure of a liquid. Modern cars use several hydraulic mechanisms, the operating principles of which are approximately the same. An example is the braking system. And yet, each of these mechanisms has certain design features. The classic headlight hydrocorrector consists of the following components:
- main cylinder mounted in the dashboard area;
- piping systems;
- actuators installed directly on the headlights.
A special frost-resistant liquid is used as a working agent. Unlike electric ones, hydraulic correctors are made non-separable - this makes it easier to ensure their perfect tightness. Therefore, at the official level (that is, at service stations, car services, dealerships) it is stated that these devices are not repairable, and if they fail, they must be completely replaced. Considering that the cost of hydrocorrectors is relatively low, in most cases buying a new device really seems worthwhile. But this is how a person is designed, that if there is an opportunity to carry out repairs on his own, he will most likely take this step. In the case of a hydraulic headlight leveler, such a possibility really exists, despite assurances to the contrary.
True, it is really unrealistic to perform many operations with your own hands - for example, blowing out the system if air gets in or changing the working fluid. By the way, many drivers, when asked what is poured into the headlight hydraulic corrector, answer that it is brake fluid. This, of course, is not true - antifreeze or a composition similar to it is used here. In operating condition, the device line is always under sufficiently high pressure. If you twist the lever down, the pressure decreases and the rod forces the headlight bulb to turn down. Constant high pressure does not have a very favorable effect on the service life of the corrector, especially if low-quality materials and components were used during its assembly.
In particular, this applies to rubber seals - in winter, when the temperature drops well below zero, they can begin to collapse, which leads to depressurization of the system and leakage of fluid. As a result, the pistons jam, and this may not happen simultaneously on the left or right headlights. As a result, it becomes impossible to change the angle, and the head optics can shine in different directions, one headlight is higher, the other is lower. On all VAZ cars equipped with hydraulic correctors, these devices are assembled according to an almost identical scheme, although, of course, there are minor design differences related to the geometry of the car itself, its layout - the dimensions of the hydraulic corrector depend on this, as well as the features of the layout of the pipelines and the cylinders themselves. We present to your attention the compatibility table of the Civil Code for specific AvtoVAZ models/families:
| Hydrocorrector article number | What models is it compatible with? |
| 2105-3718010 | 2105–2107 (“classic”) |
| 2108-3718010 | 2108—21099 (Samara family) |
| 2110-3718010 | 2110—2112 (family 110) |
| 2114-3718010 | 2113—2115 (Samara 2) |
| 21213-3718010 | 21213 "Niva" |
Where is it located and what does it look like
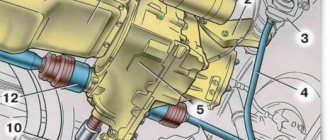
If we take the VAZ 2114 headlight hydraulic corrector as an example, the working cylinders are located under the headlights. The master cylinder is located under the adjustment knob in the passenger compartment. It turns manually. In the lower position, the light flux is directed downward (the pressure in the system is greatest), in the upper position it is directed upward. The cylinders are connected to each other by plastic tubes containing a non-freezing liquid (most often it is antifreeze or “anti-freeze”). The hydraulic corrector is sold as a kit: everything is assembled - plastic cylinders along with tubes.
Design and principle of operation using the example of the VAZ 2114
The usual standard design, installed, for example, on a VAZ 2114, includes:
- the main block (the place under the “torpedo”), where the hydraulic cylinder with the switch is located;
- hydraulic drive with plastic tubes;
- working cylinders with mechanisms that regulate the headlight reflector;
- non-freezing liquid.
If it is necessary to redirect the light flux at the desired angle, a low-pressure hydraulic system is activated, which can be changed manually. The driver turns the handle, and the rod of the actuator cylinders moves by 6-7.5 mm, which is quite enough to achieve the desired lighting angle.
Location of the working cylinders of the VAZ 2114 hydraulic corrector
What does a hydraulic corrector consist of and how does it work?
The design of the adjustment device is non-separable and simple; the hydrocorrector of the Lada Granta headlights consists of the following elements:
- the main cylinder located under the dashboard;
- a working cylinder located on each headlamp;
- reflector regulating mechanisms;
- connecting components.
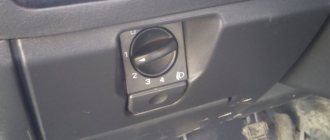
A knob for controlling modes is displayed on the instrument panel, helping the owner change the pressure in the master cylinder. A change in pressure causes the reflector to rotate, and therefore the direction of the light flux.
The peculiarity of the hydrocorrector is its tightness and closedness. If a visual inspection reveals places where fluid is leaking or there are cracks, the connecting tubes require replacement.
The change in pressure in the main cylinder is transmitted to the working elements, causing the pistons to rotate, changing the angle of inclination of the reflector. Electrical correctors operate using on-board electricity and therefore do not depend on the ambient temperature. More reliable devices of this type are more expensive.
Operating principle of the VAZ 2110 hydraulic corrector
The corrector works on a fairly simple principle. The driver, by switching the knob located on the instrument panel, changes the fluid pressure in the main cylinder, which is immediately transmitted through the connecting tubes to the working mechanisms. In the cylinders located in the headlight units, this leads to a change in the length of the rods rigidly connected to the pistons. The rod pushes the lever, which exerts force on the reflector, which as a result takes the corresponding position.
All this happens when the system is closed and sealed. In the event of depressurization, the headlight hydraulic corrector stops functioning.
Manual headlight adjustment
In what cases is replacement or repair required?
It is not difficult to understand that the headlight corrector is not functioning or is working poorly: when you try to change the direction of the light beam, you notice that the head optics do not respond to turning the hydraulic corrector knob and the light is directed in one position. Moreover, both headlights and one of them may not work. If there is a problem, you will have to dismantle the device. The next stage is a complete replacement of the headlight hydraulic corrector: its components are non-separable and cannot be restored.
Reasons why the hydraulic corrector does not work and troubleshooting methods
Most often, the corrector stops working due to fluid leaking from the working, master cylinder or connecting tubes. This may be due to cracking of rubber seals (sometimes due to a sharp drop in air temperature during frost). As a result, the cylinder pistons become stuck in one position, and it becomes impossible to adjust the headlights when the load in the car changes. If the light is adjusted, but within a very small range, the culprit may be one of the cylinders, where the piston stroke has decreased. Another reason why the headlight hydraulic corrector does not work is the loose engagement of the rod with the lever in the actuator. There is only one method for troubleshooting - replacing worn-out or worn-out components and parts.
Hydrocorrector malfunctions
Among the most likely causes of a non-working headlight hydrocorrector is depressurization of the joints of tubes and sealing cuffs. The consequence of loose connections is loss of working fluid and air being sucked into the system. For the working pistons to move properly, the system must be completely filled with liquid. The manufacturer does not suggest repairing the hydraulic corrector, so if the system fails, the assembly is replaced. Nevertheless, the article “Repairing a hydraulic corrector” shows that the system can be troubleshooted and restored.
This is interesting: Renault Logan - replacing lamps in a headlight with your own hands
Where is the lamp hydraulic corrector located? Each headlight unit has an actuator that acts on a reflector, from which 2 tubes go into the cabin. Through a technological hole in the engine shield, the tubes go to the master cylinder and the switch on the dashboard.
Reasons for failure of the hydraulic regulator
If, when turning the headlight adjustment knob, the light beam does not change direction, this indicates a failure of the hydraulic corrector. There are several reasons for the malfunction:
- One of the working cylinders is jammed. In this case, the corresponding reflector will not rotate.
- The connecting tubes were damaged and the system depressurized.
- Failure of sealing due to damage or wear of seals.
If the system is depressurized, it is impossible to regulate both lamps. Most often, they lower and take a lower position, as a result, the headlights only illuminate the road next to the car. At night, this increases the risk of an emergency. You can try adjusting the hydraulic device rod.
Manufacturers of hydraulic correctors did not provide for the repair of the closed system as a whole and individual elements. Therefore, if the device fails, it is necessary to either install a new hydraulic regulator or replace the hydraulic device with an electric one.
Some car enthusiasts try to repair the regulator, but this does not bring long-term results. For example, they replace the working rod with a self-tapping screw of a suitable diameter with the sharp end removed. This makes it possible to fix the reflectors in a certain position. It will be impossible to make adjustments from the interior.
If, during a visual inspection of the hydraulic regulator, cracks are found in the connecting tubes, the repair will consist of eliminating them. The cause of cracks is temperature changes in the engine compartment of the car. If the crack is close to the main or working cylinder, cut off the cracked end. The tube damaged in the middle is completely replaced by pumping with antifreeze.
What to look for when choosing a new concealer
These devices come in three types: manual, hydraulic, pneumatic or electric. The last option is considered the most technologically advanced. Devices of this type are installed on almost all latest VAZ models. Nevertheless, many car owners prefer to install hydraulic correctors: it’s all about the cost, which is 4-5 times lower than other types of devices or more, if we also remember automatic systems. And since the headlight hydrocorrector is not repaired, in any case you will have to purchase a new set. There is actually only one manufacturer of hydraulic systems on sale - the DAAZ plant. Modifications of correctors for various VAZ models:
- for “classics” 2105-07 number 2105-3718010;
- for front-wheel drive 2108-2199 - No. 2108-3718010;
- for 2110-2112 - No. 2110-378010 and 378010-10;
- for 2113-2115 - No. 2114-3718010;
- for Niva - No. 21213-3718010.
Typical malfunctions and methods for their elimination
If the device does not work, the reasons may be the following:
- Sensor failure. Such a malfunction may be accompanied by the appearance of a corresponding malfunction icon on the dashboard. As a rule, this problem is caused by a breakdown of the device bracket, as a result of which the controller can transmit incorrect information to the control module.
- Poor contact between the device and the system. Such a malfunction is usually associated with souring of the contacts, as a result of which the current conductivity is noticeably reduced. Accordingly, this leads to the node being inoperable.
- Failure of the tuning mechanism. This problem is most relevant for domestically produced cars (the author of the video is Konstantin Napolov).
Replacing headlight hydraulic corrector
If you decide to install a hydraulic corrector, which is installed standard on Lada cars of previous years of production, you can do the work yourself. On more modern cars (Priora, Kalina, Granta, etc.) electrical systems can be installed.
Parsing and removing old
Algorithm of actions for dismantling the hydraulic corrector:
- unscrew the screws on the clamps securing the tubes to the corrector parts;
- disconnect the actuators attached to the snap-on latches from the headlight units;
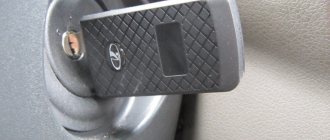
- from the passenger compartment, remove the rotating handle of the hydraulic regulator from its place (it is located directly on the main cylinder);
- unscrew the plastic nut with which the main cylinder is screwed to the “torpedo”;
- pull it out (after pushing the rubber seal into the cabin) complete with plastic tubes and actuators.
Hydraulic corrector in the cabin with the handle removed
Installation and connection of a new
Installation of a hydraulic corrector instead of a faulty one is carried out in the reverse order of dismantling - nothing complicated is observed here.
If you decide to install an electric device (it is ideal instead of a hydraulic one), the algorithm of actions will be slightly different:
- remove the negative terminal from the battery;
- dismantle the old hydraulic corrector along with the pipes, main and working cylinders;
- replace it with an electrical device;
- dismantle the lever of the old mechanism in the cabin;
- connect the “plus” of the electrical corrector to the 20th contact of the block, the “minus” can be “found” under any body stud in contact with the metal;
- instead of plastic tubes, lay the wires from the kit and, for reliability, secure them with dielectric clamps to the common wiring harness;
- attach the actuators to the headlight housings;
- Replace the removed negative battery terminal and check the operation of the system.
Installing a new device (master cylinder)
During the installation of the electric corrector, it makes sense to simultaneously check the efficiency of the optics. If you notice condensation inside the headlamp, it is better to replace it, because in the future the level of road illumination will only worsen.
More:
- a black coating inside indicates that the light bulb does not have long to “live”, so it needs to be replaced and it is better to do this in advance, and not on the way;
- if you notice peeling of the reflective layer, you will also have to buy a new headlight (it is better to change both units together);
- inspect the block lens - if the scratches and chips are serious, it is recommended to replace the old glass, using a special sealant when installing a new one;
- Before installation, clean the protective caps from dirt.
The best and most expensive option is to install an automatic correction system. In this case, the driver does not need to do anything: the device will automatically adjust the beam of light. The design includes sensors installed at the front and rear. Their task is to determine the ground clearance on both axles of the car. This allows you to “calculate” the tilt of the body and send the necessary information to the electronic control unit. He gives a command to the actuators, and, taking into account the speed of movement, the latter, through a gear motor, change the angle of inclination of the head optics. The system is quite complex and requires a professional approach during installation.
A simpler option involves installing one ultrasonic sensor at the rear. It is suspended on a hinge and secured. The shortest distance to the road surface is 25 cm. You can install the system yourself.
Light adjustment
After installing a new corrector (no matter hydraulic or electric), it makes sense to adjust the light beam. To do this, you need a flat wall, which must be marked in accordance with the manufacturer’s recommendations (see the car’s operating instructions). The marking can be done independently, in accordance with the figure below.
Further:
- stop the car five meters from the marked wall;
- use the hydraulic corrector handle to set the correct light beam;
- Each headlight can be adjusted individually;
- if the “efforts” of the hydraulic corrector are not enough, use the mechanical levers located on the headlight unit.
Wall marking scheme for light adjustment
Is it possible to repair a hydraulic corrector?
Manufacturers of correctors for the Lada Granta did not provide for the possibility of restoring the device. It is assumed that the driver should make a change. However, it is possible to repair the hydraulic corrector yourself, although it eliminates the problem only for a while. It is impossible to achieve full functionality, however, the lampshades are installed in the working position and secured in it.
This is interesting: Causes of iveco edc error: why does the light come on?
The choice between an electric corrector or a hydraulic regulator is based on several parameters:
- cost – hydraulics will cost much less than an electric corrector;
- operating conditions - when the car often finds itself in situations with sudden temperature changes, it is worth paying more, but getting a reliable adjustment system;
- car model - not all cars allow you to connect an electric corrector, however, it is possible to install one on a Lada.
Barbaric repair method
Many drivers do not burden themselves with either repair or replacement of the hydraulic corrector. When the headlights begin to shine downwards, they simply screw in screws from the back of the working cylinder. Adjustment of the position of the rod and the level of tilt of the headlights is carried out by screwing in and unscrewing the screws.
After such a repair, the concept of a headlight range control is no longer applicable to the system, since the possibility of quickly adjusting the angle of the headlight reflector from the passenger compartment disappears. But such repairs have a right to life if the malfunction caught you on the road and there is simply no other way to raise the headlights.
Recovery without removal
- Pull the actuators out of the headlight assembly.
- Remove the tubes from their seats, and then secure the tubes so that the remaining working fluid does not leak out of them. It is better to preheat the landing site, but you can simply cut the tubes at the edge of the landing sites. Check the stroke of the actuator cylinders by moving them by the rod using pliers. The pistons should move without jamming.
- Each actuator has a plug for bleeding the system, which must first be pulled out.
- Turn the switch on the dashboard to position O. Fill the tubes with antifreeze so that a small drop remains on top, then put them on the fittings of the actuators.
- Position the slave cylinder bodies so that the bleeder hole is the highest point.
- Holding the rod in the maximum retracted position, fill the working cylinder with liquid until a small “hill” forms above the bleeder hole.
- Close the plug.
The system should work, but since the seals of the connections at the main cylinder, the regulator at the dashboard and the seals of the working cylinders were not checked, one cannot be sure of the long service life of the hydraulic corrector after such repairs. This restoration method will not work if the system is airy at the master cylinder in the cabin.
Restoration of headlight hydraulic corrector
You need to know where the headlight hydraulic corrector is located and how to remove it, since for a complete troubleshooting you will need to dismantle the working cylinders and the main adjustment mechanism. Take 2 small pieces of tube to connect the working cylinders to the main mechanism after removal, fill the system with water. If the device is operational, set the switch to the maximum headlight raise mode and leave the mechanisms in this position for several hours. If no leaks have appeared during this time, the system can be filled with antifreeze and installed on the car. If the leak does not appear in the pipe connections, it is better to replace the hydraulic corrector with a new one or install an electric corrector instead.
This is interesting: Diagnostics of injectors - how to check it yourself: step-by-step instructions
Only new coolant should be used so that dirt particles do not interfere with the normal movement of the pistons. Remember that the system must be completely filled with working fluid. To restore, you will need a syringe and a blunt needle so as not to damage the cylinder seals. Do-it-yourself repairs, the assembly and disassembly process are perfectly shown in the video.
Price
A hydraulic corrector for VAZ cars is quite inexpensive - from 300 to 500 rubles. An electromechanical device will cost approximately 1800-2000 rubles.
There are also universal types of autocorrectors suitable for installation on any make of car. For example, a system from the manufacturer Hella will cost from 14 thousand rubles.
Do not forget: for xenon headlights, regardless of the make and model of the car, only the installation of an automatic corrector is required.
If you have any questions, leave them in the comments below the article. We or our visitors will be happy to answer them