How to bleed the brakes on a Chevrolet Niva yourself
Experienced car owners know that the brake fluid on a Chevrolet Niva needs to be changed every fifty thousand kilometers, but at least once every 2 years. So, if the car reacts poorly to pressing the brake pedal, this indicates that there is moisture or air in the system. Consequently, it is necessary to bleed the brake system in the Chevrolet Niva, completely replacing the brake fluid. Foreign elements appear there due to the natural chemical decomposition of some components of the brake fluid and the high temperature generated during braking. The following are considered signs of air penetration into the hydraulic drive:
Note. When pumping a hydraulic drive is directly related to the repair of one of the circuits, and the serviceability of the second circuit is known, it is permissible to pump only the circuit being repaired.
The process of bleeding the hydraulic drive in a Chevrolet Niva is identical to replacing the brake fluid. The only difference is that the condition for the end of pumping of the working cylinder is the end of the release of air from the tube, and not the appearance of new brake fluid.
Thus, the car owner needs to bleed the brakes when observing any of the following signs:
How to bleed ABS brakes yourself
Good day, dear car enthusiasts! There is most likely no driver among us who has not at least once experienced a feeling of helplessness at the moment of braking. When the car continues to move, and not at all in the direction the driver wants. Skid.
Fortunately, engineering does not stand still. The modern driver is armed with a system such as ABS. Let's take a closer look at the system and see if it is possible to bleed ABS brakes yourself.
Bleeding the brakes without an assistant
ABS (Anti-lock Braking System) is an anti-lock braking system that prevents the wheels from locking during emergency braking.
The main task of ABS is to regulate the speed of rotation of all wheels. This is done by changing the pressure in the car's brake system. The process occurs using signals (pulses) from each wheel sensor that enter the ABS control unit.
The principle of operation of the anti-lock braking system The contact patch of the car's wheels is relatively immobile to the road surface. According to physics, the wheels are affected by the so-called. static friction force.
Taking into account the fact that the static friction force is greater than the sliding friction force, ABS effectively slows down the rotation of the wheels at a speed that corresponds to the speed of the car at the moment of braking.
Anti-lock braking system design Let's list the main components of ABS:
- sensors installed on the wheel hubs of a car: speed, acceleration or deceleration;
- control valves installed in the line of the main brake system. They are also components of the pressure modulator;
- ABS electronic control unit. Its task is to receive signals from sensors and control the operation of valves.
Bleeding an ABS brake system will require you to have certain technical skills. In addition, it will not be superfluous to first study the manual on the design and maintenance of the brake system of your car.
Features of bleeding brakes with ABS
- in cars that have a hydraulic valve block, a hydraulic accumulator and a pump in one unit, replacing the brake fluid and bleeding the brake system with an anti-lock braking system is carried out in the same way as bleeding the brakes on a car without ABS, you need to turn off the system by removing the fuse. Bleeding of the circuits is carried out with the brake pedal pressed, the RTC bleeder fitting must be unscrewed. The ignition is turned on and the pump expels air from the circuit. The bleeder screw is tightened and the brake pedal is released. An extinguished malfunction light is evidence that your actions were correct.
- Bleeding the brake system with ABS, in which the hydraulic module with valves and the hydraulic accumulator are separated into separate units, is carried out using a diagnostic scanner to retrieve information from the ABS ECU. It's unlikely you have one. Therefore, bleeding of brakes with ABS of this type should most likely be done by you at a service station.
- Bleeding the brake system with ABS and electronic activation systems (ESP or SBC) is carried out only under service conditions.
It is important! It should be remembered that the pressure in the brake system reaches 180 atm. Therefore, in order to prevent the release of brake fluid, before disconnecting the brake lines on any system with ABS, it is necessary to discharge the pressure accumulator. To do this, with the ignition off, press the brake pedal 20 times.
Technology for bleeding the brake system with ABS
Bleeding brakes with ABS, like bleeding a conventional brake system, is done with an assistant. Turn off the ignition (position “0”). Disconnect the connectors on the brake fluid reservoir.
Front wheel brakes:
- put the hose on the bleeder fitting;
- open the fitting back;
- the brake pedal is pressed all the way and held in the depressed position;
- we observe the release of an “aired” mixture;
- tighten the fitting and release the pedal.
Rear right wheel brake:
- put the hose on the bleeder fitting, unscrew it one turn;
- press the brake pedal all the way, turn the ignition key to position “2”. In this case, the brake pedal is held in the pressed position;
- a running pump will expel air from the system. That is, as soon as the brake fluid begins to come out without air bubbles, close the fitting and release the brake.
READ MORE: Statement of claim from a legal entity to a legal entity, sample basis for filing, how to write correctly
Rear left wheel brake
- The hose is put on the fitting and unscrewed 1 turn;
- DO NOT press the brake pedal;
- a working pump pushes out the “aired” mixture;
- press the brake pedal halfway and tighten the fitting;
- release the pedal and wait until the pump stops completely.
In reverse order: ignition key to “0”, connect the connectors to the brake fluid reservoir, check the brake system for leaks (see ABS fault indicator).
Good luck with bleeding your ABS brakes.
How to bleed the brakes on a Chevrolet Niva yourself
An assistant is required to bleed the brakes.
Meanwhile, the choice of the sequence of bleeding the brake lines is not significantly important, since each caliper has its own connection to the main cylinder.
The car must be placed on a level surface, in first or reverse gear. Then it is advisable to place wheel chocks or a device made of boards under the wheels. Next, you need to check the brake fluid level in the cylinder reservoir, which is located under the hood (between the windshield and the air filter housing). After pumping out the old fluid from the tank, add fluid to the max mark on the tank. The preparatory activities have been completed, you can proceed directly to work.
It is not so easy to determine at random when a complete replacement of the brake fluid on a Chevrolet Niva has been carried out. It’s appropriate to proceed from the following volumes: if the car has ABS, you will need 0.5 liters for each caliper; without ABS, 0.4 liters is enough. Such figures are given with a slight margin so that the replacement is carried out efficiently and the conditions for the new fluid replacement are standard.
Source
Replacing brake fluid
If a replacement is needed, then you should study the structure of the brake system of your vehicle. Changing ABS brake fluid is very different.
Suppose without an ABC or a hydraulic accumulator, the pump and the ABC hydraulic valve block are located in one unit, then you can replace the fluid with your own hands. With integral ABC, it would be more correct to go to a service station.
Work must be carried out on each circuit of the brake system. The tools you will need are an empty bottle and a flexible hose. Additionally, you need to have a set of keys to work.
It all starts with the wheel that is furthest from the brake cylinder. First you need to drain the fluid from the brake reservoir and pour new one into it. Next, unscrew the fittings on each brake cylinder and wait until the old brake fluid drains out.
When a new one starts to leak, tighten the fitting. If the car has a diagonal system of contours, the process must begin with the right rear wheel, then the left front, then the rear left, and finally the front right.
With a parallel circuit, the sequence is:
Replacement must be carried out on removed wheels. If there is a hole, the work will be much easier. As a last resort, you can do all this with a jack, removing the wheels one by one.
At the same time, you can visually check the condition of the car, check the suspension elements and shock absorbers.
Be sure to bleed the brakes after all work. Look in the reservoir; you may need to add new fluid.
It is necessary to check the effectiveness of the brakes after replacing the brake fluid. We carry out the test on a dry road at various speeds. The car should stop smoothly and maintain directional stability. Have a good trip and no breakdowns.
Sources
Rules for filling brake fluid
Fresh and old fuel oils are highly toxic and pollute the environment. with whom they are in contact. Therefore, when replacing brake fluid with your own hands, it is forbidden to drain it into a river or onto the ground. It is also undesirable to pour liquid into the toilet. Proper disposal of brake fluid is carried out by handing it over to special collection points for toxic and toxic waste.
A rag may be required when working with brake fluid. It shouldn't leave lint. It is strictly forbidden to use rags that have previously been in contact with engine or transmission oil. Even a small amount of lubricant entering the circuit significantly reduces the effectiveness of the brakes.
Brake fluid is highly hygroscopic. Therefore, it should be stored exclusively in closed containers. Even short contact with the environment leads to the absorption of moisture from the air. As a result, the boiling threshold of fuel oil is significantly reduced.
If in the process of working with the brake circuit it was possible to drain a certain amount of brake fluid, then its reuse is prohibited. This rule is relevant even if the mileage on the drained fluid is minimal. For topping up, you can use only fresh liquid from a hermetically sealed package.
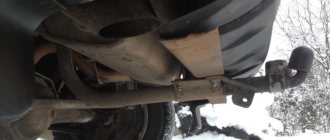
Design of the working hydraulic system
In order to increase the reliability and safety of control, the hydraulic brake system of the Chevrolet Niva is built according to a dual-circuit diagonal design. The first hydraulic drive circuit drives the front right and rear left wheels, and the second drive drives the front left and rear right wheels. Thus, controllability is maintained in the event of failure of one of the hydraulic drive circuits. The hydraulic braking system includes:
Also interesting: How to bleed the brakes on a Chevrolet Niva correctly
Features of work on the VAZ-2121 Niva
As for the VAZ-21213 Niva, this car has its own characteristics. And although the system on this car is dual-circuit, it is different from other VAZ cars.
On this SUV, one circuit combines all 4 brake mechanisms, and the second - only the front wheels. To ensure that the circuits are independent, the Niva uses a block caliper in front, to which two brake hoses fit; accordingly, there are two fittings for bleeding.
Bleeding the brakes on a Niva is done in the following sequence: first, air is expelled from the rear right mechanism, then from the rear left one. Next, the general circuit on the front brakes is pumped - first the right, then the left (the principle of the distance of the wheel from the master cylinder). In this case, it is important not to confuse the fittings - the upper one is responsible for the general contour, and it is this that should be used.
Only then is the front brake circuit pumped, for which the lower fitting is used. Here the pumping sequence does not matter; you can start with both the left and the right mechanism.
But the Chevrolet-Niva does not use such a brake design. A conventional diagonal dual-circuit system is installed there, so the pumping sequence is identical to the process on VAZ-2108 and higher cars.
Brake fluid Niva Chevrolet, choice
Let's take the following fact as an axiom - almost NONE of the leading manufacturers of pads or brake components make their own brake fluid. It is made either by chemical concerns or manufacturers of auto chemicals and oils. Example. Everything that is in jars of the TRW, BMW, ATE brands is made by manufacturers ROWE, BASF, Pentosin, ELF-TOTAL. Therefore, when I selected suppliers, I was guided by the following thought. A well-known company that deals with brake systems simply will not disgrace itself and sell a low-quality product in its own name. That's why I settled on Bosch, TRW, Brembo products. To fully pump the system of our car, 1 liter of product is enough. There is still some left for refilling.
Purpose and operation of the pressure regulator
The pressure regulator (“sorcerer”) is designed to prevent the car from skidding during sudden braking. This is achieved due to the fact that the rear wheels begin to brake after the front ones. The time delay is provided by the regulator lever, which, when the car brakes sharply (the nose drops and the rear rises), pulls the piston in the regulator cylinder and closes the fluid supply channel to the working cylinders of the rear wheels.
In this case, the rear brakes do not work and the wheels spin until the rear of the car drops back. Thus, the “sorcerer” automatically regulates the fluid pressure in the rear cylinder path in inverse proportion to the load on the rear axle. In addition, it increases the braking efficiency of an empty vehicle when the load on the front axle is higher than on the rear.
This work must be carried out at every maintenance and after repair of the rear suspension.
Chevrolet Niva
Attention! If brake fluid gets on your car's paintwork, plastic parts, or wiring, it can cause damage. Remove it immediately with a clean cloth.
Next, you have to bleed the brake system hydraulic drive until new fluid (lighter than the old one) begins to come out of the bleeder fittings of all working cylinders.
We carry out pumping to replace the fluid with the engine not running, first on one circuit, and then on the other in the following sequence:
- right rear wheel brake;
- left front wheel brake mechanism;
- left rear wheel brake;
- brake mechanism of the right front wheel.
Before pumping, check the level of working fluid in the hydraulic brake reservoir. If necessary, add liquid. We bleed the brakes with an assistant.
We clean the bleeder fitting of the brake mechanism of the right rear wheel from dirt.
Brake fluid selection
All brake fluids except DOT 5 use polyethylene glycol in combination with boric acid polyesters as a base, while DOT 5 uses silicone as a base. Brake fluids DOT 3, DOT 4 and DOT 5.1 have the same base and can be interchanged without any problems, at least within the same manufacturer.
Some manufacturers use polyalkylene glycol as a base for the production of DOT 3 (and possibly other grades). Information on the incompatibility of liquids based on polyethylene glycol and polyalkylene glycol could not be found anywhere, and knowledge of chemistry as a first approximation allows us to state that such a mixture will work no worse than the original components.
It should also be separately mentioned that some brake fluids are designed to work in the braking systems of cars with ABS (anti-lock braking system), most often they are marked with the addition of the designation “ABS”, for example DOT 5.1/ABS, or this is indicated separately on the packaging.
You should not mix brake fluids, even of the same class, if one of them is designed for ABS and the other is not, i.e. mix, for example, DOT 5.1 with DOT 5.1/ABS, because these fluids have slightly different chemical compositions of additives to reduce aeration (prevent the formation of bubbles) in the ABS system and there is no guarantee that as a result you will have a brake fluid that is chemically and physically stable system.
If you have a car with ABS, then you cannot use DOT not designed for ABS or even just add it to another DOT for ABS, which is understandable. If we are talking about a bicycle and hydraulic bicycle brakes, then you can use any DOT, rated for ABS or not, preferably without mixing them.
When glycol-based fluids (DOT 3, DOT 4 or DOT 5.1) are mixed with silicone-based DOT 5 fluid, a chemical reaction occurs resulting in a compound that does not meet any brake fluid requirements and is aggressive to the seal material.
Do not mix DOT 3, DOT 4 or DOT 5.1 with DOT 5 silicone fluid! A complete replacement of glycol brake fluid with silicone is possible (DOT 3, 4, 5.1 to DOT 5), but this requires first cleaning and thoroughly drying the entire brake system of old brake fluid. At the same time, there is no guarantee that the material of the brake system seals will be resistant to silicone fluid, although the chances of damage to the seals by silicone fluid are quite small, because Silicone based fluid is not as aggressive as glycol based DOT. The advantages of such a replacement in the case of a bicycle are extremely unclear.
Replacing silicone brake fluid with glycol is practically impossible (DOT 5 to DOT 3, 4 or 5.1), no matter how much you flush the entire system beforehand, because glycol DOT is very aggressive and if the brake system elements were not originally designed for it, then most likely In all, the brake system seals will be destroyed. https://www.drive2.com/l/457842415315760117/
How to Bleed Brakes (3 Main Mistakes in Bleeding Brakes)
Knowing how to bleed brakes will be useful to any driver, since the procedure is not very complicated, and it must be performed after many manipulations related to the brake system. So why waste extra money once again by sending your car for service when you can pump the brakes alone?
By following the instructions and avoiding the mistakes described below, it is quite possible to remove the air from the brakes yourself, with or without ABS. Bleeding brakes with ABS is by no means more difficult, but still it is a separate topic worthy of its own article.
It is only worth noting that if there is an anti-lock braking system with ESP and SBC modules, then the path lies with a service that has the necessary equipment.
You can pump the brakes yourself, or you can have an assistant, whose task is to press the brake pedal on command. The procedure for bleeding the brakes should be found in the manual for a specific car.
If the diagram is not indicated, then bleeding is done in the form of the letter Z. This means that you need to pump in this order: right rear - left rear - right front - left front wheel.
To bleed the brakes, you will need a brake fluid container and a clear rubber hose.
First you need to get convenient access to the brake system bleeder fittings. To do this, you can put the car on a lift or platform and remove all the wheels. Don’t forget to clean the fittings near each wheel from dirt and pour a little “brake fluid” into the prepared container.
Instructions:
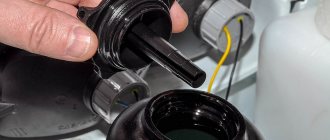
- Pour new brake fluid into the master cylinder reservoir.
- Connect the hose to the fitting, and lower the other end into a container with brake fluid.
- Command your assistant to press the pedal several times and hold it depressed until the fluid flows.
- Unscrew the fitting and the liquid will flow into the container you prepared. Carefully monitor the fluid level in the tank and add as necessary.
- Repeat the previous 2 steps until the brake fluid comes out clean without air bubbles, and tighten the fitting.
- Repeat the same procedure on the remaining wheels.
Bleeder fitting on the brake caliper. A hose is put on it
The brakes are bled when it is necessary to remove air from the brake system. This often happens when replacing brake fluid, which is done approximately every 50-60 thousand km. mileage or once every 2 years.
It is also necessary to bleed the brakes after repairing the brake system: replacing the master cylinder or vacuum brake booster. The need for bleeding also arises when depressurization occurs due to damage to the hoses, or when the liquid in the expansion tank drops below the minimum mark.
The pedal will indicate that you need to bleed the brakes - it will become soft and begin to sink. And the brakes themselves will become more sluggish. However, this could also indicate a more serious problem with the brake rotor or pads. So, if bleeding does not help, perhaps you should still contact a specialist - brakes are no joke!
How to pump the brakes with a partner has already been described above. What to do if there is no such thing nearby, but you need to bleed the brakes? You can get out of this situation in several ways:
- You can bleed the brakes alone if you have a gas stop. The meaning is the same as when pumping with an assistant, only instead of him the gas stop will press on the pedal. Therefore, you need to press the pedal several times, keep it pressed, set the stop and begin to bleed the brake fluid. When the fluid begins to flow, the stop will begin to push the pedal to the floor to the limit.
- bleeding the brakes with a syringe. You need to hermetically embed the syringe into exactly the same lid as on the tank. Then, having first filled the syringe with brake fluid, replace the regular cap with this device, unscrew the fitting, place a container and apply pressure with the syringe.
- another method with a modified lid. You need to insert a car nipple into a cap similar to the one installed on the tank. Then put the lid with the nipple on the tank, then put one end of the hose with a connection clamp on the lid, and the other on the spare chamber, inflated to no more than 1 atmosphere. Open the fitting and bleed out the liquid with air bubbles.
READ MORE: What to do if the month is over, the employee quits and the SZV-M has not yet been commissioned in 2021
Replacing brake fluid and bleeding brakes
Bleeding brakes with a homemade device
DIY brake bleeding device
These are the main ways to bleed brakes without an assistant, but many drivers have their own methods, which, however, are not very different from the above.
Before you start bleeding your brakes, it's worth considering three common mistakes that are made when doing this. Therefore you CANNOT:
- Mix different brake fluids. If you mix mineral brake fluid with glycol, it will damage the rubber cuffs of the hydraulic drive and clog the system with clots. It is also not recommended to mix liquids of different classes (DOT 3, DOT4, DOT5), since they have different boiling points and this will reduce their characteristics.
- Allow the brake fluid level to drop significantly. If you do not monitor the brake fluid level in the reservoir and it drops below the minimum level, air will enter the brake system.
- Create high pressure in the brake reservoir. When pumping the brakes yourself, do not overdo the pressure created in the reservoir, otherwise it may rupture. Recommended pressure is 0.8 atmospheres.
to our channel in Yandex.Zen
Even more useful tips in a convenient format
Subscribe
Did not find an answer to your question?
Required Tools
In order to change the brake fluid on a Chevrolet Niva, you need the tools from the table below.
Table - List of tools required to change brake fluid
| Tools | Note |
| Spanner | "at 8" |
| Transparent hose | Up to a meter long |
| Rags | To clean dirt |
| Syringe | Can be replaced with a rubber bulb |
| Tara | Can be replaced with a rubber bulb |
To carry out work, access from the bottom is required. Therefore, an inspection hole or overpass will be required. It is more convenient to replace the vehicle with a partner, but there are ways to carry out the task alone.
When does the need arise?
The brakes need bleeding if there is interference with the system design, namely:
- Tubes and hoses are being replaced.
- The brake fluid is changed.
- New calipers are installed on the front wheels.
- New cylinders are mounted on the rear axle.
- The master cylinder is being replaced.
In other words, bleeding is necessary if there has been a leak in the system. Before bleeding the brakes on the Niva, you should prepare the car for this procedure. First you need to loosen all the bleeder fittings. To do this, you need to use a special key at “8”. It is best to carry out all work on an overpass or inspection pit.
Replacing brake fluid, checking the level, topping up
| Replace the brake fluid in the hydraulic brakes every two years, regardless of the vehicle's mileage. |
| Before replacing the brake fluid, check the tightness of the hydraulic drive (see here) and eliminate any malfunctions. |
| You will need: an “8” wrench, brake fluid, a rubber or transparent hose, a transparent container. |
What brake fluid should I fill and how much?
Brake fluid type DOT-4 SAE J 1703, FMSS116. "Tom" or "Rosa" (not lower than DOT-4)
Total volume: 0.5 l .
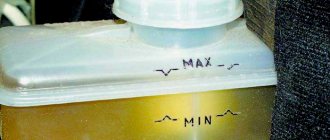
Checking the level and adding brake fluid
| When the brake fluid level in the reservoir drops below the “MIN” mark, the warning lamp in the instrument cluster lights up red. We recommend checking the level before each trip and, if necessary, adding fluid to the tank without waiting for the warning light to come on: this operation is best carried out in advance. If you have to add brake fluid to the reservoir quite often, immediately contact a specialist or fix the problem yourself. |
| You will need: brake fluid, a clean rag. |
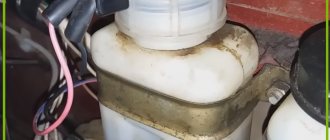
| The reservoir is installed on the master cylinder of the brake system on the left side of the engine compartment near the bulkhead. |
What you need to know about bleeding the system in a Chevrolet
- Hydraulic fluid contains poison. If it comes into contact with exposed skin, wash it off immediately with a large stream of water. If suddenly the substance gets into your eyes, or, worse, you swallow it, you should seek medical help.
- Some types of hydraulic fluid are flammable and can therefore catch fire if they come into contact with hot elements or an open flame. During your work, you should always remember this in order to take appropriate precautions in time.
- The liquid is aggressive to plastic parts and paint. If the substance gets on the surface of a painted body or plastic, immediately wash it off with a large stream of water.
- The liquid is hygroscopic, that is, it can absorb moisture from the air. Excess moisture content lowers the boiling point to unacceptable levels, resulting in an unsafe reduction in braking performance.
- Used hydraulic fluid cannot be reused. It is most likely already contaminated. If you need to add or replace fluid in the system, use only the recommended type.
Tools:
- Split spanner 10 mm
- Split spanner 8 mm
- Rubber bulb
- Capacity for brake fluid 1-2 l.
Parts and consumables:
- Brake fluid
- Rags
- Aerosol lubricant type WD-40
- Brake fitting
- Bleeding hose
Bleeding the brakes is necessary when replacing brake fluid, as well as to remove air that has entered the hydraulic drive during the repair or replacement of individual components of the brake system. Air trapped in the hydraulic drive causes an increase in the free play of the brake pedal (the pedal becomes “soft”) and significantly reduces the effectiveness of the brakes.
– when you press the pedal once, the pedal travel increases, its “softness”;
– with repeated pressing of the pedal – a gradual decrease in the pedal stroke with a simultaneous increase in its “hardness”. Before bleeding the hydraulic drive, it is necessary to identify and eliminate the cause of depressurization.
We carry out the work with an assistant on an inspection ditch or overpass. Thoroughly clean the wheel cylinder bleeder fittings from dirt. We remove air first from one brake circuit, starting from the wheel cylinder of the right rear wheel and ending with the cylinder block of the left front wheel. We remove air with the rear wheels loaded.
When bleeding the brakes on a car with the rear part suspended (for example, on a lift), it is necessary to load the rear brake pressure regulator, insert a screwdriver between the pressure regulator piston and the piston lever.
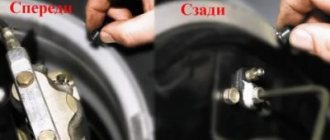
1. Remove the protective cap from the bleeder fitting of the wheel cylinder of the right rear wheel.
2. We put a hose on the head of the fitting, lowering its free end into a vessel partially filled with brake fluid.
3. An assistant presses the brake pedal three to four times at intervals of 1-2 seconds and holds the pedal down. Using the “8” wrench, unscrew the bleeder fitting 1/2 - 3/4 turn. In this case, air and part of the brake fluid are forced into the vessel, and the pedal is lowered to the floor (air bubbles are clearly visible in the vessel with the liquid).
We tighten the fitting and only after that the assistant can release the brake pedal. We repeat the bleeding operation until the release of air bubbles from the hose stops and only brake fluid comes out. In this case, air and part of the brake fluid are forced into the vessel, and the pedal is lowered to the floor (air bubbles are clearly visible in the vessel with the liquid).
4. Then remove air from the cylinder block of the left front wheel.
Also interesting: Chevrolet Niva brake system
5. Remove the protective cap from the lower bleeder fitting of the cylinder block of the left front wheel.
6. Putting a hose on the head of the fitting, lower its free end into a vessel partially filled with brake fluid. We remove air through the lower fitting of the cylinder block.
7. In the same way, remove air through the upper fitting of the cylinder block of the front left wheel.
8. To remove air from another circuit, we bleed in the sequence: left rear - right front wheel.
When removing air from the system, you need to monitor the fluid level in the master cylinder reservoir and add it if necessary.
If there is no air in the system, the brake pedal should be “hard”, i.e. when pressing, go no more than half the distance to the floor.
When removing or replacing elements of one of the circuits, only this circuit must be pumped. When removing or replacing the master brake cylinder, pressure regulator, or a drop in the level of brake fluid in the reservoir, resulting in air entering the hydraulic drive, it is necessary to completely bleed the brake system, i.e.
The article is missing:
- Photo of the instrument
- Photos of parts and consumables
- High-quality photos of repairs
Brake pads for Chevrolet Niva
The front wheels of the Niva Chevrolet use disc brakes, and the rear wheels use drum brakes. Accordingly, the pads on them are different. Pads are the main working part of the brakes, which carry the most load and wear out the fastest. If the car is used intensively, the condition of the pads should be checked at least once every six months. Today there are many different domestic and foreign manufacturers of pads for Niva-Chevrolet cars.
They differ in price, material, service life. The so-called “Kevlar” pads from the Japanese company NIBK are considered the most effective and “cool”. They are made using modern nanotechnology from a compound that is equally effective in various operating modes. The advantages of this pad model include:
The only disadvantage of these pads is the high cost, but the price corresponds to the quality.
If you need information about replacing front pads, this is the place for you.
Brake fluid Chevrolet Niva
In accordance with the operating instructions, brake fluids that comply with the international safety class DOT-4 are used in the brake system of vehicles produced by the GM-AVTOVAZ JV. Table 13.6
Brake fluid
| Name | Manufacturer |
| "Rosa DOT-4" | OJSC "Caprolactam" |
| Spectrol Disc Brake fluid | NPF "Spektr-Auto" |
| Brake fluid DOT-4 | BP, UK |
| Brake fluid DOT-4 | STP |
Repairing auto parts yourself is a responsible task that should be taken as seriously as possible. Sometimes a faulty spare part takes the driver by surprise, forcing him to spend a lot of time and money searching for a good service station, but there is an alternative solution to the problem; this requires a small amount of knowledge and a set of tools.
When repairing Chevrolet Niva brake fluid, you need to be extremely careful and not neglect the little things. To get acquainted with the issue, car enthusiasts often use various Internet portals dedicated to auto parts. Some of them use narrowly focused forums. But, as a rule, only generalized information is provided there, which is known initially. Where can you find a reliable source that offers really useful things? Our portal is open for this 24 hours a day. Online mode allows us to help clients at any time convenient for them. Moreover, a mobile version has been developed that is available to everyone.
A detailed description of such a unit as Chevrolet Niva brake fluid has a good structure with thematic headings. In addition, there is always the opportunity to familiarize yourself with the intricacies of installation. There are often situations when a driver is confident in his abilities, but when he gets down to work, questions begin to arise. Thanks to our portal, such moments can be easily avoided. The site is a database that is updated regularly. By using it as a support during repair work, the car enthusiast receives a serious advantage. Each of the articles has reliable support, tested in practice.
In addition to the repair manual, the owner of a personal car will be able to prevent a lot of breakdowns that occur due to the human factor, thanks to the information located on the site. Users are presented with a lot of useful recommendations for proper operation, which will help significantly extend the life of the unit and avoid many negative consequences.
Online support is an excellent and most convenient way to obtain the necessary information. Another significant plus is that articles are written for people. We understand that the reader will do everything with his own hands, and we try to make it as convenient and efficient as possible. Use the resource at any time of the day and find the answer to any question you may have regarding cars.
↓ Comments ↓
1. Car structure
1.0 Car structure 1.1 General information about cars 1.2 Passport data 1.3 Car keys 1.4 Controls 1.5 Heating and ventilation 1.6 Doors 1.7 Seat belts 1.8 Adjusting the position of the front seats 1.9 Adjusting the steering wheel
2. Recommendations for use
2.0 Recommendations for operation 2.1 Safety rules and recommendations 2.2 Tools and accessories 2.3 Running in the car 2.4 Operating the car during the warranty period 2.5 Checking the car before leaving 2.6 Replacing the air filter entering the cabin 2.7 Using a jack 2.8 Towing the car
3. Problems along the way
3.0 Malfunctions along the way 3.1 The engine does not start 3.2 Malfunctions of the fuel injection system 3.3 No idle speed 3.4 Interruptions in engine operation 3.5 The car moves jerkily 3.6 The car accelerates poorly 3.7 The engine stalls while driving 3.8 The oil pressure has dropped
Advantages and disadvantages of the braking system
Reviews from car enthusiasts about the brake system on the Chevrolet Niva show that it is generally quite reliable and effective, fully consistent with the class of SUV cars. The advantage is ease of control, ease of maintenance, adjustment and replacement of parts. The disadvantages are due to the use of a pressure regulator, the operation of which in some cases can manifest itself in the form of uneven braking, the appearance of vibration when braking at certain speeds, and an increase in braking distance.
Effective brakes on the Chevrolet Niva, as the main condition for the safety and controllability of the car, help maintain the high popularity of this model for many years.