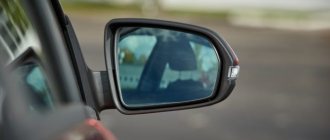
Many car enthusiasts are puzzled by the side mirrors on the Lada Vesta, many are interested in the question of whether they are a sphere or not. Do they fold, how do you take them apart? The developers tried to make revolutionary spherical mirrors on the Lada Vesta, by which the Lada Vesta can be distinguished from other AvtoVAZ cars. Reading numerous reviews about side mirrors on websites and forums, drivers identified both visible shortcomings and obvious advantages. Read the article and find out everything about it!
Advantages of side mirrors of Lada Vesta over other VAZ cars
Let Vesta not create a show effect like the Lamborghini Huracan. It must be admitted that the domestic geniuses of the automotive industry managed to combine all the wishes of regular customers in the side reflectors of the Lada Vesta:
- good location/good view;
- built-in turn signal and hazard warning repeaters;
- successful design of the repeaters (with a bend), which allows you to see the turn signal on in the reflector;
- heated rear view reflectors;
- electronic adjustment of the side mirrors;
- the ability to bend in the opposite direction, which prevents their breakage when they come into contact with obstacles (while driving backwards);
- possibility of folding manually.
Disadvantages of side rear view mirrors of Lada Vesta
The last point of advantage can be immediately renamed into a disadvantage, including:
- lack of an electronic adjustment mechanism for folding side mirrors;
- creaking during folding;
- reduction in the information content of the reflection when the car is moving, which causes rattling and shaking at speed or on a bad road;
- fogging of turn signal repeaters and hazard warning lights;
- if the LEDs of the turn signal repeaters fail, the entire assembly should be replaced;
- detachment of the mirror element at low temperatures during folding.
Almost all defects are eliminated by the manufacturer during the warranty period.
Adjusting the side mirrors of a Lada Vesta car
There are four control buttons on the driver's door control unit. For adjustment, there is a slider that has three positions (middle, far left and far right), which must be moved in the desired direction. After this, you can adjust them to the individual characteristics of the driver using the joystick, which is located above the slider. After adjustment, the slider must be returned to its original position, and the indicator lights should go out.
Windshield pillar trim
You need to open it, lower the window, disconnect the terminals from the battery. Then disconnect the connector with wires. To do this, you need to pull its lock up. The part is ready to be removed from the hinges.
Tip: If the door is being removed for repairs that require disassembly, it is recommended to disassemble it while it is on its hinges. This is easier to do thanks to free access to both sides of the door.
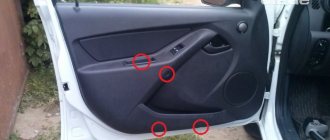
The casing is removed to repair the mechanisms that are installed under it, or in case of some modification. The tools you will need are a flathead screwdriver and a socket wrench with a T20 (star) bit.
The following sequence of actions is performed:
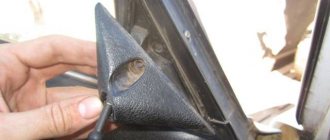
- Remove the side mirror triangle. The part is pryed off with a screwdriver and the latch is snapped off. Then disconnect the block with wires;
- The doors are pryed up from the bottom, then the lampshade is removed and the wires are disconnected from it;
- Using a wrench, unscrew the three screws securing the casing from below;
- They find a plug from the top end and take it out. Unscrew the fastening screw that is screwed in behind it;
- Another screw is found and unscrewed inside the door handle;
- Carefully pry up, remove the unit that controls the exterior mirrors, power windows and central locking, disconnect the wiring from it, unscrew the fasteners located perpendicular to the door part;
- Starting from the bottom, insert a screwdriver between the door and the trim until all the latches are released.
Remove the window handle. To do this, insert a screwdriver or a spatula between its middle mount and the bottom washer, and pull the protrusion on the middle part outward. When the protrusion is pressed out, the middle part is pulled out. Then remove the handle from the slot of the window regulator, the base of the handle, and the round plastic washer.
Insert the tool between the door handle and its trim, then remove the trim. There are two bolts screwed in under it, which we unscrew with a wrench. At the very bottom of the card, find a self-tapping screw and unscrew it using an asterisk attachment. Now the casing is fixed only on plastic clips and velvet. The card is pryed up, starting from the bottom, and all the latches around its perimeter are snapped off. Then remove the card from the velvet.
The side window trim is attached to the rear parcel shelf trim. This trim is removed together with the rear parcel shelf upholstery.
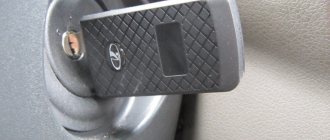
How to disassemble a side mirror on a Lada Vesta
To disassemble the side mirror at 2180, you need to do several simple manipulations. Since the Lada Vesta turn signal indicator is an electrical device, when removing the reflector it is necessary to remove the negative terminal from the battery. It is necessary to remove the trim from the car door pillar by first unclipping the upper and two lower latches. After this, you need to disconnect the wires and unscrew the three screws that secure the rear view reflectors to the door.
Once the reflectors are removed, their disassembly is almost complete:
1st step: turn the mirror element to the side until it stops to remove it (the reflector heating wires do not need to be disconnected);
Step 2: use a flat-head screwdriver to unclip the mirror element from the housing;
Step 3: To release the colored plastic trim clips, use a flat-blade screwdriver and then slide the trim to the side.
If you remove the side mirror, you can get to the mechanism that provides electrical power to the repeaters. After replacing the relevant parts, installation proceeds in the reverse order.
Lada Vesta ➤ splinter › Logbook › Installation of running repeaters. Two ways to disassemble mirrors.
Hi all.
The recording will be useful when replacing repeaters, replacing a mirror, a mirror element, or when disassembling a mirror for any manipulation. I bought running repeaters (or running
, as anyone pleases)). The old ones served me faithfully for 3.5 years. Sometimes we sweated, but not much. But I hit the mirrors a couple of times. In winter, some roads in our city are very narrow). When choosing the lesser evil, I choose to hit with a mirror)
Then these repeaters appeared. I looked at others - everyone seemed happy. Well, I ordered it from Vestashop.
Yes, of course - boyishness. But sometimes you want to play) And as we know, men never leave childhood. Only the toys change...
By the way, the logic behind Vesta’s turn signals is interesting. Turning only works when the engine is running. Even when igniting there is silence. The emergency light always works. But without ignition - no sound. It was different with our previous cars...
I ordered, as always, with other products. Otherwise, delivery is quite expensive). The repeaters came in their own box, well packaged. They seem to be made with high quality.
Option 1. With dismantling the mirror element
.
First, I moved the lower inner edge of the mirror element deeper into the mirror. This makes it easier to get to the latches from above.
I checked. Everything is working. Here is a comparison with a standard repeater. In general, it’s like this: The one running in front is better. Blinks brighter than standard (much). Better visible. Well, it just blinks more beautifully (IMHO). From the interior it’s a little worse to see. The regular one blinked brighter. Here the extreme diode somehow quickly goes out. It's not critical for me. You can still see whether it blinks or not. From behind you can see worse. But that’s why there’s a rear turn signal (on the lamp). From the side, the person running is brighter and more noticeable.
The video shows how the “running” turn signals on the mirrors work in bright sunshine at night. Comparison with ordinary ones. Side, back, front view
In general, I liked how it worked. But there is also a second mirror...
Option 2. Without removing the mirror element.
The second mirror was disassembled quickly. But be careful, you can break off the latches. I crawled up to them with a long flat-head screwdriver. For clarity, I’ll post a photo of the removed cover (though from a different mirror) here. I unclicked everything except the 4th one - it flies off on its own. You can't get close to her. All latches are intact. If you leave the last two and remove the cover, they may break! You can get to the fifth by turning the mirror completely outward (folding it in the opposite direction))
Source: www.drive2.com
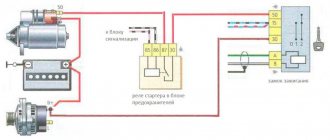
How to turn on heated mirrors
Starting in 2021, AvtoVAZ has equipped the 2180 with the additional function of “electric drive and electric heating of side reflectors.”
This function is activated only after starting the engine (so as not to damage the battery) and switching on the heater to the window blowing mode (windshield and side). After this, you need to press the button on the climate console, which is responsible for heating and blowing the reflectors, rear and windshields.
To activate this function on the luxury version of Lada Vesta, you need to press the leftmost button at the bottom on the car’s climate control unit with the inscription “MAX”.
At 20-degree frost (which is usual for an Eastern European winter), the following happens:
- after 1 minute the ice on the reflectors begins to melt;
- after 2-3 minutes the ice melts completely;
- after 4 minutes the mirror is clean and dry.
Disassembly procedure
Once the structure has been removed, disassembly can begin. If it is required, of course. Perhaps you have found a new mirror whose price suits you completely. Then you can skip this point.
If it is necessary to disassemble an element, we start from whether it is internal or external.
The interior mirror is disassembled as follows:
- there is a place where the glass and the body are connected;
- spin is inserted;
- pressed with little force;
- a gap appears;
- use a mediator to pass along the entire length of the gap;
- the body is divided into 2 parts;
- the mirror is removed;
- everything else is located underneath it;
- We carry out the necessary work.
You may also need to disassemble your car side mirror.
It doesn't matter whether left or right
The task here is to remove the reflective element. Be prepared for the fact that the instructions below will not fit your specific car. There are cars on which everything is not quite like that. Sorry here, the guide is not universal.
But it is the following scheme that is suitable for most cars.
- Using a hairdryer, the area between the case and the glass is heated;
- Do not heat to high temperature. Use a household hair dryer on medium power;
- Use a flat-head screwdriver to separate the body into 2 parts;
- Sometimes it is necessary to bend the terminals;
- If you are afraid of damaging the mirror, wrap the instrument with electrical tape;
- On some cars you need to slightly press the mirror to the center and move it to the side;
- The glass is carefully removed;
- Remove the screw from the plastic frame, if there is one;
- Under the frame we see the entire mechanism;
- Use a screwdriver to remove the broken structure and replace it with a new one.
That's it, the work is almost completed. But since we disassembled everything and changed the necessary components, now we need to assemble the structure and install it back on the car.
What are mirror covers for Lada Vesta needed for?
The reflector cover in body color is installed by AvtoVAZ conveyors not only for the purpose of maintaining a unified design solution.
Firstly, the overlay on the rear view mirror improves the aerodynamic properties of the car.
Secondly, the pad eliminates the unpleasant sound defect when driving fast (whistle), which distracts the driver.
Thirdly, it is possible to choose chrome linings or linings in body color, which is quite profitable from a financial point of view.
Video
The exterior of the car with such a body turned out to be very stylish. In the car, the developers changed the front bumper, slightly enlarged the air intake, and also changed the appearance of the niches for the fog lights. They did a good job on the interior too. New functionality has been added; the seats and sides in luxury trim levels are covered with more wear-resistant leatherette. The mirror covers of the Lada Granta were also replaced. They are manually adjusted in this car. Granta is available in three trim levels:
Although it is made on the basis of Kalina, it still has its own individuality. Nevertheless, Lada Granta owners often think about various modifications.
The process of changing the appearance of a car can take place in different ways. Car owners go to various lengths to make the car stand out among other similar ones. You can change cars beyond recognition. There are special bumpers on sale; you can do airbrushing on the entire body. You can change the interior of the cabin or make changes to the design of the engines. And that is not all.
The side mirror cover can significantly improve the car's aerodynamic capabilities. When the speed is more than 80 km/h, mirrors with overlays will not whistle, since their shape is more streamlined. Another benefit of these accessories is improved appearance. You can experiment with different trims without damaging the body.
You can buy trims with the option of an LED turn signal repeater. This allows for additional safety while operating the machine. The turn signal repeater on the side mirror improves the visibility of the flashing light. This will avoid accidents and other problems. You can buy pads with electrical adjustment and heating. Most side mirror covers are made in Togliatti.
It all depends on the colors, shapes, and fastening capabilities. Overlays that are not painted in any color can be purchased for pennies. Analogues that are made in China can be purchased for 100 rubles. However, they are unreliable. Overlays with a repeater option, adjustment, and heating cost about 2,000 rubles. Mirror covers are one of the simplest, but very noticeable types of tuning!
As for installation, anyone can handle it. However, in case of even minimal doubts, it is better to contact the nearest car service center. This way you can avoid the risk of damaging the paintwork of the body or trim. Usually the linings are equipped with everything necessary for convenient mounting on a car. Using an example, we will describe the installation of an overlay using hermetic glue or silicone.