Location and design of the vacuum brake booster
The vacuum brake booster (VUT) on the VAZ 2110 is located at the rear wall of the engine compartment (directly under the wipers). You can see it by simply opening the hood and removing the protective cover.
This is a unit with a round body, located just below the wipers
This is a device with a round body, which is divided into 2 parts: vacuum and atmospheric. A diaphragm separates these parts. The vacuum chamber is connected to the intake manifold via a check valve. This valve creates a vacuum in the chamber. And a monitoring valve is connected to the atmospheric chamber, which is activated after pressing the brake pedal, as a result of which the vacuum chamber is connected to the atmospheric one. After this, the VUT diaphragm begins to put pressure on the rod of the main brake cylinder, brake fluid is pumped into the working cylinders, and braking begins. And when the driver releases the gas pedal, the diaphragm, under the action of the return spring, returns to its original position, and braking stops.
Basic elements of a vacuum booster
Replacing the vacuum booster VAZ 2110, 2111, 2112
If the brake pedal begins to be pressed hard, a hiss appears and the speed “plays”, most likely your car needs to replace the vacuum booster of the VAZ 2110, 2111, 2112. You should not delay the repair. Otherwise, you are taking a risk when driving onto the motorway. This procedure is not complicated; even a beginner can do the repair with his own hands if he has common sense and the ability to use a tool. How to fix this malfunction will be described below, but first you should familiarize yourself with the vacuum circuit diagram.
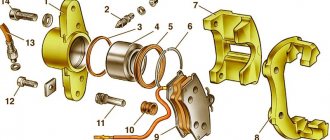
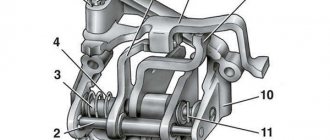
1 – cylinder, 2 – tank, 3 – amplifier, 4 – bracket, 5 – pin, 6 – bracket, 7 – pedal, 8 to 13 – fastening elements.
But the same brake reaction can occur in case of damage to the integrity of the hose or its loose connection, or failure of the check valve. Therefore, it is advisable to check them first. If there are no cracks or tears in the rubber of the hose, and the valve works correctly, then the reason is in the vacuum booster itself.
When to repair and when to replace?
- The VUT will have to be changed if the diaphragm, return spring or one of the valves is damaged. Then the car owner will simply be forced to remove the VUT and replace it. Moreover, this will need to be done as quickly as possible. Replacement in this case is the most reasonable solution, since it is not always possible to find individual spare parts for VUT on sale (this is especially true for diaphragms).
- It is advisable to carry out repairs in case of damage to external hoses. The hose may crack, the clamp on it may become loose, which leads to a loss of tightness, etc. All these problems can be eliminated without replacing the VUT. A leak in the system is, of course, bad, but it is not a critical failure (unless the driver is annoyed by the hissing in the cabin).
Diagnosis of VUT malfunction: why it hisses or is leaking
- If braking is accompanied by hissing, then the first thing you need to do is inspect the VUT and the hose connecting it to the manifold pipe. There is a high probability that the hose will be damaged. In this case, the problem can be solved by a simple replacement. But the second option is also possible: brake fluid leaks may be found on the VUT itself. In this case, the amplifier itself will have to be changed.
- Another point that indirectly indicates a malfunction of the VUT: the car’s engine began to “trouble” or began to run jerkily. This happens due to a leak in the VUT hose. Air enters the hose, which from there goes directly into the intake manifold. Due to excess air, the fuel mixture supplied to the combustion chambers becomes too lean. As a result, interruptions in engine operation. To eliminate air leaks, it is often enough to tighten the loose clamps on the VUT hose.
- If you still have doubts that it is the VUT that is faulty, you can verify it this way: turn off the engine, and then press the brake pedal 6-7 times. After the 7th press, you need to release the pedal, let it go through about half of the free stroke, then stop it with your foot and start the engine. If the pedal falls to the floor after starting the engine, the VUT is working. If it remains motionless, the VUT will have to be changed.
Diagnostics
In fact, the failure of the vacuum brake booster is not very harmless. Especially if the failure occurs unexpectedly. The first sign of a breakdown is the brake pedal becoming sticky. If this pedal has become much harder than it was before, then it makes sense to check the amplifier. Most likely, he simply cannot cope with his responsibilities. Often, when you press the brake, you can hear a hissing sound.
Diagnosing such a malfunction is very simple. To do this, with the engine turned off, press the brake pedal 5-6 times and leave it pressed. After this, we start the engine. The pedal should go down a little, this indicates that the brake vacuum is fully operational. If the brake pedal does not go away, then most likely there is a problem with the booster. First, check all hoses and fittings for air leaks. After that, run the diagnostics again. If nothing has changed, then it makes sense to replace the entire amplifier.
Article on the topic “How to check the vacuum brake booster?”
How to repair or replace a VAZ 2110
- If during diagnostics it turns out that the intake manifold hose is faulty, its clamps are loosened using a flat-head screwdriver, after which it is removed manually and replaced with a new one. If the cause of the hissing is not damage to the hose, but the loose clamps themselves, they are tightened using a flat screwdriver.
- If the VUT itself is faulty, it is replaced. First, the connector of the sensor indicating the brake fluid level is disconnected. It can be easily removed by hand.
This connector can be disabled manually - Next, the vacuum hose is disconnected from the VUT. It is also removed manually, while holding the VUT check valve with the other hand.
The check valve must be held with the other hand. - The master brake cylinder is attached to the VUT with two 10mm nuts. They are unscrewed using an open-end wrench.
They are unscrewed with a 10mm spanner. - After this, the main cylinder is carefully moved away from the VUT (the brake pipes do not need to be removed).
There is no need to disconnect the tubes from it - In the cabin, under the dashboard, the brake pedal bracket is disconnected. It is held on by 4 nuts, which are unscrewed with an 11-mm open-end wrench.
They are unscrewed with an open-end wrench 11 - After this, the VUT, together with the pedal and bracket, is carefully removed through the engine compartment, replaced with a new one, after which all components are reassembled.
This is done through the engine compartment
Video on the work
Master brake cylinder
Now let's talk about the master brake cylinder on a VAZ 2110 car. If you do not want to allow the brakes to fail while driving, they should be checked periodically, and if problems arise, take appropriate action immediately.
A common reason for replacing the master brake cylinder of a VAZ 2110 is precisely the fact that the brakes are lost.
Symptoms of a problem
Of course, brakes can completely lose their effectiveness for various reasons, but now we are talking specifically about the master cylinder. If the reason lies therein, then it can be determined by the following signs:
Replacement
To repair the master brake cylinder of a VAZ 2110, you will need to first disassemble it and then install a new element.
The most difficult process is disassembly. Therefore, let's talk about it in more detail.
- Carefully disconnect the master cylinder from the pipeline.
- Disconnect the block, which is equipped with wiring, from the emergency brake fluid indicator. The connection to the “ten” is made by terminals.
- Cover the pipe and assembly openings with something to prevent brake fluid from leaking. It will pollute the interior space, which is undesirable.
- Now remove the cylinder along with the reservoir. To do this, simply unscrew the fastening nuts that connect the element to the vacuum booster.
- After removing the brake fluid level sensor, drain the brake fluid present from the cylinder and the cylinder itself.
- If there is no serious need, you should not remove the tank. But for complete assembly, the tank is removed and then installed in place in strict order.
- Before reassembly, each element is washed with purified brake fluid. A good alternative is isopropyl alcohol.
- Do not forget to dry the parts with a compressor and wipe with a clean, dry cloth.
- Carefully avoid contact of the main cylinder with fuel or kerosene.
- Pay special attention to the O-rings. If you wash them with special alcohol, do not keep the rings in this liquid for more than 20 seconds. After processing, immediately dry and wipe the seals.
- Treat the surface of the piston and mirror to remove all rust.
- When replacing the master cylinder, new O-rings must be installed, regardless of their current condition.
- Check the elasticity of the piston springs under load. Refer to the VAZ 2110 repair manual, which indicates the appropriate loads and forces for testing.
- When free, the length of the spring should be 59.8 millimeters. If the indicator deviates from the norm, be sure to replace the springs.
Article on the topic: Instructions for replacing the pump on a VAZ 2114
VUT and trucks
In trucks such as Gazelle or UAZ, the VUT is located in the same place (at the rear wall of the engine compartment), so the procedure for replacing it is practically no different from that given above. The only difference is in size: the diameter of the truck’s VUT is 2 cm larger.
As you can see, replacing a VUT with a VAZ 2110 should not cause any particular difficulties. Getting to this unit is easy; you only need to unscrew a few nuts, and everything else can be easily removed by hand. Difficulties for the car owner can arise only at the diagnostic stage. Sometimes it happens that a crack in a VUT hose is so small that it cannot be seen with the naked eye. In this case, all hope lies only in hearing: air leaking into the collector is almost always accompanied by a thin whistle. But to hear it, you will need to get out of the cab and open the hood.
- Author: Alexey Stepanov
Copywriter with five years of experience. Rate this article:
- 5
- 4
- 3
- 2
- 1
(0 votes, average: 0 out of 5)
Share with your friends!