The braking system on the VAZ-2107 car is presented in the form of disc (front) and drum (rear) brakes. The design of the front and rear brakes has significant differences, so it is appropriate to consider the principle of replacing the rear brake pads on a VAZ-2107.
In principle, the rear pads have a longer lifespan than the front ones, but in any case the time comes when replacement is necessary. Often the service life of the rear pads is about 40-50 thousand km, but it all depends on the nature of the vehicle’s operation. In this material we will pay attention to how the rear brake pads of a VAZ 2107 are replaced, and what, in general, these products represent.
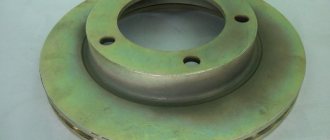
Appearance
Reasons for replacing pads
Braking is carried out using a special lining on the block. And when its thickness becomes less than 1.5 mm, it is necessary to replace the brake pads, the lining of which on the VAZ-2107 wears out quite quickly.
If you have any doubts about the performance of the rear brakes, it is worth checking the thickness of the lining.
The main sign of wear of this element is a squeaking noise coming from the rear of the car when you press the brake. Over time, the sound will increase in intensity to a metallic grinding sound until the gasket wears down so much that the brake stops working.
It happens that the brake pad is pulled out as soon as they suspect something is wrong, and often cracks or irregularities are found on it, which causes the element to move away from the body, which indicates the need for replacement.
It happens that the purchase of a low-quality pad is accompanied by the same signs of imperfection.
Brake pad problems
The parts of the braking system in question have to be changed not only when they wear out, but also when malfunctions occur that are associated with the use of low-quality consumables or too active driving. The following characteristic signs indicate problems with the pads:
- creaking, grinding and other extraneous sounds when braking;
- car skidding when pressing the brake pedal;
- to operate the pedal you have to exert more or less force than usual;
- beating of the pedal when braking;
- after releasing the pedal, it does not return to its original position;
- the presence of black dust on the rims.
Extraneous sounds
Modern brake pads are equipped with special indicators that indicate wear of these car parts. The indicator is a metal strip that is attached below the friction lining. When most of the material is worn out, but the pad is still able to decelerate, a characteristic grinding or whistling sound appears when the brake pedal is applied. If the pads are not equipped with such indicators, the presence of extraneous sounds indicates obvious wear of the elements in the brake mechanism and the need to replace them.
Pad wear can manifest itself in different ways, and one of the signs is extraneous sounds when braking.
Skid
If the car skids to one side when braking, then the likely cause is wear on one of the pads. The car can skid until it turns around, even on a dry surface. In addition to the pads, skidding can occur due to scuffing or deformation of the brake discs.
Video: why the car pulls to the side when braking
Some time ago I was faced with a situation where the car began to pull to the side when braking. It didn't take long to find the reason for this behavior. After a quick inspection of the car's underside, it was discovered that one of the rear brake wheel cylinders was leaking. This caused brake fluid to get on the working surface of the pad and drum, as a result of which the mechanism was unable to perform its function. The problem was resolved by replacing the cylinder and bleeding the brakes. If you encounter a similar situation, I recommend replacing the entire cylinder rather than installing a repair kit, since the quality of rubber products today leaves much to be desired.
Increase or decrease pedal effort
If the pedal has to be pressed unusually hard or lightly, the problem may be caused by worn or dirty pads. If everything is in order with them, then you should check the integrity of the entire brake system for fluid leaks.
Vibration
If there is vibration when you press the brake pedal, then a possible reason is that dirt has gotten between the brake disc and the pads, or a crack or chips have appeared on the latter. As a result, parts are subject to premature wear. However, you should be aware that a similar phenomenon is also possible due to problems with the hub or hydraulic cylinders of the brake system.
The pedal goes down
Sometimes it happens that the brake pedal does not move back after being pressed. This indicates that the pads are “stuck” to the disc. This phenomenon can be observed at sub-zero temperatures when moisture gets on the pads. In addition, air may enter the braking system, which requires inspection and subsequent repair or bleeding of the brakes.
Plaque on discs
Plaque on wheel rims is black dust, which indicates wear on the pads. If the dust contains metal particles, then not only the pads are erased, but also the brake disc itself. If such a situation arises, you should not delay inspecting the brake mechanism, as well as replacing failed parts.
The appearance of black deposits on wheels can be caused by active driving or natural wear of the pads.
One day I noticed that the front wheel rims were covered with black dust, and it was not road dust. It is no longer known what brake pads were installed at that time, but after replacing them with factory ones from AvtoVAZ, the situation remained unchanged
Therefore, I came to the conclusion that the appearance of black dust is a normal phenomenon, indicating natural wear of the pads.
When product replacement is required
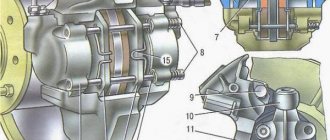
Both the front and rear wheels are characterized by the use of 4 brake pads to ensure effective braking. These products differ only in design, although the principle of operation is similar.
The rear pads of the VAZ 2107 are presented in the form of an arched steel structure, on the outer part of which a friction layer is applied. It is due to the friction of this layer against the inside of the drum that the car stops. If you do not replace the brake elements in a timely manner, this will be fraught with the development of unpredictable consequences, because the most important thing for any car is the serviceability of the braking system.
It is necessary to change the rear brake pads on a VAZ-2107 when the friction lining wears down to a thickness of less than 1.5 mm. It will not be possible to determine this fact without removing the wheel and dismantling the drum. But this is one of the main ways to determine whether the brake system is faulty. There is a second option, which is more convenient and does not require dismantling the rear wheel.
To do this, you need to listen for signs of squeaking of the rear wheels, as well as grinding and lack of braking effect, but this can lead to damage to the drum itself. You can squeeze the handbrake while standing on a slope and check that it is working properly. Of course, the cable on the handbrake may become loose, but if you tighten it and still have no effect, then it’s time to start replacing the pads.
If the rear brakes are not functioning, then it is time to change the pads. It is recommended to change them as a set on both rear wheels, since they are often worn out at the same time. What is the process of replacing rear brake pads on a VAZ-2107 will be determined further.
Features of replacing rear pads
At the beginning of the work, it should be noted that the handbrake must initially be lowered to its lowest position. This will allow you to dismantle the brake drum and thereby get to the worn parts. To begin replacing the brake pads of a VAZ 2107, it is necessary to remove the rear wheel:
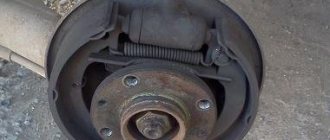
- There is a drum behind the wheel, which also needs to be removed. There are no problems with this, so we move on.
- After removing the drum, it is necessary to inspect the worn pads. If the thickness of the friction lining exceeds 1.5 mm, then there is no need to replace the products. Before carrying out further work, it is necessary to clean the mechanism from dirt and dust. To do this, you can use a brush or cloth.
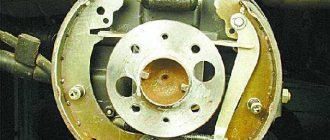
- If the products need to be replaced, then you need to take a screwdriver and then remove first the upper, then the lower connecting springs. If you can’t dismantle it with a screwdriver, then you should use pliers. The photo below shows the springs that should be removed.
- Next, you need to remove the clamps, which consist of a rod, a washer and a spring. These washers must be rotated 90 degrees to remove them through the slots. This is what the washers that hold the pads look like.
- Similar procedures are carried out with the second block.
- After removing the springs and clamps, the pads are removed independently.
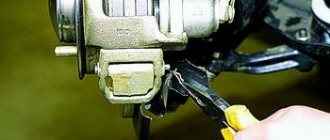
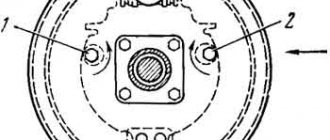
- The parking brake locking pin is straightened. The photo below shows the location of the locking pin. Now you need to unscrew the parking brake lever. This can be done using pliers. After this, the washer is removed, then the lever.
- During the dismantling process, you will have a question, what to do with the parking brake tip? It must be disconnected from the product and then left hanging.
- If necessary, it is recommended to replace all parking brake parts that were removed from the old product with new ones.
We recommend: Car wheel balancing
The rear brake pads on the VAZ 2107 should be installed in the reverse order of removal. Before installation, remember to bring the brake cylinder pistons as close as possible. Despite their simple design, installing them is much more difficult than the front ones. But having completed the procedure once, all subsequent repairs will be much easier for you.
The cost of new pads starts from 800 rubles per set, but it is important to purchase high-quality products, and not Chinese “consumer goods”. Not only the service life of the products, but also the braking of the car will depend on this. This completes the replacement procedure; if you have any questions, be sure to ask them.
The life and health of the driver and passengers depend on the condition of the braking system. Owners of "sevens" often independently monitor the condition and replace the brake pads of the car. This is a simple operation that does not require special tools or high qualifications. It is enough to have basic plumbing skills and know how to change brake pads on a VAZ 2107 .
Replacing the rear brake pads of a VAZ 2107
Every owner of a VAZ 2107 should know how to understand that the car requires urgent replacement of the rear brake pads. It is also good to learn how to perform such repairs yourself, because installing new pads does not require any expensive tools.
If you hear whistling and squeaks from behind while braking, and the handbrake does not hold well, most likely your car needs to replace the rear brake pads of the VAZ 2107. Delaying the work is not recommended, since operating a vehicle with a faulty brake system is fraught with serious consequences.
Carrying out repairs is not difficult, but there are several nuances that must be taken into account during the work. Before work, it is advisable to familiarize yourself with the diagram of the brakes on the VAZ 2107.
On the “classic” there are 4 rear pads, but even in order to assess the degree of wear, you need to remove the drums and wheels. How to fix this problem yourself, read and see below.
Required spare parts
On the Russian market, rear pads for “classics” are offered in a wide range. But practice shows that you should not purchase Chinese parts. They are of low quality: ferodo has a low coefficient of friction, and the linings come off quickly. It is advisable to purchase parts with the following article numbers: 2101-3502090-55, 21010350209055, 2101-3502090, VR311, BS-T 1001 N, 13.0460-2966.2, 602966, 2101-3501089, 2101-3 501800-82, 21010350180082, 2101-3501089. These are Russian and European products, the price varies from 500 to 1100 rubles, but you will put really high-quality parts on the car that will last a long time.
Tools required for repairs
To perform the repair you will need the following tools:
- wheel wrench;
- brush with metal bristles;
- ruler;
- sandpaper;
- keys;
- jack;
- pliers.
In car services, this service is provided inexpensively as of February 9, 1019 - on average, the price of installing rear brake pads on a VAZ 2107 is 600 rubles. But you will save time on travel, and at the same time, during the work, you will do your own inspection of the car.
Order of Operations
Work can be carried out without an inspection pit or overpass. The machine is placed on a flat surface and raised with a jack. Next, the following operations are performed:
- The car is set to speed, stops are installed under the front chassis, the rear wheels are “hung out” and removed.
Behind the wheel there is a drum that needs to be removed. If the knot has not been removed for a long time, it is most likely “stuck.” You can use WD tools for removal.
- After removing the drum, the brake pads are accessible. They can be inspected and cleaned of dirt. If the friction layer has reached a minimum, you should continue repairing the rear brake pads of the VAZ 2107.
- Then the connecting springs are dismantled: first the upper one, then the lower one. The operation is performed with a screwdriver; if necessary, you can use pliers.
Now you can remove the clamps. They consist of a rod, a spring and a washer. The last elements need to be rotated 90 degrees and removed through the slots. The same procedure is performed on the other block.The procedure for replacing brake pads can be seen in this video:
Let's summarize
It is important that before installing new parts, the cylinder pistons must be brought together as much as possible.
If the drum still refuses to “sit” in its normal place, you can remove the collar. This is done like this: the drum is fixed on the axle shaft with the reverse side, the motor and speed are turned on. The bead is sawed off with a file. Despite the simple design of the rear pads, their installation is more difficult. But having performed this operation once, you will perform all subsequent repairs with ease. And the rear pads need to be changed every 40-50 thousand kilometers. This is precisely their resource. German pads can last longer if you operate the car as usual and the way you drive the car is not aggressive.
Replacing the front pads of a VAZ 2107
To replace the pads you must perform the following steps:
- Jack up the car and remove the wheel.
- Treat the pad guide pins with WD-40.
- Remove the cotter pins from the fingers using pliers.
- Using a hammer and a bit (or a thin screwdriver), knock out the pins and remove the springs that press the pads.
- Separate the pads using a strong screwdriver or pry bar.
- Remove the old front pads of the VAZ 2107.
- Check the thickness and condition of the brake disc. If it is deformed or less than 9mm thick, replace it.
- Press in the brake cylinder pistons completely. This can be done by inserting the old pads into place and spreading them all the way using a pry bar.
Tip: Before completely recessing the pistons, you should check the brake fluid level. As the pistons retract, the fluid level rises. To prevent brake fluid from spilling out and getting on body parts and damaging the paintwork, you can take a little of it from the reservoir using a syringe or syringe.
- Insert new front brake pads on the VAZ 2107.
- Insert the pins of the front pads and secure them with cotter pins.
- Install the pad springs.
- Press the brake pedal several times so that the pistons come out of the brake cylinders and compress the pads.
- Install the wheel and lower the jack.
After replacing the VAZ 2107 pads on one wheel, you need to replace them on the second.
At the end of the operation, you should check the brake fluid level and add it if necessary.
Replacing the rear brake pads of a VAZ-2107 with your own hands
Hi all! In winter, my old “bug” had problems with the brake pedal beating and strange noises from the rear when braking. Since the rear brakes had not been touched for five years, I decided to replace everything there. Well, without hesitation, I ordered new pads, everything arrived promptly and on time as usual. I didn’t take any risks and ordered proven factory pads, along with a new handbrake cable, but more on that next time.
So, we hang up the rear axle of the car, remove the wheel, and release the tension of the hand brake. We unscrew the two pins securing the drum and screw two M8 bolts into the special threaded holes, pressing the drum away from the hub.
Using a mallet and a little force, remove the drum, then one by one remove the springs, pad clamps and disassemble the mechanism, remembering what was where. We clean everything from dirt and wear products, and thoroughly clean the hub flange for the new drum.
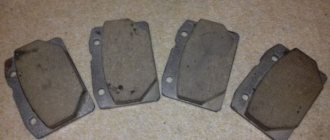
As we can see, the brake drum has worn out and should be replaced; the pads, although with a decent residual lining thickness, are still better to be replaced as well.
New pads are packaged in a standard colored cardboard box, there is a protective hologram and all the necessary manufacturer data is indicated.
Externally, the new pads are made of high quality, the metal base is covered with a protective varnish, the linings are graphite-colored with a touch of metal chips, the original thickness is 5 mm.
The pads also have factory laser markings.
We install the new pads in reverse order, there should be no problems.
It is necessary to make sure that the upper and lower ends of the shoes fit into the grooves, otherwise the drums may not fit into place. We put the drum in place, and carry out the same operation on the other side. We adjust the tension of the handbrake and you can drive out.
After the replacement, the vibration in the pedal completely disappeared, the brakes became very soft and smooth, no more squeaks or extraneous sounds. In general, go for it! Attached is a short video of the process:
Article number and approximate price for original front pads for VAZ 2107
The original front brake pads of the VAZ 2107 have catalog number 2101-3501090. The price of consumables is 260-380 rubles. The manufacturer of native products is the enterprise OJSC TIIR.
ATTENTION! A completely simple way to reduce fuel consumption has been found! Don't believe me? An auto mechanic with 15 years of experience also didn’t believe it until he tried it. And now he saves 35,000 rubles a year on gasoline! Read more"
Front pads VAZ 2107
When product replacement is required
Both the front and rear wheels are characterized by the use of 4 brake pads to ensure effective braking. These products differ only in design, although the principle of operation is similar.
The rear pads of the VAZ 2107 are presented in the form of an arched steel structure, on the outer part of which a friction layer is applied. It is due to the friction of this layer against the inside of the drum that the car stops. If you do not replace the brake elements in a timely manner, this will be fraught with the development of unpredictable consequences, because the most important thing for any car is the serviceability of the braking system.
It is necessary to change the rear brake pads on a VAZ-2107 when the friction lining wears down to a thickness of less than 1.5 mm. It will not be possible to determine this fact without removing the wheel and dismantling the drum. But this is one of the main ways to determine whether the brake system is faulty. There is a second option, which is more convenient and does not require dismantling the rear wheel. To do this, you need to listen for signs of squeaking of the rear wheels, as well as grinding and lack of braking effect, but this can lead to damage to the drum itself. You can squeeze the handbrake while standing on a slope and check that it is working correctly. Of course, the cable on the handbrake may become loose, but if you tighten it and still have no effect, then it’s time to start replacing the pads. If the rear brakes are not functioning, then it is time to change the pads. It is recommended to change them as a set on both rear wheels, since they are often worn out at the same time. What is the process of replacing rear brake pads on a VAZ-2107 will be determined further.
We recommend: How to change the Chevrolet Lacetti fuel filter with your own hands?
Features of replacing rear pads
At the beginning of the work, it should be noted that the handbrake must initially be lowered to its lowest position. This will allow you to dismantle the brake drum and thereby get to the worn parts. To begin replacing the brake pads of a VAZ 2107, it is necessary to remove the rear wheel:
Replacing brake pads on a VAZ-2107
There are several very important points that must be taken into account when replacing rear brake pads. For example, before starting work, you must lower the handbrake to the lower position. Both in the case of the front and rear, it is impossible to replace only a pair of pads, but all 4.
If you replace only one side, it may turn out that the new pads are much harder than the old ones or, on the contrary, they will brake better due to the complete absence of carbon deposits. Therefore, one side - with old pads - will skid during heavy braking.
Dismantling:
- First of all, remove the wheels and drums.
- Most likely, the brake system will be dirty, so it needs to be thoroughly cleaned. After this, you may not even need to change the pads themselves if the thickness of the gasket exceeds 1.5 mm. Using a brush you can quickly and efficiently clean the system. But never use strong solvents or other chemicals when cleaning.
- Remove the horizontal spring located on top. To do this, use a screwdriver or pliers to help yourself unfasten the element from one end, and then easily release the second.
- Once you remove the spring, you will notice a pair of bolts that support the piece that holds the pads in place. This is called a bowl. Press it down and turn it clockwise 90°, after which you can remove it. Before completely removing the bowl, feel for the rod on the back side and hold it, otherwise it will get lost.
- Remove the other compression spring that became visible after getting rid of the bowl. After this, remove the rod behind it. These elements prevent the block from being removed.
- The released block can now be removed. But both pads are attached to each other by a spring, which should be taken into account when removing them one by one.
- The opened spacer bar can be easily removed simply by hand. If you don't get rid of it, it will interfere.
- After you remove the front pad, only now can you remove the second (rear) pad using the same principle. During the process, you will be disturbed by the tip of the standing cable, which engages with the element being removed. It can be detached and just left hanging.
- The time has come to confirm or refute your assumption about the breakdown of the brake pads. Check whether they need replacing: use a caliper to measure the thickness of the lining in several places, which should be at least 1.5 mm. The replacement method, if necessary, will be described below.
- Using thin pliers, unpin the parking brake lever pin. Remove the released washer and remove the lever. As a result, the finger itself will be freed. The parking brake is commonly called a “handbrake”. All the parts you removed will then be installed on the new handbrake in the reverse order of dismantling. For the handbrake to work, it will need to be raised.
Installing new brakes:
- Check the tightness of the nuts securing the brake shield to the beam. If they need to be tightened, the tightening torque is 41.6-51.4 N*m (4.2-5.2 kgf*m).
- Clean the seating surface with sandpaper, it is located at the flange and brake drum.
- Remove the collar that has appeared on the drum during use. Start the car and engage first gear, which will cause the rear drums to move. Use a file to remove the bead. Then turn off the engine and remove the drum.
- Install the pads in reverse order of removal.
If you are doing everything for the first time and are still poorly oriented in the details of your car, use the detailed video instructions.
Lada 2107 1.6 › Logbook › Replacing front brake pads
Lately there has been a strange noise when braking on turned wheels. I don’t quite understand why only on rotated ones. If this had always been the case, it would have been clear that the pads had worn down to nothing. But in any case, I decided to change them, because... this was done quite a long time ago, and if it doesn’t help, look further.
What I like about the VAZ is its very cheap parts. I bought the front brake pads for 300 rubles. produced by AvtoVAZ. There are various stickers on the box to confirm originality.
Previously I changed the rear brake pads. The front ones turned out to be much less of a problem and in general the work was much easier. We remove the wheel.
At the same time, I check all the levers, rubbers, and silents. Everything seems ok.
To remove the pads, you need to remove the cotter pins that secure the tensioners. Then we remove these guides using pliers. On the right wheel everything turned out very simple.
To remove the pads, you need to squeeze the caliper. I do this using a gas wrench. After compression, the pads can be easily removed by hand. And this is what we see:
It can be seen that the block has been worn down, but not right down to the metal. Although more than recommended - 4mm. I was also embarrassed that I was cutting off some rags. In general, we install new ones. Because They are much larger than the old ones, you have to squeeze the caliper all the way to get them in there. We assemble in reverse order and go to the right wheel.
On the right, as always, problems arose. One of the tensioners was not pulled out. Because of the dirt, it turned sour and “stuck.” WD-40, another guide and brute force came to the rescue