Replacing rear brake pads
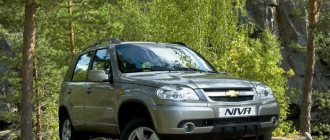
The Chevrolet Niva car is highly reliable and durable.
One of the important advantages of this car is the ability to make minor repairs yourself, without visiting a service station. One of these components is the car’s braking system. The ability to change consumable parts and independently perform diagnostics increases the safety of the driver and passengers and makes the trip safer.
The Chevrolet Niva has drum-type brakes on the rear axle. The main component that needs to be replaced periodically are the brake pads. The car manufacturer recommends checking the pads after 20,000 miles. Replacement is carried out after 30,000 kilometers.
But do not forget that, first of all, these parameters depend on the driving style and operating conditions of the car. On roads with poor surfaces, you tend to have to slow down more often, which leads to faster pad wear. Mainly the outer lining suffers, as it wears out much faster. To monitor its condition, there is a special window on the drum through which you can see the level of wear.
The car can be used if the thickness of the lining is more than 2 millimeters. Otherwise, it is necessary to replace all linings on the rear axle. All 4 are replaced, and in this case the level of wear of the others does not matter.
If you partially replace the brake linings, this will lead to a deterioration in the driving performance of the car and problems with the operation of the braking system. When braking, the car will move away from the trajectory.
To replace brake pads in a field, you must place the car on a flat surface. After this, you need to put stops under the front wheels to prevent them from rolling. The vehicle must be released from the parking brake.
Next, you need to slightly loosen the wheel bolts, lift the car with a jack and remove the wheel.
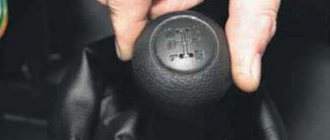
For further actions, you will need a key size 13. Use it to loosen the parking brake cable. To do this, loosen the nut and locknut.
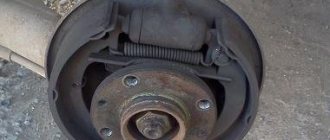
After this, using a 12mm wrench, unscrew the bolts holding the brake drum.
If the car was driven in winter, a problem such as drum sticking may occur. To fix this problem, you need to tap the drum around the circumference using a wooden or rubber mallet. If you don't have a mallet, you can use a regular hammer. But the blows must be delivered through a wooden block or piece of rubber.
Attention! The use of lubricants is strictly prohibited. This can damage the vehicle's braking system.
After the drum is removed, it is carefully inspected for damage. Sometimes, when using a car, cracks, grooves or chips may appear on it. If there are defects, the drum must be replaced.
Before removing the Chevrolet Niva brake pads, you need to use two levers to press the pistons into the wheel cylinder. This is necessary to install new brake pads.
The garter spring and spacer bar are removed next. Be careful when removing, as a spring that pops out can hurt your hands.
Then, using pliers, you need to unscrew the outer cup until the slots on it line up with certain protrusions on the stand.
These parts are quite small; it is better to use a separate container for storing them. If there is rust or dust on the surface, it must be cleaned immediately.
Now you can carefully move the front pad to remove the lower spring.
In a similar way, the rear block is removed and the cable that controls the parking brake is disconnected.
Replacing rear brake pads on a Niva Chevrolet usually does not take much time. Installation of new pads and assembly is carried out in reverse order.
After completing the work, you must press the brake pedal firmly several times so that the system sets the necessary clearances and adjusts the position of the brake pads. Also, after replacement, it is recommended to maintain the speed limit and avoid increased braking efforts.
Source: expertniva.ru
Why the rear wheel jams and what to do: advice from car enthusiasts
- “The reason is the cable.”
“I suffered with this rear wheel wedge. There was a need to transfer all new parts from an old car to a recently purchased one. I failed to notice that the defect was in the handbrake lever, to which the cable is attached. The previous owner lengthened it a little so that he could use the handbrake with the old stretched cable. This small nuance led to the rear left wheel jamming.New pads, drum, cylinder and handbrake cable were installed, but the slightest hit in the hole on this side led to jamming. A cheap item caused significant problems. How much time was lost, I rebuilt the wheel three times, but the fault appeared again.”
- “An ordinary hammer will help.”
“I had to somehow replace the drum brake pads on a VAZ 2114 car. In the process of removing the drum, the pad guides were bent. I didn’t notice this in time and, since the pad had little wear, I installed it back. After this, the wheel began to jam periodically. Repeated disassembly, straightening of the bent element - as a result, everything works without problems.” - "5 reasons for the wedge."
“I’m answering a popular question on the Internet: “Why does the rear wheel jam?” Several problems may be causing this. For example, a leaking oil seal. I myself encountered something similar in winter on a VAZ 06. Wear of the spacer bar and, as a result, mismatch of the slots. Or, for example, the tension spring has lost its properties. In some designs, the brake cylinder may be the culprit for the wedge. This applies to products with retaining rings that limit the reverse movement of the piston. When the pads are worn out, the stroke of the cylinder is no longer enough to move them apart. Designs with an eccentric have their own nuances.” - "Everything is in order."
“Many drivers have encountered a stuck rear wheel. The first thing to do here is to make sure that the levers are mobile. If there are no comments, you should check the wheel bearing. On a jacked car, move the wheel to the sides. The presence of a lift will indicate imminent wheel bearing failure.” - “A little bit of moisture and that’s it!”
“Last winter the handbrake cable froze. Even a slight jam at the end of the cable stroke led to the rear wheels blocking. If you drive a little, the brakes remain cold and the wheel does not jam. If you use the car intensively, you should put the car on the handbrake, and after turning it off, the rear wheel does not spin. I had to manually pull the cable under the car with a pry bar. We're talking about disc brakes." - "The problem is the drums."
“During the replacement of the brake drums, it turned out that the adjusting bars had lost their functionality due to age and corrosion. They no longer worked automatically; only manual adjustment was possible. This is after both rear wheels suddenly jammed while driving in the parking lot with the handbrake turned off. I had to solve the problem on the spot by opening the brake mechanisms.Removing the drums was not an easy task. The slats were completely apart. I picked at the joints of the two halves of the planks with a screwdriver and solved the problem. The slats no longer jam, but they are no longer adjustable. I'm planning to buy new ones. But they are imported and are not cheap, so now I am collecting money.”
Changing brake pads Niva Chevrolet
Chevrolet Niva owners usually operate their iron horse both in rural areas and completely off-road. And they are often forced to change many parts themselves, using a minimal set of tools and ingenuity. Therefore, for most of them it will not be difficult to replace the brake pads themselves. Moreover, they are essentially consumables and, depending on the conditions of use, cover from 5 to 15 thousand kilometers.
A complete set of front and rear pads will cost from 2,500 thousand, depending on the manufacturer. It should be taken into account that if the replacement is incomplete on one axle, the car may pull to the side when braking. Therefore, it is best to change the pads completely, or separately front or rear.
We get rid of vibration and extraneous sounds of the Niva transfer case forever
The characteristic howl and hum of the transfer case on VAZ-21213 cars, alas, is familiar to many owners of such cars. Let’s figure out what is the reason for these problems, and most importantly, how to get rid of them without using “collective farm” methods, such as additional noise reduction.
Content
- Let's understand the terminology.
- We study problems and repair methods. Vibration and how to deal with it.
- We remove the howl and hum.
- We remove the possibility of oil leakage.
- Niva (LADA 4×4)
Understanding the terminology
Let's start by diving into the materiel. Transfer case (TC) is a separate unit of an all-wheel drive vehicle, which provides multi-mode power distribution from the engine to the front and rear axles.
Externally, this is a mechanism located under the bottom of the car, in the body of which a multiplier (divider) is placed in series to obtain an intermediate gear ratio in the transmission and a splitter of one power flow into two. It is with the help of this device and its controls (levers) that go into the vehicle interior that the LADA 4×4 driver selects the all-wheel drive operating mode.
The RK directly connects the front driveshaft and the intermediate shaft (shaft) with the vibration damper to the vehicle’s gearbox. As is probably already clear from the description, this element is connected to the rear axle of the car via a rear propeller shaft.
We study problems and repair methods.
Any car owner definitely doesn’t need to be told why howling and humming are bad. Vibration of the transfer case on a Niva at low speed is quite common. The driver, of course, gradually gets used to many extraneous sounds in the car, but the noise level is high enough to make it impossible to carry on a conversation with passengers while traveling. Due to excessive noise pollution, you will inevitably have to deal with the problem.
Vibration and how to deal with it.
The main reason for the occurrence of unnecessary sounds is multi-frequency vibrations of the components of the transmission. In general, the vibration of the transfer case on a Niva is one of the most common cornerstones that other car owners are forced to fight (or put up with) constantly.
- Check the cushions (supports) on which the power unit, gearbox and other parts are attached to the body, including the muffler. Any worn-out pad or rubber band can easily cause excessive shaking of the iron and accompanying rumble. It is better to replace worn silent blocks and pillows immediately.
- Be sure to pay attention to the intermediate shaft (inlet shaft). If you see signs of “fatigue” - change the elements that have become unusable, or the entire part!
Perhaps this is the most complete set of measures that experienced auto mechanics advise when the transfer case on a Niva hums and vibrates!
Removing the howl and hum
We will assume that we have dealt with the vibration, but an equally significant problem remains - how to remove the howling of the transfer case on the Niva. Vibrations of the mechanism are not always the only reason for the appearance of extraneous irritating sounds. And the characteristic noise of the transfer case, alas, is one of the “trademark” shortcomings of one of the best domestic SUVs.
- The first thing you should pay attention to is the levers. It is better to immediately replace them with silent ones - with anti-resonance bushings inside. They won’t eliminate all the noise, but they will definitely extinguish some of it.
Removing the possibility of oil leakage
In an effort to resolve the question of how to get rid of the howling of the transfer case, even before the 2010 update, the manufacturer began assembling this mechanism using silicone sealant instead of cardboard gaskets. And he introduced an improved crankcase ventilation system with an open breather, which was located under the hood. Again, the reliability of the vehicle when passing fords has increased slightly, and most importantly, the load on the seals has also decreased.
We mention them again to point out that the fewer vibrations and shocks, the longer it will not take to detect an oil leak on the transfer case housing due to deteriorated seals. Moreover, the flange in the RC covers can cause noise - during operation, the bearing seats are simply broken.
We hope that the steps listed above will become complete step-by-step instructions on how to eliminate transfer case noise on a Niva.
A universal remedy that will definitely eliminate the noise of the transfer case?
For people who do not want to spend a lot of time modifying the components of their SUV, there is a proven solution. A fairly reliable universal option for how to remove the howling of a transfer case on a Niva, one might say, know-how from the SV-PARTs company, is the installation of a steel four-satellite differential.
Practice shows that it eliminates up to 90% of noise. Perhaps, if you also follow the previous recommendations, then the total effort will be enough to find comfort and peace behind the wheel of your favorite car.
There is a difference? What transfer cases are on different modifications of the Niva?
One more point should be paid attention to: is there a difference for different modifications of the Niva car.
Niva (LADA 4×4).
The VAZ-21213 (Niva), and with it the VAZ-21214, LADA 4×4 URBAN and other small-scale vehicles assembled on their basis, are equipped with a single transfer case, only taking into account the updates and improvements introduced by the plant in 2009-2010.
Chevrolet Niva
Here you need to take into account that the transfer case of the VAZ-2123 car, which the Niva actually is, has exactly the same device as similar units on an ordinary VAZ SUV.
But the Chevrolet Niva, as you know, has a different control mechanism - it uses a single transfer case lever, not two. Gears are switched lengthwise, and the locking is switched across. At the same time, it was initially installed with a different clutch (Valeo) and small-module RK with single-row or double-row bearings. And the car left the factory with a transfer case control lever with a built-in damper, which removed excess noise in the range of 4-5 thousand revolutions of the power unit.
So, regarding the discussion on the topic “the causes of vibration and howling in the transfer case on a Chevrolet Niva and how to eliminate it?” The advice we gave above is quite appropriate.
SV-PARTS recommendations
We would like to point out that the assortment of the SV-PARTS online store has everything to solve issues with the transfer case, even complete units for Niva 4×4 (VAZ 2121) and Chevrolet Niva. We also recorded a short video to help car enthusiasts so that you don’t have to waste a lot of your time
Watch, comment and conquer new horizons off-road with us!
How to change rear brake pads on a Chevrolet Niva
Chevrolet Niva is a car from the SUV class. And for an SUV, the condition of most control systems is the key to successfully passing an obstacle. Thus, an important role is played by the braking system and the parking brake, which performs the function of blocking the wheels while stationary. Blocking or braking of the rear wheels of the car is performed by drum brakes. The most important elements of these brakes are the rear pads of the Niva Chevrolet. Actually, this article will tell about them.
Original auto parts
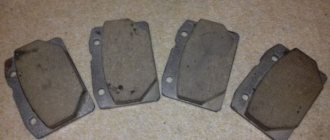
The part itself consists of a metal base and a ceramic or synthetic lining. Due to increased friction, components must be fire resistant and wear resistant. There are both disc and drum variations of the systems. The pads in both cases differ in shape and method of fastening. As a rule, the drum version is rarely used, and only on the rear wheels. The LADA Sport kit will cost you about 650 rubles. It already has all four parts, you don’t have to buy anything else. They have a width of 8 millimeters and a length of 11 cm. A quiet and high-quality replacement option. Don't forget to check that the article numbers match one of the ones below:
AvtoVAZ itself offers a similar solution. VAZ-2108 brake pads are suitable for most VAZ car models and cost about 480 rubles. In particular, they can be installed on VAZ 211213, VAZ 2121. The set consists of two front and two rear pads.
Check that the items and dimensions on the box are correct. If the barcodes are poorly printed, the box does not match the image in the catalog - most likely, this is a fake.
What are pads
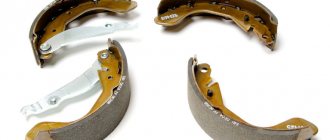
The brake pads are arched in the shape of the letter “C” and are installed in the rear wheel drums, where they do their work. The brake pad consists of the following elements:
- main part made of special steel;
- friction lining applied to the brake pads from the back of the head;
- fastening elements, which are various holes.
Rear brake pads
Let's briefly consider the principle of operation of the rear pads. So, the brake pads are located in the rear wheel drums, two in each. They are located with the inner side facing each other, and the outer one, with a friction layer, interacts with the wheel drum. The resulting interacting force, which is accompanied by the release of energy, ultimately leads to the car stopping.
When you press the Niva Chevrolet brake pedal, pressure is created in the brake system, which acts on the pistons of the working cylinders of the front and rear wheels. Next, the so-called extrusion of the pads occurs; the friction part interacts with the moving wheel drum (or disk) and leads to its braking. As the pads wear out, the friction layer wears off. The inside of the drum is also erased.
When is pad replacement necessary?
Before replacing the rear pads, an inspection must be carried out. A malfunctioning handbrake does not mean that the brake pads are urgently needed. They change in the following cases:
- If the thickness of the friction layer is less than the permissible value, that is, less than 1.5 mm.
- There is oil or other liquids on the lining.
- There are cracks, gouges or chips on the layer.
- Poor connection between the gasket and the base.
Only disassembly and detection of one of the above damages indicates the need to replace the pads.
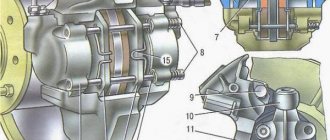
Drum brakes: how they work and how to repair them
Drums, of course, long ago lost the evolutionary war to discs, but to this day they are quite actively used on inexpensive and lightweight machines. All Ladas, Renault Logan, VW Polo sedan, Skoda Rapid, Daewoo Matiz - the list of completely modern models using these archaic but durable brake mechanisms will be very long. This means it’s useful to know how they work, why they break and how they are repaired. After theoretical preparation, we will go to the repair zone, where we will examine the drums of a rare Chinese sedan Chery Jaggi, better known in Russia under the name QQ.
Drum brake design
Drum brakes have not changed fundamentally since their mass appearance in 1902 thanks to Louis Renault. True, those brakes had a cable drive, and therefore they were exclusively mechanical. Plus they did not have automatic adjustment, so the driver had to regularly check the gap between the pads and the drum. But the fundamental design, I repeat, has changed minimally.
We will describe here the most common, classic design of the drum brake mechanism. There is a brake flap that is rigidly attached to the rear axle housing or wheel axle, and it does not rotate. There is also a drum that is attached to the wheel hub and rotates with it and the wheel.
The brake pads are installed on the brake flap. On one side, the pads rest on the axles, on the other, on the pistons of the working brake cylinder (this is clearly visible in the photographs). When the brake pedal is pressed, the brake fluid pushes the pistons in the working cylinder apart, which in turn pushes the brake pads apart. The pads are pressed against the surface of the drum and the car slows down. Friction linings are glued or riveted to the pads. To prevent the pads from falling out, pressure springs are installed.
A nice feature of this design is that one of the pads has the property of wedging (it is called active). To give an example, imagine a car wheel, spin it well and try to insert an object between the wheel and the arch with your hand: on one side the object will be pushed out, and on the other it will be pulled even more into the space between the wheel and the arch, thereby wedging wheel. The same situation applies to the pads.
The second block (passive) is repelled by the drum, and its efficiency is lower than the first - this, on the contrary, is an unpleasant moment. To compensate for the difference, the friction lining of the passive pad is larger in size than the active pad.
The downside of a jammed pad is that the braking force does not increase in proportion to the force on the pedal. Simply put, you press the brake pedal and get a completely different, much greater deceleration than expected. This is not the case with disc brakes.
To ensure that the pads return to their original position after braking, return springs are installed on them. Often, if the rear brake mechanism is drum, then the same pads are activated when the parking brake (“handbrake”) is applied. One of the pads has an additional lever to which a cable is attached, when moving the cable the pads are moved apart.
On modern cars, the drum brake mechanism is self-adjusting. That is, you don’t need to crawl under the car every few thousand kilometers or after repairs, like on a ZIL 130, to measure the gap between the friction linings and the drum.
In the photo: ZIL-130 '1966–74
However, even on modern cars the parking brake still needs to be adjusted. Therefore, the spacer strut, thanks to which the pads are moved apart when the handbrake is tightened, tends to lengthen or shorten due to the rotation of the nut (it is also clearly visible in the photo). Another positive aspect of drum brakes is the working surface area of the friction linings - in any case, it is larger compared to disc brakes.
But due to the specific operating conditions (see above), the wear of the linings is uneven, which means that the force will also change with wear. In turn, no one bothers to increase the working area of the linings by increasing not only the diameter of the drum, but also its width, and this is an indisputable plus. This is skillfully used by truck designers, for whom it is more important to brake 20 tons within the limits of decency than the delicate connection between the driver’s foot and the acceleration of the vehicle’s deceleration.
Moreover, even if a car has disc brakes installed all around, then with a high degree of probability the handbrake brake mechanism is implemented using a drum circuit. They simply make a groove in the disc and create their own small drum and place it inside the pad.
A few words about outdated drum brake designs. In search of simpler and more effective design options, engineers, in order to solve the problem with a block that does not wedge, came to the conclusion that it is possible to install two working cylinders on two opposite sides of the brake flap (as on the GAZ 24 and many other cars with drum brakes in front and behind). In this case, both pads became jammed, but only when moving forward.
AZLK designers used drum mechanisms with floating shoes. Floating because they do not rest on an axle, each on its own, but on a hinge connecting both blocks. Therefore, when the pistons move them apart, they are stabilized relative to the drum due to efforts. And the wedging effect of the active block is reduced due to the transfer of force through the hinge to the passive block.
Pros and cons of drums
One of the main advantages of drum mechanisms is that they are closed from the environment - neither dirt nor dust gets inside. It’s hard to disagree with this, but with a caveat – if we are talking about dirt outside. All the wear products of the pads that appear inside the drum cannot simply “get out” from there. All the beauty of being closed by a drum is visible in the photographs of the experimental subject.
If in disc brakes the remains of the friction linings are simply blown out of the mechanism, then in drum brakes almost everything remains in place. And further. Anyone who has driven trucks or ancient cars with “drums” in a circle in their life must remember: if you drive through a deep puddle or ford, then you need to press the brakes several times to dry them out, otherwise they simply won’t happen. There is no such circus with discs.
Drums also overheat easily and, unlike disks, cannot be quickly cooled by incoming air. In this case, it is difficult to warp the drum itself (which cannot be said about discs), but the braking efficiency of hot drums decreases very significantly.
In terms of dynamics, drums are also inferior to discs, since the latter are lighter. Plus, the maximum braking force of drums is greatly limited - excessive pressure on the pads can simply “break” the drum. Discs can be compressed much more strongly.
Example of rear drum brake repair
Everything here is, in general, quite predictable. Drums are usually disassembled for two manipulations: replacing the pads or repairing the jammed mechanism itself.
This time we received a car with a non-working rear right brake and no parking brake. The experienced eye of the foreman found no brake fluid leaks. Therefore, the probability of a stuck brake wheel cylinder has increased to 99%. The decision was made immediately - disassembly and more detailed diagnostics.
Unscrew the nuts and remove the wheel. Fortunately, the drum did not stick and came off quite easily. The owner of the car felt better when he found out that it was too early to change the pads. But then the bad news came. The parking brake strut is soured, therefore, it is impossible to adjust the location of the pads, and this is the reason for the missing handbrake. Further. The pistons in the working cylinder were jammed, which is why the car did not brake. Verdict - replacement of the working cylinder. The owner faced the difficulties courageously and blessed us to start immediately.
Since it is necessary to replace the working cylinder, we clamp the brake hose to prevent all the brake fluid from leaking out of the circuit. Unscrew the connecting nut and disconnect the brake pipe from the working cylinder. Using narrow-nose pliers, remove the lower spring from the brake pads. Then we disconnected the parking brake cable from the brake shoe lever.
Using the same narrow-nose pliers, they pressed, turned and removed the pressure springs of both pads. The springs are fixed on the finger: each has a small support cover with a slot, and the outer end of the finger is flattened. Accordingly, during installation, the spring is compressed, the end of the pin passes through the slot, and in order to fix the spring, it is turned. But that will come later, now it’s dismantling.
After removing the pressure springs, both pads can be removed from the brake flap and the working cylinder. This is what we do by moving them slightly apart to overcome the force of the upper return spring. Then we unscrewed the fastening bolts and removed the working brake cylinder. We removed the spacer from the pads, cleaned it thoroughly and designed it so that the parking brake could be adjusted. The upper return spring was then removed.
Replacement of rear brake pads of Chevrolet Niva
Tools:
- Pliers
- Medium flat screwdriver
- Small hammer
- Wheel chock
- Rolling jack
- Rubber bulb
- Brake fluid container
- Wire brush
- Mounting blade (2 pcs.)
Parts and consumables:
- Rear brake pads
- Graphite grease
- Aerosol lubricant type WD-40
- Brake fluid
Note:
The minimum permissible thickness of the friction linings of brake pads is 1.5 mm. Replace the pads in the following cases:
– the thickness of the linings is less than 1.5 mm;
– the surface of the linings is oily;
– the linings are not firmly connected to the base;
– the linings have deep grooves and chips.
Warnings:
Do not use gasoline, diesel fuel or any other mineral solvents to clean brakes. Replace the brake pads on both rear wheels at the same time. It is not permissible to replace the front and rear pads with each other, as well as between the left and right wheels. This may result in uneven braking.
You will need: pliers or a screwdriver, two mounting blades.
1. Engage 1st gear and install thrust blocks under the front wheels.
2. Check: the parking brake lever must be lowered all the way down (the car is released).
3. Remove the wheel.
4. If the brake fluid level in the master cylinder reservoir is at or close to zero, pump out some of the fluid from the reservoir. Otherwise, when replacing the pads, it may splash out.
5. Remove the brake drum as described here.
6. Remove the lower tension spring using pliers.
7. Rotate the upper pressure spring cup 90°.
8. Remove it along with the spring and lower cup. Remove the pressure spring rod from the brake shield.
Disabling the parking system
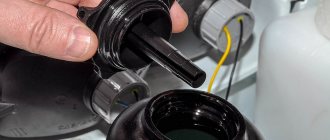
Before removing the rear brake pads, it is necessary to disconnect the Niva Chevrolet handbrake cable. Before doing this, it is better to install the car on an inspection hole or overpass in order to have access to the bottom.
We find the spring that is responsible for the return stroke of the cable and disconnect it using pliers.
We completely remove it so that it does not interfere with further actions.
Then you need two 13mm wrenches, with which you need to unlock the two nuts at the end of the cable.
Then you need to tighten the handbrake cable using pliers and unscrew the remaining nut.
After this, you can remove the guide.
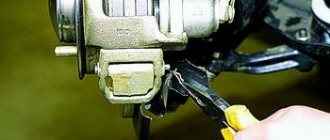
At the tip of the cable there is a protective rubber cap that needs to be moved to the side.
After this, carefully remove the cable tip from the bracket located on the body.
For greater convenience, it can be pryed off using a flat-head screwdriver.
Then you need a 8mm wrench with which you need to unscrew the bolts holding the cable sheath at the brake shield.
Now you can completely remove the cable from the seats. Dismantling the cable on the other side occurs in the same way.
To install the new part in place, you must do all the steps in reverse order.
Replacing the front pads.
To change the front brake pads of a Niva Chevrolet, you first need to lift the other side using a jack. After removing the wheel, you need to clean the surface of the parts and treat the cotter pin with WD-40 type lubricant.
After this, using pliers, carefully remove the axle cotter pin.
Then, using available tools, we push out the lever axis.
Then, using pliers, you can remove the axle from the seat.
Then completely disconnect the lever.
There are two springs installed in the guides. You need to get them out right away so as not to lose them.
Then you can begin to remove the brake caliper.
In order not to disconnect the cylinder block from the system, you can simply place it on the steering knuckle.
Now that access to the brake pads is completely open, you can simply remove them from the guides and replace them with new ones. Before installing new parts, you need to press the pistons inside the cylinders, since the width of the old pads was smaller due to wear and tear and the piston stroke was increased.
For these purposes, you can use sliding pliers or a pipe wrench. The block is installed in the guide. The caliper is placed on top and the caliper is pressed in using a handy tool.
After replacement, we reassemble in the reverse order.
To make installation of the clamping lever easier, you can file its edge.
You can shape the edge into a cone for easier installation.
After assembling the system and installing all components, you must press the brake pedal several times to ensure that all components fit into place.
Installing ventilated discs
But what needs to be done when replacing brake discs on a Chevrolet Niva? Installing ventilated discs instead of standard ones is quite difficult; you will have to perform several costly manipulations:
- Replace wheel rims. Instead of size R15 you will need to put R16.
- Of course, you need to buy the discs themselves.
- You will also need a new set of pads.
- You still need to install new calipers and fasteners.
After installing all the elements, you can start operating the car. And do not forget to promptly check the condition of the brake mechanisms. If necessary, you need to replace the brake discs on the Chevrolet Niva. If the standard ones do not suit you, you need to install ventilated ones - they can not only eliminate overheating, but also significantly improve braking efficiency.
Removing a soured brake drum VAZ / Russian crazy service car
In this video I show how to remove a drum that has become soured on the axle shaft. Special pullers couldn't cope with this.
Having learned from the “bitter” experience of the previous 10, having driven the tires from the passenger compartment, the very first thing I did was remove the drums. I coated the seats with graphite. Such questions no longer arise! ! ! and also loosened all the nuts on the brake pipes, including the ABS unit, one by one. made it possible to lubricate the brake nut contact.
Read news about the new Niva
- How to bleed the brakes of a Niva Chevrolet
- Hard or soft brake pedal. What is the reason and what to do
- Rear disc brakes
- How to bleed brakes on a Chevrolet Niva correctly
- Brake system Chevrolet Niva
- How to tighten or replace the handbrake on a Chevrolet Niva
- Creaking pads: How to fix whistling when braking
- Chevrolet Niva bolt pattern: diameter of the holes in the Chevy Niva, what is the bolt pattern of wheels and rims in the Chevrolet Niva, radius 15 and 16
Analogs
If you want to save on purchasing original spare parts, pay attention to analogues. They are in no way inferior to parts from AvtoVAZ or LADA, and sometimes even surpass them in certain characteristics.
| Brand name | vendor code | Price, rub.) |
| LYNXauto | BD4602 | 860 |
| Ferodo | FDB195 | 1140 |
| Delphi | LP189 | 870 |
| HI-Q | SP1168 | 460 |
| TRW | GDB265M | 570 |
The selection of similar parts is large, so choosing the necessary ones will not be difficult. The main thing is to pay attention to the article number. This will prevent you from purchasing a low quality fake. Also, fake parts do not have markings, or they are poorly printed on the products themselves.
Also interesting: What to check when buying a Niva
| Brand name | vendor code | Price, rub.) |
| Bosch | 1987475191 | 312 |
| Rosdot | 000006237 | 480 |
| Pilenga | BS-T001 | 560 |
| Fenox | BP50001C3 | 670 |
| "Start" | 361278J,MSK026 | 520 |
The minimum thickness of the brake pad linings should be 1.5 millimeters. To assess the condition of parts without removing them, you can use the inspection window. It is located in the brake shield.
Device
The VAZ 2123 transfer case is installed at the rear of the gearbox and is attached with brackets to the bottom of the car. It is driven by an intermediate shaft. Torque from the drive shaft to the drive axles is transmitted by cardans, which are screwed to the flanges of the transfer case drive shafts.
The transfer case body is made of aluminum alloy. In its upper part there is a hatch with a lid.
The transfer case consists of the following parts:
- RK Corps.
- Drive shaft.
- Control levers.
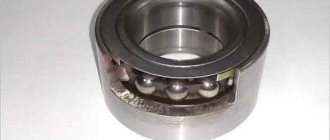
- Bearings.
- Gears.
- Drive shafts (front and rear).
- Flanges.
- Differential mechanism housing.
- Axles.
- Satellites.
- Clutches for gear shifts and differential locks.
- Oil seals.
- Retaining and thrust rings.
- Housing covers.
- Breather.
The Chevy Niva transfer case has three speeds:
- The first one, with a gear ratio of 1.2.
- Neutral.
- Low (second), with a gear ratio of 2.135.
Neutral allows you to temporarily disengage the gearbox from the transmission. It is used when connecting a winch and other units to a vehicle.
The first speed is intended for on-road driving, and the second is for off-road use where high torque at low speed is required.