The braking system of a car is an extremely important element that ensures that the car stops, allowing it to be fully controlled and prevent emergency situations from occurring. According to traffic regulations, a car with faulty brakes cannot be operated on public roads. One of the important components of a car's braking system is the front brake disc. During operation, this element is subjected to heavy loads, as a result of which replacement is periodically required.
Which APs should be used for replacement?
Now the time has come to change the TD, but the car owner does not have the money to go to a service center or he does not trust those who work in one service station for the entire small town. In this case, the car owner, if he is not too lazy, can replace the brake elements himself. The main thing is to buy original TDs.
Attention! If original brake discs are not available in auto stores in your city, then you can always order them from an online store, auto mechanics advise.
Article numbers of original brake discs on Niva Chevrolet:
- 21210-3501070-01;
- 21210350107001;
- 2121-3501070-01.
Knowing the TD article number, model and engine size of the Niva, you can select the necessary original brake elements.
What to do if the Niva brake disc cannot be removed?
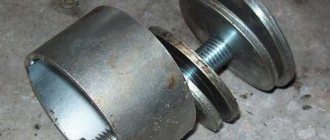
It often happens that the brake disc simply cannot be removed - it becomes stuck due to heat, rusts or sours due to dirt and scale. In this case, you have to use special pullers.
Experienced car mechanics remove the entire disc along with the fist and squeeze out the disc using a press.
If there is no puller, people often start hammering on the disc from the back side - sometimes this helps, but we do not recommend doing this. The edges of the brake disc simply break off from impacts.
If the disc cannot be removed because the pins cannot be knocked out, then you have to pick up a grinder and cut off the excess parts.
Below watch the video in which the author was unable to remove a disk using a homemade puller and used an angle grinder to remove the disk that was stuck on the hub. Sometimes this is the only option for the Chevrolet Niva - brute male power.
TD malfunctions
In what cases should brake elements be changed even if the car obeys the car owner:
- scratches. They appear due to the operation of the brake pad without coating. In this case, you need to change the pads. And only then look at the serviceability of the TD;
- steering wheel vibration when braking Niva Chevrolet. It indicates that the TD is deformed and must be urgently replaced;
- appearance of cracks. In this case, replacement is also required.
After the faults and brake elements to be replaced are identified, they are purchased strictly according to the article numbers, the Chevrolet Niva is driven into the pit and the procedure for replacing the brake parts is carried out.
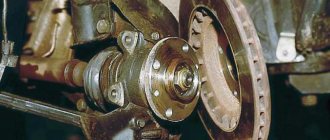
20.8. Disassembling the front brake mechanism
We hang and remove the front wheel.
Using a 10mm socket, unscrew the bolt securing the hose guide brackets...
...and remove the guides.
Using a 14mm socket, unscrew the bypass bolt of the brake hose of one circuit.
We remove the hose with the bypass bolt.
The hose fitting is sealed on both sides with copper washers.
Similarly, disconnect the brake hose of the other circuit.
Remove the cylinder block with the brake caliper (see Replacing the front brake pads).
We take out the brake pads.
Clamping the brake caliper in a vice with soft metal jaw linings, use a drift to remove the cylinder block retainer.
At the same time, we recess the cylinder block retainer with a rod with a diameter of 3–4 mm and, hitting the cylinder block with a hammer with a plastic striker, we begin to move the block along the guides of the brake caliper.
After moving the cylinder block by 1.5–2.0 mm, remove the rod. Using a hammer with a plastic striker or mallet, knock out the cylinder block from the caliper guides.
Cylinder block and brake caliper.
We remove the retainer and its spring from the socket of the brake cylinder block.
The retainer fits into the caliper hole and limits the movement of the cylinder block.
We assemble and install the front brake mechanism in the reverse order.
To facilitate assembly, use a file to remove the chamfers from the guides of the cylinder block.
Having sunk the latch into the block socket, insert the block into the grooves of the caliper. Using a hammer with a plastic striker, hammer the cylinder block until the retainer fits into the caliper hole. To remove the shoe guide...
...remove the upper clamping lever in the same way as the lower lever (see Replacing the front brake pads).
Using a 10mm socket, unscrew the bolt securing the front casing to the pad guide.
Using a chisel, loosen the two bolts securing the shoe guide to the steering knuckle.
Using a 17mm wrench, unscrew the bottom bolt.
It is more convenient to unscrew the top bolt with a head.
Remove the front cover...
...and the pad guide.
The brake disc and its protective casing can be dismantled only after removing the hub (see Replacing the hub bearings). When tightening the bypass bolts, note that the position of the brake hoses is determined by the guide brackets. We carry out the assembly in the reverse order and bleed the brake system (see Bleeding the brakes).
Copyright © 2007-2020 All rights reserved. All trademarks are property of their respective owners.
Front brake element replacement process
Tools you will need:
- jack;
- gloves;
- key;
- cleaner;
- screwdriver.
The process of replacing the front discs is as follows:
- Remove the wheel.
- Unscrew the screw at the lower brake flap.
- Bend the shield stoppers with a screwdriver.
- Remove the guide block bolts.
- Remove the shield and caliper.
- You hang the last one on a rope. This is necessary so that it does not interfere with you while installing a new disk.
- Remove the hub protection.
- Hold the last one and unscrew the nut.
- Remove the brake element.
- Install a new part and repeat the process in reverse order.
There are some nuances that need to be taken into account according to experienced mechanics. We'll tell you about them.
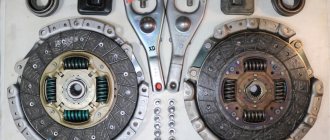
When replacing brake discs, it is recommended to replace the brake pads. Otherwise, the procedure will be incomplete and useless. Without new brake pads, the discs will quickly fail.
For your information! Experienced mechanics also recommend paying attention to the wear of the pads. If they are only slightly worn, then you can leave them alone and change only the TD.
In urban environments, brakes wear out faster than on highways. When changing disks, it is advisable to change all four APs. If testing shows that only two front or two rear ones are too worn out, then experienced mechanics recommend leaving a pair of discs that can still last twenty thousand kilometers.
The procedure for replacing brake discs on a Niva:
First, jack up the car and unscrew all 5 wheel nuts:
Then you will need to remove the brake pads. To do this, you will need pliers to remove the cotter pin from the clamp rod:
And again, use pliers to pull the rod outward to remove the caliper fixing plate. After this, lift the caliper up and remove the pads:
Then we take a 13mm wrench and unscrew the two bolts that secure the bracket, after spraying them with WD-40 lubricant.
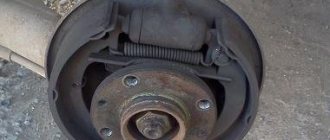
Replacing rear TDs
All the tools that are needed to change the front brake parts are also suitable for replacing the rear brake elements. Changing disks is done as follows:
- Place the Niva Chevrolet vehicle on a jack.
- Lift one side of it and remove the wheel.
- Unscrew the bolts on the brake drum.
- Remove the drum completely.
- Using a screwdriver, try to carefully pry and remove the tie bar and spacer.
- Rotate the shank of the front pad strut.
- Move the front block to the side.
- Remove the rear tension spring.
- Remove the rear pad support post.
Install a new disc and reassemble the Niva Chevrolet brake system in the reverse order of disassembly.
Now you know how to remove and install new brake discs on a Niva Chevrolet. However, sometimes car owners who are starting to repair their car for the first time encounter problems such as difficulties in removing the disc. He just stops and the person doesn’t know what to do next.
Niva's wheels are heating up - what to do in this case?
It happens that during operation the car wheels begin to heat up. This may indicate either their poor quality or breakdown.
Were you confused by the price of disc brakes and decided to buy a cheaper part? Then the heating problem can be solved very simply - replace the parts with better ones. In this case, you need to forget about saving. It is best if these are ventilated brake discs that match your “iron horse”.
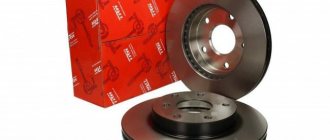
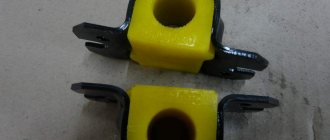
Niva ventilated discs are parts with special holes and notches through which air passes and additional cooling occurs, preventing the brake disc from overheating. Such discs are very reliable, which has long been proven in practice. Most often, tire drivers choose brake discs from Brembo, Zimmerman, Delphi, Bosch and other manufacturers that have proven the quality of their products.
Also interesting: Lada Niva Travel “Lux” 2021 - maximum equipment, prices, competitors - New cars 2020-2021
Having taken into account all the tips given above, you can be confident that the Niva, or rather its braking system, will never let you down and will work for your benefit for many years. This concludes the article about how to replace the front brake discs of a Chevrolet Niva. We can only hope that the new Chevrolet Niva will have fewer shortcomings and shortcomings in the braking system and that the designers will take into account the operating experience of the previous model. Good luck to everyone on the roads and safe driving.
PS: Watch the video with a review of the front brake discs and their replacement on a Chevrolet Niva from experienced car enthusiast Sergei Zykov.
What to choose: ventilated or non-ventilated wheels
Car owners often ask mechanics which wheels are better. Recently, the production and installation of ventilated APs has increased. Because they dissipate heat better than regular ones. This increases the lifespan of the brake elements.
Ventilated discs are larger in diameter than regular ones. Therefore, they are able to cool faster and improve braking. Such TDs are effective during sudden braking. In this case, the conventional mechanism overheats, the brake fails, and the Chevrolet Niva begins to rattle.
Replacing wheel bearings and brake discs
Replacing wheel bearings and brake discs
Post by muzolya » Mar 20, 2010, 4:02 pm
Hello everyone again)
I will change Thor. Disks.
1 — Tell me what difficulties and problems may arise?
2 — Will it be necessary to touch the wheel bearing?
Re: Changing brake discs.
Posted by ALK » Mar 20, 2010, 9:50 pm
replacing bearings... note that the disc is simply knocked off the hub. those. If you do not unscrew the hub nut, you can knock the disc off the bolts. however, I am not saying that this is how it should be done
Who knows what's going on behind the fence of the zoo? ©
Re: Changing brake discs.
Post by muzolya » Mar 20, 2010, 10:38 pm
Re: Changing brake discs.
Post by Suicide » March 21, 2010, 00:37
Re: Changing brake discs.
Post by ALK » March 21, 2010, 00:42
Who knows what's going on behind the fence of the zoo? ©
Re: Changing brake discs.
Post by muzolya » Mar 21, 2010, 02:06
Re: Changing brake discs.
Post by Suicide » March 21, 2010, 02:57
There are conical bolts. You can knock it inside the disk. But to push a week out of there =) Although, if they try REALLY hard so that not a single one fails..
For example, pull it off with a puller ala for brake drums, then carefully put a new one in place and press it in with nuts.
If you try without taking it apart, then yes.
And so, you put the car on supports, unscrew the ball and steering rods, the hub nut, take out the knuckle, hub, CV joint, knock out the disk... put everything back and adjust the bearings...
Re: Changing brake discs.
Post by Pilot » March 21, 2010, 03:12
Re: Changing brake discs.
Post by Suicide » March 21, 2010, 03:17
Re: Changing brake discs.
Post by Captain » Mar 21, 2010, 04:38
Re: Changing brake discs.
Post by muzolya » Mar 21, 2010, 04:47
Re: Changing brake discs.
Post by Captain » Mar 21, 2010, 04:58
Re: Changing brake discs.
Post by Suicide » March 21, 2010, 05:28
Re: Changing brake discs.
Post by Zhora » March 21, 2010, 1:23 pm
Re: Changing brake discs.
Post by Pilot » March 21, 2010, 2:36 pm
Suicide 1 nut that always unscrews or 3 bolts that always turn sour, which you have to install new ones every once in a while. Captain It's not very convenient to twist those bolts. Well, to me anyway. And so the head is high and normal. Again, they are secured by bending the plate. And here business is 1 minute extra.
Suicide Zhora I wrote it, with a sledgehammer on the lever. With 2-3 hits, anyone will pop up. Let’s not touch the ball anyway!
PS: 2 years of work in the service teaches you to do everything quickly, and not oh! with all sorts of nuts, washers and groovers with a diameter of 8 mm.
Re: Changing brake discs.
Post by Portada » Mar 21, 2010, 2:40 pm
About wear of brake discs and its detection
Unfortunately, a car does not last forever and all parts fail sooner or later. Brake discs are no exception. And water and dust bring this part closer to unusability even faster.
The first sign of disc failure is braking problems . You will feel it even without technical inspection. But it’s best if your fears are confirmed at the service station.
If you don’t want to go to specialists, you can try to identify the problems yourself by paying attention to the following signs of brake disc wear:
- When braking, extraneous noises and the car moves jerkily;
- Cracks and grooves appeared on the part in the form of grooves around the disk;
- The detail shows severe wear.
If any of the above symptoms are present in your car, then you need to replace the front brake discs as soon as possible.
Major mechanism failures
When using a car, natural wear and tear occurs on all elements. And the disc is no exception - the pads gradually erase it. It is also worth noting that the service life of the pads is much shorter than that of the disc. But driving on dusty roads and water will significantly reduce the life of the pads and disc.
The most obvious sign that some kind of breakdown has occurred is the appearance of problems when braking. Any driver can feel changes in performance, but it is still recommended to carry out diagnostics at a service station. This will allow you to identify all problems in the brake system and more. But you can try to identify faults yourself if you have the desire and opportunity.
How to diagnose breakdowns?
Before replacing the Chevrolet Niva brake discs with your own hands, you need to diagnose the entire system. The fact is that tubes and hoses can also become unusable, and this also affects driving safety. But let's get back to the pads and discs. Checking them for malfunction is quite simple:
- Pay attention to whether there are any extraneous sounds when braking - grinding, noise, jerking, and others.
- Are there any cracks, gouges, or chips on the surface of the disc? It is also necessary to carefully inspect the pads and check the thickness of the friction layer.
If you notice such malfunctions, you need to take immediate action. The disc wears out after prolonged use, so you will have to check its thickness with a caliper. When grinding a disk, you need to pay attention to its final thickness - it should be more than 9.5 mm. If the thickness of the disc is less, it is prohibited to install it on the car. It may also happen that the metal becomes covered with cracks and breaks into pieces.
The reason for the heating of Chevrolet Niva brake discs
Excessive heating, over 200 degrees, indicates the presence of malfunctions that arose for several common reasons:
- violation of the integrity of the disk or its deformation;
- lack of sufficient brake fluid level;
- poor quality or heavily worn pads;
- drum brake pads on the rear wheels - in this case, you shouldn’t be surprised why the front ones get hot - they take the maximum load on themselves, unloading the rear axle.
Severe overheating of the brakes on a Chevrolet Niva is dangerous due to complete failure of the part, which can subsequently lead to expensive repairs.
Brake fluid. Classification
DOT3 - mineral base. 50% - alcohol, 50% - castor or camphor oil. Applicability: low-speed vehicles with drum brakes.
DOT4 - in the language of motor oil, semi-synthetic. The base is glycol. Applicability: cars with disc brakes on all wheels.
DOT5.1 - synthetic. The basis is silicon-organic polymer derivatives. Applicability: sports cars and motorcycles.
The main technical requirements for brake fluid are as follows:
- The brake fluid should not destroy the rubber seals in the system
- Brake fluid must have lubricating properties. This applies to the surfaces of the brake pistons in the cylinders.
- Must have stable characteristics at low and high temperatures.
The last point is worth dwelling on separately. The operating range of brake fluid from a “normal manufacturer” is from −40 to +100 degrees Celsius. The basis of DOT4 liquid is glycol, or in simpler terms, a substance from the group of polyhydric alcohols. Main advantages: high boiling point and good viscosity. Main disadvantage: hygroscopicity. That is, the intake of moisture (water) from the surrounding air. And here all the characteristics are rapidly creeping down, the boiling point drops, and the viscosity increases at negative temperatures (jelly-like state). Over the course of a year, glycol takes up to 3% of its volume of moisture from the air, and here everything depends on the package of additives that the manufacturer added to it.
How to avoid overheating of Chevrolet Niva brake discs
There are several points that Chevrolet Niva owners should know in order not to overheat the brake discs:
- Regular maintenance was not invented by reinsurers, but by scientists as a result of research and calculations, so one should not neglect the postulates that every driver should know, like the “Our Father”.
- So-called aggressive driving should be avoided - the metal heats up faster than it cools down, and careless handling of the equipment leads to disruption of the braking system.
- It is necessary to regularly check the presence of brake fluid in the system.
- Replace the pads in a timely manner - after covering the designated mileage or if you suspect excessive overheating of the discs.
- Next, it will be clear why the brake discs heat up after replacing the pads.
- Avoid low-quality products - do not buy used spare parts, do not contact dubious brands and manufacturers.
- Contact only professionals to replace not only brake system parts, but whenever necessary. Specialists are responsible for the quality of their work, so we can talk about greater safety when driving in a car.
The last two points often cause brake discs to overheat after replacement. Also, after replacing the pads, overheating can be observed due to the fact that other elements of the system in question are damaged, for example, corrosion around the rubber band of the brake cylinder jams during braking. In addition to what has already been said, it is recommended not to use a car wash immediately after driving on a city highway - the temperature contrast will lead to a violation of the integrity of the disk, which will subsequently be the result of overheating.
What if the disk gets hot?
When operating a vehicle, it may occur that the disk becomes very hot. Of course, it will heat up during friction; this is a completely normal process. But sometimes it happens that the temperature just goes off scale. And many problems may appear - cracks, defects, severe wear. The problem of excessive heating can be solved quite simply if you take this issue seriously.
It is equipped with cast iron discs. Today you can find ventilated products on sale that have notches and holes on the working surface. It is with the help of such elements that a large amount of heat can be removed. And the brake disc will not heat up to critical temperatures.