The stable operation of injection power units depends on the synchronous functionality of all electronic components.
One of these important components is the electronic speedometer. The article will answer the question why the speedometer on a Lada Priora car does not work. Symptoms, causes of failure, and methods for checking damaged elements of the entire system will also be described.
Layout and operating principle
The Lada Priora model is equipped with a fully electronic speed calculation system. It consists of the following elements:
- Speed sensor (EMF). Its function is to create electrical impulses.
- Electrical wiring. Powers the speedometer system with electric current.
- Fuse. Protects the system from voltage surges.
- On-board computer. Monitors work and analyzes incoming data.
- The speedometer itself. Necessary for visual speed control.
There are not many components in the system. The system works as follows:
- The speed sensor produces electrical impulses. It is installed on the gearbox housing. On power units with 16 valves, the EMF is located on the side of the expansion tank. The EMF is installed opposite the flywheel. This gear has teeth along its entire diameter. There is only one tooth missing in one place. It is to this place that the magnetic speedometer sensor reacts. During the passage of an empty space, the EMF opens, thereby creating an electrical impulse.
- The pulses generated by the opening are sent through wires to the ECU. The computer calculates the speed at which the signals arrive and converts them into an electrical voltage of a certain strength.
- Voltage is supplied to the instrument panel, activating the speedometer drive motor.
- The electric motor deflects the speedometer needle by a certain degree.
In addition to needle deflection, electrical impulses from the speed sensor are necessary to calculate the fuel supply to the engine. Based on the data received, the on-board computer determines the required amount of combustible mixture and its filling with air. In this way, the required, stable engine speed is maintained for the current speed limit.
The speedometer on the Priora does not work for several reasons. But this is always preceded by the appearance of a number of symptoms of a malfunction. They will be described below.
Symptoms of a speedometer failure on a Priora
A car speedometer is necessary to measure speed, as every driver knows. From this we can conclude that its failure is diagnosed due to one of the following problems:
- When the car is moving, the speedometer needle does not deviate from zero;
- The speedometer incorrectly detects the vehicle speed or turns off during operation.
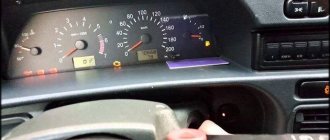
Most often you come to deal with the second option of speedometer failure. A typical problem for Lada Priora cars is a temporary failure of the speedometer, when while the car is moving the needle drops to zero, an exclamation mark lights up on the dashboard and the electric power steering also fails. After a few minutes, the problem disappears and the car’s electronics operate as before.
Please note: Lada Priora cars are equipped with an electronic speedometer, as a result of which there are two options for failure: mechanical or electronic, that is, a failure of the microprocessor that controls the device.
Symptoms
Drivers accustomed to carburetor engines often do not react to the appearance of symptoms of speedometer failure. On injection engines, you need to pay attention to the behavior of this device. Symptoms of failure are as follows:
- The instrument needle does not work completely or partially. It can periodically turn on, tremble, freeze at a certain level.
- Complete failure of the instrument panel.
- The speedometer determines the speed limit with a large error.
- The engine is losing power.
- Fuel consumption increases noticeably.
- The stability of the power unit at idle speed is lost.
All these signs are the result of a breakdown or malfunction of the components of the speed calculation system. A detailed analysis of the reasons will be given below.
Checking fuses
Often the cause of a speedometer malfunction is a blown fuse. Most often, a fuse fails due to water getting on it, which flows onto the contacts, which leads to an interruption in the operation of the electrical circuit. If the check reveals that the fuse responsible for the operation of the dashboard has blown, then the car owner will simply need to replace it with a new one. Finding the right fuse is quite simple by marking “IG/METER”, but if the replacement process does not help solve the problem, then you will have to check the integrity of the wires that go to the dashboard from the speed sensor.
Malfunctions
If the speedometer on a Priora stops working, then you need to check each of its components step by step. It's better to start with the device itself.
Drive unit
The drive is checked by simply disconnecting the negative terminal of the battery. After reconnecting the terminal, the on-board computer reboots the system. Next, you need to reset the odometer, hold down the reset button and turn on the ignition. The tachometer and speedometer needles should deflect to the maximum. If this does not happen, then electrical voltage is not passing through these devices.
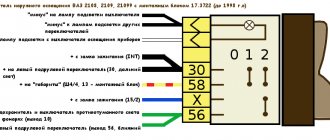
You can conduct an additional test of the speedometer's performance. On a Priora, the speedometer may not work due to a failure of the signal receiver drive. To check you need:
- From the “+” terminal of the battery, run a wire to terminal “26” of the red connector.
- With short touches you need to simulate the arrival of signals from the EMF.
- The arrow should deflect each time terminal “26” is touched.
If there is no response to the incoming voltage, you will have to dismantle the panel and remove the instrument printed circuit board. It needs to be inspected for breaks or oxidation of soldering and tracks. The oxidation needs to be cleaned, and the broken tracks need to be soldered with jumpers. Next, perform the following test:
- Set the tester to resistance measurement mode.
- Connect the red measuring probe to terminal “26”.
- Apply the black test lead to ground.
- The pulse input should show an operating resistance of up to 3 ohms.
If these readings are not present, then the fault lies in the radio components of the drive or its motor has burned out. Without special knowledge, such breakdowns cannot be repaired on your own. You'll have to change the drive.
Fuse
The speedometer is protected by fuse “F1”. It is located in the safety block under the dashboard, on the driver's side. It is necessary to remove the element and check the condition of the internal jumper.
If it is broken, you need to replace the element with a 10 Ampere analogue. Before replacing, it is important to clean the fuse contacts from oxidation and possible carbon deposits.
After replacement, you need to check the operation of the speedometer again.
Wiring
It's just that fuses don't blow. This was preceded by a short circuit or high voltage.
It is necessary to carefully check the wiring for breaks, deformation, and lack of insulation. All defects found must be eliminated.
EMF
If the Priora's speedometer does not work, the cause may be the speed sensor. Its verification is carried out sequentially. First you need to check the condition of the connecting plug. It is necessary to open it and inspect the contacts of both parts of the socket. If dirt, moisture, or oxidation is detected, clean with a solvent. Next, you need to check whether the electrical voltage reaches the sensor itself. Necessary:
- Set the multimeter to voltmeter mode to measure DC voltage.
- Connect the red test probe to terminal “1” of the wiring cable.
- Connect the black probe to terminal “3”.
- Turn on the ignition.
The voltmeter should show a result equal to the battery voltage. If voltage is supplied, then the sensor’s ability to generate electrical impulses is checked. This test requires:
- Raise the drive wheel of the vehicle on a jack.
- Connect one end of the control wire to terminal “2” of the sensor.
- Connect the red probe of the multimeter to the second end of the control wire.
- Connect the black test lead to ground.
- Insert the plug into the EMF socket.
- Turn on the ignition.
- Rotate the drive wheel of the machine.
As electrical voltage is applied to the sensor, it must produce electrical signals. The tester defines them as a pulse voltage from 0.6 to 12 volts. If there is no response from the tester, then you will have to dismantle the EMF to check.
To dismantle, you need to loosen the air purification filter pipe. The EMF is immediately visible directly below it. Its dismantling is carried out using the “10” key. You need to unscrew the mounting bolt and turn the sensor a little. Next, you need to pry the device with a screwdriver and remove it from its seat.
Since the EMF on the Priora is of a magnetic type, metal debris from the gearbox is often magnetized to its lower part of the body.
Metal particles prevent the magnet from opening, which makes it impossible to create an electrical impulse.
You need to thoroughly clean the device body and check its functionality. To do this, you need to connect the plug with the previously described wire connected to terminal “2”.
- Connect the red probe of the multimeter to the wire.
- Connect the black probe to ground.
- Set the multimeter to DC voltage measurement mode.
- Turn on the ignition.
- Attach a screwdriver to the end of the sensor.
- It should be magnetized.
- The moment the screwdriver is disconnected from the sensor, a pulse should be created that will be visible on the multimeter display.
A more thorough test can be carried out by reinstalling the sensor and rotating the drive wheel. In this way, more accurate pulses can be obtained. You can conduct an additional test of the sensor by checking its electrical resistance.
This requires:
- Set the multimeter to resistance measurement mode.
- Connect the red probe of the tester to terminal “1”.
- Black probe with terminal “3”.
- Resistance should vary from 3 to 10 ohms.
- Then you need to bring a metal object to the sensor.
- The contacts should open and the readings on the multimeter should drop to “0”.
If the EMF does not pass the test, then it must be replaced with an exact analogue.
Checking the condition of the wires
When operating the car on not very good roads, one of the wires that goes to the dashboard from the speed sensor may break, which leads to damage to the speedometer. A special tester will help determine the integrity of the wires; if the wires are not damaged, the device will notify you of this with a signal, but if the signal does not arrive, the wire must be replaced with a new one.
Experts recommend not only checking the integrity of the wires, but also analyzing the functionality of the following elements:
- Check whether the contact goes to the column that connects the wires to the speed sensor. Quite often, contact is lost due to oxidation, and it will be possible to resume the operation of this element after the plaque has been thoroughly removed.
- Check the functionality of the motion sensor using a special scanner. If during the test the device reveals interruptions in operation, the element will need to be replaced with a new one.
- Check the functionality of the dashboard. To do this, you need to remove the printed circuit board from the dashboard and visually inspect its condition. If traces of oxidation are noticed at the connection point or a so-called “track break” is detected, the board must be replaced.
Most often, the measures described above help restore the functionality of the speedometer, but if the desired result is not achieved, car owners will only have to check the operation of the speedometer itself, or more precisely, the functionality of its needle drive. If during the test it is confirmed that the arrow drive is faulty, the speedometer will have to be replaced.
It will be much easier to carry out automotive repair work if you use a video tutorial as a hint, which is taught on the Internet resource at any time of the day or night by real professionals in their field.
Why the speedometer on the VAZ 2110 does not work - reasons and repairs
Speedometers are a device that allows you to measure the speed of a car and the distance it has traveled. It appeared a little later than the first cars. If it malfunctions, the driver will not be able to correctly navigate the moving stream of cars on the road, since the flow of information about the vehicle’s speed and the amount of distance traveled will stop.