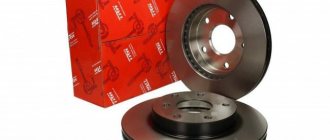
If you notice that the stopping distance of your car deviates from the norm, this means that the brake system is worn out and requires thorough attention. All thoughts should be focused on solving the question of how to change brake discs on a VAZ 21099 and check the pads.
Let us remember that the brake disc is a metal structure made in the shape of a circle and installed on the front axle. The disc actively takes part in the braking process and tends to wear out after a certain period of time.
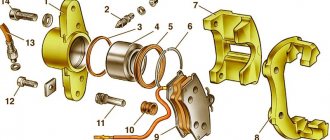
If we talk specifically about VAZs, then most often they have only two brake discs on the front axle, but the rear of the car has drum brakes, other manipulations are carried out with them, the procedure is not the same as changing brake discs on a VAZ 21099.
Such factory equipment was thought out from the very beginning, and in principle functions reliably.
VAZ 21099
When is a brake disc considered worn out?
Imagine the conditions under which a brake disc has to function. The part interacts with the brake pads and caliper; during movement, the disc heats up to 350 degrees Celsius.
And if it is the summer period, driving in traffic jams, then the load on the brake system increases, as a result, rapid wear and tear and the urgency of the task of how to change brake discs on a VAZ 21099, the choice of a specialist to whom you will have to contact.
Brake disc VAZ 21099
After studying the technical documents, it becomes clear that brake discs with maximum operation can withstand 50,000 kilometers, and then you need to think about how to change the brake discs on a VAZ 21099 and check the entire system. Experienced drivers who have mastered the skill of smooth braking are lucky; they never use emergency braking, because their discs will last until the car’s mileage is 100,000 kilometers.
Measuring brake disc thickness
The moment of alarm for a part can be determined by visual inspection and measurements of the disk. If it turns out that its thickness is approaching 10 mm, then this parameter is already critical and requires action to be taken immediately, otherwise the task of how to change brake discs on a VAZ 21099 will have a difficult solution.
Main signs of brake disc wear
- While driving, the driver feels shocks coming from the steering wheel.
In such a situation, driving safety is on the brink. Firstly, it is clear that a worn brake disc overheats and every minute threatens to burst or suffer dangerous damage or unwanted deformation. Secondly, with frequent braking, there is a negative impact on the brake disc, and the situation becomes more complicated, so you urgently need to think about how to change the brake discs on a VAZ 21099.
To replace brake discs with your own hands, you will need simple tools.
Having made it a priority to solve the problem of how to change brake discs on a VAZ 21099, at the same time think about when it is more profitable to take the time for repairs and go to the garage to resuscitate the brake system of a personal car. You will need:
- A standard set of reliable wrenches for removing the brake disc. They provide a reliable grip on the fasteners; with their help you can grab nuts of different sizes and unscrew them.
Set of wrenches - WD-40 lubricant is purchased, which helps in working with soured fasteners when the process of how to change brake discs on a VAZ 21099 is started, so work is carried out with tightly tightened nuts and bolts.
WD-40 lubricant - A metal ruler for taking measurements, because you shouldn’t judge the condition of the disc by eye. Let us remind you that the critical thickness of the part is 10 mm.
Metal ruler - Rubber hammer for dismantling the disk and placing it in place. Iron can also be used, but it can create a precedent, causing unwanted damage to the metal part.
Rubber hammer - You will also need 7 and 19 mm socket heads. It will not be superfluous to prepare a wrench and a ratchet to solve the issue of how to change brake discs on a VAZ 21099.
Socket heads
We are considering one of the options for changing brake discs on a VAZ 21099
- The machine is securely fixed at the repair site. For this purpose, wheel chocks, bricks, and removed tires are used, which are installed under the rear wheels. You can also use a hand brake so that nothing gets in the way of deciding how to change the brake discs of a VAZ 2107.
Wheel chocks
Important! Take a ruler and estimate the thickness of the disk; perhaps repairs are not yet needed. Measurements are taken in several places. The condition of the metal is assessed and the presence of chips and scratches on the disc is excluded.
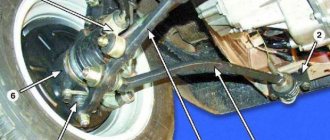
- We remove the front wheel, where the procedure will take place to decide how to change the brake discs of a VAZ 2107. We recommend gradually loosening the bolts on the wheel, and then completely removing the tire by jacking it up.
Removing the front wheels - The brake pads and also the caliper are removed. It is worth working with fastenings carefully. Carefully inspect the brake hose, if possible, move it to the side and secure it, and then decide how to replace the brake discs of the VAZ 2107. Removing the brake pads
- Apply WD-40 lubricant to the fasteners that connect the disc and the hub, they will then yield more easily to the force of the tools used. It’s better when the understanding of how to replace brake discs on a VAZ 2107 manifests itself smoothly in practice. Fastener Lubrication
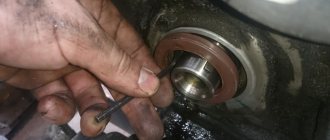
- The disc can usually be removed without much effort, but if difficulties arise, use a hammer and use firm and periodic blows to remove it from its seat. And the rhythm is as follows: several blows and spinning the disk so that it can be dismantled. Removing the brake disc
Important! You have a removed disk in your hands. Assess its condition. Thickness is normal! Are there any deformations? Then you can return the product to its place, but under one condition! Which one? Pay attention to the edge of the disk; an unwanted bead has formed there during operation. You can really remove it - you can just grind it off with a file.
- The disk has been dismantled, but do not forget about the edging, which is located along the perimeter of the working part of the disk. The protector should be removed to free the seat from unnecessary parts.
- One of the last stages of solving the question of how to change brake discs on a VAZ 2107 involves returning the disc to its place. If you suddenly need to clean the repair area, you can perform all the necessary procedures and eliminate dirt and old grease. Brake disc installation
Important! Before installing a new disk on a seat, it is worth degreasing it and removing all factory grease, then it will function more reliably.
Important! It is advisable to change the brake pads with the discs, then you will be less likely to think about how to replace the brake discs of the VAZ 2107.
- We will replace the disk on one side and proceed to replacing a similar part on the other. All manipulations are standard.
Thus, the article outlines an algorithm on how to change the brake discs of a VAZ 2107 without much difficulty and delay.
A beginner may be able to succumb to the repair process if the newly minted self-taught master is aware of the specifics of the procedure and is not afraid to begin repairs on his own.
How often have you changed your brake discs? Typically, how long did they last from the moment you purchased the vehicle? Help with statistical calculations. And for this you leave information in x.
Source: https://tire1.ru/pomenjat-tormoznye-diski-na-vaz-21099/
Lada 2000, 70 l. With. - with your own hands
Bogdanovich
Lada 2109, 1998
25 000 ₽
Makhachkala
Lada 2109, 2002
50 000 ₽
Stone-on-Obi
Lada 2109, 1998
55 000 ₽
Achinsk
Lada 2109, 2002
59 000 ₽
See more cars on Drome
Participate in the discussion can only registered users.
Login Register
Installing rear disc brakes on a VAZ 2109
Many people want to install rear disc brakes on their VAZ 2109. But how rational is this decision?
Making such changes to the design of the brake system is prohibited. Such work is carried out entirely at your own responsibility.
Advantages and disadvantages
If you decide to change from conventional drum mechanisms to disc brakes, be sure to take into account the positive and negative aspects of such a decision.
| Advantages | Flaws |
| Braking distance is reduced | High cost of new disc brakes compared to traditional drums |
| Braking force is distributed evenly across all wheels | Requirements for precise adjustment and tuning, which not everyone can do with their own hands |
| Unsprung weight is reduced | If installation requirements are violated, the car skids, it brakes unevenly, and squeaks occur. |
| Provides more efficient heat dissipation and prevents brakes from overheating | Replacing drums with DT is illegal and not a certified action for VAZ |
| Increases the reliability of the braking system | There may be problems with the traffic police. People don’t often find fault with rear disc brakes, but if they catch you, you’ll have to competently “excuse yourself” |
| Replacement and maintenance of pads cause fewer problems and difficulties | There are problems with the handbrake that needs to be changed or improved |
| No need to regularly tighten the handbrake | In case of accidents, you will most likely be the culprit, since such design changes are unacceptable by law |
| Appearance noticeably changes for the better | Careful adjustment is required after replacement, which is best done at a service station |
| Disc brakes do not freeze during winter washing, which cannot be said about drums | If you make an error during assembly, the rear wheels may begin to brake more effectively than the front wheels, which will cause serious consequences and troubles. |
Think carefully about the feasibility of carrying out such work. Please note that all responsibility falls on you.
Replacement
Since you can no longer be stopped and you want to equip the rear wheels of your VAZ 2109 with disc brakes, first prepare a set of necessary components that will be useful during the replacement process.
- Calipers. Take simple front calipers from a VAZ 2109;
- Hoses. Use front brake hoses as standard iron hoses will not reach into place;
- Pads. Any high-quality pads of the required size will do;
- Bolts, washers-grower. Requires M10x1.25 bolts 30 millimeters long. A total of 12 pieces and always with growers;
- Distance washers. Take the timing belt tensioner roller washers, which are used for the VAZ 2108. You need 8 of these pieces;
- Faceplate or caliper mounting plate. Need 2 pieces. Moreover, this part is non-standard; it will have to be made as accurately as possible using a coordinate machine;
- Disks. Front discs with a diameter of 240 mm are suitable. First sharpen them so that the hub seats coincide by 60 millimeters. You can machine the hub itself, not the brake disc. The choice is yours.
To achieve a high-quality result when installing disk mechanisms, you first need to ensure proper dismantling of the elements of the braking system.
Dismantling
Let's start the procedure. It is not the easiest, but it is quite possible to do it yourself.
- Remove the wheel.
- Release the tension on the handbrake cable and close the rear pads.
- Using a 12mm wrench, unscrew a pair of guide pins.
- Using a hammer, carefully knock down the brake drum. Before doing this, it is better to clean the seats with a wire brush, and also treat the surfaces with WD40.
- Apply gentle blows with a rubber mallet or use a wooden block. You should knock along the entire circumference of the brake drum. In some cases it comes off quite hard, but be patient.
- Using a screwdriver, pry up the lower tension spring TK and remove it. Using the same spring, you can remove the small springs (guides) that press the pads to the boot. This is the brake cylinder shield.
- Remove the springs, then grab the bottom of the brake pad and lift it up.
- Place the upper part against the brake cylinder and remove the spacer bar.
- Remove the shoe from the brake cylinder and remove the upper tension spring TK.
- Remove the handbrake lever from the handbrake cable and remove the second brake lever.
- Remove the bolts that secure the hub to the beam. Arm yourself with a split wrench or a regular open-end wrench 17 and a wrench to increase the leverage. Treat the bolts with WD40 and remove them.
- Proceed carefully, no sudden movements. Otherwise, you will simply lick off the edges of the fasteners.
- Before knocking down the hub, remove the brake pipe. To do this you need a split wrench. Having torn off the fastening, bend the tube slightly to the side and seal it with a cap, which must first be removed from the cylinder bleeder fitting. This will prevent brake fluid from leaking.
- The hub is held in the seat of the beam, and it is there from the factory. That's why she probably got attached to it. The blows will have to be delivered accurately and powerfully. Hit the support disk from the inside, alternating strikes from above and below.
- If you ruin the platter, no big deal. It's going to landfill anyway.
- When the hub begins to gradually separate from the beam, apply less strong blows. Knock off the hub completely.
Installation of HTD
Now comes the most crucial moment - installing disc brakes on the rear wheels of your VAZ 2109.
- Decide exactly how the caliper will be mounted. This can be done from behind or in front of the axle. Please note that this does not affect efficiency, so there is no need to think too much. To make it more symmetrical, we choose the rear location.
- Join the hub and faceplate into a single unit. Make sure the holes line up. If there are any inaccuracies, use gentle hammer blows to center the position. It is very important.
- Straighten the corners of the beam on which the caliper will eventually be able to rest. This can be done with a regular hammer. The processing of one or another corner depends on which side you chose for installation.
- Install the hub. Please note that you do not need to use an engraver for the upper left hub fixing bolt. Otherwise, you will have to work with a grinder, grinding off the fastener head. Without doing this, the caliper bracket will simply rest against the gromver.
- Place the purchased disc brake on the hub.
- Install a bracket on the faceplate, and place washers between the elements at the joints. This will give you the necessary clearances.
- In some cases, washers do not correspond to the required dimensions, so it is better to choose them specifically for your car.
- The connection between the faceplate and the bracket is tightened with an applied force of 3-4 Nm.
- Install the pads, connect the hose to the caliper, and then connect the tube to the hose. It is important not to do the opposite here.
- Seal the brake line and pressurize the system by pressing the brake pedal. Make sure the system is tight and there are no leaks.
- If everything works well, you can install the brake discs on the second rear wheel in the same way.
After completing the assembly of the new brake system on the rear wheels, be sure to bleed the brakes. You cannot go on the roads without this.
It would be a good idea to visit a trusted car service center, where experienced specialists will analyze the quality of replacing drums with discs and make sure that the settings are correct. It would be nice to have friends here who won’t deceive you.
Source: https://auto-self.ru/ustanovka-zadnih-diskovyh-tormozov-na-vaz-2109/
With perforation or splines (grooves)
Another reason for brake failure is carbon deposits on the pads that appear during frequent braking, especially on a high-speed racing track. It is this carbon deposit that can turn the block into a real slippery ski. Gas outlets and perforations help cut off this slippery layer, thereby renewing the pad. However, they wear them out faster.
Perforation along with grooves helps remove water, dirt, and dust, which significantly reduces the risk of scratching the part being described. The grooves reduce wear and increase braking force.
Collapsible
When braking, the discs heat up and the heat is transferred to the hub. At high temperatures this unit may fail. For this purpose, some manufacturing companies produce dismountable brake discs - a working disc, which is bolted to the middle part, mounted on the hub.
Most car owners operate their cars on city or country roads, and not on race tracks. The effectiveness of standard brakes will be sufficient for such driving. But if you wish, you can improve the braking system of your car. To do this, it is not necessary to install disc brakes on the rear wheels.
The required efficiency will be achieved by replacing the VAZ brake discs installed by the manufacturer at the factory with parts of a larger diameter or by installing this unit with perforations. The difference will be felt immediately, and not only when braking. Tuning the brake system will help change the appearance of the car.
Replacing brake discs Lada 2109 (VAZ 2109)
If braking noticeably worsens while driving, it is recommended that you conduct a detailed inspection of the entire braking system. Knocking noise in the front suspension can also tell a lot about the condition of the car. This type of problem can be caused by worn brake discs. As a rule, the degree of wear is checked only by visual assessment.
Replacing the front brake disc of a VAZ 2109 is recommended when significant wear is observed. It is noteworthy that replacing the front brake disc on a VAZ 2109 can be easily done on your own. The presence of cracks and damage may also be the cause. Changing the front braking mechanism is not so difficult, so if you have competent instructions, the work will be completed successfully.
The thickness of the non-vented disc should be approximately 10.8 mm, while the thickness of the vented part should be a minimum of 17.8 mm. Change brake pads and discs if the indicators are less than normal. It must be taken into account that the axial runout of the surface should be less than 0.15 mm.
Note! If there are scuffs and deep scratches on the discs, braking efficiency will be significantly reduced due to greater wear of the pads. In this case, an urgent replacement of the rear discs or a change in the front braking mechanisms will be required.
Now you can get qualified assistance in grinding discs at a service station. Experts must take into account acceptable standards. The groove is made to the same depth on both sides.
Helpful information
So:
- The classic 16-valve package includes R14 brake discs.
- The 8-valve kit includes R13 brake discs.
- It is unacceptable to install R14 brake discs on machine discs of 13th radius.
To replace front brake discs quickly and correctly, you need to be able to distinguish between the types of automotive components in question. Thus, they distinguish:
- collapsible disks;
- elements with grooves and perforations;
- disks with special gas outlets;
- ventilated elements.
When is it time to replace the front brake discs?
The front braking mechanisms on the VAZ 2109 are replaced in case of mechanical damage or when the working part of the disc wears out (thickness is less than the norm of 10.8 mm).
Note! Further use of a worn disc or element with cracks is strictly prohibited.
If there are minor scratches or abrasions on the functional surface, they can be removed by grinding the disc using specialized equipment in a workshop. If this is not possible, or the damage is so significant, you cannot do without replacing the part.
Replacing brake discs
Of course, you should always follow the advice from the car manufacturers. It should also be noted that the degree of wear of brake discs will directly depend on the driving style and operating conditions of the vehicle. If the driver prefers fast driving, then the discs will need to be replaced after 70 thousand kilometers.
Note! Even a less-than-professional driver can replace the front brake disc.
The first thing to do is to remove the front wheel and also unscrew the mounting bolts.
Since the question “how to remove the brake disc?” sounds quite often on automobile forums, it is worth assuming that this matter has its own nuances.
As a rule, it is most difficult to remove discs that are “overgrown” with dirt and “stuck” with rust. This happens due to untimely preventive measures.
Note! When changing brake discs, you will need not only the knowledge of a specialist, detailed instructions, but also well-chosen spare parts.
Experts believe that perforated discs are the right choice. Of course, each car owner independently decides on the purchase of parts, while cost and other factors influence. One way or another, the ideal option would be original spare parts, which are not always possible to find in ordinary auto repair shops.
Despite the fact that a preventive inspection of the entire system, which involves changing disks, can be performed independently, turning to professionals at a service station has its advantages:
- excellent professional performance;
- performing complex repair work using special equipment (diagnostic and repair equipment).
Naturally, having your car repaired at a service station is always good, but not when you need to save money. Today there are detailed instructions, photo reports with a detailed description of the actions, so every car owner can change the brake system discs. To perform the work, you need to acquire a standard set of tools and detailed instructions:
- To begin with, you need to put the car in first gear or turn on the handbrake of the VAZ. Next, the wheel bolts are loosened.
- The car is raised and the wheels are removed.
- In the brake mechanism, from the inside, you need to unscrew the mounting bolts of the guide pads towards the steering knuckle.
- The steering knuckle is dismantled, after which I hang it on a wire to the rack. You need to make sure that the hose does not get twisted or stretched too much.
- The working surface of the disk is cleaned of dust, dirt, as well as wheel pins. If necessary, the surface of the disk, joints and small elements can be treated with a special liquid, for example, WD-40. Thus, traces of metal corrosion are eliminated.
- Using a spanner, the wheel pins are unscrewed.
- The brake disc is knocked off the hub by hitting it with a hammer from the inside through a spacer made of wood.
- The part is replaced and the steps are performed in reverse order.
Since repairing or replacing parts of a VAZ 2109 car at a service station is expensive, you have to perform such actions yourself.
For effective and high-quality work, the instructions must be correct and correspond to a specific type of car, since the procedure may differ.
Today, the price of specialist services is not encouraging, so it is advisable to start studying your car yourself.
One of the simplest modifications to the brake system of the front-wheel drive family of VAZ 2108, 2109, 21099 cars is the installation of brake discs from the VAZ 2110, or VAZ 2112.
How are they different from standard stock ones? Firstly, they are ventilated, that is, they more effectively remove the heat generated during braking.
Secondly, the wheels from the VAZ 2112 are larger in diameter, which means they cool even better and brake more efficiently.
But there is a peculiarity in this - they are suitable only when using 14-inch wheels; a 13-inch wheel will not fit on the brake disc from a VAZ 2112.
Therefore, we decide right away: if you have 13-inch wheels, install brake discs from 2110; if you don’t plan to use 14-inch ones, and you don’t plan to use 13-inch ones, then it’s better to install brake discs from 2112.
Ventilated brake discs are most effective when braking from high speeds, when a regular disc can overheat, brake fluid, especially if it has absorbed moisture, boils and the brake pedal “falls”.
For this modification we will need: 1. The brake discs themselves from 2110 (13″) or 2112 (14″) - 2 pcs. 2. Caliper with guide (bracket) from 2110 (2112) - 2 pcs. Brake discs 2110 are thicker, respectively, the caliper and caliper are larger than those from 2109. 3. Protective covers - 2 pcs.
We leave the brake cylinders and pads the same. If they need to be replaced due to malfunction or wear, then brake hoses and front brake lines may be needed if the old ones suddenly do not come off.
The process itself is identical to that if you were simply replacing brake discs. We remove the wheel, remove the brake cylinder with caliper. Next, unscrew the 2 bolts securing the bracket, 2 bolts securing the protective casing, unscrew the 2 studs on the disk, and remove the disk itself.
- We take a new disk 2110.
- Now we assemble everything in the reverse order: install a new disk from 2110, screw the bracket.
- Next, we replace the caliper by disconnecting the old one from the brake cylinder and screwing in a new one from the VAZ 2110.
- We insert the pads and install the cylinder with the caliper in place.
- When both sides have been replaced, bleed the brakes.
If you have wheels with a non-standard offset, then due to the increased thickness of the brake disc, the caliper may rest against the disc and block the wheel. It’s better to find out this in advance so that you don’t have to remake everything back to stock.
Actually, this modification is quite simple; you can do it yourself in an hour.
Well, now about the benefits of all this. Reviews are different, some do not notice the difference with stock, others note certain improvements.
If you change the disks anyway, I recommend giving it a try. The most noticeable improvements will be when installing larger wheels from the VAZ 2112.
Brake discs provide braking to the front wheels when the vehicle is moving. The effectiveness of braking, and, consequently, safety on the road depends on their condition. Brake discs on a VAZ 2109 are replaced in the following cases:
- The thickness has reached the maximum permissible minimum value - 10.8 mm. At the same time, the thickness must be controlled in two places. If the wear is uneven, then replacement is carried out in any case.
- The disc has deep scratches or chips.
Such noticeable defects on the brake disc occur as a result of using low-quality brake pads or careless driving on uneven road surfaces.
Using such a brake disc will inevitably lead to its breakdown and sudden braking at speed, or, at best, to a deterioration in braking properties.
Small scratches on the brake disc can be removed using special equipment. However, not every driver can afford such devices. In this case, the brake disc must be replaced.
Source: https://avtozam.ru/vaz/zamena-tormoznyh-diskov-lada-2109-vaz-2109.html
Features of TC
Brake pads (TC) installed on the VAZ 2109 have their own features and characteristics, which you should know about before purchasing new parts.
- The base of the block is made of fairly durable metal.
- A friction lining is glued on top of the base using special glue under the influence of a temperature of 100 degrees Celsius.
- The rear brakes include 4 pads. The body and base are stamped from sheet metal and then welded.
- The roughness on the surface of the pads, necessary to speed up the grinding in of the brake pads, is achieved through special processing.
- Efficiency during control braking from 80 km/h - 320 Nm. The pressure inside the brake system is 40 bar. The pads are cold.
- All elements of the brake system are made in accordance with strict international standards and requirements.
- The service life of a vehicle directly depends on driving style, road conditions and a number of external factors.
The operating manual states that the service life of the TC on the VAZ 2109 is within 70-90 thousand kilometers. But in practice this period is somewhat shorter.
Rear TC kit
Golden rules
There are four golden rules that must be strictly adhered to when replacing front and rear TCs.
- When cleaning brakes, never use mineral solvents such as diesel fuel, gasoline, etc.
- When replacing pads at the rear or front, both should be changed at once.
- You cannot swap front and rear TCs, as well as left and right, and vice versa. Otherwise, braking will be uneven.
- If there is a maximum level of brake fluid in the reservoir (MAX mark), part of the brake fluid must be pumped out.
Taking into account all these rules, you can begin to replace the TC.
VAZ 2109 - replacing front brake discs
The front brake discs on a VAZ 2109 car are replaced in case of mechanical damage or when the thickness of the working part becomes less than the maximum permissible - 10.8 mm. Operation of a worn-out disk, with cracks or less than the permissible thickness is not allowed.
If there are various small scratches and nicks on the working surface of the disk, you can get rid of them by sharpening the disk using special equipment in a specialized workshop. If you do not have this option or the damage is more significant, then we will replace it.
To carry out repair work, prepare a standard set of tools and perform the following sequence of actions:
- We put the car in first gear or turn on the handbrake. Then loosen the wheel bolts.
- Raise the car and remove the wheel.
- From the inside of the brake mechanism, unscrew the bolts securing the guide pads to the steering knuckle.
- We remove the steering knuckle and hang it from the stand using a wire, while making sure that the brake hose is not twisted or too tight.
- We clean the surface of the brake disc and wheel pins from dirt. If necessary, treat the surface of the connection between the disk and the hub and the bolts themselves with a liquid such as WD-40, if there are significant traces of metal corrosion on their surface.
- Then use a spanner to unscrew the wheel pins.
- We knock the disc off the hub by hitting it with a hammer from the inside through a wooden spacer.
At this point, the repair work on removing the front brake disc of the VAZ 2109 is completed. Replace and install in reverse order. If you do not plan to replace the disc, then before installing a new one, use a file to file away the curb formed by friction with the pads. Use the file carefully so as not to touch the work surface.
Source: https://zubilovaz.ru/vaz-2109-zamena-perednix-tormoznyx-diskov
Helpful information
Replacing front brake discs on a VAZ 2109
So:
- The classic 16-valve package includes R14 brake discs.
- The 8-valve kit includes R13 brake discs.
- It is unacceptable to install R14 brake discs on machine discs of 13th radius.
To replace front brake discs quickly and correctly, you need to be able to distinguish between the types of automotive components in question. Thus, they distinguish:
- collapsible disks;
- elements with grooves and perforations;
- disks with special gas outlets;
- ventilated elements.
This is interesting: CVT for Renault Captur: fuel consumption, reviews
Replacing brake discs
If the front brake discs are worn out enough or wear unevenly, they must be replaced with new ones, since the braking efficiency of the car is significantly reduced.
The maximum permissible residual thickness of the VAZ 2109-2108 brake disc is 10.8 mm. If the measurement shows a lower value, the parts must be changed immediately.
Of course, there are special workshops where you can sand the surface of the discs if there are burrs, deep grooves, etc. on it, but in this case the thickness may exceed the minimum and you will have to install new ones again.
To carry out this procedure with our own hands, we will need the following tool:
- Driver and ratchet handle
- The socket head is 7 mm deep and 19 mm regular
- Small extension cord
- Hammer
Instructions for removing brake discs
Before proceeding with routine repairs of the VAZ 2109, it is necessary to remove the caliper, but the brake hose does not need to be unscrewed, since this is not necessary.
After replacing the discs, be sure to install a set of new brake pads, since the old ones are worn out and can damage the disc in the very first kilometers of the car.
As for the price of these parts, the most affordable option from a domestic manufacturer can cost from 500 rubles per piece, respectively, a pair will cost 1000 rubles. If we consider higher quality components, for example AvtoVAZ, ATE or Ferodo, then such kits start at least 1500 per pair and reach 2500 rubles.
Source: https://remont-vaz2109.ru/zamena-tormoznyx-diskov/
Leveling up
You can first remove the old strut, but before installing the new one, you must bleed it.
There is no need to pump single-pipe struts due to the fact that the container with high-pressure gas is reliably isolated by a piston.
If you avoid the bleeding procedure, or do this work incorrectly, the twin-pipe shock absorber may fail due to air or gas entering the inner sleeve, depending on the type of strut, through the valve. This happens when the unit is not transported in an upright position.
Now let's see how to pump the racks with your own hands.
Rack type
Stages of pumping
Rear oil struts
Front gas-oil struts
Check the stroke of the rod after bleeding. If there are no dips, no bubbling sounds, everything is fine. If such phenomena occur, it is necessary to repeat the pumping procedure several more times.
Please note that gas-oil struts, unlike oil struts, are pumped only in the position with the rod up. The shock absorber must remain in this position until installation begins.
Replacement of Front Brake Discs of VAZ 2109
One of the simple modifications to the brake system of the front-wheel drive family of VAZ 2108, 2109, 21099 cars is the installation of brake discs from the VAZ 2110 or VAZ 2112.
How do they differ from regular stock ones? Firstly, they are ventilated, in other words, they better remove the heat generated during braking.
Secondly, the wheels from the VAZ 2112 are larger in diameter, which means they are even better cooled and brake more efficiently.
But this is where the peculiarity lies - they are only suitable when using 14-inch wheels; a 13-inch wheel will not fit on a brake disc from a VAZ 2112.
Therefore, we decide right away: if you have 13-inch wheels, install brake discs from 2110; if you don’t plan to use 14-inch ones, and you don’t plan to use 13-inch ones, then it’s better to install brake discs from 2112.
More well-ventilated brake discs show themselves when braking from high speeds, when a regular disc can overheat, the brake fluid, especially if it has absorbed water, boils and the brake pedal “falls”.
For this modification we will need:
- The brake discs themselves from 2110 (13″) or 2112 (14″) - 2 pcs.
- Caliper with guide (bracket) from 2110 (2112) - 2 pcs. Brake discs 2110 are thicker, respectively, the caliper and caliper are larger than those from 2109.
- Protective covers - 2 pcs.
We leave the brake cylinders and pads the same. If they need to be replaced due to malfunction or wear, then brake hoses and front brake pipes can come in handy if the old ones suddenly do not come off.
We remove the wheel, remove the brake cylinder with caliper. Next, unscrew the 2 bolts securing the bracket, 2 bolts securing the protective casing, unscrew the 2 studs on the disk, and remove the disk itself.
We take a new disk 2110. Now we assemble everything in the reverse order: install a new disk from 2110, screw the bracket. Installing the guide (bracket)
Next, we replace the caliper by disconnecting the old one from the brake cylinder and screwing in a new one from the VAZ 2110. We insert the pads, install the cylinder with the caliper in place... and the caliper with the brake cylinder. When both sides have been replaced, bleed the brakes.
If you have wheels with a non-standard offset, then due to the increased thickness of the brake disc, the caliper may rest against the disc and block the wheel. It’s better to find out this in advance so that you don’t have to remake everything back to stock.
The caliper rested against the wheel disk. Actually, this modification is quite simple; you can do it yourself in an hour.
Well, now about the benefits of all this. Reviews are different, some do not notice the difference with stock, others note certain improvements.
If you change the disks anyway, I recommend giving it a try. The most noticeable improvements will be when installing larger wheels from the VAZ 2112.
Source: https://autointerline.ru/zamena-perednih-tormoznyh-diskov-vaz-2109/
With gas outlets
In cases of active braking, the main unit may not be sufficiently cooled during braking, and its temperature in this case may rise to 180-250 degrees. In this case, ordinary pads will smoke. The gas that is released when the pads rub against a hot disc forms a layer between them, which prevents them from fitting tightly to each other. This is the reason for the loss of braking. To prevent this, there are gas outlets, grooves and perforations.
Photo of brake discs with gas outlets
Determining the degree of wear
You have received basic information about the maximum and permissible wear. Now you need to find out exactly how the wear of a part is determined and what is required for this.
Not a single specialist or auto parts manufacturer can say 100% exactly how long a brake disc will last or how many kilometers it can travel. There is only a calculated resource, which is influenced by many additional factors. Yes, for starters it’s worth focusing on the quality of the disc itself, the raw materials used and adherence to technology. This is a question for the manufacturer. It's definitely not worth saving on brake discs. It is better to give preference to more expensive, but reliable and proven parts from leading manufacturers.
But there are other factors that provoke gradual or rapid erasure of the disk, exceeding the calculated values. These are driving style, condition of the brake unit, pad wear, climatic conditions, road surface condition, etc.
All this suggests that diagnosing discs is the task of the car owner himself.
It is unlikely that it will be possible to carry out an accurate diagnosis without removing the wheel. You can only visually try to take a closer look at the condition of the element through the wheel rim and roughly assess its current condition. But it will not be possible to check the disk for curvature or accurately determine the degree of wear.
And it doesn’t matter what kind of car we’re talking about. Brakes wear out everywhere, be it:
- VAZ 2110;
- Mercedes E-Class;
- Skoda Octavia;
- Subaru Forester;
- Daewoo Lanos;
- Chevrolet Aveo;
- VAZ Niva;
- Chevrolet Niva;
- Nissan Qashqai;
- Mitsubishi Galant;
- Chevrolet Captiva;
- Lada Kalina;
- Opel Astra, etc.
The first step is to remove the wheel from the side where there is a potentially problematic part.
Another feature is that it is recommended to replace both wheels at the same time, even if the second disk is in better condition and has not completely worn out.
Measurements are taken first and then a visual inspection is performed. Then an appropriate decision is made. You may need to groove the discs, which in theory can be done with your own hands.
Why did it happen so?
Perhaps the automatic requests do not belong to you, but to another user accessing the network from the same IP address as you. You need to enter the characters into the form once, after which we will remember you and be able to distinguish you from other users exiting from this IP. In this case, the page with the captcha will not bother you for quite a long time.
It is also possible that your computer is infected with a virus program that is using it to collect information. Maybe you should check your system for viruses.
If you have any problems or would like our support team, please use the feedback form.
In fact, replacing brake discs on a VAZ 2114 is not a very complicated process. This work can be done with your own hands. This will take you about 5 hours with a competent and careful approach. There is no need to rush, as this can lead to more serious consequences.