Car enthusiasts who operate their cars year-round are very familiar with the problem of windshield wipers freezing and icing up. To restore elasticity and performance to rubber elements, they must be constantly cleared of ice along with the frozen glass area. If you often find yourself in a similar situation, the issue needs to be resolved radically - organize electric heating of the windshield wiper blades. Additional equipment is inexpensive and can be installed on the vehicle yourself.
How to quickly warm up wipers
If a difficult situation arises, do not tear the frozen wipers off the glass so as not to damage the rubber band. Lightly moving the brushes may help, but not always. We have to resort to other defrosting methods.
Methods for heating windshield wipers:
- Turning on the heater. This must be done simultaneously with turning on the engine, so that the air flowing onto the glass warms up slowly. Otherwise, the windshield may crack due to sudden temperature changes.
- Using antifreeze. To melt ice, you need to spray it on the surface or pour it onto the brushes directly from the canister.
If after such actions the brush does not thaw, then you need to wait some more time. Typically the process takes 15-20 minutes.
It is better to take some measures in advance. For example, if the car will be left outside in bad weather, you need to carefully bend the brushes so that they do not touch the glass. Then wipe off the accumulated snow and wipe dry with a rag.
But it is better to install heated brushes. Such windshield wipers will save time and make life much easier for any car enthusiast.
Types of heating elements
There are several options for solving the issue of brushes freezing in the cold season using heating elements.
The following types exist:
- Overlay film thermocouple. On one side it has a sticky layer. It is glued to the surface of the windshield where the wiper fits. Then they connect the wires to the contacts, which are connected to a separate button or cigarette lighter. But it is best suited for the rear window of a car, which undergoes heat treatment at the factory and is not afraid of temperature changes in different zones. The windshield may crack.
- Ready-made models of windshield wiper blades , which have built-in heating systems.
- Heating elements built into brushes. You can buy them or make them yourself.
There is no point in making completely heated wipers with your own hands. The thing is that there is a large assortment of ready-made models for any car on sale. They are durable, flexible and inexpensive.
The peculiarity of such equipment is maximum convenience with minimal problems. Some models even have a control panel. They differ from ordinary ones in that they are frameless.
Factory heated glass
When it comes to installing a fully heated surface, the situation is different. Installing this heated windshield yourself is much more difficult. At the same time, the wind turbine itself is more expensive than the standard one. First, you should remove the standard one from the car and clean the seat from any remaining glue. Then on the heated glass you need to find the ends of the taps for connection. They are usually located at the end of the glass. Next, you need to connect electrical wires to these terminals by soldering. The connecting areas must be insulated using liquid insulating materials. After the work has been done, the glass is mounted on the car, like a standard one, and they begin to connect it to the on-board electrical network.
DIY installation
If purchased models are selected, detailed instructions are included with each one. Therefore, there should be no problems with connection. It's a little more difficult to create the heated brushes yourself.
In order to convert regular windshield wipers into a heated version, a thin wire is placed inside the blades. When electrical voltage is applied, it heats up and ice does not form around the brush. At the same time, the rubber part does not lose elasticity and other useful characteristics in frost.
Tools
Such a device can easily be made in a few evenings.
To make it using frameless brushes you will need:
- 20 meters of wire;
- scotch;
- board (you need to measure the same length as the brush);
- nails (2 pcs);
- 40 centimeters of copper wire;
- soldering iron;
- foil;
- heat-shrink tubing.
The first step is to remove and disassemble the wipers. And then make heating elements.
Making a heating element
The next step is to create a heating element and connect it to the wipers.
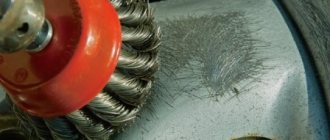
Creating a heater tape:
- Take a prepared board and hammer two nails into it along the edges.
- A wire is wound onto the board in turns. You have to make sure it doesn't get twisted.
- The wires are connected with tape every five centimeters. The joints will look like flat noodles.
Heating element connection:
- Copper wire is cut into two pieces of 20 cm each - these are two wires.
- They are soldered to the resulting heating element.
- The fastening points must be insulated with heat-shrinkable tubing.
- After all the manipulations, the finished element must be wrapped in foil.
- Then prepare the wipers: remove the plastic and rubber bands from them. Insert the heater inside and reassemble.
- Solder terminals to the wires.
- To insulate the wipers, you need to put a corrugated tube on them.
Connection
The resulting product is connected to the car system via a relay. It is designed for a current of 10 to 15 amperes. The control wire must be connected to a contact into which electricity is supplied after the ignition is turned on. The switch is located on the dashboard of the car.
A fuse is also required. It is installed on a wire that goes to the relay for turning on the device from the battery.
Functionality check
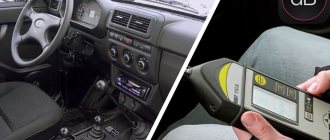
You will need a thermometer to check. Advanced wipers first turn on for 10 minutes. Measure the heating temperature. Then turn it on again for half an hour and measure the temperature again. It should be higher than the previous one.
It should be taken into account that if the check is carried out in winter and on the street, then the wipers will not heat up to a high temperature, a maximum of 50 degrees Celsius. This is quite enough to clean the ice. In warmer times of the year and in a garage, the figures will be higher.
There will be no instant heating; this requires waiting 10-15 minutes. The windshield does not warm up.
Classification of warm wipers
Modern models of warm wipers should be classified as follows.
- Frame brushes, where plastic parts are installed instead of metal parts, since frost is not so bad for this material. Special rubber with water-repellent properties is also installed. Consequently, the brush does not freeze to the glass surface and remains softer at low temperatures. Such wipers do not need to be replaced with regular ones with the arrival of spring.
- An analogue of a frame brush with a special structure, thanks to which the metal insides remain protected, as well as the rubber in the key links. Among the disadvantages, it is worth highlighting the loss of efficiency at high speeds, as well as problems with eliminating moisture, since it condenses from the air on metal elements during sudden temperature changes.
- Brushes with heating element. Visually, they are similar to frameless models, but are much more effective than the latter. The elasticity is maintained for a long time, and the structure is reliably protected from freezing.
This is interesting: Review of the Toyota RAV4: technical specifications, equipment, prices in 2021
Pros and cons of homemade heating
Heated brushes have their advantages and disadvantages.
What are the benefits of windshield wipers with a heating element:
- the ice crust melts faster;
- the wipers do not freeze due to the fact that the liquid remaining on the glass and in the wipers does not freeze;
- suitable for work in any weather;
- They are easy to mount, install and connect.
Materials for manufacturing are readily available. To make heating for windshield wipers with your own hands, basic technical skills are enough.
But the disadvantage of these devices is that even warm wipers will not help if the glass is too icy.
Installation can be problematic if the car owner decides to install the heating device not through the cigarette lighter.
Driver reviews
Such a device as a heating device for windshield wipers cannot leave any motorist indifferent, given the harsh realities of the Russian winter. Reviews about heating elements are mixed. It is likely that both the quality of workmanship and the climatic conditions in which they were tested play a role here.
I took brushes from Burner for my Chevrolet Aveo. I bought it on the Internet. I don’t have enough knowledge to connect the wipers; my husband did this.
I chose the ones that came with a device that connects to a battery. They operate only at a certain temperature and the machine’s engine is turned on. They turn off as soon as the motor stops or the temperature rises to a certain level. They have enough power from my Chevrolet's generator.
The idea itself is good, but the quality of the brushes is disgusting. Washer streaks formed on the glass and did not wash off. In general, I used them for a season and took them off. We tried to find rubber bands for the brushes to replace the original ones, but nothing worked out.
Tanya, 25 years old (Smolensk)
I decided that store-bought brushes were too expensive. And he did the heating for them himself. As a heating element, I used nichrome in factory insulation, which I took from old seat heating. I disassembled the brushes and installed the elements.
Our winter conditions are quite mild, with a maximum of minus 10 degrees Celsius. Tests have shown that the element heats up in 5-7 minutes. At low temperatures and light snow, such brushes cope quite well.
I was afraid that the glass might burst due to temperature changes on the surface. But this happens due to a sharp change in temperature. I have a smooth heating process. Therefore, no problem.
Maxim, 30 years old (Kaliningrad)
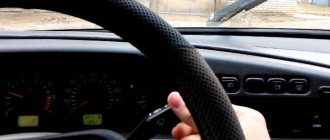
I installed frameless wipers on my Mazda. I think this is a very useful and effective thing. There is absolutely nothing to break there; the rubber bands can be changed. But our climate has changed dramatically and now there is nothing to freeze. If there is two weeks of frost, then it is not at all necessary to spend money on them.
The windshield wipers were connected not to the cigarette lighter, but to a relay that turns on the heated rear window. It is located under the hood. That is, when the heating in the cabin was turned on, the heating of the wipers immediately turned on. When the glass and the cleaner were heated at the same time, everything that had frozen up immediately “flew off.”
Igor, 40 years old (Bryansk)
Connecting warm brushes
You can install heated brushes either in a car repair shop or yourself. If the second option is more preferable for you, focus on the following sequence of work.
- Thoroughly clean the surface of the windshield from dust and dirt.
- Remove the protective film from the purchased brushes.
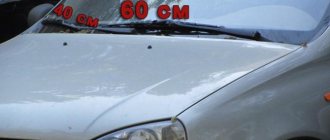
- Decide where to install the wipers on the glass. Mark the area where the brush will stop, and glue the ESCHS to this place on the inside of the glass. At this stage, it is important to consider that the wiper stop zone should be in the center of the heating material.
- Connect one cable to the vehicle ground, and the second to the wire labeled +12 volts through the switch.
- At this point, you can start the wipers.
Installation of the power button
While driving, you need quick and convenient access to the power button, therefore, it should be located based on this requirement. You must have basic electrical knowledge and follow these guidelines.
- Connect the relay to the power button. The best place for the relay is under the hood of the car. Watch the length of the wires.
- To make it convenient to pull wires into hard-to-reach places, use wire.
- Ensure that all wires are properly insulated, otherwise you will have to do everything all over again due to a short circuit.
- Start connecting the relay with a minus and end with a plus.
- Install a fuse between the positive wire.
This is interesting: How to change the pump pump on a Lada Priora car
As a result, turning on the machine and pressing the button should activate the start of the devices and the heating. This function should be disabled when the button is pressed again.