- Operation of the VAZ 2110 fuel pump, its malfunctions
- Replacing the pump and its filter
- Required Tools
- The process of replacing the fuel pump VAZ 2110
- How to measure the pressure in the fuel system?
Most of the units and components in cars of the Lada Samara model line can be changed with your own hands. To do this, just stock up on the necessary tools and purchase a new part. This material describes in detail how to replace a VAZ 2110 fuel pump and its filter element - a mesh. The work is quite simple, since installing a new product does not require an inspection hole or a lift. After studying this material, the reader will learn how to change the fuel pump, when it needs to be done and how to determine that the unit has failed. To make sure that the device has failed, you need to measure its pressure - the article contains several ways to perform this action.
Advice! Many Samara owners install a VAZ 2110 Bosch fuel pump. Despite the higher cost, the imported unit has a long service life, and it is easier to maintain when compared with a standard unit.
Operation of the VAZ 2110 fuel pump, its malfunctions
From the name you can understand that the fuel pump supplies fuel from the tank to the engine injectors. Accordingly, if the unit is faulty, then there will be no gasoline injection, and the power unit will not start working. There are options for injector and carburetor. The VAZ 2110 is equipped with an injector; therefore, the fuel pump must be suitable for this system. If the “ten” was modernized by installing a carburetor, then the unit will have to be taken out of stock. The unit is located in the fuel tank - under the left rear door, the electrics go under the rear row seats.
It is quite simple to understand that there are faults in the pump or its network:
- The car won't start. There are many reasons for this malfunction, but before performing a full diagnosis, you need to check whether the pump mesh is clogged or clogged.
- There are noticeable jerks in first gear. There are also many options here, but one of them is a non-working fuel pump.
Replacing the fuel pump mesh with your own hands
Let's start with the fact that in some cases, many car enthusiasts decide to clean the fuel pump mesh, especially when a new filter is difficult to find on the open market. Note that after cleaning the fuel pump screen, it is possible to remove a significant part of the contaminants, although the optimal way remains to replace the fuel pump screen with a new one. The fact is that it will not be possible to completely remove dirt. Also, cleaning is often impractical, since the cost of a new fuel pump mesh is usually quite affordable (about 2 USD for meshes for VAZ family cars);
Replacing the fuel pump filter is a procedure that should preferably be performed every 50-100 thousand km. mileage To replace the fuel pump filter you need a minimum set of tools:
- set of wrenches;
- screwdrivers;
- tubular keys;
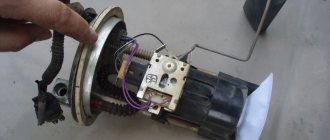
Let us add that there is no need for an inspection hole or a lift, since access to the fuel pump is provided from inside the car. On most cars, the fuel pump is installed under the rear seat; the fuel pump screen is located in the pump housing itself, located in the lower part. It turns out that it is possible to remove the fuel pump filter only after removing the fuel pump from the gas tank and disassembling its housing (if necessary).
The entire process of replacing the fuel pump mesh in general terms is as follows:
- removing the rear seat to provide access to the pump;
- decrease in pressure in the fuel line;
- disconnecting the battery terminal and the power supply from the fuel pump;
- removing the fuel lines and removing the fuel pump;
- dismantling the pump mesh and replacing it with a new filter;
- assembly in reverse order;
How to measure the pressure in the fuel system?
Screw on the meter hose
The easiest way to measure pressure is with a special device - a pressure gauge. The kit also includes an adapter and drain. Pressure can be determined using an air pressure gauge. This device is present in almost every motorist, as it is used to measure tire pressure. A normally functioning pump in a VAZ 2110 should have a reading of 2.8-3.2 atm. You need to connect the pressure gauge and check what the indicator is with the engine not running, but with the fuel pump on. It must be no lower than 2.8 atm.
Instructions for replacing the fuel pump mesh on Chevrolet, ZAZ and Daewoo Lanos, Sens and Chance
It should be noted right away that the resource of this filter element ranges from 50 to 100 thousand kilometers. It all depends on the quality of the gasoline being poured into the tank, but you can refuel once unsuccessfully and, at best, end up having to replace the filter, and in the worst case, you will have to change the fuel pump.
Next, we’ll look at how to replace the Lanos fuel pump mesh yourself, and what you’ll need for this. When carrying out the work, you will need a minimum set of tools, consisting of a flat or slotted screwdriver, steel wire and a hair dryer. To replace the mesh, you will need to remove the entire fuel pump module. How to do this yourself is described in detail in the material on removing the gas tank or instructions for replacing the Lanos fuel pump. The process of dismantling the fuel pump assembly with the mesh must begin by disconnecting the negative terminal of the battery.
After the fuel pump module assembly is removed from the mounting hole of the tank, we proceed to further steps to replace the strainer:
- After removing the pump, there will be some fuel left in it, which can be drained back into the tank or container by turning it upside down
- We place the entire mechanism assembly on a clean cloth or newspaper, and proceed to replacing the mesh
- The first step is to dismantle the float, for which the plastic clip in the shape of the letter “C” is removed. To remove the clip, you need to squeeze it and remove it from its seat.
- To get to the fuel pump coarse filter, you should remove the top cover of the plastic flask. It is attached using three protruding slots, which you need to press with a screwdriver.
- Before removing the top cap of the flask, you need to disconnect the power supply connector for the fuel level sensor. This sensor is attached to the outer flask (also called a glass)
- Next, we move on to dismantling the inner flask with the fuel pump, since the mesh is attached specifically to it. You can dismantle the inner flask using strong steel wire, from which you need to make a hook. An example of such a hook is shown in the photo below.
- The hook is needed to dismantle the inner flask (with the fuel pump), to which the mesh is attached. This flask is fixed using an internal protrusion along the circumference on the outer flask. The photo below shows a protrusion in the inner part of the outer flask, through which the fuel pump bracket with filter is fixed
- To simplify the process of dismantling the inner flask, it is necessary to heat the walls of the outer bowl with a hairdryer. This will lead to its expansion, which will allow you to easily and quickly remove the flask (it is important not to overdo it with a hairdryer)
- Using a hook, you need to hook onto the plastic protrusion on the inner flask and pull towards you (moderately). To increase the effectiveness of actions, efforts should be made alternately at several points. As a result, the inner flask with the fuel pump and the mesh located at the bottom is removed
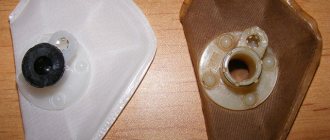
- It is this mesh that needs to be replaced, having previously assessed its condition
- In 100% of cases, the inside of the outer flask will have contaminants that should be removed
- Let's start removing the mesh, for which you first need to remove the locking ring (washer) by prying it off with a screwdriver
- The old filter is removed, replaced by a new one, and secured with a retaining ring. It is recommended to purchase a new ring, since when it is removed, the quality of fixation has significantly decreased. If you install an old ring, there is a high probability that the mesh may come loose during use.
- We install the Lanos gas tank mesh in place and carry out the assembly in the reverse order
The procedure for replacing the gas tank mesh is not difficult, but it is very responsible, since the work is carried out with parts that are coated with highly flammable substances.
After assembling and installing the fuel pump with the new element in place, you can put the negative terminal on the battery and turn on the ignition. When the pump pumps gasoline and turns off, you can start the engine. This completes the process of replacing the fuel pump mesh.
This is interesting! Two types of fuel pump modules TA and TG were installed on Lanos. The principle of replacing the mesh on TG type devices is discussed above. Blocks of the TA type differ in that the mesh on them is located on the outside. You can read more about the differences between the modules here.
Replacing the fuel pump filter
VAZ 2110 fuel pump filter
Now we finally come to the most important part, replacing the fuel pump filter. Replacing the fuel pump is usually done with your own hands and takes no more than thirty minutes.
- First you need to disconnect the wires from the battery (usually the wire with minus voltage is disconnected);
- Then we move into the car interior and remove the passenger seats, since the fuel pump is located directly under them (electric);
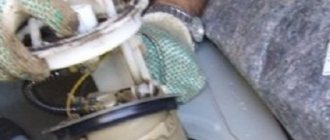
- When we finally see the fuel pump, we need to carefully remove two screws from it and lift the cover;
- We see the power supply; it must be turned off;
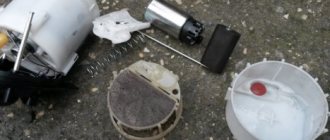
- Then we take out the entire fuel pump and unhook the filter from it;
- We install a new filter, carefully attaching it;
- We put the fuel pump back in its place.
That's all, a new filter for the fuel pump has been installed and we did it ourselves. A fuel pump filter usually does not cost too much and its maximum price is 200 or 500 rubles. If these instructions are not clear enough, you can watch a video or photo and figure it out.
Cleaning method
The procedure is carried out in several stages. First, the rear seat cushion is removed and half of the sofa is reclined. Then remove the plastic cover of the fuel pump. Then you need to relieve pressure in the fuel system.
Now you can remove the negative terminal from the battery. It is necessary to disconnect the tubes from the pump (gasoline may spill). A special clamping ring-cover is unscrewed. The remaining gasoline should be drained from the fuel pump housing and the sealing ring should be removed. The pump can now be removed.
You will need to disassemble the pump to clean it. First, the lower part is removed, and only then the mesh. To dismantle the latter, you need to pick up the filter with a screwdriver at the place where the pump is attached to the housing. Usually the mesh is very dirty.
You can replace the part with a new one, but you can also clean it. As for cleaning the fuel pump mesh, it is better to choose one designed for cleaning the carburetor. If there is a need for mechanical action, it is better to clean the part with a soft brush. Then the mesh is dried and blown. At the end of the process, it is recommended to wash the mesh itself and the bottom of the fuel pump housing with gasoline. All that remains is to put everything back together.
It is not difficult to clean the fuel pump screen yourself. However, as with all repair work, all prescribed safety precautions must be followed. If you don’t want to do the replacement yourself, you can take the car to a service center, where they will do it for little money.
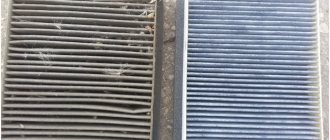
Fuel coarse mesh in the fuel pump - why is it needed?
The initial cleaning of the fuel is ensured by a mesh mounted on the fuel pump body, and when the car begins to move jerkily and the fuel supply is difficult, first of all you should check the condition of this mesh, because it can be contaminated to such an extent that its initially snow-white color is very difficult to recognize.
Note! The main reason for grid contamination is poor fuel quality!
When to change the screen in the fuel pump?
In order to understand when it is necessary to replace a particular component in the fuel system, and specifically the grid, you need to know about the presence of pressure in the fuel rail. You can learn how to take measurements correctly from this article.
You can also find out about its insignificant condition by the following signs:
- When the ignition is turned on, a very prolonged and loud hum , since gasoline is hardly sucked into the system through a clogged mesh. This can significantly reduce the working life of the fuel pump itself and the contamination of the entire fuel system as a whole.
- While driving, when switching to third or fourth gear and then pressing the gas pedal, there is no increase in power .
- Also, a clogged mesh can cause a loss of speed while the car is moving , since the required amount of fuel simply does not enter the combustion chambers.