Print this article Font size 16
The design of starters on the VAZ 2109 has fairly good reliability indicators. But with use and over time, they still fail.
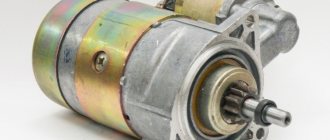
Appearance of the device
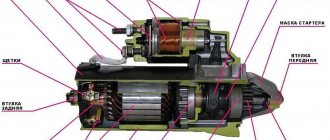
Design and operating principle
To understand the features of the repair, you must first study the design of the starter and understand how it works for the benefit of your car.
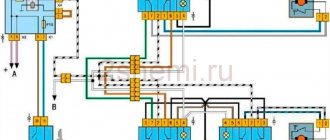
Let's start with the design. It includes four main nodes.
| Knot | Peculiarities |
| Electric motor | It transmits direct current through four brushes |
| Freewheel with gear | A clutch or bendix drives the flywheel of your car's engine. |
| Traction relay | Serves to extend the bendix with gear when turning on the electrical appliance |
| Bushings | Ensure easy rotation of the clutch, rotor, and gear. One bushing is located inside the starter, and the second is in the clutch housing. |
Device diagram
Having familiarized yourself with the starter diagram, you can discuss the principle of its operation.
The operating principle is to convert an electrical signal into the rotational movement of a drive gear. Current is transmitted through the brushes to the poles of the electric motor. At the same time, the clutch extends and the gear is connected to the flywheel ring. To start the engine you need a quick but easy rotation of the starter. When the engine starts, the clutch returns to its original position.
Why doesn't the VAZ 2109 starter turn?
In cases where, when starting the mechanism, you hear 2-3 clicks that follow each other, but the starter does not work, this may indicate the following problems: the terminals of the car battery are loose or oxidized; The battery is discharged; The starter core is not fixed with a special holding winding.
If you hear only one click when you turn it on, and the starter does not fire, the reason lies in one of the following elements:
But when there are no clicks when starting, professionals recommend replacing the starter key or the ring that is located in the gearbox. Also, complete silence may indicate that a short circuit has occurred on the winding. Confirmation of short circuit Usually it is smoke and a noticeable “aroma” of burnt insulation.
Note that sometimes a prepared repair kit for repairing a starter may not be needed. The driver dismantles the mechanism to check its elements, tries to find faults, but sees that all of them, without exception, are in normal condition. In this case, it is recommended to put the repair kit aside and clean the starter components and then lubricate them. As a rule, the system begins to function again.
Typical faults
It is better to start diagnosing the starter even before you remove it.
After dismantling, some signs of failure, by which the source of the problems can be determined, can no longer be determined.
Signs of a faulty element include:
- An unusual noise occurs when the engine starts;
- Complete absence or slow rotation of the starter;
- Rotation occurs, but there is no gear engagement with the Bendix ring;
- The unit rotates with the bendix, but then the clutch breaks;
- Turning the key in the ignition, there is silence.
Checking the dismantled unit
Before blaming the starter for everything, take the time to look under the hood and check the condition of the terminal contacts and connectors. Also pay attention to whether everything is ok with the battery. Only after this can you start working on the starter.
Diagnostics
To carry out diagnostics, arm yourself with a conventional tester with voltmeter mode.
- Connect the battery terminals to the poles of your measuring device. You will need an assistant to drive.
- After connecting the terminals to the voltmeter, look at the readings of the device. If the battery is working properly, the data will be 11-13 V.
- Turn the ignition key and at this moment measure the voltage. If the losses are only 1-2 Volts, then the starter works normally and does not show resistance.
- If the voltmeter parameters decrease by 2 times or more, the reason is in the starter. Or rather its bushings or brushes.
- Remove the starter and check the relay. Connect the battery terminals to its terminals on the body and transfer it to 12 V. If the overrunning clutch moves in the front cover, then the relay works perfectly. If not, replace it.
Starter mechanism malfunctions
If any difficulties arise with starting the car, this unit is the first to be suspected, but now, knowing the design of the VAZ 2109 starter, you will quickly figure out where to look. Various sounds similar to metal grinding should also alert you; it is quite possible that your VAZ 2109 will need to disassemble the starter. The reason may lie in the flywheel, and its crown will need to be replaced. In this case, the car will most likely start, just not right away.
But if the car does not start and there are no alarming sounds, then you may have to replace the clutch. Disassemble the starter and dismantle it, try turning it in both directions. If it rotates freely, then calmly throw away the failed part. You can understand that it is necessary to remove and replace worn starter brushes installed on a VAZ 2109 by a characteristic click, after which the expected engine start will not take place.
Source
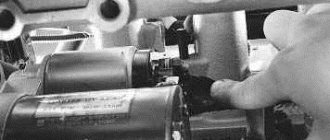
Removal
Well, the check showed that the starter needs to be repaired. Therefore, the first thing we do is dismantle it.
- Secure the car stationary by turning on the handbrake and placing stoppers under the wheels.
- Move the negative terminal from the battery to the side. This will deprive your car of power.
- Disconnect the wire connector from the starter solenoid relay terminal.
- Unscrew the fastening nut from the relay contact bolt and remove the wire.
- If there is a crankcase guard, remove it. Here all the bolts are simply unscrewed.
- The 2 starter fixing nuts are unscrewed from the bottom of the engine compartment. But the third one is more conveniently removed from inside the engine compartment.
- Having removed the fasteners and disconnected the wiring, you can safely remove your starter from the clutch housing.
Before starting work, be sure to clean the device from accumulated dirt so that it does not get inside the structure and reduce all repair efforts to nothing.
Disassembly Features
Disassembling the starter is done in stages.
The first stage is to inspect the condition of the brushes. To do this, you need to remove the protective cover, release the springs and remove the brushes. Using a caliper or ruler, measure the height of the brushes. If it is less than 12 cm, then they should be replaced. The working surface must not have cracks or chips.
Brush height measurement
The second stage is dismantling and checking the anchor. To do this, the housing is removed along with the stator. At the anchor, it is necessary to perform a visual inspection of the commutator and check the winding for integrity.
Removing the device's anchor
The third stage is removing the freewheel from the gear. To dismantle the coupling, you need to remove the armature from the front cover, then remove the intermediate support from the shaft. Next, you should inspect the gear teeth. If it is discovered that the clutch is faulty, it must be replaced.
Overrunning clutch and gear
The fourth stage is replacing the solenoid relay. Replacement should be done if the freewheel does not extend when voltage is applied to the terminals. It is better to change the entire assembly.
Traction relay VAZ 2109
The fifth stage is replacing the starter bushing. If the starting device begins to jam during rotation, the cause is most often worn starter bushings on a VAZ 2109. If you are replacing the VAZ 2109 starter bushings, then you need to change the bushing located in the rear cover and the second one installed in the clutch box. Naturally, you need to know how to replace the starter bushing.
Front and rear hubs
Defects in bushings are detected by inspecting them. The working surface should not be chipped, cracked, scored, or severely worn. You can conclude that the VAZ 2109 starter bushing needs to be replaced by the presence of play.
Before installing new parts, the inner surface must be lubricated with engine oil.
Repair
Next, you have to check the condition one by one and take appropriate measures to eliminate problems with the following components of the starter:
- Brushes;
- Anchor;
- Overrunning clutch;
- Traction relay;
- Bushings.
Now let's talk about everything one by one.
Brushes
First, assess the current condition of the brushes. In most cases, they are the source of problems with the starter.
- Remove the pair of screws that hold the protective cover in place. The cover is now easy to remove.
- Use a screwdriver to remove the retaining ring from the shaft, and don’t forget about the adjusting washers.
- Unscrew 2 more tie rod nuts. Remove the manifold side cover.
- Use a screwdriver to press out the springs and remove the brushes from the holder.
- Measure the brushes with a caliper or ruler. If the height is less than 12 millimeters, the brushes must be replaced.
- It is also better to replace elements if there are chips, cracks and other defects on the surface.
Brushes
Anchor
If all is well with the brushes, the next suspect is the anchor.
- Remove the housing with the starter.
- At the anchor, look at the condition of the commutator, check whether the winding is intact.
- If there is carbon deposits on the collector or signs of breakdown, clean these areas with fine sandpaper.
- Check the armature and stator windings using a multimeter in ohmmeter mode.
Overrunning clutch
Parallel checking of the overrunning clutch with the armature will allow you to replace the latter at the same time.
To gain access to the clutch you will have to remove the armature from the front cover. At the same time, change it if necessary.
- Remove the retaining ring located near the overrunning clutch.
- Remove the restrictor ring.
- Remove the plastic lever stop, which will allow you to reach the anchor.
- Remove the intermediate support from the shaft.
- Check the condition of the gear teeth. If there are defects, the unit is replaced with a new one.
Bendix or overrunning clutch
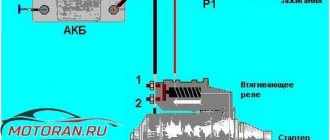
Traction relay
Replacing the traction relay is necessary if, when voltage is applied to its terminals, the overrunning clutch does not extend. Sometimes the VAZ 2109 is equipped with collapsible relays. But it’s still better not to repair it, but to replace it with a new relay.
- To remove the relay, unscrew the two screws located on the front;
- Lift the relay, disconnect the armature from the lever;
- Remove the relay from the housing, grabbing the spring and armature. All elements are changed if necessary.
Relay
Starter malfunctions on VAZ 2109, their causes, elimination.
Starters for the VAZ 2109 are very reliable, unpretentious and interchangeable, like almost any equipment of the VAZ automobile industry. Their faults are also approximately the same.
To avoid frequent repairs of the VAZ 2109 starter, you need to follow simple operating rules:
In case of problems when starting, the first thing to assume is that the starter is faulty. True, it works in conjunction with many systems and mechanisms of the car; correct identification of the source of trouble is also necessary. Sometimes simply charging the battery is enough.
Strange sounds at start-up, while the starter is operating, should be taken into account immediately in order to take timely measures. You can repair or replace the VAZ 2109 starter yourself, without going to a car service center.
Most popular problems
Causes, what to check and how to eliminate:
Nothing happens when I turn the key
When turning the key, there are no characteristic clicks or changes in the illumination of the instruments.
Causes, what to check and how to eliminate:
Frequent problems with the starter and repair of the starter on the VAZ 2109
Causes, what to check, how to eliminate
In this case, to repair the starter on a VAZ 2109, you should measure the height of the brushes (should be at least 0.12 cm), replace them if necessary. Also, find out how freely the brushes move. If the collector is burnt, clean it.
The VAZ 2109 starter clicks but does not turn
The VAZ 2109 starter clicks, but does not turn, there is no start, but the instrument lighting blinks, dims or goes out.