Carburetor engine power supply system: 1 – fine fuel filter; 2 – fuel supply hose to the fuel pump; 3 – fuel pump; 4 – heated air intake; 5 – check valve; b – fuel drain hose from the carburetor; 7 – cold air intake; 8 – thermostat; 9 – air filter assembly; 10 – carburetor; 11 – fuel drain pipe; 12 – fuel supply pipe from the tank; 13 – fuel tank; 14 – flange of the fuel level sensor and fuel intake tube; 15 – separator hose; 16 – filling pipe hose; 17 – filling pipe; 18 – fuel tank plug; 19 – separator; 20 – two-way valve hose; 21 - two-way valve
The fuel supply is located in the tank located under the bottom in the rear seat area. The tank is made of steel and consists of two stamped parts welded together. The tank is connected through a drain hose to a separator that captures gasoline vapors. The condensate from the separator is drained back into the tank. The separator communicates with the atmosphere through a two-way valve that prevents excessive increase or decrease in pressure in the fuel tank. The filler neck is connected to the tank with a gas-resistant rubber hose secured with clamps. The plug is sealed. Through a fuel intake with a mesh filter, gasoline is supplied from the tank through steel fuel lines and rubber gas-resistant hoses to a fine fuel filter, a fuel pump and then to the carburetor. Gasoline is sucked from the tank due to the vacuum created by the gasoline pump.
Fine filter - with a paper filter element in a plastic housing, non-separable design. There is an arrow on the filter housing that must coincide with the direction of fuel movement.
The fuel pump is a diaphragm type, mechanically driven by the camshaft eccentric, with a manual pumping lever. It consists of a lower housing with drive levers, an upper housing with valves and pipes, a diaphragm assembly and a cover. The diaphragm assembly is installed between the upper and lower housings. Two diaphragms (working) are installed on top, and one (safety) on the bottom: it prevents gasoline from entering the engine crankcase when the working diaphragms rupture. In this case, leaked gasoline is discharged through holes in the external spacer located between the safety and working diaphragms. The diaphragms, together with the internal spacer and plates (from the outside), are assembled on the rod and secured with a nut. The rod is inserted into the cavity of the balancer using a T-shaped shank. A spring is installed between the diaphragm assembly and the lower housing. The upper housing is closed with a lid secured with a bolt. Underneath there is a mesh fuel filter.
The pump is attached to the engine with two studs through a heat-insulating spacer, sealed on both sides with cardboard gaskets. Part of the gasoline supplied to the carburetor is drained back into the tank through a system of pipelines and hoses - this improves pump cooling and prevents the formation of vapor locks in the power system. The drain line has a check valve that allows fuel to flow in only one direction - from the carburetor to the tank.
The air filter housing can receive cold air through an intake near the radiator or hot air from an intake mounted on the exhaust manifold. The flow is switched by a damper controlled by a thermostat. The built-in thermal power element opens the hot air damper when the incoming air temperature is below 25 °C and completely closes it if the air is heated above 35 °C. Thus, the temperature of the incoming air is automatically maintained within 25-35 °C. The air filter is dry, with a replaceable paper filter element. The filter housing is mounted on the carburetor studs through a rubber gasket and secured with four self-locking nuts through a metal plate.
Fuel supply diagram for an engine with a fuel injection system: 1 – injectors; 2 – fitting plug for monitoring fuel pressure; 3 – injector ramp; 4 – bracket for fastening fuel pipes; 5 – fuel pressure regulator; 6 – adsorber with solenoid valve; 7 – hose for suction of gasoline vapors from the adsorber; 8 – throttle assembly; 9 – two-way valve; 10 – gravity valve; 11 – safety valve; 12 – separator; 13 – separator hose; 14 – fuel tank plug; 15 – filling pipe; 16 – filling pipe hose; 17 – fuel filter; 18 – fuel tank; 19 – electric fuel pump; 20 – fuel drain line; 21 – fuel supply line
Fuel is supplied from a tank installed under the bottom in the rear seat area. The fuel tank is made of steel and consists of two stamped halves welded together. The filler neck is connected to the tank with a gas-resistant rubber hose secured with clamps. The plug is sealed.
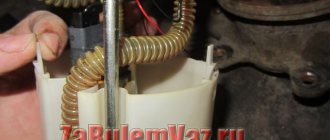
The fuel pump is electric, submersible, rotary, installed in the fuel tank. The developed pressure is at least 3 bar (300 kPa). The fuel pump is turned on at the command of the injection system controller (with the ignition on) through a relay. To access the electrical connector of the pump, there is a hatch under the rear seat in the bottom of the car. From the pump, fuel under pressure is supplied through a flexible hose to the fine filter and then through steel fuel lines and rubber hoses to the fuel rail. The fine fuel filter is non-separable, in a steel housing, with a paper filter element. There is an arrow on the filter housing that must coincide with the direction of fuel movement. The fuel rail serves to supply fuel to the injectors and is mounted on the intake manifold. On one side there is a fitting for monitoring the fuel pressure, on the other there is a pressure regulator. The latter changes the pressure in the fuel rail - from 2.8 to 3.2 bar (280-320 kPa) - depending on the vacuum in the receiver, maintaining a constant difference between them. This is necessary for accurate dosing of fuel by injectors.
The fuel pressure regulator is a fuel valve connected to a spring-loaded diaphragm. The valve is closed under the action of the spring. The diaphragm divides the regulator cavity into two isolated chambers - “fuel” and “air”. The “air” is connected by a vacuum hose to the receiver, and the “fuel” is connected directly to the ramp cavity. When the engine is running, the vacuum, overcoming the resistance of the spring, tends to retract the diaphragm, opening the valve. On the other hand, fuel presses on the diaphragm, also compressing the spring. As a result, the valve opens and part of the fuel is released through the drain pipe back into the tank. When you press the gas pedal, the vacuum behind the throttle valve decreases, the diaphragm, under the action of a spring, closes the valve - the fuel pressure increases. If the throttle valve is closed, the vacuum behind it is maximum, the diaphragm pulls the valve harder - the fuel pressure decreases. The pressure drop is determined by the spring stiffness and the size of the valve opening; cannot be adjusted. The pressure regulator is non-separable; if it fails, it is replaced.
VAZ-2109 injector
There are rumors on the Internet that the VAZ 2109 injector has long ceased to be popular among car owners. Anyone who wants to exchange a domestic car for a foreign car is mistaken.
For the same money they will buy a beautiful firebird, under whose plumage there will be a decrepit, senile body, like that of a courier during the Kaiser’s reign. Yes, the VAZ has its drawbacks, but it also has quite a few advantages: if you buy even a used car from one owner and with low mileage, then the engine will almost always please you, the electronics will not seem stupid, so you can close your eyes to the rest .
Just don’t wave your hands now and say that domestic g... doesn’t sink in water. The interior is not a gift, but its explosiveness is fully justified by the material from which the body is made. This is not a piece of plastic covered with foil. Perhaps tuning the interior will help you.
The car is not wasted on trifles: if the problem is in the pads, then it will remain there. It happens that the panel goes out right on the road, but the problem is quickly eliminated, the stove fails, but you can find an approach to it with skillful tuning. There is a desire to change it to a more advanced tenth model - the problem will quickly be solved. You can sell a 2109 injector quite quickly, whereas a foreign car takes months to wait for a buyer.
And no need to say that you ride on the toilet. Even a Volkswagen with 25 years of life would not allow itself to be called that. And you! Oh, I wish I could take our nine-wheeler for a ride to Moscow! After that, you can erect a monument to her and become a pedestrian, and hang a photo with your iron friend in a frame on the wall.
It’s not for nothing that they say that the VAZ is a cheap car. For citizens of Russia and post-Soviet countries there will be no problems with spare parts for a long time. Do you want to do the renovation yourself? There is a lot of information in stores and on the Internet. Try to dig up so much material for a Korean car. You would rather love the domestic auto industry than a prince from far away, rusting right under your windows.
He doesn’t want to, my dear, it starts, there are no spare parts in the workshops, you have to wait for months until they bring it. But for our cars there is always a green light. Chairs in the evening – money in the morning! The VAZ is not as bad as it might seem at first, although it requires some fine-tuning. Do you still want to try a foreign car in action? Then buy at least an unfucked version, at least ride for pleasure until breakdowns lead to a nervous breakdown.
What is an injector
The VAZ 21093 car has an injector, the electrical circuit in the device allows, through an electronic control system, to start and optimize engine operation. The main element of the new supply was the injection of a combustible mixture into the combustion chamber under pressure. In carburetor-type engines, the flow of the combustible mixture occurred under vacuum.
In order to ensure optimization of the operation of the VAZ 2109 injector engine, the electrical circuit is designed in such a way that through the ECU - an electronic control unit - a full range of control is carried out and the process is carried out from the supply of fuel to the emission of exhaust gases.
Car VAZ 2109 injector wiring diagram includes:
- electronic fuel injection system;
- electronic ignition system;
- system for monitoring the state of fuel supply, combustion and gas emissions.
At the same time, there are still reserve connectors in the block, allowing you to connect additional sensors for monitoring the operating status of the mechanisms. Such options include an anti-theft device, a knock sensor and others.
On a VAZ 2109 car, the injector electrical circuit is designed in such a way that the engine is controlled through the ECU. The system completely controls the fuel combustion process through it.
VAZ 2109 engine injector: control system diagnostics
Before touching upon general issues of diagnosing the control system, it is worth getting acquainted with the controller lamp
If a malfunction occurs while driving the car, the controller will detect it and notify the driver using “CHECK ENGINE”, while storing in its memory the necessary codes about the nature of the malfunction. With their help, the process of diagnosis and subsequent repair of the fuel injection system will be facilitated. It is the controller that is able to coordinate the operation of VAZ sensors and systems that are part of the general composition of all fuel injection units.
A few words about the DST-2M digital tester.
It is used to diagnose the engine injection control system. It is worth remembering that only a competent specialist can make the correct diagnosis. No matter how much an inexperienced mechanic strives to automate the process of diagnosing a car, having the necessary tools, he will not succeed without certain skills, which can in some cases aggravate an already difficult situation.
Diagnostics includes the following steps:
- checking the fuel supply system, the operability of all sensors, actuators and the ignition system;
- reading fault codes;
- compression measurement;
- data monitoring of the entire control system.
Once the injector has been diagnosed, the entire range of necessary services becomes clear if it is associated with a failed electronic system responsible for the performance of the engine.
Replacing the fuel line of a VAZ 2109
Perhaps the most difficult operation (if there is no pit and lift). To replace the lines, I had to remove: - the link, - the anti-roll bar, - pants, resonator, muffler, - tank (change it anyway), - steering rack, - old supply line fuel (I left the return line under the adsorber). Purchased: - highways = 400 RUR, - set of rubber pipes = 560 RUR, - fuel filter = 200 RUR, - fuel filter clamp = 80 RUR (barely found!), - fastening the lines from VAZ 2110 for 5 pipes-8 pieces = 136 RUR (went around the whole city, thank you for finally opening “Ladya”), rubber bands -10pcs=20r
The arrangement of the tubes in the VAZ 2110 mounts (for 5 tubes) and in the original eight-wheel ones (for 4 tubes) are different! Therefore, I had to swear a lot, and also re-arrange the brake lines!
Reworking the fuel lines took one day of life and a lot of nerves, a lot of nerves! But now we will have an adsorber))) Ecology comes first!
One beautiful July day, the car was making a lap of honor around its native area. Everything would have been fine if not for the pungent smell of gasoline. Considering the fact that the car had not driven normally for a long time and had recently returned from cleaning the bottom, the first thing I decided to do was look under the hood at the pipes and pipes.
My “joy” knew no bounds when I saw the fuel pipe calmly lying approximately in the middle of the left wheel drive. Having lifted the phone a little and fixed it, I went to the place of the upcoming repair, that is, to the place where the car usually spends the night.
For a long time I couldn’t get around to repairing it, and then another two-week vacation. In short, I only got to the car repair on August 16th. First of all, I decided to fill all the tube mounting studs with a well-known and much-loved compound - “WD 40” and clean the fastenings on the bottom from mastic (after welding, the bottom was completely processed).
Two studs in the engine compartment (under the steering rack and above it)
Fastening the pipes near the gas tank
Another stud on the bottom (it’s hard to see, the photo was taken on a phone and lying on the asphalt)
No matter how hard I tried to do without casualties, it didn’t work out. The result of my labors were two broken pins - one near the gas tank (pictured), the other - the second one from the engine shield. Well, actually, it’s not scary, both are located in places where, in fact, they may not exist.
Let's continue further. Having unscrewed the hoses from the gas tank and lowered the tank itself, I pulled the hoses out from under it.
To ease further hassle, I decided to remove the gear shift link and the handbrake cables (which, by the way, I will also change). There are no photos, because sometimes I just forget, and sometimes the rain pushes me on. Pulling out the tubes, I saw the same hole from the rotating wheel drive, and squeezing the tube a little, I realized that no one had touched them in 15 years. At this point the decision was ripe to change the brake pipes to the heap, so as not to have to go through them a second time.
The return hose to the tank is normal from the outside, but it has been pretty battered by life (it’s all cracked, it just broke in my hands).
A hole in the tube caused by the drive.
It was not possible to remove the tube completely.
So far, the only new spare parts are the fuel main pipe, the brake pipe to the sorcerer and the fuel hose.
Now I’m waiting for the spare parts I ordered from the store - a fuel return pipe, a brake line, brake hoses from the sorcerer to the rear brake hoses, handbrake cables, a return hose, a bunch of clamps, a handbrake lever and, well, nothing - a short-throw rocker and a Kalino-cardan with anthers.
As soon as the order is ready and I have time, I will make more, I will write about everything. Well, at the end of this story, a photo of beauty in the car.
If such malfunctions occur in the operation of the carburetor engine of VAZ 2108, 2109, 21099 cars, such as unstable idling, failure when pressing the gas pedal, drop in power and throttle response, difficulty starting the engine, etc., you should pay attention to the fuel supply system to the carburetor, namely on the cleanliness of fuel lines and the cleanliness of the vehicle’s fuel tank. The presence of blockages and contaminants in them often leads to disruption of the fuel supply to the carburetor and further to the engine, followed by the occurrence of the above-mentioned malfunctions. Let's consider cleaning fuel lines on VAZ 2108, 2109, 21099 cars.
VAZ 2109 injector controller
The controller receives the necessary information from the sensors, then makes calculations: based on them, it independently issues commands to the actuators. This device is quite reliable. One problem: it is afraid of large surges in on-board voltage. This can happen when the generator malfunctions or the starter sticks while the engine is running; sometimes the process of “lighting” another car or the use of a low-quality starting charger is to blame.
As soon as malfunctions occur, the controller immediately detects them, notifies the driver with the above-mentioned lamp, and stores the codes. Under his control, the injectors try to work smoothly, as does the ignition system.
The injectors turn on in pairs, but this depends on the type of controller itself. An interesting fact is that pairs of injectors tend to turn on alternately, approximately 180° from the crankshaft rotation. This is called double synchronous injection, but sequential operation is possible. An idle spark is provided for the system: 16-valve engines are an exception. They are already equipped with personal ignition coils for each spark plug.
This process occurs as follows: high-voltage pulses are applied to a specific pair, and the formation of a working spark occurs in the cylinder on the compression stroke and on the exhaust stroke. Otherwise, an idle spark will form. In this case, a small amount of energy is required for the cylinder during the exhaust stroke, and the rest of it is used during the compression stroke. This is how the process of ensuring normal sparking and unhindered ignition of the fuel mixture occurs. The whole process can be repeated if the cylinders decide to switch roles unexpectedly.
The controller controls not only the fuel supply, but also the energy accumulation time and ignition timing. This concerns the crankshaft rotation speed in idle mode, the uninterrupted operation of the electric fuel pump, the tachometer and the warning lamp, which is located on the VAZ instrument panel, the cooling system, and the cabin air conditioning compressor clutch. The device generates certain speed signals to the trip computer, regulates fuel consumption, and maintains the required stereochemical ratio (gasoline-air as 1:14.7).
Power supply system VAZ 2109 injector diagram
The power supply system for injection engines of VAZ 2108i, 2109i, 21099i cars is designed to ensure an uninterrupted supply of fuel to the engine cylinders. In addition, it has the functions of storing a certain supply of fuel on board the vehicle and cleaning it from mechanical contamination.
Power system diagram
Diagram of the power supply system for the injection engine of VAZ 2108, 2109, 21099 cars (EURO-2 toxicity standards)
Elements of the power supply system for injection engines of VAZ 2108i, 2109i, 21099i cars
— Fuel tank
welded, welded from two stamped halves. Capacity 43 liters. The filler neck is located in the right rear fender of the car.
— Fuel module
(electric fuel pump) is installed in the fuel tank and combines a fuel pump and a fuel level indicator sensor. To access the module, there is an inspection hatch under the rear seat in the car body. A fuel purification strainer is installed on the inlet pipe of the fuel module.
VAZ 2109 injector does not start
Problem: the car worked fine all day and drove dozens of kilometers around the city. I stood in the garage resting for several hours. The owner decided to go out again on business, but could not start it. It seemed like something was catching, but then it died out. I had to unscrew the candles, which were thoroughly wet, and put the ones I had just bought in their place. And again a bummer! I had to check the timing belt: it turned out to be normal, I removed the battery and examined it for a failure. I checked the fuel pump: it is also ok. There is a return line, there is fuel too, but the car just doesn’t want to start.
Conversion of carburetor to injector VAZ 2109
First you need to choose a good injection system for the VAZ 2109. Bosch M 1.5.4 is perfect for installation due to its reasonable cost. We installed the injection system without additional upgrades or improvements. This is better than installing an external fuel pump and purchasing additional parts from General Motors.
It is more correct to buy parts that have already been time-tested and are used on production cars, including:
Various bolts, clamps and other consumables are not a problem to purchase at any store.
Tank replacement
Before disassembling the carburetor system, wash and dry the new gas tank and install an electric fuel pump. Remember that the arrows on them must match in both places. Make sure that the float of the sensor indicating the fuel level in the gas tank.
Holes for mounting the module and sensor
Next, you need to make a hole in the cylinder block for mounting a bracket designed for an ignition module with a depth of 20 mm, and another one for the knock sensor (16 mm). To do this, drain the antifreeze and remove the radiator along with the bumper.
Cooling, generator
Among other things, you need to install a new coolant pipe, and change the temperature sensor in the radiator. After this, you need to drain the oil and remove the pan from there, remove the toothed pulley and belt, and install a special generator damping pulley instead of the standard one.
Then it is necessary to install a new generator, since the new system requires more voltage than usual. Here you can’t get by with just a regular pulley replacement. We need to install a new generator in our VAZ 2109 - this is a must. Otherwise, the generator will simply become unusable.
Wires, connecting devices
- Next, you need to roll out the gasoline - the tank should become lighter.
- Then, before proceeding with further manipulations, remove the battery.
- After this, remove the distributor and fuel pump with all accessories, air filter, carburetor and cables (gas and air supply).
Fuel hoses VAZ 2109 injector
Finally, I completed one of the most difficult stages in converting to an injector, this is installing the lines and tank.
IMHO! Well, if, after all, you, the reader, decide to open this necessary cart, sit comfortably on your fifth point to get at least a little pleasure)))
Perhaps the story should begin with a return to the past, or rather about the purchase of a tank. After the purchase, the tank was cleaned both inside and out. Then my favorite zincari was used...
Then we move to the garage, where we prime and paint the tank
We could have stopped at this point in pampering with the tank, but that’s not for us. I also decided to cover it with rubber mastic.
At the same time I glued rubber bands to it
Next we plug in the fuel pump with the FLS you need. Now we're done with the tank, IT'S BETTER TO TAKE A TANK WITH M6 STUDS
, they are welded through spacers, if they break off, it’s easier to attach a new one.
For clarity, we take this diagram and begin to stick tubes and hoses into it; I assembled it according to it, with the exception of the gravity valve (I decided not to stick it in).
Here's everything you need to pull hoses and lines (the lines themselves are not shown in the photo)
We pull off the old tank and neck and begin to pull the tubes according to the diagram
Of course, there are no photos of the process, and it’s impossible to really take it, it’s too stormy))) In general, everything turned out as it should:
I pulled 3 tubes: - forward - return - tube under the adsorber (I took a pipe from the carb and extended it with a hose) A logical question, why am I bothered with this adsorber? I’ll say this clearly not because of the environment, but because it allows you to save 3- 5% gasoline, which I wrote about here
Next, we plug in the hoses for the fuel filter (initially I thought that they wouldn’t fit, but when I stuck the tank in its rightful place, everything fit as it should!). IMPORTANT TO HAVE STUDS LIKE THIS
.
under the filter bracket mount, although you can move the filter under the hood either with self-tapping screws or weld it in. I’m talking about studs
.
When twisting the line fittings, do not forget to put the rubber rings on the dad
. It’s better to put the wiring under the EBN right away, then it’s probably not realistic to plug it in, or you need thin hands with long and tenacious fingers
Well, now we just grab the hoses to the separator with ties, adjusting the length of the hose so that it doesn’t get too tight
This is where we can finish with the fuel wires. The task is quite difficult, without a pit (even the weakest one) it is not possible to do it at all, and the assistant is sometimes very relevant. I fiddled with all this for 2 days.
Fuel circulation in the vehicle’s fuel system is carried out through pipelines connecting the tank, filters, pumps, carburetor or ramp, injectors, etc. The elasticity of pipelines is ensured by hoses - read the article about these components of VAZ cars, their types, design and features.