Electric windows are very convenient devices that are controlled by a special button and make it possible to lower or raise the side windows without rotating the previously used handles. Unfortunately, this option is provided only in some modifications of the VAZ-2110 car. Therefore, in this article we will tell you how to install it yourself and ensure maximum comfort in controlling the side windows.
Selecting window regulators for installation on a VAZ-2110
If you want to install electric windows on your car, you will first need to choose the most reliable device that will serve for many years without causing any problems. On the modern market you can find the following options:
- traditional cable structures, which are relatively easy to install, but differ from others by not having a very long service life, wear out quickly;
- strip devices that are not very convenient to use;
- rack and pinion window lifters, which are deservedly recognized as the most suitable and reliable in operation.
When choosing devices suitable for your car, pay attention to factors such as:
- the speed of raising and lowering the glass, which largely depends on the gear motor installed on the car;
- the ability to use the device in the cold season;
- noise level during product operation.
Taking into account all these factors, you will be able to choose window lifters that will not only work flawlessly, but also will not create any problems in specific operating conditions.
Manufacturers of electric windows for VAZ cars
ESP for VAZ 2101-07 and 2108-2115 cars is produced by various companies - the mechanisms can have different designs and are sold in sets for two or four doors. Zhiguli electric windows are almost never sold individually; in stores you can only find separate ESP motors. Among the most well-known manufacturers of electric window lifting mechanisms are:
- Katran (2104-05-07);
- Granat (2104/2105/2107);
- Forward (2108-09-099);
- SPAL DE LUX (2110-11-12);
- Golden eagle (2110/2112).
The industry produces several types of ESP for Zhiguli cars, and electric windows can be:
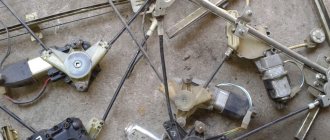
Each model of window lifters has its own characteristics, advantages and disadvantages. It should be noted that ESP mechanisms from different manufacturers have design differences between each other, and therefore they are not interchangeable. Kits of parts are relatively inexpensive, and the most popular are ESP kits for front doors. The standard set of electric windows includes:
- the door lifting mechanisms themselves with motors;
- two window lift buttons;
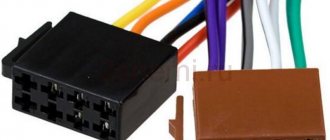
- wires with plugs for connection;
- necessary fasteners;
- stubs.
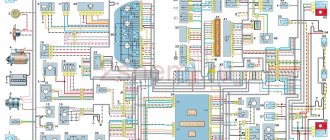
Almost all kits contain instructions for installing parts with an electrical connection diagram.
How to install and connect power windows on a VAZ-2110
The most preferred devices are rack type, so we will describe the installation process as an example. The connection diagram for the window regulator on a VAZ-2110 car is as follows:
- remove the negative terminal from the car battery to stop the supply of voltage to the on-board power supply network;
- we take the wires that come standard with rack-and-pinion window lifts and make a kind of harness out of them that makes connection easy;
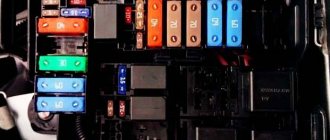
- remove the car mounting block, which will require unscrewing the self-tapping screw that secures the special latch;
- turn the block over and carefully install block Ш1 of the pre-prepared wiring harness into the corresponding connector;
- dismantle the door trim;
- we pull the wires to the electric window drive. To do this, you will need to carefully pass them through the holes in the door itself and the body pillar on the desired side.
After this, buttons or keys are installed that will be used to control the power windows. Depending on your desire, they can be attached either to the door trim of a VAZ-2110 car, or to an existing control panel. In the first case, you will need to use an additional wire, which will allow you to equip the key backlight.
The process of dismantling and replacing the device
If you decide to repair the front or rear SPs or replace them, then you will probably know how to remove the device. The procedure for removing and connecting a new window regulator may vary. It all depends on the type of joint venture, as well as the design features of the car.
Let's consider the process of replacing a manual SP with an electric one:
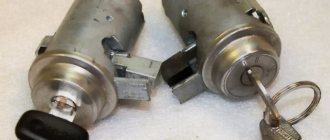
- First, the ignition is turned off and the car battery is disconnected; this must be done in order to de-energize the on-board network.
- Then the control handle located on the car door is removed. To dismantle the handle, remove the stopper located under the special washer - all these components are located on the handle itself. Using a flat-head screwdriver, you will need to move the latch to the side and remove the locking element from the slot. These steps will allow you to dismantle the handle. If this element is installed tightly enough, then try prying it off with a screwdriver.
- After this, the armrest handle is dismantled. Using screwdrivers, remove the plugs - behind them there are screws that secure the handle. They are unscrewed with a Phillips-blade screwdriver. To make things easier, you can also remove the handle trim on the side rearview mirror. After completing these steps, you will need to remove the door trim. At this point, the preparatory stage can be considered complete.
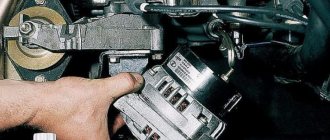
- Next, in order to electrically install the motor, control unit and other components of the joint venture, you will need to gain access to the latches. These components are used to attach the device itself to the glass. The device is fixed with two screws; they can be unscrewed with a wrench.
- When these steps are completed, you will need to remove the glass or fix it in one position with tape. It is necessary to disconnect the socket from the slot and unscrew the nuts using a wrench; this will allow you to dismantle the old SP mechanism. To install a new system, you will need to connect the block with wiring to the plug on the mounting block. In this case, it must be connected to the back of the fuse box.
- Next, the devices themselves are installed directly with an electric motor, control module, lifting mechanism and other components. First, all the components must be installed in the car door. When the fastening studs in the frame are installed, the nuts that secure them will need to be completely tightened. When installing, be sure to use the instructions that come with the kit, as well as the connection diagram. The latter will be required to properly connect the connector with the wiring.
- When all the elements of the electrical circuit are connected, it is necessary to connect the battery terminals and diagnose the performance of the joint venture. To do this, you will need to close the contacts on the wires.
- Then the central module with buttons is installed. This device must be installed either in the doors, or on the center console, or on the tunnel that runs from the console to the rear seats. The last option is more preferable.
- Now you need to lower the mechanism with the electric motor until you see that the mounting holes of the holder coincide with the technological holes in the mount. This clip must be bolted.
- Using the control keys on the central unit, you will need to make sure whether the joint ventures are working correctly and whether there are any problems with their operation. If no errors were made during the work and all actions were performed correctly, the window regulators will work correctly. If you make mistakes, you may encounter performance problems. At the final stage, you will need to assemble the door and install the trim in place. In the place where the handle for raising and lowering the glass was located, you will need to install a plug.
Installation process of electric windows
In addition, it is necessary to install the power windows themselves. The procedure is performed in the following sequence:
- temporarily remove the glass seal located on the inside of the door;
- remove the glass, and then dismantle the window regulator fastening mechanism;
- we install devices that will operate from an electric drive;
- connect the negative terminal to the battery and check the operation of the new window regulator;
- We install the glass in place and trim the door.
Installation
Now we replace the defective unit with a new one and carry out the assembly work in the reverse order. But if the glass is removed completely, it is necessary to carefully adjust its position afterwards by moving the bolts in the mounting holes.
It should also be taken into account that during dismantling, the holders, also called pistons, may be damaged, so it is better to buy a set of new ones just in case, in order to avoid troubles.
When installing the lift handle, you need to make sure that it is seated tightly enough. If this does not work, then you should wrap it with electrical tape.
Features of connecting power windows
Unlike conventional mechanical devices, power windows are not equipped with traditional gear reducers, but with a special drum. The shaft of a DC electric motor is inserted into its hole located in the center. In this case, the motor is only a component of the gearmotor, on which, as we found out earlier, the speed and quality of raising and lowering the windows depends.
Before installing a new power window, you must select the correct device based on its technical characteristics, and also make sure that the product is in a fully folded state. Otherwise, you are unlikely to be able to install the product efficiently and ensure its flawless operation after connecting it to the vehicle’s on-board network.
Kinds
A window lifter is a device used to move window glass and hold it at the desired point. Currently, the range of window lifters is quite wide, it includes not only many brands, but also differences in target orientation:
- front doors
- rear doors
- left doors
- right doors.
Moreover, the design for each device will be different. But in each of the listed cases there are common points; each window regulator consists of:
- grooves installed on the inside of the door frame, the purpose of which is to hold the glass sheet at a certain point
- “rails”, which are statically fixed in the door body and act as guides for the movement of glass
- seal, damper, made of soft rubber, limiting the movement of the glass sheet up and down.
In addition, any type of window regulator consists of two main components:
- lifting mechanism
- drive unit.
There are two types of drive:
- Mechanical - consists of a simple set of parts, a pair of gears and a handle. In order to set the glass sheet in motion, you need to turn the handle clockwise (if you need to raise the glass) or counterclockwise (if you need to lower it). Physical forces are transferred to the drive roller, that’s the whole principle of operation of the mechanical device.
- Electrical is a more complex set of parts. An electric window regulator consists of a drive drum or gear and an electric motor with a built-in worm-type gearbox.
Rack and pinion window lift
According to the lifting mechanism, window lifters are divided into several types. Moreover, in AvtoVAZ cars there are different design options for window lifters.
So, the well-known seven is equipped with a rack-and-pinion type device; by the way, the “ten” also has rack-and-pinion window lifters.
This option is good because it is easy to repair and easy to operate, but a serious disadvantage of the design is its unreliability. In addition, the rack-and-pinion type of device requires lubrication.
Cable (mechanical)
A more advanced design is the cable type, presented in the tenth VAZ model.
The positive point here is the fact that the possibility of glass distortion is completely eliminated. But, like rack and pinion mechanisms, cable mechanisms are also unreliable.
Although the price for them is not so high, window regulators made of galvanized metal, which cost about 400 rubles, and Metprom devices, which cost 300 rubles, enjoy a good reputation.
A standard cable window lift costs less, 250 rubles.
Power window
The new generation of mechanisms are lever ones that operate using hinges.
We recommend: The best ways to replace fine and coarse fuel filters on a VAZ 2109/2114/2115
Their advantage is the absolute absence of noise, but this type of device only works in conjunction with an electric motor, while the first two can also be presented in a mechanical version.
The tenth model is equipped with two types of window lifters: simpler modifications of previous years come with mechanics, and modifications of later years of production come with electric windows.
But since owners of the old ten are more common among motorists, then we will next talk about how to replace a mechanical window regulator yourself, but first we will understand the most common faults of window regulators characteristic of the VAZ-2110.
By the way, the electric window lifter changes in exactly the same way; all the grooves and fastenings are similar and will fit easily.
- What most often happens in the top ten is the grinding of the lift gear, which makes the device inoperative.
- The second reason is a cable break, which disrupts the entire system.
Problems can be solved by dismantling the device and replacing defective parts, or by completely replacing the window regulator, which would be a more correct and simpler option. Now let's get to work.
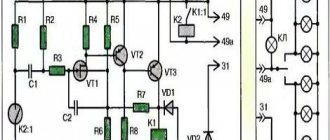
Serial connection - diagram
We connect the output of additional button 1 in the driver's door to input 6, and output 7 to input 3 of the main button on the passenger door. We cut the wires in the block connecting contacts 5-6 and 6-3. The minus of contact 5 now goes only to the backlight, and contacts 6 and 3 now take output from additional buttons 1 and 7 of the driver's door. Installation in parallel will result in short-circuiting during lifting and lowering. Power wires are highlighted in bold.
When using trigger buttons, connect all ESP motors only through a relay. When using a conventional door closer, relays are also needed, since they are not in the long-press closer block and all the current flows through the buttons and wires from them.