09.19.2021 8 406 Cylinder block
Author: Victor
Many owners of Lada Priora, in the process of car maintenance and repair, independently replace the head gasket or grind valves. When performing such work, it is important to observe the sequence and tightening torque of the cylinder head on the Priora.
[Hide]
In what cases is it necessary to tighten the block?
During the operation of any car, including the VAZ 2170 Priora, the engine head is exposed to long-term cyclic effects of gases located in the engine cylinders. On older power units, the tightening of the cylinder head screws could weaken under such loads and periodically needed to be brought to a normal level. Today, all VAZ Priora engines use bolts made of special steel, which are tightened once for their entire service life.
If a coolant and oil leak occurs, there is no point in further tightening and tightening these bolts, since this will not improve the tightness of the joint. The only correct way to combat a leak is to remove the head, check the evenness of the mating surfaces and replace the gasket. After performing any repair work related to removing the head from the engine, it must be tightened in compliance with all necessary conditions.
The video from the author Alex ZW shows the process of installing the cylinder head on an 8-valve engine.
How the work is carried out
First of all, prepare your tools. You will need to have:
- torque wrench;
- a set of keys;
- calipers;
- knob;
- socket heads.
Each bolt is tightened in 4 approaches: 2 circles with different torques and the same with a 90-degree turn. There are several rules that must be followed to ensure that the fasteners on the cylinder head are tightened successfully:
- Always replace old fasteners with new ones. The fact is that the fastening elements are under tension during engine operation. This leads to their wear and breakage.
- Carefully inspect the cylinder head bed and other elements. Worn or deformed parts are best replaced. A small break or crack can lead to global destruction.
- During any repair, the gasket should be replaced with a new one.
- Tighten each in 4 approaches, observing the order. Take your time with this work and constantly check the diagram so as not to get confused. We recommend that beginners watch the video instructions before starting work. With its help, you will be able to visualize each step and definitely won’t make a mistake.
- All tools must be of high quality, especially the torque wrench. It's better to borrow it for a day than to buy it and try to save money. A good key doesn't cost a penny.
It will be useful: Features and rules for choosing oil for engines with installed gas equipment
Before starting work, set the knees and camshaft to the top dead center position. The tightening occurs step by step as follows:
- 1 circle with a moment of 2 kgf/m (20 N*m);
- 2 circle with a torque interval from 7.1 kgf/m (69.4 N*m) to 8.7 (85.7)
- 3rd circle – turn 90 degrees;
- finish the job with another 90 degree turn.
Follow the rules described above when assembling the mechanism so that it will serve you as long as possible. Refer to the diagram to ensure the work is done correctly. Please note that first each bolt is tightened with a torque wrench to the specified torque, and then the remaining circles also follow the pattern.
Take your time when tightening, make smooth movements. If over-tightened, the fastener simply breaks. It's good if it happens during work. If you fasten the cylinder head too tightly and do not correct the error, the bolts may burst during operation, which will lead to expensive repairs of that unit. If the tightening is loose, the gasket will begin to leak. If you do not detect this immediately, the breakdown will become more than serious.
Nuances of work
At different times, Lada Priora cars were equipped with engines with a displacement of 1.6 and 1.8 liters and a different number of valves in the heads - V8 (or 8V) and V16 (or 16V). The type of unit head determines the size of the bolts, the order of their installation and the tightening torque of the cylinder head on the Priora.
If the car has an 8-valve engine, then it can use head mounting bolts of different sizes:
- on old motors 21114, M12*1.25 hex head screws are used;
- on more modern 21116, which went into production approximately in mid-2011, M10*1.25 elements with an asterisk head are installed.
When installing a removed head, it is necessary to use new screws, since the old ones will be stretched and have internal damage.
Also, the engines use gaskets of different designs - combined on the old unit and all-iron on the new one. The procedure for tightening bolts for engines with metal and combined gaskets is absolutely identical.
The main nuances when performing work are checking the length of the fasteners, observing the sequence of tightening the screws and monitoring the tightening force. Violation of these conditions leads to damage to parts and the need for additional repair work. The procedure itself is not complicated and can be done independently in any convenient place - in a garage or in an open parking lot, with the exception of the case of installing the head on the engine, which is preferably installed indoors.
It is important to remember that tightening the bolts “by eye” without a torque wrench is unacceptable, since a uniform fit of the mating surfaces of the head and block will not be ensured.
Tools and materials
Before starting the tightening procedure, you should prepare everything necessary to perform:
- wrench with built-in dynamometer up to 100 H⋅m;
- a set of sockets and regular keys;
- Togh E14 key;
- calipers for measuring the remaining length of bolts;
- plate with a marked scale up to 180 degrees;
- new bolts.
A torque wrench is an important tool for DIY repairs.
Step-by-step instruction
Sequence of operation on an 8 valve engine:
- Wipe the cylinder head surfaces and dry the bolt holes in the engine block.
- Install the gasket on the block and align it along the guides.
- Mount the head on top and insert 10 M10 or M12 mounting bolts. If the owner decides to save money and keep the old screws, then they should have a length of no more than 135.5 mm.
- Tighten the elements according to the diagram. The tightening force should not exceed 20 N⋅m.
- Then you need to re-tighten the bolts. The second tightening force should be in the range from 70 to 85 N⋅m.
- Next, you need to tighten the screws by 90 degrees in the same sequence. The rotation angle can be controlled using a special device, which is a plate with an attached scale from 0 to 180 degrees.
- In accordance with the regulations, you need to tighten the bolts again by 90 degrees.
- The attachment of the 8 valve head to the block is complete.
- After assembling the motor, you need to check the quality of operation by starting and warming up the engine. A securely tightened joint between the head and the block should not allow working fluids to leak from the crankcase of the power unit.
Homemade device for controlling the rotation angle
If a more powerful and modern engine with sixteen valves is installed on a car, for example, the VAZ 21126 model or 126 for short, the procedure for pulling the bolts has its own characteristics.
In order to correctly tighten the cylinder head screws on such units, you need to:
- Remove oil from the mating surfaces and check that there is no liquid in the bolt holes.
- Install the gasket, center it and place the head on top.
- Insert 10 mounting screws M10*1.25 into the guide holes, having previously lubricated the threads with engine oil. If you decide to use old bolts, which is permissible for 16 valve heads, then their remaining length should not exceed 98 mm.
- Perform preliminary pulling according to the scheme with a torque of 12-20 N⋅m.
- Increase the tightening degree to 26-34 N⋅m and re-run all the bolts in the same sequence.
- Then you need to tighten the screws 90 degrees, with a force of about 50 N⋅m.
- Repeat tightening by 90 degrees again, the torque on the key will be approximately 80 N⋅m. Some instructions recommend waiting up to 20 minutes between turns, but in practice no advantages of such a scheme have been identified.
- After assembling the power unit, you should check the quality of the work performed.
The procedure for pulling the head on 1.8 liter engines, which are 1.6 liter engines with an enlarged cylinder, is completely identical to that described above.
If during the work process the correct moment of force is applied to the bolts, corresponding to design calculations, then the gasket will be evenly and tightly pressed along the joint, ensuring a reliable and tight connection. It is important to note that if it is necessary to remove the cylinder head from the engine, then the screws are also loosened according to the scheme established by the regulations. Chaotic unscrewing of the elements will lead to deformation of the head and the appearance of invisible microcracks.
Adjusting the tightening torque of bolts for a 16 valve car
Adjusting the tightening torque is a simple process, and after reading the material and video in this article, you can handle it yourself. It is enough to tighten it once and then you will be able to do it yourself and at the same time you will be able to help your friends if necessary. It is important to adhere to the diagram for cars with a 19-valve engine and observe the timing.
Required Tools
- a set of keys;
- a torque wrench (no need to buy it, it’s better to borrow it for a day or two);
Torque wrench - knob;
- rod compass;
Shtengel compass - socket heads.
Scheme
The pattern for tightening on a 16-valve engine differs from the pattern for an 8-valve engine, so we will present both one and the other so that you can compare them.
Scheme for 16 valves
Scheme for 8 valves
Just don't get confused when you install. In any case, before starting work, check the instructions that came with the car. Tightening with different torques on a 16 valve unit occurs in 2 circles with different torques, and then another 2 circles with a rotation of 90 degrees. Nothing is difficult, which means you can cope on your own.
Stages
In order for self-tightening of bolts to be completed successfully and to last for a long time, a number of simple rules should be followed:
- It is better to use new bolts, since during operation they are under constant tension and lose their properties over time. There is no guarantee that the old bolt will not withstand the stress and will burst.
The length should not be more than 9.5 cm - It is not advisable to reinstall the gasket, even if it is in reasonable condition.
- Strictly observe torque when tightening.
- The sequence of tightening the bolts should be exactly the same as in the diagram for 16-valve power plants.
- Before installing the cylinder head, carefully inspect all parts for damage and deformation. If any are found, do not ignore them, but be sure to replace them. Often, small breakdowns lead to major damage, and sometimes even to the complete destruction of systems and mechanisms.
- Do not use tools of dubious quality and manufacture. This is especially true for a torque wrench.
By following these simple rules, you can guarantee the best tightening and a reliable tight connection.
Place the cylinder head on the block, first making sure that the crankshafts and camshafts are set to the top dead center (TDC) position.
Proper twisting
The tightening process itself takes place in 4 circles:
- 1st circle - moment 20 N m (2 kgf/m);
- 2nd circle - moment 69.4–85.7 N·m (7.1–8.7 kgf·m);
- 3rd circle - turn the bolts 90 degrees;
- 4th circle - another 90 degree turn.
As you can see, everything is simple. If you have any questions, watch the video. In terms of time, this work does not take more than twenty minutes, but it allows you to save a decent amount, which they will charge you at the service station.
Loading …
Photo gallery
The photo below shows the procedure for loosening the bolts and tightening them, which must be taken into account when repairing the cylinder head on a VAZ 2170 Priora.
Scheme for loosening bolts on an engine with 8 valves
Scheme for loosening bolts on an engine with 16 valves
16 valve head tightening diagram
8 valve head tightening diagram
Video “How to properly tighten cylinder head bolts”
In this video, a master with extensive experience shows and describes in detail how to properly tighten the cylinder head bolts. On a Lada Priora car with a 16-cl unit, work is performed according to the same scheme.
Many owners of Lada Priora, in the process of car maintenance and repair, independently replace the head gasket or grind valves. When performing such work, it is important to observe the sequence and tightening torque of the cylinder head on the Priora.
In what cases is it necessary to tighten the block?
Video “Installing and tightening the cylinder head on a Priora”
The assembly of the upper part of a 16 valve engine is presented in a video from the Expert R channel.
Do you have any questions? Specialists and readers of the AUTODVIG website will help you ask a question
Was this article helpful?
Thank you for your opinion!
The article was useful. Please share the information with your friends.
Yes (100.00%)
No
X
Please write what is wrong and leave recommendations on the article
Cancel reply
Rate this article: ( 3 votes, average: 5.00 out of 5)
Discuss the article:
Tightening torque of the VAZ-2112 cylinder head (16 valves): diagram
Cars October 25, 2017
The tightening torque of the VAZ 2112 cylinder head (16 valves) is very important, since deformation occurs if the head is unevenly installed.
This leads to the fact that after disassembly it will be necessary to grind off at least 2 mm from the surface of the block head.
If all tightening torques are observed, then you will not have to sharpen the head, and if you do need to do this, then no more than a quarter of a millimeter.
Head design
The 16-valve engine uses a cylinder head containing the following elements:
- Two camshafts. They have five supports, cast iron, each with 8 cams. It is impossible to install an exhaust camshaft instead of an intake camshaft (and vice versa).
- 16 valves. They are installed on guide bushings.
- Seats are installed directly on the block head, which come into contact with the valve plates.
- Hydraulic compensators in the amount of 16 pieces.
Camshafts are mounted on cylinder head supports. Compliance with the tightening torque of the VAZ-2112 cylinder head (16 valves, 1.5 liters) ensures normal engine operation. This will also allow you to avoid expensive surface milling after the next dismantling of the head.
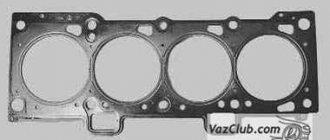
Preparing to replace the cylinder head gasket
When removing the cylinder head, be sure to change the gasket - it cannot be reused, as this will lead to breakdown.
It also needs to be changed if a leak of antifreeze or engine oil is detected in the area where the block and head are connected. Leaks often occur as a result of damage to the head itself due to excessive heat.
If you do not observe the tightening torque of the VAZ-2112 cylinder head bolts (16 valves), the gasket may be damaged and fluid leaks may occur.
Preparatory work before replacing the gasket:
- Disconnect the negative terminal from the battery.
- Set the piston in the first cylinder to the position corresponding to top dead center.
- Completely drain the liquid from the cooling system - to do this, first unscrew the plug at the bottom of the radiator, then in the engine block.
- Be sure to relieve pressure in the fuel system - there is a special fitting in the rail for this.
- Unscrew the nuts securing the exhaust pipe from the exhaust manifold.
- Remove the thermostat.
- Unscrew the nut that secures the bracket to the liquid pump pipe.
- Loosen the nut that secures the bracket to the manifold (exhaust). After this, move it to the side so that it does not interfere with the work.
- Disconnect the wiring block from the oil sensor and on engines of the VAZ-2111 modification you need to unscrew or loosen the nuts that secure the support and support brackets.
Video on the topic
Removing the block head
After the preparatory work, you need to completely remove the head. To do this, the following manipulations are performed:
- Disconnect the white block from the DPKV; to do this, you will need to press the plastic latch.
- Remove the plastic decorative panel and metal cover from the block head.
- Remove the timing belt. To do this, you need to unscrew the tension roller nut and remove it completely.
- The camshaft pulley must be secured with a screwdriver - try to prevent it from turning.
- Unscrew the camshaft mounting bolt and remove it completely.
- The second camshaft is removed in the same way.
- Unscrew the ten bolts that secure the head to the block.
After this, you can completely remove the cylinder head. The tightening torque of the VAZ-2112 cylinder head (16 valves) under the turbine is the same as without it.
Valve System Features
On the VAZ-2112 car, the valve design is very similar to that used in the engines of the VAZ-2110 modification. Only their diameter of rods and plates is slightly smaller. Dimensions:
- The inlet valve is a plate with a diameter of 29 mm, a rod of 6.975 mm.
- Exhaust valve - plate with a diameter of 25.5 mm, rod 6965 mm.
A spring is installed on each valve; its unloaded length is 38.19 mm. If there is a load of 240 Newton, it decreases to 32 mm. If a spring is subjected to a load of 550 Newton, its length is reduced to 24 mm.