Why would you need to replace an acoustic shelf?
If the sound quality of the speakers initially satisfied you, then the need to make an acoustic shelf with your own hands may arise for the following reasons:
- damage to the stock part;
- decision to increase the number of speakers;
- to improve sound quality;
- wear of a previously installed element.
Drivers often encounter breakage of shelf fasteners, which occurs while driving on a rough road. Most often, this malfunction is encountered by drivers who do not slow down in front of potholes or on rural rough roads.
However, the vast majority of VAZ-2115 owners replace the acoustic shelf in order to improve the sound quality of music inside the car.
In this case, the shelf should be made of plywood with your own hands or to order. This material will help make the speakers sound clearer.
Making your own rear acoustic shelf
It’s quite difficult to get good sound in a car, but it’s possible. The interference is not only noise, but also a weak stereo effect, which is especially pronounced on the rear columns. To resolve this problem, use the following options:
- Point sound. In this case, the speaker should be aimed at the listener. In the case of a car, the only way to implement such a solution is to mount the speakers in the center of the ceiling, building an acoustic podium. However, as practice has shown, it is difficult to organize a reliable mount, and there is also no bass.
- Reflected sound. Here the speaker is directed at the rear window, reflecting from which the stereo effect is enhanced and the sound becomes three-dimensional. To implement this option, you need a properly manufactured acoustic shelf.
Despite the fact that there are quite a lot of such goods in stores, true connoisseurs of high-quality sound are not always satisfied with their quality. Therefore, the question is: “How to make an acoustic shelf?” - very relevant.
Preparing to make a shelf
First of all, you will need to prepare the materials and tools that will be required to complete the work. Purchase in advance:
- plywood sheet;
- carpet for cladding;
- radio fabric;
- PVA glue;
- fabric glue;
- a box of self-tapping screws.
The tools that will be useful to you are a jigsaw, a drill or screwdriver, and a grinder.
Please note that the plywood must be at least a centimeter thick, otherwise the shelf will be no more effective than the standard one. Many people are interested in how to take the dimensions of a shelf correctly, so as not to make mistakes during manufacturing. To do this, experienced craftsmen recommend removing the standard shelf and using it for a pattern. In any case, you will have to dismantle it; it is better to do this before cutting the material. This way you definitely won’t go wrong with the size.
Removing the stock shelf is not that difficult. To do this you will need:
- Remove the rear seat.
- Locate the four main acoustic panel fasteners and remove them.
- It is important that the seat belt is fully extended while working. To prevent it from gathering into the tension mechanism, move the two latches and remove the belt guide.
- Unscrew all side frame fasteners.
After dismantling, parts of the old panel can be used as a pattern. In this case, a drawing will not be needed. To do this, first draw them on cardboard, and then transfer them to plywood. You have to prepare the following parts of the structure: main, decorative and adjacent. Next, prepare the side supports and grates.
On the side of the seats, on the main part of the panel, there is no need to make cutouts in the corners, since attaching a homemade shelf can be done differently than a stock one. From the old shelf, cut out the part that fits the rear glass and attach it to the new panel. You can also not take the side walls from the design of the old acoustic panel, but cut them diagonally yourself. By stitching, adjust them to the main part. Assemble the structure with screws. It is enough to screw in only a couple so that in case of a mismatch in size, dismantling can be done easily.
In the main part of the stock panel, two holes are usually pre-made for speakers. If necessary, you can make additional holes, for example, so that the shelf can accommodate several different speakers. In the decorative part, each of the holes should be several millimeters larger. Measure them against the speakers you plan to install. The heads must fit freely into the place prepared for them.
Acoustic shelf VAZ 2115 for six speakers: how to make it yourself
It is quite difficult to achieve good sound in a car, but it is still possible. In addition to noise, in a moving car, there is the problem of a weak stereo effect, especially from the rear speakers. The problem of stereo effect in a car is associated with the wrong direction of the speakers and the obstacles that exist between the speaker and the listener, this could be the rear seat headrests, passengers in the back seat. There are two ways to solve this problem:
1. Spot sound - Installation of speakers aimed directly at the listener, but since the passengers are in different corners of the car, so as not to deprive anyone, the speakers should be directed to the center of the cabin, avoiding obstacles. In this case, the speakers will have to be installed under the ceiling and acoustic podiums made for them. The disadvantages of this type of design are the difficulty of implementing durable mounting of the podiums and the almost complete absence of bass.
2. Reflected sound - Well, here, everything is much simpler, we direct the speakers to the rear window, the reflection of sound from the glass enhances the stereo effect, the sound becomes more voluminous. This option is much simpler, and if the acoustic shelf is manufactured correctly, the bass will not suffer.
Store acoustic shelves usually have speakers pointed at the ceiling of the car, where some of the sound is damped by the soft or fleecy ceiling, and if there are obstacles in the form of headrests and passengers, you actually want to cry. It’s better to do this shelf yourself, especially since it’s not that difficult, but you’ll have to work hard.
How to make an acoustic shelf with your own hands.
A friend asked me to help him make a classic acoustic shelf for 6x9 coaxial speakers (ovals), this is how we made it, based on the above.
It will be useful: Replacing the cylinder head gasket of a VAZ-2107 (injector, carburetor) with your own hands
We prepared the interior, removed everything unnecessary, removed the factory decorative shelf and insulation.
We marked it on a piece of chipboard using a decorative shelf.
It is necessary to mark it in such a way that the future acoustic shelf is shorter than the decorative shelf, half a centimeter on each side, otherwise it will not fit.
Tried it on in the car.
We mark the holes for the speakers.
Shelf with cut holes for speakers.
At the request of a friend, so that it would not fall from the shelf, and to tilt the speakers onto the rear window, we made a template.
When you turn the template over, you get another symmetrical half.
We trace the template and cut out the second level of the acoustic shelf.
We glue it with construction glue and tighten it with self-tapping screws.
We tried it on again in the car, along the holes for the speakers in the acoustic shelf, with a sharp object, and made notches to cut large holes in the iron shelf.
We used a small grinder to cut holes in the iron shelf. The holes must be made no smaller than in the acoustic shelf. If you don’t make free access to the trunk, you shouldn’t hope for a decent bass. And one more piece of advice: the cleaner the trunk, that is, the less junk in it, the better the bass.
We screwed on the next level of the shelf.
Trimmed, sharpened and sanded.
They covered it with carpet and the acoustic shelf is ready, all that remains is to screw on the speakers and you can put them in the car.
Someone glues noise insulation or vibroplast under the shelf; with a shelf like the one we got, this is of no use, but it wouldn’t hurt to tape it over the trunk.
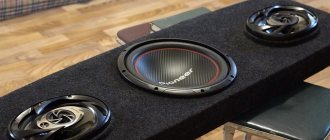
Here you can clearly see that the speakers will play on the reflection from the rear window.
We got everything we wanted from an acoustic shelf; we made the shelf at random, and came up with the appearance and functionality along the way. I would like to say separately about the bass, it is there. And if you install a good car radio, speaker and power cables, and add an amplifier, I’m sure it will be no worse than with a ten subwoofer. And for fans of subwoofers, I recommend making a large hole in the center of the shelf, and a mesh on top, a subwoofer with a bass reflex or a proper bandpass in the trunk, that’s what will happen.
How to assemble correctly
The rear acoustic panel is quite easy to assemble:
- Once you have secured the side and main parts, place the speakers in place, secure them and cover them with radio fabric. You can use a grid instead.
- Make a frame from PCB or plywood and cover it with mesh or radio fabric. Glue the material and leave it to dry for several hours.
- Next, glue all the plywood parts and cover the acoustic element with carpet. You can secure the material with glue, but some use a furniture stapler for this purpose.
- A day later, after the shelf has completely dried, you can mount it using the corners. They will be located in the mounting areas of the rear seat of your car. This installation will not take much of your time and effort.
Such a panel will not irritate your ears with squeaks; even speakers that are not of the best quality will sound clearly in it.
Sources
- ladaautos.ru/tuning/kak-samostoyatelno-sdelat-akusticheskuyu-polku-vaz-2115.html
- zen.yandex.ru/media/thesoundteam/akusticheskaia-polka-dlia-vaz-2115-svoimi-rukami-i-kak-ee-izgotovit-5fc5d2b44fa3013b234efc1d
- drive2.ru/l/10564303/
- drive2.ru/l/5940465/
Manufacturing stages
You should start, like any serious business, with preparation. In this case, you need to remove everything unnecessary from the interior, and then remove the decorative shelf that was installed by the manufacturer and the insulation. We got it like this:
Stage 1. Applying markings. You can use wood, but in our version it is chipboard. The decorative shelf is used as a kind of template.
However, approximately 0.5 cm will need to be removed from each side in order for the shelf to fit into the space allocated for it.
Stage 2. Sawing. Of course, you can do this job manually, but it is better if you have a suitable power tool.
Performing preliminary fitting:
Stage 3. Holes are marked according to the size of the speakers
Now you need to carefully cut the holes, something like this:
Stage 4. Create a template. This way you can install the speakers at the desired angle. In addition, nothing will fall off the shelf. In our version it looked like this:
Now you need to turn it over to get the other half
Next, we lay the finished templates on the chipboard, trace and cut them out.
We glue the resulting second level of the acoustic shelf and further strengthen it with self-tapping screws.
Stage 5. Now you need to try it on again:
The next step is to cut a hole in the iron part of the shelf. Its diameter should be the same or slightly larger than that of the product being manufactured. To do this, you should use a grinder. If access to the trunk is not organized, then you shouldn’t even dream of normal bass sound. You also need to keep in mind that clutter in this cavity does not have the best effect on the sound quality.
Stage 6. We decided that one more level would not be superfluous. This is what it looks like:
And then we installed this:
Stage 7. Cut off all excess, grind and go through with sandpaper
All that remains is to cover the product with a suitable material, in our case it is carpet.
There is no need to use vibroplasts or sound insulation on the acoustic shelf itself, but it is very advisable to cover the trunk with them. Stage 7. It is also the final stage. The almost finished product is installed in place.
In this image you can see that the sound from the speakers will be reflected from the rear window:
It will be useful: Which carburetor to put on Niva 21213: detailed diagram of the part and description of the operating principle, recommendations from specialists on selection, installation and configuration
The VAZ 2107 acoustic shelf with your own hands looks attractive and copes with its functions perfectly. Moreover, no special financial costs were required.