MANUAL 2 channel power amplifier Mystery MR 2.75
Main features: 2-channel class AB power amplifier, MOSFET technology Rated power (4 Ohms) 75 W x 2 channels Rated power (2 Ohms) 120 W x 2 channels Frequency range 20 Hz - 22 kHz Low frequency level adjustment range from 0 up to +12 dB at 45 Hz Low-pass filter 50 - 250 Hz / 18 dB per octave High-pass filter 50 - 250 Hz / 18 dB per octave Input impedance 20 kOhm Dimensions (L x W x H) 200 x 263 x 51 mm
1. RCA input Used to connect the amplifier to the line output of the head unit. The RCA output is used to connect a second amplifier. 2. Low frequency level control (BASS BOOST) This control is designed to smoothly adjust the gain boost at a frequency of 45 Hz within the range from 0 to +12 dB. 3. High-pass filter When connecting speaker systems smaller than 6x9 inches to the amplifier, it is recommended to set the crossover switch (6) to the H P position and set the HIGH PASS control to a frequency value of 65 Hz or higher to avoid damage to speaker systems by low-frequency signals. 4. Low Pass Filter When connecting a subwoofer to an amplifier, set the crossover switch (6) to L P. Set the crossover frequency to 100 Hz or lower, otherwise the speakers may be damaged. 5. Input signal adjustment (Level) This knob (5) is designed to adjust the amplifier input signal level. For correct settings, first move the control (5) to the MIN position, and the head unit volume control to the 3/4 position from the maximum (BASS and TREBLE controls in the zero position). Then slowly turn the Level knob (5) towards the MAX position. Note: If the sound becomes distorted, turn the control back a little. 6. Crossover switch The crossover switch allows you to select the speaker output mode: LP (low-pass filter), HP (high-pass filter) or OFF (filter off). 7-8. POWER and PROTECTION indicators These indicators show the operating modes of the amplifier: POWER - the amplifier is turned on and operating normally, PROTECTION - the amplifier has turned off due to overload or overheating. 9. Fuses Fuses are designed to protect the amplifier from overloads. Make sure you use the correct fuses. 10. +12V terminal The terminals are designed to supply (+) power to the amplifier. Connect to the (+) terminal of the car battery using a cable with a cross-section of up to 4 Ga. Install a fuse in this circuit near the battery. Note: This connection is made last when installing the amplifier (to prevent damage). 11. REMOTE INPUT (RMT) terminal The terminal is designed to turn on/off the amplifier by applying (+) 12V to this terminal. Typically, this signal appears at the output of a switched-on head unit designed to control an active antenna or other equipment. If there is no such signal, connect this terminal to the ACC circuit of the vehicle ignition switch. 12. GROUND (GND) terminal This terminal is designed to supply (-) power to the amplifier. Connect directly to the car body using a cable with a cross-section of up to 4 Ga. Note: This connection is made first when installing the amplifier. 13. Terminals for connecting speaker systems Terminals are designed for connecting one or more speaker systems. Follow the "2/1 channel (two or one channel)" connection diagram in the instruction manual.
Stereo mode (2-channel connection)
Bridge connection (single channel)
Technical characteristics of Mystery MR 2.75 Power at 4 Ohm load. 75 W x 2 channels Power at 2 Ohm load. 120 W x 2 channels Bridged power into a 4 ohm load. 225 W x 1 channel Frequency range. 20 Hz - 22 kHz Signal to noise ratio. > 90 dB Harmonic distortion factor. 60 dB Low Pass Filter. 50 Hz - 250 Hz / 18 dB per octave High Pass Filter. 50 Hz - 250 Hz / 18 dB per octave Bass level adjustment range. 0 to +12 dB at 45 Hz Input impedance . 20 kOhm
Good nutrition is the key to success
The amplifier connection procedure begins with the power wires. Wiring is the most important element of a car audio system; the volume and sound quality depend on it. Amplifiers need a stable power supply, otherwise the power will not be enough and the sound will become distorted. To understand why you need to pay attention to the quality of wiring and how it affects the sound reproduced by a loudspeaker, you need to know what a music signal is.
Some suggest that it represents a sine wave, however, the musical sinhala is characterized by a large difference between the normal and peak value. If sharp signal bursts are not important for car speakers, then in the case of an amplifier the situation is completely different. If the signal exceeds the permissible power for even a second (or even a millisecond), then these “anomalies” will be audible even to those who cannot boast of a good ear for music.
If the car amplifier is connected properly, the signal will flow through the wires undistorted. Carelessly done work or incorrectly selected wire cross-section will result in the sound being more compressed, rough and sluggish. In some cases, wheezing may also be clearly audible.
How to choose a wire cross-section?
Wire is the most common metal with a certain level of resistance. The thicker the wire, the lower the resistance of the wire. To avoid sound distortion during large voltage fluctuations (for example, when playing powerful bass), you must install the correct gauge wire.
It is worth noting that the cross-section of the positive cable should not be larger than the negative one (the length does not matter).
An amplifier is considered to be a rather electrically intensive device. For its effective operation, high-quality grounding is necessary so that it is possible to receive the necessary energy from the battery. To choose the correct wire cross-section, you need to make some calculations. First, look at the instructions for the amplifier (or directly at the box from the manufacturer, if there is no documentation, use the Internet) and find the rated power value (RMS) there. Rated power is the signal power an amplifier can deliver over an extended period of time to one channel of 4 ohms.
If we consider four-channel amplifiers, they usually have a power of 40 to 150 watts per channel. Let's say that the amplifier you purchased produces 80 watts of power. As a result of simple mathematical operations, we find out that the total power of the amplifier is 320 W. Those. How did we calculate this? It’s very simple to multiply the rated power by the number of channels. If we have a two-channel amplifier with a rated power (RMS) of 60 W, then the total will be 120 W.
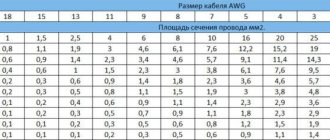
After you calculate the power, it is advisable to also determine the length of the wire from the battery to your amplifier and you can safely use the table to select the required wire cross-section. How to use the table? On the left side the power of your amplifier is indicated, on the right you select the length of the wire, go up and find out what cross-section you need.
The table shows the cross-sections of copper wires, remember that a large number of sold wires are made of aluminum coated with copper, these wires are not durable and have more resistance, we recommend using current copper wires.
Fuse selection
In order to secure the connection of the car amplifier, it is necessary to protect the power supply from the battery to the amplifier using a fuse. Fuses should be placed as close to the battery as possible. It is important to distinguish between a fuse that protects the device itself (whether it is an amplifier or a radio) and a fuse installed on the power wire.
Reviews about Amplifier MYSTERY MA-4.600 V3
I was looking for a fairly simple and at the same time accurate description of the procedure for setting up a car amplifier and came across the Sutener logbook Acoustics purchased.
The choice of amplifier is almost complete - there are three candidates. About them - in a separate thread. I stupidly copied the instructions, first correcting the spelling errors;. If during setup there are deviations from what is written below, I will correct the article later. How to set up an amplifier? Selecting the amplifier sensitivity level Roughly speaking, volume, although this is not entirely true. By turning the knob from a larger number to a smaller one, we increase it.
Attention: on different amplifiers, options are possible - either it will be a selector with a choice of filter type and one regulator, or separate regulators for the high-pass filter and low-pass filter. Some older amplifier models have fixed filters. Filtering is selected using the selector.
For the most part, it is necessary for subwoofers in a bass-reflex design. But it can also be used as a high-pass filter. Attention: the bass boost frequency is usually fixed. But on some amplifiers there is an additional regulator that allows you to select the required frequency.
- Information How to set up an amplifier
Phase control Serves to coordinate the operation of the subwoofer with the front. And in general for more precise tuning. There are also fixed phase controls. Please do not consider the following text as a user manual. Here I tried only to briefly and in a more accessible language explain “what’s what.” When setting up your amplifier, use your head and be smart!
I am not responsible for any damage caused to you. If you are not sure that you can do this yourself, contact a specialist. If you have component or coaxial acoustics [two speakers in the front and two in the back] 5.
Set the high-pass filter control to Hz. Next, turn “Gain” to minimum. And set the volume on the head unit to almost maximum. Next, turn up the Gain until distortion appears. Be careful. More fine-tuning is to find a compromise between the “volume” and “bass” of the speakers, with the main thing being the absence of distortion in the sound.
Use the gain and high-pass filter to customize the sound you like best, alternately adjusting the gain and filter frequency. For subwoofers and similar bass speakers, everything is similar, except that here we use a low-pass filter, that is, the goal is to prevent the subwoofer from reproducing higher frequencies. Typically, Hz is selected when tuning. If you have a FI body, then it is advisable to use a subsonic. If there is a phase control, take the time to turn it and listen.
Perhaps in some position the subwoofer will play louder and faster. The meaning of the final setting should be this: each speaker should play its own frequency range. If, for example, you have a subwoofer and a front, then, as a rule, the high-pass filter frequency for the speakers and the low-pass filter frequency for the subwoofer are set to the same.
This is usually the case, but not always the case. Remember that you create the sound for yourself. Customize it the way you like it best. Level - level - you set the input sensitivity of the amplifier. X-over - crossover operating mode - if the amplifier powers the subwoofer, set it to LowPass.
Subsonic is an infra-low-pass filter, that is, frequencies below 20 Hz. This filter eliminates it. Tell me, will the amplifier power 4 horn tweeters without capacitors? Is this the correct setting in this photo? Is there a mistake in the text? If I'm wrong, correct me. Buy a car on Drome. Register or login:. Bookmarked, thanks. This is all done by ear!
Connecting interconnect wires and control (REM)
To lay the cable, you need to find the linear output on the radio. The linear output can be recognized by the characteristic “bells” that are located on the rear panel of the radio. The number of linear outputs differs in different radio models. Usually there are from one to three pairs. Basically they are distributed as follows: 1 pair - you can connect a subwoofer or 2 speakers (labeled as SWF) If there are 2 pairs of them, you can connect 4 speakers or a subwoofer and 2 speakers (outputs are labeled F and SW), and when there are 3 pairs of linear wires on the radio, you can connect 4 speakers and a subwoofer (F, R, SW) F This is Front i.e. front speakers, R Read rear speakers, and SW Sabwoorer I think it’s clear to everyone what that is.
The connection will require an interconnect wire, which should never be skimped on. It is prohibited to lay the interconnect cable near the power wires, as various types of noise will be heard when the engine is running. You can run the wires both under the floor mats and under the ceiling. The latter option is especially relevant for modern cars, in the interior of which there are electronic accessories that create interference.
You also need to connect the control wire (REM). As a rule, it comes with interblock wires, but it happens that it is not there, purchase it separately; it does not need to be of a large cross-section - 1 mm2 is quite enough. This wire serves as a control for turning on the amplifier, i.e. when you turn off the radio, it automatically turns on your amplifier or subwoofer. As a rule, this wire on the radio is blue with a white stripe; if it is not there, use a blue wire. It is connected to the amplifier to a terminal called REM.
Amplifier connection diagram
Connecting a two-channel and four-channel amplifier
We have combined this section because these amplifiers have a very similar connection diagram, one might even say more simply, a four-channel amplifier is two two-channel ones. We will not consider connecting a two-channel amplifier, but if you figure out how to connect a four-channel amplifier, then you will not have any problems connecting a two-channel amplifier. Most car enthusiasts choose this option for their installations, since this amplifier can connect 4 speakers, or 2 speakers and a subwoofer. Let's look at connecting a four-channel amplifier using the first and second options.
Connecting a 4-channel amplifier to a battery is recommended using a thick cable. How to choose the right power wires and connect the interconnects, we discussed all this above. Amplifier connections are usually indicated in the manufacturer's instructions. When an amplifier is connected to an acoustic system, it operates in stereo mode; in this mode, this type of amplifier can operate under a load of 4 to 2 ohms. Below is a diagram of connecting a four-channel amplifier to speakers.
Now let's look at the second option, when speakers and a subwoofer are connected to a four-channel amplifier. In this case, the amplifier operates in mono mode, it takes voltage from two channels at once, so try to select a subwoofer with a resistance of 4 ohms, this will save the amplifier from overheating and going into protection. Connecting a subwoofer will not be a problem; as a rule, the manufacturer indicates on the amplifier where to get the plus to connect the subwoofer, and where to get the minus. Take a look at the diagram of how to bridge a 4-channel amplifier.
Connecting a monoblock (Single channel amplifier)
Single-channel amplifiers are used for only one purpose - connecting to a subwoofer. A notable characteristic of amplifiers of this type is increased power. Monoblocks are also capable of operating with resistances below 4 ohms, which is called a low-impedance load. Monoblocks are classified as class D amplifiers, and they have a special filter for cutting frequencies.
Adjusting the subwoofer input sensitivity “GAIN” or “LEVEL”
Another important step in setting up a subwoofer is adjusting the subwoofer's input sensitivity level. It is located on the subwoofer amplifier and is designated by the word “GAIN” or “LEVEL”.
It looks like a “twist” with numbers, for example, from 0.3 to 5 V. This is not a volume level, as some people mistakenly think, although when set to maximum values, the volume does increase. This function is needed to match the level of the head unit and amplifier.
“GAIN” is adjusted using different methods. But their essence is something like this: a music signal in the form of sines with a certain frequency is supplied to the subwoofer. The level of input sensitivity is minimal.
Gradually increase the volume on the head unit until audible distortion appears. After this, the volume knob is turned back so that the sound becomes clear again. Then the “GAIN” is adjusted in the same way, turning the “knob” until signal distortion appears. Then they return it a little back. Setting up the subwoofer in the car will be more accurate if you use an oscilloscope in the process.
Video on how to properly connect a four-channel and single-channel amplifier
We hope that this article helped you understand how to properly connect a car amplifier. Rate the article on a 5-point scale; if you have any comments, suggestions or you know something that is not indicated in this article, please let us know! Leave your comment below. This will help make the information on the site even more useful.
Car owners who like to listen to music loudly should definitely know how to connect a Mystery subwoofer. This device is considered one of the most popular and frequently purchased. To experience all the benefits of this technology, you need to connect it correctly and install it inside the car.
Setting delays
The next step in setting up a subwoofer in a car is setting the delays. But this is only possible on a processor head unit or with an external processor. Some acoustic designs, such as FI, do not always have good impulse response, so the bass may be a little late. This is not always pleasant to hear.
For example, the front speakers played a note, and a split second later the sub played. To prevent this, the delays are adjusted, which allows the front speakers and subwoofer to play simultaneously.
What do you need
Before you start connecting the Mystery subwoofer, you need to find or buy several additional components in specialized stores. They will be used during work and will allow you to achieve the desired result as quickly as possible.
To connect the Mystery sub you will need the following components:
- control wire;
- fuse for power wire;
- amplifier plug;
- 2 power wires;
- reversible RCA cables.
In addition to various components, you will need some materials and tools for the job. Without them, it will be impossible to do quality work.
Are you a car driver?! Then you can take this simple test and find out. Go to test »
List of required items:
- screwdriver;
- pliers or pliers;
- knife;
- electrical insulating tape.
Easy way to connect
Connecting the Mystery active subwoofer is done in two main ways. One of them is suitable for beginners, and the other is for professionals. When choosing the best option, you should evaluate your own capabilities, as well as your ability to perform such work.
Subwoofer connection procedure:
- A place is found in the car interior where the device will be located. Experts recommend placing the subwoofer so that passengers sitting next to you do not experience inconvenience from the loud sound emanating. However, it is prohibited to install the equipment in places where it will be obscured by any object. Otherwise, the sound quality of the melodies will decrease.
- Using power cables, connect the subwoofer to a power source (battery). If it is not possible to use this option, then connect the device through the cigarette lighter.
- A fuse is installed on the positive wire. This is necessary to ensure that a sudden surge in voltage does not damage the elements of the audio system and render it inoperable.
- The connected subwoofer is connected to the radio using double-sided RCA cables (“tulips”).
Connecting car subwoofers - DRIVE2
parallel connection of 2 coils
Parallel connection of two subwoofers
Parallel-series connection of subwoofers
Serial connection of two subwoofer coils
Daisy chain connection of two subwoofers
Daisy chain connection of two subwoofers
What could be easier than connecting a single-coil subwoofer to a monoblock or multi-channel amplifier. It's a completely different matter if the subwoofer has two voice coils or two or more of them. A two-coil subwoofer, as well as two, three or more subwoofers, can be connected in four ways: each coil separately, parallel connection of coils, serial and combined. What each of these subwoofer switching options gives is, first of all, versatility, different capabilities. Let's consider each option separately. But first of all, you need to understand what happens when the coils are connected in parallel or in series. When the coils are connected in parallel, the total resistance, roughly speaking, becomes half as much. For example: if we connect two 4 Ohm coils in parallel, we get a total resistance of 2 Ohms, if we connect two 2 Ohm coils, we get a total resistance of 1 Ohm.
The opposite effect occurs with a series connection. When connecting two 4 Ohm coils in series, we get a resistance of 8 Ohms, when connecting two 2 Ohm coils, we get 4 Ohms. etc.
-Connect each coil separately. This option allows you to connect a powerful two-coil subwoofer to a less powerful four-channel amplifier if it is not possible or not possible to purchase a powerful monoblock. Naturally, the resistance of the coils must correspond to the operating load of the amplifier in a bridge connection and the GAIN controls must be at the same level.
Connection via amplifier
Having understood how to connect the Mystery active subwoofer, you can perform a similar operation with a passive device. This type of work involves the use of a special amplifier, which is connected to the subwoofer. Thanks to this additional element, the volume limit will increase and the sound quality will improve.
- One end of the negative wire is connected to the GND terminal on the amplifier.
- The opposite edge of the same power cable is connected to any part of the car body.
- Contact points are carefully isolated.
- The positive wire is connected to terminal +12 located on the rear panel of the amplifier.
- A fuse is installed on the power cable.
- Find the Remote terminal on the amplifier and connect the subwoofer to it.
- Using an RCA cable, connect the amplification device to the radio.
- Check the reliability of the connection and begin setting up the acoustic equipment.
- To do this, insert a disc into it (included in the Mystery subwoofer kit) on which a test melody is recorded.
- After the sound starts, turn the volume down to minimum and begin adjusting the settings.
- As soon as the sound becomes “clear,” increase the volume and retest the device.
The Mystery subwoofer is easy to connect, so you can do the job yourself. Properly installed equipment will function smoothly and delight the car owner with high sound quality.
Advantages and disadvantages
How to connect an active Mystery subwoofer
The most important advantages of this active subwoofer are the following functions:
- It is equipped with a built-in amplifier, due to which an even higher sound level is achieved.
- This device is very compact in size.
Note. Due to this, it can be easily placed, as mentioned above, directly under the car seat.
- Thanks to the quality characteristics of this speaker, it is possible to reproduce sound with clear low frequencies. At the same time, due to this, the frequency of the sound will be slightly increased, which is why it will be clearer.
- The speaker costs very little - only 2500 rubles. But despite the price, it is very reliable.
- Its sale began in the Russian Federation in 2012. That is why purchasing such a device will not be difficult, since it is now quite common.
- And although the device has a very compact size, the sound quality can be called very good. That is, the subwoofer (see How to make a subwoofer: practical tips) has excellent sound output.
How to connect an active subwoofer Mystery
- It has a stylish design (although this is not so important, because it will still have to be “hidden” under the seat). However, due to this, it can be placed near the rear window without any problems. But in no case will it affect the overall style of the car. The body is aluminum and very durable. As a matter of fact, you can be convinced of this only once you see this speaker.
Note. The speaker can easily withstand even the strongest mechanical shocks. And this is a fairly common occurrence, since the device is located directly under the car seat.
- The remote control of any system perfectly controls the volume of the subwoofer. Also on its body there are several additional adjustments that facilitate the operation of the subwoofer itself.
Remote control that fits directly on the steering wheel
- The sub has an overload and power-on indicator, thanks to which the user can always understand whether the device has already booted up or whether it needs to wait a little longer.
- Suitable for any car as the speaker is universal.
- It is easy to connect, but this requires special knowledge.
Note. You can get them after reading our instructions.
This device has few disadvantages. But still they exist:
- Connecting a subwoofer is specific, so you will have to tinker with it a lot.
Note. You should not purchase this subwoofer based solely on its price. This technique is perfect for those who are installing a subwoofer themselves for the first time. It will fit into a car that requires not too high acoustic parameters.