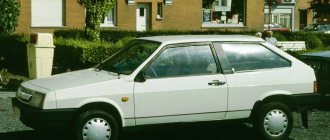
Causes and symptoms of malfunctions
There are several reasons why the VAZ-2114 steering rack needs to be replaced:
- Natural wear and tear of components;
- Wear due to foreign particles (sand, dirt) getting inside the mechanism;
- Damage to the rack or pinion teeth.
Natural wear and tear is understandable. If a car has driven more than 100 thousand km (and on our roads maybe less), then play in the steering is a common occurrence. But other causes of malfunctions are influenced by the features of operation and maintenance.
Damaged boots and oil seals, careless operation of the car, ignoring adjustment work - all this significantly reduces the life of the steering mechanism and leads to damage that makes further use of the unit impossible.
A worn or faulty VAZ-2114 steering rack will definitely manifest itself, and the symptoms can be different:
- Increased free play in the steering;
- Knocks from the steering rack when driving over uneven surfaces;
- Strong vibrations in the steering wheel;
- The car pulls in different directions;
- Crunching in the area of the steering mechanism when turning;
- Wedging;
- "Weighting" of the steering wheel.
Since many symptoms are also inherent in problems with other components of the VAZ-2114 steering, before making a replacement, you should first make a diagnosis.
It comes down to checking the camber/toe angles, the condition of the rod ends and silent blocks, as well as the column shaft and its components.
Lubrication
For VAZ cars, the only steering rack lubricant recommended by the manufacturer is FIOL-1.
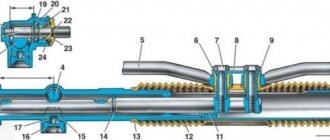
1. Lubrication during assembly. First, the rail and the internal cavity of the housing are lubricated.
How to adjust wheel alignment with your own hands? - there is more useful information here.
- A generous coat is then applied to the plastic sleeve.
- Lubricant is placed in the seat for the needle bearing.
- The rail is installed in the housing.
- The steering gear shaft is lubricated.
- Grease gets clogged up in the bearing.
- The stop is lubricated.
- Screws and stoppers are installed.
- The casing and anthers are put on.
2. Lubrication without removing the rack. After cutting through the plastic clamps, the side protective caps are removed.
It is through the side holes in the rack body that lubricant is pumped. It is recommended to carry out this procedure at least once every 150 thousand km.
For convenience and greater efficiency, you can use a syringe with a nozzle made of a rubber hose of such a diameter that you can insert it between the rail and the body. The hose must be pushed from the side where the rod bolts are attached.
You may be interested in this article - When and how is a wheel bearing replaced?
At this point on the bushing there is a cut through which the lubricant will pass into the space behind the bushing and lubricate the steering mechanism.
How to lubricate the steering rack in the absence of FIOL:
- Litol. It is the most suitable lubricant to replace the recommended one. Has good lubricating properties and durability.
- Solid oil. Not recommended due to its tendency to dry out over time and lose its lubricating properties.
- Graphite grease. For the same reason as grease, it is not entirely suitable for lubricating the rack.
When is replacement carried out?
If the condition of the listed elements does not cause any complaints, and adjustment work cannot be performed due to backlash, the fault lies in the steering mechanism itself.
Increased free play and knocking can still be eliminated by adjustment. While under the car on the mechanism body, you can find an adjusting screw for a special key, which can be replaced with a 17mm hexagon.
Using a wrench, tighten the screw until it stops, and then unscrew it by ? revolutions, and check the “heaviness” of the steering wheel. It should rotate easily, then you can check the behavior of the steering on the road.
If the adjustment does not help, the play and knocking remain, the VAZ-2114 steering rack needs to be repaired or replaced.
Read on the topic: The play in the steering, what it should be, is normal.
But if there is a crunch in the rack, you can immediately start replacing it, since adjustment with such symptoms obviously will not help.
Replacing the VAZ-2114 rack can be entrusted to service station specialists, but you will have to pay. The cost of replacement services at service centers varies from $20 to $45. And if we add the price of the rail itself, then the amount comes out to be considerable.
You can replace everything yourself, saving on this, especially since performing the operation on a VAZ-2114 is not difficult and even a novice car enthusiast can do it.
Also read about the causes of knocking when turning the steering wheel.
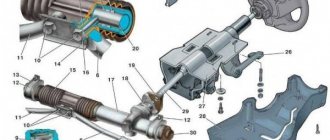
How the steering rack works on a VAZ 2114
The steering on the VAZ 2114 is designed so that it is possible to change the angle of the steering column. Type – rack and pinion, with a cardan shaft. The cardan shaft itself is composed of an upper shaft and an intermediate shaft, the connection between which is carried out through a cardan joint.
How the steering rack on a VAZ 2114 is arranged: 1 – protective cap; 2 – steering gear housing; 3 – rack; 4 – drive gear; 5 – inner tie rod end; 6 – spacer sleeve; 7 – tie rod mounting bolt; 8 – connecting plate; 9 – support sleeve; 10 – steering gear support; 11 – rack support sleeve; 12 – protective cover; 13 – clamp; 14 – rack restrictive ring; 15 – sealing ring of the rack stop; 16 – nut; 17 – rack stop; 18 – roller bearing; 19 – ball bearing; 20 – retaining ring; 21 – nut sealing ring; 22 – gear bearing fastening nut; 23 – boot; 24 – lock washer.
The intermediate (lowest) steering shaft is connected to the steering mechanism through a coupling. This mechanism is made up of a toothed gear, a crankcase (cylindrical in shape, the rack itself is located in it) and a steering rack that is in mesh with the drive gear.
The rack is pressed to the gear by a metal-ceramic stop and a spring. At the bottom of the rack there is an adjustment screw with a rubber seal. It allows you to level and adjust the size of the gap when working out the shaft.
When the steering wheel is turned, the rotation from it is transmitted through the shafts that make up the universal joint and cardan joint, to the drive gear, which, rotating, displaces the rack. The steering rack, through couplings, is connected to the steering rods.
The length of steering rods is changed by rotating the couplings. The couplings cannot rotate spontaneously, since they are tightened on both sides by locknuts. By manipulating the length of the rods using couplings, the toe-in of the front wheels is changed.
The rods, through swing arms, are connected to the front suspension struts, which rotate when the rack is shifted. The inner tie rod ends are bolted to the rack.
The steering rack on the VAZ 2114 is mechanical, it does not have amplifiers, and the attachment to the body (the partition wall of the engine compartment, in the engine compartment) is carried out using two clamps. The clamps attract the rack body to the body.
The gear shaft rotates on a pair of bearings, one of which is a needle bearing, and the other is a radial ball bearing.
- The task of the first is to serve as a lower support, simultaneously performing the role of a guide.
- The second is the upper support and clamp for the steering shaft inside the housing.
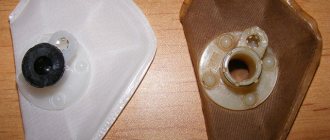
The drive gear-shaft has splines and a groove for connection to the steering clutch. The mechanism is protected from external influences by anther. The mechanism housing, as well as the boot, have marks to check the accuracy of the assembly. Inside the housing, a special plastic bushing serves as an additional support for the rack, reducing backlash when the rack moves.
Changing the rack yourself
There are two ways to replace the rack. The method is selected based on why exactly the mechanism is being removed - for replacement or repair.
In the case of installing a new rail, you should first determine its completeness.
They go on sale both assembled with steering rods and without them.
The first replacement option involves pressing out the tips from the steering knuckles, so the work will require a special puller.
Tools and accessories
To carry out the replacement you will need:
- Socket or open-end wrenches for 10, 13, 17, 22 (but better - heads with a knob equipped with a ratchet mechanism);
- Jacks and supports;
- WD-40 product;
- Flat screwdriver;
- Hammer;
- Rags;
- Tip remover (if the rods are also dismantled).
Work technology
Let's look at how to replace the VAZ-2114 steering rack without changing the rods. The technology for carrying out the work is as follows:
- We put the car on a flat area or hole, immobilize it (tighten the handbrake, put wheel chocks under the rear wheels);
- Loosen the wheel bolts;
- Using jacks, we hang up the front of the car, then secure it with props. If you have one jack, first lift one side, put a support, remove the lifting mechanism and go to the other side;
- Remove the front wheels;
- In the arch on the left side, in the direction of travel of the car, there is a technological hole that can be covered with a lid (not always). We dismantle this cover;
- If there is an absorber, loosen the clamp securing it, pull out the element and move it to the side;
- Using a hammer and a screwdriver, we bend the antennae of the plate, which prevent the bolts securing the rods to the rack from loosening (for ease of work, you can turn the steering wheel to position the rack in a place that is easy to access);
- We unscrew the fastening bolts and pull them out together with the fixing plate;
- We move the rods to the side;
- In the cabin, in front of the front shield, at the bottom we find the junction of the column shaft with the gear shaft of the mechanism. Unscrew the fixing bolt. By moving the steering wheel towards you, we move the connection;
- Using a 13mm socket, unscrew the nuts securing the brackets that secure the mechanism. They should be treated with WD-40 first, as they often rust. Attempts to unscrew without pre-treatment may lead to breakage of the pin;
- Remove the staples;
- We move the mechanism towards the engine so that the gear shaft completely comes out of the hole in the shield;
- We pull out the assembly through the technological hole;
- We push the new mechanism through the hole, correctly place it, fix it and connect it to the column.
Reassembling the steering control is done in the reverse order of removal.
Photo removal procedure
Disconnect the tie rod ends from the strut arms. We unscrew and remove the coupling bolt of the lower flange of the steering shaft coupling and use a screwdriver to loosen the flange.
Using a 13mm spanner, unscrew the 2 nuts of the bracket for the right fastening of the rack to the partition of the engine compartment.
Remove the bracket from the studs.
We also remove the left bracket.
We slightly move the steering mechanism forward and remove the drive gear shaft from engagement with the lower flange of the steering shaft coupling.
We turn the rack with the drive gear shaft up and remove it from the engine compartment through the left side.
The nuances of replacing the assembly assembly
In the case of replacing the VAZ-2114 rack assembly with rods, we proceed somewhat differently.
There is no need to unscrew the rods from the rack during the work. But you will have to disconnect the tips from the stand. This operation will not be difficult if you have a puller.
If it is not available, you can use the folk method;
- Unbend and remove the stopper;
- Unscrew the tip nut;
- We take the pry bar and place it between the rod and the protrusion of the stand, to which the tip is attached;
- We use a pry bar to create a pressing force and at the same time apply sharp blows with a hammer to the protrusion (usually 2-3 blows are enough for the tip to “pop out”).
Next, we do everything identical to what was described: unscrew the fastening nuts and the fixing bolt on the column shaft. Afterwards all that remains is to remove the mechanism and replace it with a new one.
After replacement, it will be necessary to adjust the camber/toe angles of the VAZ-2114 steering, even if the rods were not removed. This operation will definitely not be superfluous.
Replacement
After purchasing the part, you can begin work on replacing it. The action is not so much complicated as it is tedious. At the same time, there are nuances that are rarely described in manuals, but without their implementation the service life of the part can be significantly reduced. It is advisable to treat all threaded connections with liquid wrench.
- Put the car on the handbrake, place wheel chocks under the rear wheels;
- The front part of the car is jacked up, the wheels are removed;
- In the cabin, unscrew the locking screw of the steering cardan;
- Let's go under the hood. For convenience, remove the absorber, as well as the battery. In principle, you can do without this, but it’s better to remove it so as not to cling to them during the repair process;
- Remove the cotter pin from the tip pin. Tighten the castle nut. Using a puller, remove the hinge from the mounting on the steering knuckle. If you don’t have a puller at hand, you can use the “old-fashioned” method using a crowbar and a hammer. The work is done from both sides;
- After this, unscrew the 4 nuts securing the rack to the body. After which the part is knocked out of the splines. Having done this, it can be safely pulled out through the right side;
- After removing the rail, twist the ends. Be sure to measure the distance from the ball joints to the main links. This will allow you to easily get to the service center to install wheel angles;
- A new rail needs to be prepared. To do this, remove the side plugs and fill them with lithol or similar lubricant. This will extend the service life of the part;
- We twist the tips;
- What remains is the most “erotic” part. We drag the rail into place. After that, we attach the rail to the fastening studs. The most difficult thing is to get into the steering column splines. It's easier to do this with an assistant. You direct the rack from below, he controls the process from the cabin;
- Tighten the steering cardan locking screw.
All that remains is to install the parts removed during the work. After assembly, take the car for a ride. There shouldn't be any knocking. It is also highly recommended to visit a service center to adjust the suspension. Conclusion. For many car enthusiasts, a faulty rack seems like a very difficult problem. But, in practice, replacing the steering rack on VAZ 2114 and 2115 is not very difficult. If everything is done carefully and in order, there should be no problems.
Be sure to pay attention to the selection of spare parts. There are quite a lot of counterfeits in stores
Diagnostics and restoration of slats
Instead of purchasing a new rack, you can try to repair the one installed on the car. But first you need to make a diagnosis.
To do this, we completely disassemble the assembly into its component parts and carry out troubleshooting. This will allow you to determine which elements are extremely worn or damaged.
Repair kits for restoring the steering mechanism are sold on the market. Moreover, their completeness is very different.
Some include only rubber and plastic elements (oil seals, boots, bushings).
Others come with a new rack, gear, connecting elements, bearings (in general, almost all components).
With the help of repair kits, you can restore the functionality of the “native” unit, but only on the condition that the body is intact and does not have significant wear.
The use of repair kits can significantly reduce the cost of repair work. But they do not always allow you to restore functionality and problems with the steering remain even after repairs.
In this case, there is only one way out - replacing the steering rack with a new one.
Selecting a replacement unit
The choice of a new unit for the VAZ-2114 should be approached seriously. The main problem is that very often there are defective products on the market that are already faulty or will fail in a very short time.
The best option is to purchase an original unit. The VAZ-2114 uses the same mechanism as the cars of the Samara 1 family (2108, 2109, 21099). Therefore, its catalog number is 2108-3400012, that is, when searching, you can safely ask for a rack for the “Eight” and not worry that it will not fit. The average cost is $100.
You can also buy analogue racks produced by auto parts manufacturers. But here you should pay attention to the manufacturer (it must be well-known), as well as the availability of quality certificates.
Among analog products, we recommend paying attention to steering mechanisms from the following manufacturers:
- Weber CG 2108-0012 (its price starts at $80);
- Pilenga SR-P 1141 (costs $100);
- Trialli CR 108 and CR S 708 (the first comes without rods and lugs and costs about $100, the second has an assembled mechanism, which is why it costs twice as much).
For those who want to slightly modify the steering, you can look for tuning racks. The main difference between them is the lower number of revolutions. They are also positioned by manufacturers as reinforced.
Regarding manufacturers, it is worth looking for products from the Italian company Brembo, the Polish company ATF, or the Russian company SS20.
As for the latter manufacturer, it only produces steering racks for the 10th VAZ family, so after acquisition the mechanism will have to be slightly altered.
But we note that tuning slats will cost much more than the original or conventional analogues. So, for a Brembo unit you will have to pay about $250, for ATF - about $200, and SS20 - approximately $210-220.
Typical breakdowns
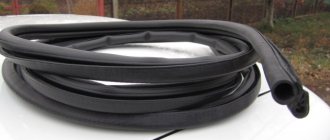
Torn steering rack boot
There are several most common reasons why the unit may need to be replaced:
- The rail has exhausted its service life;
- The vehicle is regularly driven on uneven roads;
- Having turned the steering wheel to its extreme position, sharp accelerations are often made;
- The presence of mechanical damage due to collisions with potholes, accidents, etc.
Drivers should pay attention to the behavior of their car, which itself may indicate that the steering is out of order.
This may manifest itself as follows:
- The rack knocks when turning the steering wheel;
- The steering wheel jams and turns to the sides with some difficulty;
- There is knocking and vibration during travel;
- The play at the steering wheel has increased;
- The wheel alignment is disrupted. This can be determined by uneven wear of the rubber.
New or refurbished?
Among car enthusiasts, the question often arises regarding the steering rack - should I purchase a new one for replacement or restore the “original” one? It is impossible to answer unequivocally here.
If the repair was carried out independently and using a high-quality repair kit, then after restoration the rack can serve for quite a long time.
But if you purchase a restored rack or if it is repaired at a service station, there is a high probability that problems will soon arise. After all, it is unknown who, how and with what help carried out the restoration.
As for new units, there are a lot of defective racks on the market.
In general, it is still better to try to repair the rack first, since it is much cheaper. It is worth purchasing a new mechanism only after you have already become convinced that the restoration did not help.