Causes of malfunctions
The main cause of the malfunction is simple mechanical wear. Any oil seal is, by its nature, a consumable - after a certain period of time it begins to deteriorate, since it is made of an elastic material.
The malfunction may manifest itself in the form of changes in shape, swelling, scarring, rupture or chipping of the material from which the consumable is made. Another manifestation of a malfunction may be the cuff being completely squeezed out of the seat.
Other causes of problems with the camshaft oil seal are incorrect selection of consumables, manufacturing defects, or incorrect installation. In these cases, the oil seal also does not perform its functions and needs to be replaced.
Purpose
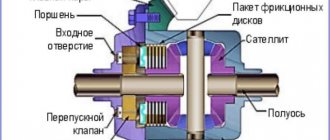
What is an oil seal and why is it needed? An oil seal (rubber-metal cuff) is a special seal in the form of a rubber ring on a metal base, which is used to seal assemblies and assemblies with rotating parts to ensure tightness of the gaps between rotating and stationary parts. The main purpose of the cuff is to prevent leakage of lubricant. In addition, the auxiliary purpose of the oil seal is to protect the unit from moisture, dust and dirt. It won't be difficult for you to replace it yourself.
Tool
Minimum required tools:
- Socket wrench “17”
- Head "10", with extension
- Flat (slotted) screwdriver
- Hammer
- Mandrel for oil seal
Diagnostics
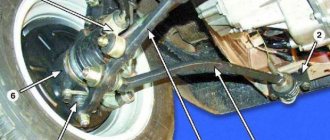
Diagnosis of a malfunction of the camshaft oil seal is carried out visually. Oil marks on the timing belt cover may indicate a cuff leak. For a more accurate diagnosis, remove the belt cover and inspect it. In the event of a malfunction, you can find traces of wear or even the belt jumping over one or more pulley teeth due to moisture.
Also, a seal malfunction can be detected during a scheduled replacement of the timing belt - it is during the procedure that oil leaks can be detected on the belt itself or on the camshaft gear. Another reason to replace the oil seal is deformation of the seal. Even if there are no oil leaks at the moment, they will certainly appear if the shape of the oil seal changes.
What's next?
After draining the oil from the car engine, unscrew and remove the pan. Then the two bolts securing the middle main bearing cover are unscrewed. It is removed and the gap between the bearing and the half ring is measured using feeler gauges. You should add to it the standard parameter of 2.31 mm.
As a result, the required size of the new half ring will be obtained. After this, by displacing the old half-ring, they are installed in their nests
It is important that the new element fits in freely. After the work is done, all removed parts are installed back.
So, we found out how to replace the crankshaft oil seal (including VAZ 2109). The driver needs to monitor the condition of the sealing elements, check the free axial movement of the crankshaft, so that further operation will be without negative consequences.
Replacement instructions
The sequence of actions when replacing the front and rear oil seals is slightly different. This is because the front oil seal can be replaced directly on the engine itself. Getting to the rear seal is usually more difficult.
Front oil seal
The sequence for replacing the front camshaft oil seal looks like this.
- The car is placed in neutral and the parking brake is applied.
- As with any work performed in the engine compartment, the battery terminals are disconnected.
- The plastic timing belt cover is removed.
- The valve cover is removed, for which you need to unscrew the fastening bolts with a screwdriver.
- A marker marks the location of the belt relative to the camshaft.
- Then you need to remove the timing belt. You don’t have to completely remove it - just remove the belt from the camshaft timing pulley. To remove it, you need to unscrew the fastening bolt with a 17 mm wrench, securing the pulley from turning. You can use a pry bar for fixation.
- Using a puller, the pulley is removed from the camshaft shank. If the camshaft has 2 pulleys, then both are removed, and the locations of the pulleys are also marked so that they are not confused during further installation.
- The key located behind the camshaft pulley is removed.
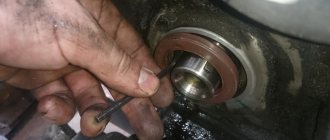
- Then, using a screwdriver or tweezers, remove the used oil seal. You should remove it carefully so as not to scratch the working surface of the camshaft to which the oil seal is attached.
After dismantling the old oil seal, you can proceed to installing a new one and reassembling it.
- The working edge of the new oil seal adjacent to the camshaft is lubricated with engine oil, and the outer part is treated with sealant.
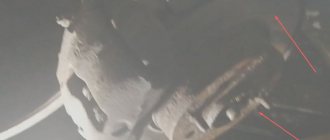
- The oil seal is placed on the camshaft and then pressed using a pressing mandrel.
Further collection of the timing belt is carried out in reverse order.
- A key is placed on the camshaft.
- Then the pulley is installed. If there are two pulleys, then each is installed in the place where it was located.
- The pulleys are tightened using a torque wrench. The voltage torque can be found in the vehicle owner's manual. When tightening, it is necessary to secure the pulleys from turning using a pry bar. First you need to engage fourth gear at the gearbox.
- Then you need to put the belt on the pulleys according to the previously marked marks. You should first inspect the belt for damage, abrasions, etc. Since oil seal leaks are detected when replacing the timing belt, it is often necessary to install a new belt. In this case, it is mounted according to the factory marks.
- The tension roller mounting bolt is tightened. The tension torque can again be found in the car's owner's manual.
- Then the crankshaft is manually turned several revolutions clockwise. This checks the belt tension. If any irregularities are noticed, the tension is further adjusted.
- At the end, the valve cover is secured back and the plastic belt cover is installed.
- After replacing the oil seal, you need to add engine oil to the oil tank to the upper mark.
Rear oil seal
Rear oil seal replacement may vary from vehicle to vehicle. For some models, access to the rear oil seal is only possible when driving the car onto a lift or inspection hole and disconnecting the clutch and gearbox drive.
For other car models, access to the oil seal is limited by the camshaft position sensor, which must be removed. To do this you need:
- disconnect the electrical connector of the sensor;
- Unscrew the fastening screw and remove the sensor;
- Using a 10mm wrench, unscrew the bolt securing the gas hose holder to the sensor wire bracket;
- Unscrew the screws securing the sensor cover, remove the cover and the bundle of wires;
- remove the sensor rotor;
- Remove the sensor cover mounting plate.
After this, you can use a screwdriver to remove the rear camshaft oil seal. Replacement is carried out in the same way. After replacing the cuff, the sensor is assembled in the reverse order.
After installing the new oil seal, you must make sure that no oil leaks appear. If the oil seal is installed correctly, then even at high engine speeds the oil should not leak. Otherwise, the sensor is installed or pressed in incorrectly, or there is a manufacturing defect in the product.
How to replace the camshaft oil seal on a VAZ 2108-VAZ 21099?
Removal: 1) At the beginning of the operation, with the “AKB” (which means rechargeable battery), remove the “negative” terminal. (How to remove the terminal from the “battery”, see the article: “Replacing the battery” in paragraph “1”)
2) Next, be sure to set all the “Gas distribution mechanism” marks, and then remove the “Timing Belt” from the car. (You will find how to set all the marks and then remove the timing belt in the article: “Replacing the timing belt”, in the “Removal” section)
3) When the belt is removed, insert a “10” socket with an extension through the hole in the camshaft pulley, and then put it on the nut that secures the rear timing belt cover, thereby securing the pulley from turning. After the pulley is fixed, using a spanner wrench, unscrew the central bolt that secures the pulley.
Note! Once the center bolt is removed, remove the camshaft pulley from the vehicle!
4) Then, taking a flathead screwdriver in your hands, use it to remove the pulley key from the groove in the camshaft.
Note! The key must be removed, otherwise it may simply get lost when removing the oil seal!
5) After the key is removed, without removing the screwdriver, use it to remove the camshaft oil seal.
Installation: • Before you begin installing a new oil seal, check its condition by inspecting its working edge, which is indicated by the letter “A”. There should be no defects on the working edge; it should be smooth, without dents, without tearing out, and without rubber sagging.
• The camshaft oil seal spring, which is designated by the letter “B,” must also be intact and not stretched, otherwise replace the oil seal with a new one.
1) First, taking the new camshaft oil seal in your hands, lubricate its working edge with engine oil.
2) Then install the oil seal with the working edge towards the cylinder head, and then carefully, using a screwdriver or a wooden stick, tuck the working edge of the oil seal onto the camshaft.
Note! When the oil seal is installed on the camshaft, finally drive it in using a hammer and a suitable mandrel diameter. If you don’t have a mandrel, then you can use a head instead, or a piece of pipe of a suitable diameter!
3) And finally, install all previously removed parts, such as the pulley key, the camshaft pulley itself and the timing belt, in their place.
Note! • For details on installing the timing belt, see everything in the same article that described the instructions for removing it.
• The camshaft pulley must be installed with the protruding part of the hub facing the car engine!
Additional video materials: Below, especially for you, we have prepared a video clip that describes in detail the replacement of the camshaft oil seal on cars of the Samara family.
Possible consequences
Leakage of lubricant through the oil seal is not dangerous only for the time being:
- Don’t forget about the dangers to the engine of oil leakage from the lubrication system: firstly, increased wear due to the parts running dry, and secondly, oil consumption for topping up, the price of which is also a pretty penny
- The timing belt can jump over a pulley tooth and even several teeth at once, all due to oil getting on the belt teeth caused by leaking camshaft oil seal, which causes an oil film to form on the timing belt
- If lubricant gets in (lubricant is a chemical), the belt begins to spread and can break under load at full speed of the car, you can imagine the consequences
- Therefore, if even minor oil stains are detected on the timing belt casing, it is necessary to immediately determine the cause of the stain.
A little about what an oil seal is in general:
- An oil seal is a rubber-metal cuff that serves to seal the rotating parts of units and prevents liquids (lubricants) from leaking out of them
- The name “oil seal” comes from ancient cars, where felt lubricated with lard (fat) was used instead of a cuff.
- The cuff has a special edge, which, when rotated, creates a turbulence that prevents lubricant from leaking out of the unit
- It is important not to confuse the direction of rotation (there are left and right cuffs), otherwise the new perfectly installed cuff will leak