Generator UAZ Patriot: design features
The Ulyanovsk Automobile Plant equips the UAZ Patriot with synchronous generators Iskra, Pramo Electro or BATE. Electric generators are equipped with a silicon diode bridge and automatic voltage adjustment. There is a pulley on the rotor axis, secured with a key and a nut. Torque is transmitted from the engine crankshaft thanks to a belt drive with a manual tension mechanism.
Adjustment of the tension force must be done carefully, adhering to the manufacturer's instructions, since excessive tension can damage the bearing supports.
The silicon rectifier bridge has a removable and reliable design, which is very convenient when repairing equipment. The rectifier bridge is sealed, which prevents dirt, water, and dust from getting inside. The technical characteristics of the silicon block are as follows: rated output voltage 14 V, current - no more than 90 A (for cars with installed air conditioning - no more than 120 A).
The bridge is located on the outside of the rear cover of the generator and serves to convert alternating current into direct current. Diodes are made of silicon and allow voltage to flow in only one direction. Heat removal from the diode is carried out by convection and air, the flow of which is created by a fan located on the rotor.
The main problem that UAZ Patriot car owners face is insufficient voltage to charge the battery. Instead of 14 V, the voltage actually comes in much less.
There are four ways to solve the problem:
- replace the generator;
- replace flint bridge;
- check the contacts powering the unit;
- install a three-level regulator.
Generator for UAZ Patriot
Any car owner knows that a generator is a special electrical unit through which mechanical energy is converted into electrical energy. This device provides electricity to a huge number of devices, systems and elements in the car.
In the UAZ Patriot with a 409 engine, the manufacturer installed an Iskra 120A generator. The design of this device contains a current rectifier made of durable silicon. There is also a voltage relay built into the generator. Thanks to the presence of both elements, it is possible to maintain the voltage value in the required values set by the manufacturer.
The cost of the original generator ranges from 5,000 to 8,000 rubles, and the final price depends on the store that sells it. If necessary, for example, during replacement, you can install an analogue generator that will fit on the Patriot.
The table shows the popular models of generators used with their articles and prices.
GeneratorArticleCost, in rubles
| UAZ, GAZ engine UMZ-417.10, ZMZ-511 14V/40A G250P2.3701-03 (OJSC ZiT) | G250P2-3701000-P2 | 3790 |
| UAZ "Patriot" engine ZMZ 409.10 120A 5122.3771-30 (PRAMO) | 5122-3771-30 | 5170 |
| GAZ, UAZ engine ZMZ-405, -406, -409 14V/90A 9422.3701 (JSC ZiT) | 9422-3701000 | 3820 |
If necessary, you can buy a cheap analog and save on replacement.
Generator replacement
The process of operating any vehicle is not complete without some breakdowns. One of the most frequent and serious problems on UAZ “Patriot” is generator failure. If this unit is not repaired or replaced in a timely manner, further operation of the vehicle will be impossible.
Why does the generator fail?
One of the reasons for generator failure is careless operation of the vehicle. An unpleasant sound that will come from the generator during a trip can warn of a breakdown.
Also, it is not the generator itself that may fail, but its constituent elements, and in this case, repairs alone can be sufficient. But if the situation is not corrected in time, the generator will break down and will need to be replaced.
To replace the generator, it is recommended to contact specialized service stations, where real professionals are ready to take on the work.
They will conduct high-quality diagnostics, determine the cause and quickly repair the generator or install a new one. If necessary, you can replace it yourself.
But for this you will need to familiarize yourself with how the UAZ Patriot works and the generator connection diagram. In addition, you can watch various photos or videos of similar processes.
Do-it-yourself replacement involves performing several steps.
Preparatory stage
In this case, the car owner needs to prepare the required tools, as well as buy a new generator - this can be the original model or its analogue. The tools you will need are:
- screwdrivers;
- wrenches for various diameters;
- extension;
- hammer.
After this, you can proceed to the next stage.
Main stage
The main stage of replacing a generator involves removing it and installing a new unit. The removal process is divided into several steps:
- First, you will need to install the car in the repair site and take care of fixing its wheels. You will also need to turn off the engine and remove the terminals from the battery. This is necessary to ensure the safety of the work being carried out.
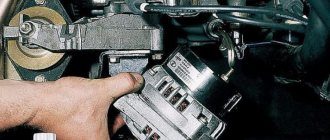
- Next, you need to disconnect the connectors with wires from the generator. This must be done as carefully as possible so as not to damage the wiring and the holes where the wires are attached.
- After this, you need to unscrew the nut from the negative terminal and remove the main cable connected to the generator.
Removing the electric generator
Below is the process of removing the UAZ Patriot generator step by step:
- Disconnect the negative terminal from the battery.
- Disconnect the cable from the generator.
- Unscrew the positive terminal nut in the device and disconnect the cable.
- Release the tension on the drive belt.
- Remove the belt from the pulleys and unscrew the locking bolt of the generator housing.
- Remove the nut securing the top of the generator to the adapter bracket.
- Remove the nut securing the bottom of the generator. Remove the bolt from the hole.
- Unscrew the 2 nuts connecting the bracket and the cylinder block and dismantle the electric generator for repair or maintenance.
The instructions described above are suitable for removing electric generators in gasoline UAZ Patriots. In cars with a diesel engine, a single belt is used to drive the generator, which rotates a fan pulley attached to the water pump rotor. Before dismantling the UAZ Patriot generator, you need to remove the impeller; the remaining steps will be the same as for cars with a gasoline engine.
Removal and installation of the UAZ Patriot generator
We remove the generator for repair, replacement and when repairing the power plant.
To remove the generator, you need to loosen or completely remove the generator drive belt. For this:
First remove the power steering pump drive belt.
Loosen the two bolts securing the tension plate of the power steering pump
Holding the tension bolt from turning with a wrench, loosen the nut and lower the pump down
When installing the belt, it is necessary that the V-belt tracks coincide with the pulley tracks
Then loosen the tension roller mounting bolt by two or three turns.
Unscrewing the adjusting bolt, loosen the belt tension
After installing the belt, you need to adjust its tension.
To do this: by rotating the tension roller bolt, we achieve a belt deflection of 13-15 mm under a load of 80 N (8 kgf) applied in the middle of the belt branch between the generator and the water pump.
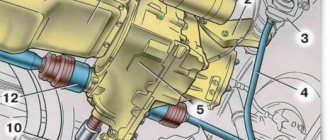
After this, remove the generator. For this:
— disconnect the negative terminal of the battery;
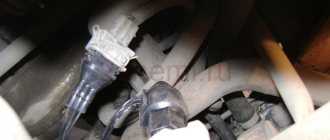
Disconnect the block with the wire from the terminal of the generator excitation winding
Remove the terminal from the “+” terminal of the generator
Remove the generator drive belt as described above
Loosen the locking bolt
Loosen the nut of the bolt of the upper mounting of the generator to the bracket
Unscrew the nut of the bolt of the lower mounting of the generator to the bracket and remove the bolt
We unscrew the two bolts securing the upper bracket of the generator to the cylinder head and remove the generator from the car
Install the generator in reverse order
We install the generator and power steering drive belts in place and tighten them as described in the article - UAZ Patriot tensioning belts
Installation of a three-level regulator
To install a three-level regulator you must:
- Dismantle the generator and remove the protective housing located on the back cover.
- Disconnect the standard voltage regulator, check the condition of the collector plates on the rotor of the electric generator.
- Install the three-level regulator: secure with standard nuts and wires.
- Make an output of an additional cable with corrugated protection through an auxiliary hole in the protective housing.
- Mount the control controller and set the necessary operating parameters.
- Replace the electric generator.
The regulator body is installed on the car body, the plug with the letter Ш is used to connect to the modernized brush assembly. The other output from the brushes is connected to the 3rd contact of the B-regulator. Block B is connected to the positive terminal of the battery via a relay, which is powered from the ignition switch.
Device and features
The plant equips cars with synchronous generators Iskra, Pramo Electro or BATE, equipped with a silicon rectifier unit and an automatic voltage corrector. A pulley is installed on the rotor shaft, which is secured with a key and a nut. Torque is transmitted from the engine crankshaft using a belt drive with a manual tension mechanism.
When adjusting, you should follow the manufacturer's recommendations, since excessive tension leads to premature failure of the bearing supports.
The diode rectifier unit is removable, which simplifies the equipment repair procedure. The straightening device is hermetically sealed, i.e., it is ensured that it remains operational when water enters. The rated output voltage is 14 V, the current does not exceed 80-90 A (on cars with air conditioning, the parameter is increased to 110-120 A).
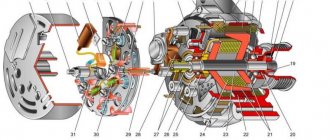
The rotor is mounted on 2 ball bearings and rotates to the right (as viewed from the drive side). The external casing of the generator is made of aluminum alloy, and a fan is provided for cooling.
Diode bridge
A semiconductor diode bridge mounted on the outer part of the back cover of the electric generator is designed to convert alternating current into direct current. The design of the unit uses silicon diodes, which allow voltage to be conducted in only one direction.
To prevent short circuits, the parts are located in a sealed casing. During operation, the device is cooled by convection and air flow created by a fan mounted on the rotor.
Three-level regulator
The factory-assembled generator design uses a standard rectifier unit, which operates without taking into account the ambient temperature. As a result, there is a voltage drop and incomplete charging of the battery.
To increase the operating parameters of the electric generator, a modernized 3-level regulator is used. The device automatically adjusts the current parameters in the generator output circuit, focusing on the air temperature. The design includes a mechanical toggle switch to switch to winter operation mode.
Patriot vehicles do not charge the battery due to the alternator rotor speed decreasing when driving off-road (putting additional load on the electrical circuits).
The situation is corrected by replacing the pulley (to increase the rotor speed) or installing a more powerful generator produced by alternative suppliers. The use of a 3-level regulator allows you to improve the operation of the electric generator; installation of an additional device is carried out independently.
Replacing the diode bridge on a UAZ Patriot
The problem with the low voltage of the electric generator may be hidden in an incorrectly functioning silicon bridge.
To check the functionality of the generator, you will have to completely disassemble the diode bridge and remove the spare part.
Ringing will help determine whether the bridge is in good condition or not. The rectifier bridge consists of six diodes conducting voltage in one direction. When ringing, we find out the resistance value. If the resistance differs between the diodes by more than 5 ohms, then it is necessary to replace the silicon bridge, since the difference in resistance will greatly affect the flow of current.
When purchasing a new diode bridge, the choice must be made based on resistance tolerances, otherwise problems with the electric generator will not disappear.
Checking and replacing the UAZ Patriot generator bearing
The electric generator has two bearings; special attention should always be paid to the rear one. The electric generator may be in a faulty state precisely because of the bearing.
The performance of the bearing is checked as follows:
- rotation speed is checked;
- the next step is to rock the bearing from side to side;
- Turn the bearing clockwise.
The part needs to be replaced if the bearing seizes, a cracking sound is heard when turning, or there are vibrations.
Bearing replacement is often carried out together with the generator cover, but sometimes it is done separately.
The procedure for replacing a bearing is as follows:
- You will need an old alternator belt: fold it in half and clamp it tightly.
- Unscrew the bearing using a 24mm socket.
- Using a 8mm head, unscrew the generator cover.
- Remove the cover and unscrew the four bolts.
- Use a rubber hammer to knock out the bearing.
- We install the new bearing in its original place using the head of the wrench and assemble the electric generator in the reverse order.
Generator UAZ Patriot and its components
A generator is an electrical device that converts mechanical energy taken from a car's camshaft into electrical energy. This electrical energy is used to power electrical appliances and equipment. Without electricity, the internal combustion engine will not operate, as it is known that the ignition of the combustible mixture is carried out by electric spark plugs. Today we will look at the main characteristics of the generator on the UAZ Patriot, as well as its main features.
Replacing the UAZ Patriot alternator belt
The alternator belt has a certain service life (15-20 thousand km), so sooner or later it will have to be replaced. It is recommended to replace the poly V-belt every ten thousand kilometers or when cracks appear on the inside of the belt.
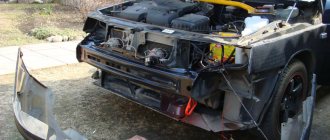
In order to replace the belt, you need to lift the hood, remove the air filter and loosen the tension roller using a 15mm wrench. After this, replace it with a new belt and tighten the tension roller for smooth operation. If you are not confident in your abilities, then it is better to entrust this work to a specialist.
Belt replacement
During use in a car, sooner or later the belt may need to be replaced. To change the drive belt you need to prepare several keys for 10, 12 and 15 then:
- The drive belt of the power steering pump, as well as the fan and crankshaft pulley are removed;
- The fastening bolts at the tension roller are loosened;
- The adjusting bolt is unscrewed, loosened and the pump and generator belt is removed;
- A new belt is installed; to do this, the roller adjustment bolt is screwed in, the belt is tensioned under a deflection of 15 mm, and the fastening bolt is tightened at the tension roller.
It's time to change the alternator belt. In order to do this, we lift the hood, remove the air filter, loosen the tension roller using a 15 mm spanner. Then we easily replace the old belt with a new one, the best choice for us is a 6RK2100 brand belt, the price in the store is 1300. We install the belt in the reverse order. Here is the installation diagram:
After installing the belt, tighten the tension roller back for smooth operation. If you have never changed the alternator belt yourself, then it is better to contact an authorized dealer so that there are no problems later on the road. As a rule, replacing the alternator belt occurs after 15-20 thousand kilometers, but in practice it is better not to wait until these figures, since the quality of the product leaves much to be desired, so we already change the belt at the first maintenance, i.e. after 10 thousand km.
This completes the replacement of the UAZ Patriot alternator belt.
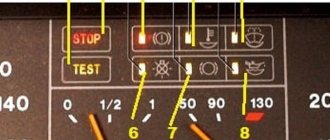
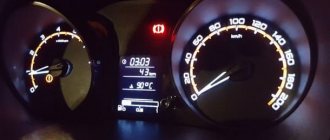
How to check the voltage of the electric generator on the battery
Electromotive force or potential difference can be determined by the following methods - using generating equipment and through a battery. The electric generator is directly connected to the power source with a thick cable, so to check the level of potential difference, you can measure the voltage at the power source. When using this method, you will need special measuring instruments - a voltmeter, multimeter or load fork.
The device wires are connected to the battery in any order. The plug must be connected to the battery terminals, and the polarity must be strictly observed. The permissible voltage in the network should not be less than 12.5 volts. At idle speed with the electrical devices of the machine turned off, this figure should be about 13.5-14 V. Reducing the voltage values to 13.3-13.8 volts is acceptable.
Based on the above, the main types of failures of the UAZ Patriot electric generator can be problems with the poly V-belt, bearing failure, or failure of the diode silicon bridge. You can also solve the problem of voltage drop on the UAZ Patriot generator by installing a three-way regulator, but this will not solve all the existing problems. If problems are detected in the operation of the electric generator, it is necessary to immediately begin diagnosing it to identify the causes of the breakdown.
Diode in the circuit
ATTENTION! A completely simple way to reduce fuel consumption has been found! Don't believe me? An auto mechanic with 15 years of experience also didn’t believe it until he tried it. And now he saves 35,000 rubles a year on gasoline! Read more"
Installing a diode with a toggle switch is the easiest way to increase the voltage. There is no need to bother, look for a lot of information in books, etc. Everything is as accessible as possible, no special difficulties.
This option of increasing the voltage, despite its simplicity, gives the most reliable result. Ideally suited for domestic and VAZ car models.
The purpose of this method of increasing the voltage in the vehicle's on-board network is to deceive the regulator, which is located inside the generator. As you know, on old domestic car models (kopek, VAZ 2105, etc.) the voltage drop sometimes reaches critical values - sometimes it drops to 12.5 volts. The battery, of course, will not be charged at this voltage.
A voltage regulator is the same brushes, a tablet, a chocolate bar - there are many names, but it is the same element that is responsible for regulating the voltage in the generator. On our domestic cars, mostly older ones, the tablets are of poor quality. They do not regulate voltage well, and as mentioned above, sometimes the current value drops below the baseboard.
So, what you need to do is insert an additional diode into the circuit. By this we will achieve the following: by how much the voltage on the diode is reduced, the regulator will increase the total current in the circuit.
There are several ways to integrate a diode. One of the best - remotely. Take a simple toggle switch and install it somewhere convenient.
Obviously, the toggle switch should be routed through the wire to the generator. You can insert the diode into the slot in the generator bridge, in the place where the wiring runs from the excitation winding to the regulator. That is, we simply insert the diode into the wiring between the bridge and the regulator.
We connect a separate toggle switch to the diode through two wires, as shown in the photo below.
When the voltage in the on-board network is sufficient, for example, in the summer, the diode is simply installed and not used. If the current is low, just turn on the toggle switch by activating the diode. In this way, we deceive the regulator.
The following diodes can be used.
Their analogues, for example, imported ones, are also suitable. They are much more compact, made of plastic (body). Domestic - metal.
Using a diode, you can provide a voltage drop of 0.9 or 1.2 volts. Thus, if the drawdown reaches 13-13.6, then approximately 1 volt will be added by the regulator. This is normal for winter loads. The standard drawdown of the regulator should be up to 13.8 volts, not lower. At this value, the battery can still charge, but if the voltage is lower, it won’t.
A drop in voltage below standard values for modern calcium batteries is especially critical. The fact is that low drawdown kills such batteries; they deteriorate. Naturally, an increased voltage indicator is not recommended. It should be no more than 14.6 volts (more about this in the table at the end of the article).
Installing a diode in a circuit is a universal solution that gives good results. However, there are some important points to keep in mind:
- Observe polarity when connecting an additional diode. If you break this rule, the battery will not be charged.
- The diode must be selected so as to deliver a current of at least 5 A.
- It is advisable to install the diode outside the generator, as it will get very hot.
- Silicon diodes are considered more efficient. They are capable of taking voltage within 0.8-1.2. But germanium diodes are no more than 0.7 volts.