Repairing the front suspension, I would like to say that there is nothing difficult if you arm yourself with all the required tools and act according to the instructions. Roads in our country have never been of high quality, and they especially deteriorate in early spring. When the snow melts, numerous cracks and potholes can be found in the asphalt. As you know, the suspension of the VAZ 2106 car is designed to soften vibrations transmitted to the car body from holes and potholes on the road surface. Due to the influence of time, the chassis wears out, as a result of which it requires repairs, which can be carried out independently. More on this later in the article.
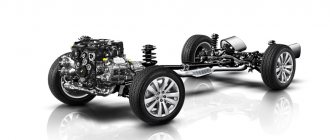
Front suspension device, what tasks it performs
The front suspension of a vehicle determines its maneuverability in turns and smooth movement. To ensure a safe and comfortable ride, you should systematically carry out vehicle maintenance and diagnostics. The presence of any extraneous sounds, knocking or grinding noises when driving, as well as a swaying sensation, indicates a malfunction of the front suspension of the VAZ 2106.
Suspension diagram
The design of the front suspension of the VAZ 2106 car includes the following components:
hub bearings (1), hub cap (2), nut (3), knuckle journal (4), collar (5), hub (6), brake disc (7), ball pin protective boot (upper) (8) , upper ball pin (9), upper bearing shell (10), upper arm (11), compression stroke buffer (12), spring insulating gasket (13), shock absorber (14), shock absorber mounting pad (15), upper arm axle (16), rubber joint bushing (17), outer joint bushing (18), shims (19), suspension cross member (20), stabilizer bar cushion (21), stabilizer rod (22), lower arm axle ( 23), lower arm (24), stabilizer bar mounting clip (25), spring (26), shock absorber spring bushing (rubber) (27), lower spring support cup (28), steering knuckle (29), ball pin race insert (lower) (30), lower support bearing (31), lower ball pin (32).
Front suspension 2106, signs of malfunction
Suspension malfunctions can appear gradually or occur unexpectedly (for example, when hitting an obstacle). It is worth noting that some faults, if not corrected in a timely manner, can cause other, more serious breakdowns. Various indirect signs indicate a suspension malfunction:
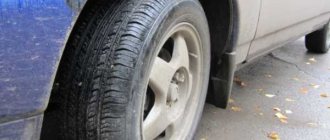
- Uneven or increased tire wear.
- "Breakdown" of the suspension.
- Knocks in the suspension when driving.
- Vibration when driving.
- Rocking (oscillation) of the car when braking and turning.
- Deviation of a vehicle from straight-line motion.
When determining suspension problems, it should be taken into account that these symptoms also accompany steering problems. As a rule, a specific suspension malfunction is determined through detailed testing, inspection, and troubleshooting of suspension elements.
Rear beam stabilizer bar
The element's purpose is to reduce the lateral roll of the car, improve the interaction of the wheels with the road surface when cornering, as well as distribute the load between the rear shock absorbers when one of the wheels drives over uneven surfaces.
The fact is that when you hit deep potholes, extremely strong suspension occurs, often causing the rear shock absorber strut rod to be pulled out.
When working in compression, the shock absorber, on the contrary, is overly susceptible to breakdown, which seriously affects its durability.
This does not happen with amplification. The resulting force is distributed between both wheels with an approximate ratio of 3 to 2, which has a positive effect on the quality of control and the reliability of the suspension elements.
The stabilization bar is installed directly on the rear beam of front-wheel drive models of domestic VAZ and other cars.
Installing a beam reinforcement should not cause any problems for most drivers. To do this, you need to use a trestle or inspection hole, and then fasten the rod to the beam according to the instructions.
The only difficulty that may arise is the need to drill eight holes in the beam housing.
Diagnostics and list of repair work
Rocking the wheel in a vertical plane with both hands.
It is recommended to diagnose the car every 15 thousand kilometers. It is very important, in this case, to carefully inspect the hinges of the levers, as well as check the condition of the upper and lower ball joints, shock absorbers, springs and the levers themselves. If there are no defects, you should simply do a wheel alignment.
Checking the condition of rubber-metal joints
Independent chassis repair includes a wide range of works, namely:
- Installation of new upper or lower supports.
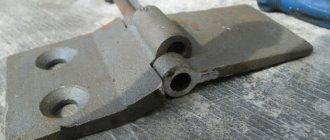
- Replacement of lower and/or upper arms.
- Installation of new hinges on the lower and upper arms.
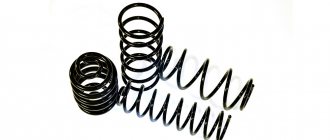
- Replacing springs.
- Replacement of suspension shock absorbers.
- Replacement of seals and bearing lubrication.
- Adjusting wheel bearings.
- Replacing stabilizer pads.
Using a depth gauge of a caliper, measure the distance from the spherical head of the pin to the outer part of the hinge cover.
After performing these works or one of them, it is imperative to do a wheel alignment.
Tools, devices, consumables for repairs
Front suspension
To repair the suspension of a VAZ 2106 car, you will need the following tools:
- Extension cords.
- Hammer.
- Screwdriver.
- Keys to “22”, “19”, “17”, “13”.
- Balloon wrench.
- Support.
- Jack.
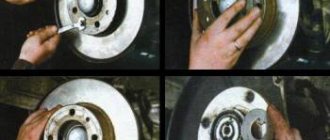
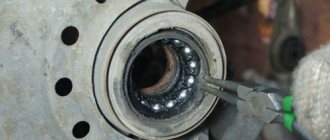
How to adjust the front bearings?
Very often the front bearings on the front suspension of a car break. It is advisable to inspect them every 10,000 km. Diagnostics and configuration are as follows:
- Use a jack to hang the wheel.
- Remove the dust cap.
- Unlock the nut on the hub.
- Using a 27 wrench, you need to tighten or unscrew the nut.
Please note that you should not use too much force when tightening. Once you have tightened the hub nut all the way, you need to turn it back 60 degrees and fix it by knocking off the edge of the nut with a hammer. The bearings have a cone shape, so if the permissible tightening torque is exceeded, they are destroyed. But they can easily withstand heavy loads, since the rollers and the holder have a very large contact area.
Front suspension cross member, removal and installation step by step
To begin, remove the lower front suspension arm from the car along with the silent blocks and the ball joint. Next, open the hood, remove the carburetor air filter, and then cover this hole with something to protect it from dirt getting into it during operation.
We are preparing a cross member, which will be required to support the engine in a suspended state while dismantling the front suspension cross member. For the material, a regular construction board with a thickness of five centimeters is suitable. The length of the traverse should be identical to the distance between the flanges of the front wings. Make a hole in the middle of the traverse into which a pin with a bracket or a long bolt is inserted.
We install the traverse on the flanges of the front wings under the hood and insert a bracket and a long bolt into its hole. We connect the bracket with a bolt to the engine eye. Lightly tighten the nut on the stud, thereby eliminating the gaps in the connections between the motor eye and the bracket.
Through the hole in the cross member, using a socket, unscrew the nuts that hold the motor mounts, as well as the nuts with spring washers, on both sides. Then place supports under the cross member and lower the car onto them so that the cross member barely touches them.
Next, on each side we unscrew the vertical and horizontal bolts that secure the cross member to the side members. When the vehicle is jacked up, the cross member will remain on the supports. We mount a new cross member and assemble everything in the reverse order.
Suspension check
It is imperative to diagnose the car’s suspension; to do this, install it on a lift or in an inspection hole. In this position, all suspension elements are much better visible. Very often the front suspension arms of the VAZ-2106 fail.
Despite the fact that their design is very reliable, cracks may appear, which will lead to the destruction of the front suspension. The procedures that need to be carried out on the car are as follows:
- Wheel camber and toe adjustments are carried out every 10,000 km.
- At similar intervals, you need to check the condition of your car tires.
- Every 20,000 km, it is necessary to check the play of the front wheels and, if necessary, tighten the nuts on the wheel bearings.
- Be sure to check the tightness of all threaded connections every 20,000 km.
- Silent blocks, stabilizer pads, ball joints must also be inspected every 10-20 thousand km.
The most vulnerable point of the entire suspension is the ball joints. They are practically eternal, if only they are used under normal conditions. In other words, they should not be under heavy stress. And most importantly, the condition of the anthers must be ideal. Make sure that no dirt gets inside the hinges when operating. It is advisable to replace them at the slightest damage to the anthers.
Ball joints, diagnostics
Diagnostics of ball joints is carried out as follows:
- We hang the wheel.
- We put something under the lower arm.
- We lower the car.
When lowering the car, the lower control arm will no longer load the suspension. We grab the wheel with both hands from above and below and make a series of sharp movements - the bottom is away from you, and the top is towards you and vice versa. If during this process you hear a knock and feel play in the hub in the ball area, then the front suspension needs repair.
How to check shock absorbers?
If the shock absorbers are damaged, this can be felt when driving. All road surface irregularities are absorbed very poorly, as a result of which the suspension does not work properly. After falling into a hole or hitting a bump, a car begins to sway for a very long time. The shock absorber is attached to the car body and to the lower suspension arm. If it is faulty, the lower arm will not encounter resistance and will begin to move freely. Another sign that the shock absorber has become unusable is the appearance of a leak on its body.
If the seals are damaged, oil comes out. In this case, the operation of the shock absorber strut is disrupted. To assess the condition of the shock absorbers, you need to sharply press on the side of the car body to bring it as close to the ground as possible. Then quickly release. With fully functional shock absorbers, the body will make no more than one upward movement. Otherwise, partial repair or replacement of the front suspension of the VAZ-2106 will be required.
Ball joints, replacement, step by step
First, we dismantle the wheel and unload the suspension, after which we unscrew the nut of the upper or lower support.
We make several blows with a hammer on the surface of the steering knuckle protrusion, releasing the ball joint, after which we free the support from the lever.
We unscrew the fastening bolts of the ball joint to the lever.
Be careful when removing the ball from the lever. It is better to remove the plate along with it, but do not forget to mount it back when installing the ball joint.
Remember that the top and bottom supports are different from each other. We reassemble in reverse order.
Front suspension upper arm, step by step replacement
- We jack up the car and remove the wheel, then place a support under the lower arm and lower the vehicle. This will load the suspension to the required state (as if the car is standing under its own weight). This will align the levers.
- We fix the axle of the upper arm with a wrench and loosen the axle nut by unscrewing it so that it coincides with the end of the axle.
- We unscrew the bolts that hold the upper ball joint and move the lever up a little, after which we completely unscrew the axle nut, pulling the axle out of the lever.
- Remove the lever with silent blocks.
- Installing a new lever.
- We install all the elements back in the opposite order to removal.
Checking silent blocks
If the silent blocks on the car are worn out, then it will not be possible to set the normal toe-in and camber angles of the wheels. Therefore, it is necessary to repair the front suspension of the VAZ-2106; the price of a set of silent blocks is about 700 rubles. When the rubber part breaks, the lever moves. If there is even slight damage, it is advisable to immediately install new silent blocks. Moreover, you need to change everything at once, in this case the performance of the suspension will become much better and more efficient. And the levers will move normally relative to the body.
Before starting work, you need to place the car on a level surface and secure the rear wheels with wheel chocks. The side of the car on which the diagnosis is being carried out must be raised using a jack and the wheel removed. It is much better if all this work is carried out on an inspection hole or overpass.
You will need to measure how far the inner and outer washers move. The outer ones should move a maximum of 3-7.5 mm for the lower lever and 1.5-5 mm for the upper one. The displacement of the internal washers should not exceed 2.5 mm on both arms. It is quite possible that the radial displacement of the silent blocks in the levers will be too large. In this case, only installing new elements will help.
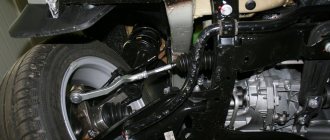
Front suspension lower arm, removal and replacement
First of all, remove the front suspension spring and, using a wrench, unscrew the two nuts holding the lever on the cross member. We dismantle it along with the ball joint, axle and silent blocks. If necessary, change the ball joint or lever. Then we put everything back in place in the reverse order.
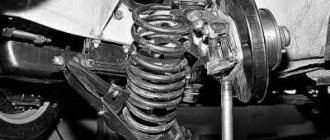
How to replace shock absorbers and springs?
If one shock absorber fails, it must be replaced in pairs. If the shock absorber on the left front side has become unusable, then the right one is changed along with it. Only in this case will the normal operation of the entire suspension be ensured. Similar requirements apply to springs.
If these suspension elements wear unevenly, the car may simply become uncontrollable when cornering. When replacing front shock absorbers, you can use a small hole, but it is better to do everything on a lift or overpass. Sequencing:
- Using a 17 mm wrench, unscrew the nut in the engine compartment that secures the shock absorber rod.
- Remove all rubber cushions attached to the rod.
- Push the shock absorber rod until it fits into the body as far as possible.
- Unscrew the two nuts from the lower arm that secure the shock absorber housing.
- Pull the entire shock absorber down.
If the work takes place on a flat surface, then you can dig a small hole under the lower arm, 15-20 cm is enough. The main thing is that the shock absorber can be removed. Or you can drive your front wheel onto a small hill, for example, several blocks of wood.