09/26/2021 18,590 VAZ 2106
Author: Ivan Baranov
A car is a place where a person is often in danger. Therefore, modern cars are equipped with various systems and means that increase the safety of the driver and passengers. These devices include seat belts. In early versions of VAZ 2106 cars, rear belts were not installed at the factory, although fastenings were provided for them. The article describes: the purpose of rear seat belts, how to install them yourself on a VAZ 2106.
[Hide]
The procedure for dismantling and installing the front belts of the VAZ 2106
You should consider in detail the algorithm for replacing the front seat belts on a VAZ 2106 car. To do this, you need to prepare the following tools:
- flat screwdriver;
- wrench 17.
Each of these types of front belts must be removed from a VAZ 2106 in the following order:
- Using a flat-head screwdriver, carefully pry and remove the decorative trim located on the top hinge mounting bolt.
New safety devices must be installed in reverse order. Installing a new coil can be somewhat difficult. To do everything correctly when carrying out work, it is necessary to ensure that the slot of the inertial reel releasing the retaining device web is positioned strictly horizontally in relation to it. If you suddenly installed the coil without following the specified rule, then in the future the mechanism may perform poorly.
3-point
Most modern vehicles use three-point seat belts, given that such a system is considered the most practical to use and eliminates the possibility of further movement of the fastened person in a collision due to inertia.
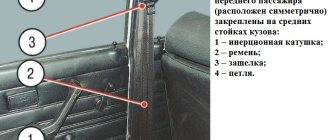
This type of design has three clamps - two points in the side pillar, and 1 with a lock between the seats.
The mounting point on the side of the vehicle pillar is fixed, and the other is equipped with a coil to automatically return the vehicle to its original state. A movable lock tongue is attached to the RB for easy fixation of the seated person. This design combines two types of 2-point seat belt at the same time.
The sliding tongue for the lock allows you to sit comfortably in the seat and, in one motion, secure your body in a stationary state in case of an emergency.
Procedure for dismantling and installing rear elements
Rear seat belts are generally more durable than front seat belts. But from time to time you have to replace them too.
When dismantling and installing these mechanisms at the rear, use the tools mentioned above. The procedure for dismantling them is as follows:
- First, the rear seat backrest is removed.
- Using a flat-head screwdriver, remove the decorative covers of the mounting bolts at the top and bottom.
- Then the bolts themselves are unscrewed along with the lower and upper fasteners.
- Carefully remove the coil and guide.
- To completely dismantle the old device, you need to insert it together with the hinge and guide into the slot in the rear pillar trim panel.
Then you can replace the old lock with a new one. To do this, you need to unscrew the mounting bolts and easily remove the old locks. Please note that this work is performed with the rear seat backrest removed. New rear security devices and locks are installed in exactly the reverse order.
An important stage in carrying out this type of work is checking the correct installation of the mechanisms. When moving smoothly, the belt should move freely, be easily secured in the lock, and when jerked, it should be sharply fixed in a certain position.
Thus, having the necessary tools at hand and following the detailed instructions, you can easily replace the safety mechanisms on your VAZ 2106 yourself.
Stages
Installing rear seat belts on a VAZ 2106 consists of the following steps:
- First you need to open the trunk of the car.
Open car trunk
- Next, we find a suitable hole in the side wall of the VAZ 2106 body, which is provided from the factory. We drill the hole to the bolt with a “10” thread.
Enlarged hole for bolt thread
- Next, you need to insert the bolt into the hole and screw it as tightly as possible with a nut. In this case, a large washer should be placed on the cab side so that the bolt head does not cut into it.
- We put the RB coil on the bolt and secure it with two nuts: internal and external.
We attach the coil to the bolt
- If everything is done correctly, then the factory technological hole will be located above the coil. The strap should be threaded through this hole.
RB freely exits their technical holes
- We check the functionality of the device. The strap should move freely.
- Next you need to install the rear shelf. After installation, the belt will be a little pinched and difficult to move. To release the strap, you need to make the appropriate cutouts.
Slots in the shelf for RB
- The second seat belt is installed in the same way.
After installing the rear boosters, you should check their correct operation. To fasten the RB, it should be pulled out smoothly without jerking. It is necessary to ensure that it does not twist anywhere. Next, you need to insert the tongue located at the end of the strap into the lock until it clicks. Then you need to tug on the latch to make sure it is securely fastened in the lock. When moving smoothly, the strap should pull out freely without delay. When jerking, it should not move. The belt is unfastened by pressing the lock button.
Result of RB installation
Thus, the VAZ 2106 car is equipped with rear inertial seat belts that were not installed from the factory. You can optionally install a middle waist strap. This completes the installation of the rear RBs. If the straps become dirty during the operation of the car, they can be washed, but do not use chemicals (washing powders, alcohol, etc.), but after a load in the event of sudden braking, it is better to replace them with new ones.
Don't neglect the safety belt and always wear your seat belt, even if the trip is short. This will reduce the risk of life-threatening injuries. It’s no wonder that wearing a seat belt is mandatory in many countries, and failure to comply with this rule results in a fine.
Didn't find the information you are looking for? on our forum.
Rear seat belt function
The main purpose of seat belts (SB) is to provide reliable protection for the driver and passengers in the event of an accident. You should fasten your seat belt before you start driving, including when moving around the city. Not only the driver, but also the passengers must buckle up.
Unbelted rear passengers create an additional threat to the life of the driver and themselves in the event of emergency braking.
There are rules for using RB:
- You cannot fasten several passengers with one seat belt;
- It is prohibited to restrain a child sitting in the arms of a rear passenger;
- There should be no objects between the person’s body and the belt that could
- injure the body in emergency situations;
- The RBs should be smooth, without twisted places, and well tensioned.
Large amounts of clothing create bulk, which reduces protection.
For the rear seats, as well as for the front ones, three-point, self-winding RBs are installed. They are mounted on the side of the body. In the middle of the rear seat there is only a two-point lap belt, the length of which can be set manually. You can install rear non-inertial RBs, but they are inconvenient to use, since they have to be wound up manually each time.
Rear seat belts
2-point
The two-point seat belt was one of the first to be installed on production vehicles (TS). The effectiveness of this type showed the least results. In total, 2 types of RB such fastening systems are provided.
In the first option, the passenger is fixed in the lumbar region transverse to the seat. One mount was located in the sill or side pillar area, and the other was located between the front seats. For the convenience of fixing the RB, the security system included a lock with a latch.
The disadvantage of the design is that the strap only held the lumbar region, and in an accident the person continued to move the upper part of the body by inertia in the direction of the steering column or panel. Thus, it is simply impossible to avoid injury, although it is possible to keep the body from flying out.
The option with a chest strap provided for the installation of fasteners on the side pillar and between the front seats. In the event of a collision, the RB guaranteed the retention of the body, but the likelihood of the person fastened slipping under the belt increased, which also contributed to the high incidence of injuries.
We change it ourselves
If the RBs experienced a shock load during an accident, they must be replaced along with the winding device. The service life of these products on the VAZ 2106 is 10 years. During operation, belts rub, fray and stretch, so it is necessary to monitor their condition. They must be clean, elastic, without damage or abrasions. If defects are found, parts should be replaced.
A set of necessary tools
To install the RB on a VAZ 2106, you need to prepare:
- a set of keys:
- screwdriver;
- inertial RB;
- fastenings;
- fasteners.
You should buy RB in a vertical version. True, you will have to suffer a little with their installation.
4-point
The four-point mounting system is rarely used on budget or low-performance cars, and is often only seen on racing or sports vehicles. Due to the inconvenience of use, it is not widely popular.
The attachment points in such a device may vary. One of the types includes vertical straps with a fixed one-piece fastening and one detachable one in the lumbar area. A special feature of this system is that the vertical straps are not attached to the structural elements of the body, but directly to the seat.
Before getting into cars, you will first need to put 2 straps over your shoulders, after which you need to stretch and secure the lumbar belt.
The second version of the system provides fixed vertical straps that can be freely detached. Each of them has a tongue for installation in the lock.
Ease of use
Speaking about ease of use, it should be noted that vertical belts are suitable for a person of any build and height, in contrast to belts with a diagonal attachment point in the body.
A diagonal belt with fastening in the body can pass almost in the neck area of a short driver. This circumstance indicates not only inconvenience, but also unsafe operation, since at the moment of a collision the inertial force and tension of the belt will act on the person’s neck. This results in a high probability of injury and significant harm to health.
For tall people, a diagonal position of the belt with an attachment point in the body is also not always suitable, since the strap passing below the shoulders can significantly restrict the movements of the arms.
Manufacturers of modern cars have taken care of this and have provided the possibility of moving the body mount in height for optimal adjustment to the seated person.
Interior lighting of VAZ 2104
The standard interior lighting of the VAZ 2104 leaves much to be desired, since at night in the car, with the lamps on the side pillars on, little is visible. To improve the situation, you can install a modern lampshade, for example, from Kalina or Lanos.
As a lampshade for interior lighting, you can choose a product from Kalina or Lanos.
The essence of the modification comes down to the fact that it is necessary to install the purchased lamp into the ceiling panel near the windshield. You can supply power at your discretion, for example, connect the ground to the rear view mirror mount, and take the plus from the hazard warning button.
Installing a modern lamp can significantly improve the interior's visibility at night.
5-point
Five-point seat belts, like the previous type, are widely used in sports vehicles, as well as in car seats for children.
In terms of its structure, it is the same 4-point belt with an additional strap. The auxiliary element is located at the bottom of the seat - between the legs, and is placed in a special lock.
This type of protection guarantees the most reliable retention of the body, and also allows you to distribute the load evenly across the belts.
What can you pay attention to when choosing a belt?
- Components. It should be noted that each car has an individual security system structure, which may differ on different models.
- Fasteners The fundamental element in the passive safety system is the fastener, since it ensures the strength of the structure. Fasteners are mounted on body elements, since at the moment the body moves by inertia with acceleration, a colossal impact is exerted on the belt.
If the fastenings were mounted in the seat, then excessive loads could simply destroy the integrity of the structure, since the backrest moves along with the body. When installing the mount into the body, such displacement cannot occur. The exception is cases when the impact leads to a total violation of the integrity of the body.
The fastening system may provide for fixing the belt directly into the seat. This design is typical in sports cars, where the seats for the driver and passenger initially provide for the impact of enormous loads, for this reason such fasteners are possible. The lumbar belt is attached exclusively to the body.
What not to do
Many motorists are simply annoyed by buckling up, and the built-in safety system begins to constantly notify the driver about this need with an unpleasant sound signal:
- Some people purchase special “plugs” that are installed in the seat belt buckle, thereby “deceiving” the vehicle’s computer. It is strictly not recommended to do these actions, since we are talking about your own safety. When using “plugs”, the car “thinks” that the airbag is fastened and the airbags will be guaranteed to deploy. As already noted, the airbag deployment speed exceeds 250 km/h, and such an impact force is quite enough to cause irreparable damage to health. For example, cases were recorded when the driver had every chance of surviving if the RB was used, and the cause of death was a fracture of the cervical vertebrae as a result of an airbag impact.
- Often there are families with children who are limited to fastening a car seat. In this case, the child remains unfixed. In the event of an accident, the seat remains motionless, and the baby simply flies out of it, getting injured.
- It is not recommended to use seat belts that show signs of deep wear or damage, since in an emergency they may not withstand extreme loads and break. If necessary, it is recommended to urgently contact a specialized service station (STS).
- In cars intended for everyday use, there is no need to equip the seat with additional safety aids. Firstly, the necessary precautions are already provided by the manufacturer, and secondly, making changes to the design can have a detrimental effect on the safety and ability of the existing device to fully operate.
Repairing, replacing or installing a passive safety system yourself is strictly prohibited.
In conclusion, it should be noted that it is necessary to wear a seat belt always and everywhere. It doesn’t matter where exactly you plan to travel – within the city or on the highway.
Regardless of driving experience and speed limit, there is always the possibility of a sudden collision with another road user. The car has always been and will be a source of increased danger and you should not neglect the opportunity to save your life and health, given that the entire fastening procedure takes no more than 1 minute.
Nowadays, cars are equipped with a significant number of safety systems and equipment. They are aimed at preventing loss of control of the car during emergency situations (active systems) and the maximum possible reduction in injury to passengers during an accident (passive means).
It all started with seat belts, which “migrated” to vehicles from aviation. The first prototypes of belts appeared almost with the beginning of the automobile era itself. In 1903, the first version of such a car security system was proposed, but then it did not catch on. They became more actively interested in them in the 50s of the last century. Moreover, at first, belts were offered only as an option and only a little later - as standard equipment.
It is worth noting that at one time the designers tried to replace the belts with another system - airbags. But later it turned out that using airbags on their own is of little use, but in combination with belts they seriously increase safety.
In general, seat belts are one of the “oldest”, but at the same time effective means of preventing injury, that is, they belong to a passive system.
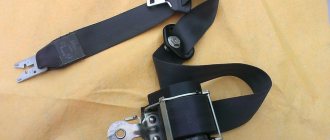
WHAT IS A SEAT BELT CONSISTED OF?
The basic design of the seat belt consists of:
- straps;
- castle;
- fastening bolts;
- retractor device.
For the production of straps, synthetic material is most often used. The main requirement for it is a high level of strength. The seat belt retractor operates using a ratcheting mechanism. Emergency blocking occurs due to the sensitive element.
The basis of the sensitive element is a simple metal ball. When it moves, the reel is fixed by a system of levers. Some designs use a pendulum instead of a ball.
Separately, we need to talk about the system responsible for the gradual tension of the tape. This happens thanks to the flywheel. It is mounted on the spool axis. This is a small disk that ensures a smooth process. But if an accident occurs, a jerk is formed, due to which the disk has to overcome the friction force. At the same time, pressure arises on the screw surface.
The seat belt device helps ensure the safety of passengers during collisions. But even they have a certain limit of effectiveness. At speeds over 200 kilometers per hour, the belts will be of little use.
The bolts in the seat belt device are responsible for reliable fastening of the entire structure while driving. They are made of hard alloy that can withstand heavy loads. Moreover, they are attached to the car frame to ensure maximum reliability.
Installation
1. Remove the rear headrests
2. Pull the right hinge of the rear seat cushion lock drive and fold back the right cushion. Pull the left hinge of the rear seat cushion lock drive and fold back the left cushion.
3. Press the lock drive handle of the right backrest of the rear seat and tilt the backrest.
4. Unscrew the four nuts of the hinges securing the right backrest of the rear seat, remove the right backrest (socket wrench 10). Repeat steps 3 and 4 with the left back. Remove the trunk shelf and trunk mat.
5. Unscrew the eight screws securing the trunk trim on the right and left (a Phillips screwdriver).
6. For VAZ-2112: unscrew the shelf lock.
7. For VAZ-2112: unscrew the lower screw securing the shelf.
8. Release the rear suspension spring support cups and rear seat backrest mounting brackets from the trunk lining.
9. Unscrew the rear seat back lock latches (spanner 19).
10. Unscrew the bolts securing the rear seat belt buckle brackets (replaceable head 17, knob).
11. Place the body reinforcement into the passenger compartment, align the holes in the amplifier with the holes on the seat back mounting brackets and with the holes for attaching the seat belt buckles.
12. Attach the retainers (included in delivery) of the rear seat backrest locks with a spring lock washer and a standard washer.
13. Tighten the bolts securing the rear seat belt buckle brackets in the assembly with the brackets (including the two bolts included in the delivery kit).
14. Install the rear seat backs. Tighten the nuts securing the bracket from the trunk side (socket wrench 10).
15. Tighten the bracket fastening nuts on the interior side (socket wrench 10).
16. Tighten the 4 bolts securing the amplifier cross member (spanner 17).
17. Adjust the position of the rear seat back locks so that the backrests easily lock and recline.
18. If necessary, loosen the two locknuts and adjust the amplifier cross member using the adjusting coupling (wrenches 27 and 24).
19. Tighten the rear seat back lock clamps and attach the lock nut from the delivery kit (spanner 19).
20. Tighten the locknut of the seat back clamp (replaceable head 17, knob).
21. Tighten the bolts securing the rear seat belts and the lower brackets of the 3rd amplifier (replaceable head 17, knob).
22. Through the holes in the side brackets of the amplifier, drill (in place) holes in the body brackets (drill, drill bit with a diameter of 8 mm).
23. Install bolts with spring washers into the resulting holes and attach nuts (bolts, washers and nuts from the delivery kit)
24. Tighten the control bolts (spanner 13, interchangeable head 13, knob).
25. Tighten the locknuts of the adjusting coupling (spanners 24 and 27).
Repair process
Now that we have dealt with the signals and reasons for blocking a fastened and unfastened seat belt, let’s move on to the repair process. Cleaning seat belts is one of the main tasks in this process, so we will consider this procedure separately. So, what should you do if you receive a signal that the lock is jammed? How can I clean it or turn it off? You will learn more about this below.
Tools
To disable the lock if a corresponding signal appears, the entire mechanism will need to be cleaned. To do this, you need to thoroughly prepare in advance and collect all the necessary tools. so what to prepare:
- a Phillips screwdriver, preferably a short one;
- flat head screwdriver;
- a wrench set to “17”, it will be more convenient to use a socket wrench;
- stationery pin;
- syringe with tube;
- some gasoline (lighter fuel is ideal).
Step by step instructions
When the entire list of tools is ready, you can begin repairing and cleaning.
Using a Phillips screwdriver, unscrew the screws that secure the strap protection. If the lock is not working, pull the strap out to its full length and secure it with a clothespin. Take a wrench and remove the screw that secures the element coil. The screw must be removed from its installation location. To prevent the element from starting to unwind, you can attach it directly to the same spool using the same clothespin. In any case, in order to disable and clean the lock, it must be locked to make further actions easier. Put the reel aside and sit in the next seat. To disable and clean the lock, you will need to find the lid behind which the inertial device is hidden. As a rule, it is slightly thicker in design. Shake the coil - under which cover you hear the noise - under that one it is located. Now to dismantle the protective cover you will need to remove four plastic pistons. This can be done using a slotted screwdriver or a thin knitting needle. The pistons should be supported by hand so that they do not fly out and you do not have to look for them and collect them throughout the cabin. Then pry up the cover with a screwdriver and remove it. Set the lid aside. Your view will now be presented with the first mechanism of the component. It is a kind of box with a cylinder and thus a locking ball and a so-called rocker inside, which jams the lock. This mechanism can be dismantled freely from the installation site. Check the functionality of this rocker - ideally it should move freely along the axis of rotation. This device should be positioned vertically with the top angled toward the locking ball. One way or another, the rocker arm must be positioned vertically so that it does not jam. If you feel that the so-called rocker arm does not move freely, then you need to clean its rotation axis. Pour some gasoline and rinse the device until it rotates freely on the axis, without the slightest jamming. Now let's move on to the second, inertial device. It is located under the gear, made of plastic and in most cases made of steel
The gear comes off freely, so remove it. Note the center of the serrated hole. It contains an eccentric with teeth
It is these teeth that jam the strap when it is suddenly pulled out. The space under this very eccentric needs to be cleaned. Pour a little prepared gasoline around the entire perimeter of the hole, add a little fuel to the center. At the same time, hold the strap, preventing it from winding up, for which you can temporarily remove the clothespin. Make sure that the liquid gets into all parts of the element, otherwise cleaning it will be useless. Take the dismantled spool with one hand so that the plastic guide along with the spring can be supported with one finger. Using your other hand, pull and wrap the safety element several times. Also pull it a few times until the device itself engages. Next, hook it on the reel one more time. These steps should be repeated several times.
At this point, the cleaning process of the mechanism can be considered complete. You should carry out all further assembly in reverse order. Do everything correctly, because an incorrectly assembled mechanism will cause breakdowns in the near future with regular use of the straps.
Recommendations
No one can ever know when an accident will happen. An analysis of a huge number of videos of road accidents suggests that the survival rate in serious accidents is many times higher for passengers who were using the RB at the time of the accident.
Situations cannot be ruled out when an unbelted driver simply flew out of the vehicle at the moment of the first impact, which saved his life, taking into account the likelihood of the vehicle subsequently moving along an unpredictable trajectory or overturning.
It is important to note that fastening your seat belt before driving is one of the requirements of the Russian Traffic Regulations, for ignoring which a fine is provided. This obligation is fully justified, since in many road accidents the cause of serious injury or death is the unfastened vehicle.
Another reason why you should spend 10-15 seconds on a passive airbag system is the likelihood of getting a concussion, a broken nose, or other damage to the area of the body that comes into contact with a deployed airbag, even in a minor accident.
It should be noted that the opening speed of the PB is more than 300 km/h. Add to this value the speed of inertial movement and the final result is a very noticeable blow, in which loss of consciousness will be the least consequence.
Car compatibility
Approximate list of compatibility of covers size S*
| Audi | A1, A2 |
| BMW | Episode 1 (04 - 07) |
| Chery | |
| Chevrolet | Lanos, Lacetti, Aveo, Spark |
| Citroen | C2, C3 |
| Daewoo | Tico, Matiz |
| Fiat | Panda, Punto, Albea, 500 |
| Ford | Ka, Fiesta, Fusion |
| Honda | Jazz, Civic |
| Hyundai | i20, i30, Atos, Getz, Accent |
| Kia | Rio, Picanto |
| Mazda | 2, 3 |
| Mitsubishi | Colt |
| Nissan | Note, Micra |
| Opel | Tigra, Corsa, Astra |
| Peugeot | 1007, 107, 206, 207, 306, 307, 308 |
| Renault | Logan, Symbol, Twingo, Clio |
| Seat | Ibiza, Leon |
| Skoda | Fabia, Roomster |
| Suzuki | Swift, Ignis, SX4, Jimny |
| Toyota | Aygo, Yaris, Vitz, Corolla, Echo |
| Volvo | C30 |
| VolksWagen | Lupo, Polo, Golf |
| VAZ | 1111, 2104-2109, 21099, 2110-2121, Granta, Kalina, Largus, Priora |
| UAZ | 3151 Hunter |
*The list is provided for informational purposes only and is not complete.
Sample list of vehicles with M-size seats*
| Audi | 80, 90, 100, 200, A2, A3, A4, A6, TT |
| BMW | Series 1 (since 2010), Series 3, Series 5, Series 7, X5, Mini One, Mini Cooper, X3, X6, M6 |
| Chery | Amulet, Tiggo |
| Chevrolet | Astro, Blazer, Captiva, Tracker, Aveo, Lacetti, Lanos, Niva, Cruze, Cobalt, Epica |
| Chrysler | Town&County, Voyager |
| Citroen | AX, BX, ZX, Berlingo, Jumper, Saxo Visa LN, Xantia, C2, C3, C4, C5, C8, XM |
| Daewoo | Espero, Laganza, Magnus, Nubira, Gentra |
| Daihatsu | Charmant, Sirion, Move, Rocky, Feroza |
| Dodge | Caravan, Caliber |
| Fiat | Brava, Bravo, Idea, Marea, Weekend, Panda, Punto, Stilo, Doblo |
| Ford | Escort, Ka, Maverick, Ranger, Focus, Focus II, Focus C-Max, Fusion, Escape, Galaxy |
| Great Wall | Safe, Deer |
| Honda | Concerto, CR-V, HR-V, FR-V, Logo, Accord, Civic, Jazz |
| Hyundai | Lantra, Matrix, Sonata, Santa Fe, Tuscon, Tiburon, Grandeur, Elantra, Solaris |
| Kia | Ceed, Cerato, Clarus, Magentic, Shuma, Rio, Spectra, Sorento, Sportage |
| Mazda | 626, 121, 2, 3, 6, 323 S, RX-7, RX-8, MX-5, CX-5, CX-7, CX-9, Familia, MPV |
| Mercedes | 100, 190, A-Class, C-Class, E-Class, S-Class, R-Class, CLK, SLK, GL, ML |
| Mitsubishi | Galant, Carisma, Colt, Lancer, Outlander, Delica, Diamante, Dingo, Dion, Eclipse, Pajero, Mirage |
| Nissan | Maxima, Primera, Avenir, Murano, Note, Cedric, Liberty, Cefiro, Pathfinder, Skyline, X-Trail, Terrano, Patrol |
| Opel | Calibra, Kadett, Manta, Tigra, Agila, Astra, Combo, Meriva, Signum, Vectra, Zafira |
| Peugeot | 106, 204, 205, 306, 307, 309, Partner, 406, 407 |
| Renault | Clio, Laguna, Megane, Scenicll, Twingo, Scenic, Modus, Safrane, Sandero, Logan, Duster |
| Rover | 200, 214, 400, Mini, 45, 75, ZT, ZS |
| Seat | Alhambra, Altea, Arosa, Cordoba, Ibiza, Leon, Toledo |
| Skoda | Favorit, Felicia, Forman, Fabia, Oktavia, Superb |
| SsangYong | Musso |
| Subaru | Impreza, Legacy, Leone, Forester, Outback, Tribeca |
| Suzuki | SJ 410, SJ 412, Alto, Baleno, Swift, Grand Vitara, Ignis, Wagon R, Jimny |
| Toyota | Camry, Carina, Lavd Cruiser, Lite Ace, RAV 4, 4 Runner, Starlet, Tercel, Avensis, Corolla, Prius |
| Volvo | C30, S40, S60, S70, S80, V40, V40-Cross Country, V50, V60, V70, XC60, XC70, XC90 |
| VW | Golf, Golf II, Jetta, Scirocco, Bora, Polo, Passat |
| TaGAZ | Tingo ('12- ) |
| GAS | 3102, 3110, Siber |
| UAZ | 3160, 3162, 3163, Patriot, Pickup |
Twisted straps
When using a seat belt, it is important to ensure that the straps do not twist and are always straightened. Each twist narrows the area of the belt and increases pressure on the chest. When struck, these thin places dig into the body strongly. It’s also bad that the kinks of the belt on the lower back do not allow you to tighten it and press it tightly to the body.
It is also necessary to clearly fix the bracket in the lock hole. Sometimes it does not fit tightly and can pop out when pulled. Then the belt will not hold the body. Such jamming of the staples occurs on old worn-out clamps.