09/25/2021 6,065 timing
Author: Victor
During operation, all components and parts of the vehicle are subject to natural wear and tear. Timing drives are very durable, but sooner or later the owner is faced with the task of replacing the Niva Chevrolet timing chain. However, this procedure has a number of subtle points, which we will talk about.
[Hide]
When to change?
The factory instructions for the Niva chain drive with the VAZ-2123 injector engine do not indicate the frequency of replacement. A sign of an impending change is the increased noise of the drive and the impossibility of further tensioning the chain. Typically, this picture begins to appear closer to 100 thousand mileage. The majority of Chevy Niva owners try to overhaul the valve drive of their cars at exactly this mileage.
For the belt drive of the Opel Ecotec Z18XE injection engine, the plant has set a replacement period of once every six years. Or every 120 thousand km.
Parts selection
When purchasing a new chain, it is advisable to check its quality. To do this, it is held in a horizontal position with the side parts of the links facing down. If the sagging of the chain ends exceeds 10 mm, then it is better to choose another part. It is also necessary to select the remaining timing drive elements.
AvtoVAZ production details and articles:
- chain - 21214-1006040-82;
- gear set - 2123-1006020-86;
- damper - 21214-1006100-01;
- chain tensioner shoe - 21214-1006090-01
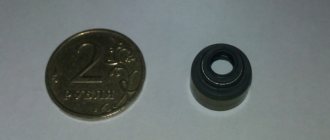
An equally common option is a ready-made set of production parts (number 10–1006001). One of the differences of this set is the Pilot automatic tensioner, which in its geometric dimensions completely corresponds to the standard part. A design feature of the tensioner is the ability to automatically adjust the chain stretch. At the same time, it does not require oil supply for its operation; everything is done using springs. The Pilot tensioner is also supplied separately from the kit (part number 21214–1006060).
On very early Niva Chevrolet cars produced from 1998 to 2002, there is a “hybrid” engine model, which is equipped with a double-row chain and chain tensioning elements from the VAZ “classic”. Such machines require their own spare parts, which are purchased only after disassembling the engine and determining the type of part.
To replace the belt on Opel engines, you usually purchase an original replacement kit (part number 1606306) or its Contitech equivalent (CT 975 K3). When replacing a belt, a new pump must be installed; the most common choice is parts manufactured by SKF (VKPC 85624) or Hepu (PK03270).
Description of replacing the timing chain Niva Chevrolet
This item
There are no specific timing for replacing the timing chain on a Chevrolet Niva. The stretching of the part is indicated by the characteristic noise of the engine after the car has traveled 100 thousand km or more. If the chain cannot be tensioned in the usual way or it easily pulls away from the sprocket by about half the height of the tooth, this also indicates a problem.
A phase check can also serve as a criterion for replacement. If the mark on the camshaft sprocket coincides with the mark on the bearing housing PB, and the mark on the crankshaft pulley at this moment is 1 cm below the mark on the front engine cover, the chain will have to be changed. The same should be done if the bushings are chipped or if cracks are detected in the cheeks of the Niva chain.
Due to the increase in the pitch between the chain links, the engine will idle unevenly even with proper ignition and normal compression.
That is why the part needs to be replaced. Weak tension allows it to “fall” between the teeth of the sprockets, creating that very characteristic engine noise. When the chain oscillates, it can break the damper, the corner of the shoe, or the stop pin.
If a loose timing chain jumps a couple of teeth, the best news that day will be a stalled Niva Chevrolet engine. Or the meeting of the valves with the pistons will lead to serious engine damage. It is because of this that it is recommended to adjust the chain tension on the Chevrolet Niva more often and replace it as soon as normal tension becomes impossible.
What is needed for the work?
Internal structure of the tensioner
The chain on a Chevrolet Niva wears out the timing mechanism more than the belt, so the sprockets will also have to be replaced. Old gears will wear the new chain unevenly, causing slippage and breakage. Of course, this is hard mechanical work. But replacing a chain is done quite rarely, so you can at the same time change the seals and gaskets, as well as all related worn parts.
First of all, you need to purchase a new timing chain (timing chain) for the Niva Chevrolet. To ensure its quality, lay the part flat and hold it suspended. If the ends sag by more than 1 cm or the sagging is uneven, it is better to refuse the purchase - most likely, the chain has already worked.
You will also have to buy:
- three gears - crankshaft, camshaft and oil pump;
- chain tensioner shoe;
- sedative;
- chain tensioner Niva Chevrolet;
- oil pressure alarm sensor;
- frontal oil seal;
- cylinder head gasket and pump gasket.
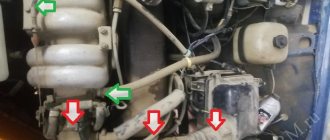
Preparatory work
In order to create the necessary space to carry out work, you will have to perform a number of actions.
- Remove the air filter and close the carburetor neck with a plug.
- Disconnect the choke cable, electrical wire, and hoses. We move them to the side.
- Remove the fan, pump pulley and generator belt.
- We remove the sump protection and the engine boot, and clean the front engine cover.
- Now you need to put the Chevrolet Niva on the parking brake and place wheel chocks under the wheels. Then engage fourth gear. Now let's start the analysis.
- Loosen the ratchet nut by striking the wrench sharply with a hammer.
- Remove the valve cover, bend the lock washer of the camshaft gear bolt, loosening it by hitting the wrench with a hammer. Turn off transmission.
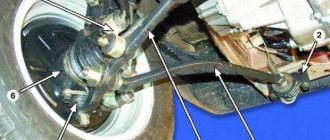
- Rotate the crankshaft pulley, align the marks on it and the front engine cover, and then align the marks on the camshaft gear and bearing housing. Removing the part
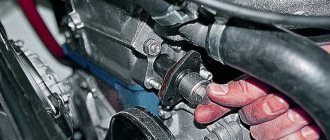
- Unscrew the ratchet nut, and then remove the crankshaft pulley.
- Remove the front engine cover, unscrew and remove the damper, bend the lock washer of the oil pump sprocket bolt and loosen the bolt.
- Dismantle the hydraulic chain tensioner: remove the oil line, change the emergency oil pressure sensor, unscrew the Niva Chevrolet chain tensioner nuts. Remove the tensioner and shoe.
- Unscrew the bolt on the camshaft gear, as well as the stop pin (at the smaller sprocket). Remove the gear and pull it out, loosen the chain and remove the smaller gear.
- Without changing the position, carefully remove the oil pump drive gear along with the chain. Disassembly of the mechanism is completed.
Installing new parts
First we change the crankshaft front seal. We remove the old one and clear the space for the new one. Lubricate the new oil seal with engine oil and install it using a mandrel. You can use an old oil seal as a mandrel.
The fastening bolt on the shoe is hammered with light blows of a hammer. It is not recommended to adjust it so that it is inserted by hand - there will be a slight backlash, which will cause the shoe to move on the axis. Place the bolt in place and tighten.
Install the new crankshaft, camshaft and oil pump gears in place so that the marks match.
Tensioner assembly
The lock washer retainer can be processed with a file, but it must fit tightly into the groove. The clamp is bent at an angle of 90°. Tighten the bolt.
Moisten the chain with engine oil and put on the crankshaft gears first, and then the oil pump and camshaft. It is necessary to tension the chain from sprocket to sprocket and observe the position of the shafts according to the marks.
Install the tensioner. Tighten the nuts. Check the alignment of the marks and the chain tension again. Tighten the bolts on the gears. After rotating the crankshaft several times, check again whether the marks match.
Lubricate the gasket with sealant, then replace the cover. Install the pulley. You can move the lid a little so that it fits well. After this, tighten all the cover bolts and nuts.
Tighten the tension and idler rollers; if necessary, they can also be replaced. Using sealant, install a new gasket on the pump, and then put the pump in place. Put the car on the parking brake and engage 4th gear, tighten the pulley nut. Connect all hoses, pipes, connectors, install the fan and radiator. Tighten all connections, then fill with coolant.
Carry out a test run of the engine. If everything is in order, install the radiator grille, boot, and protection. And now - good luck!
Source: https://expertvaz.ru/niva/chevrolet/zamena-tsepi-grm.html
How to replace it yourself?
Replacing the timing chain of a Niva Chevrolet is a labor-intensive procedure that only a fairly experienced owner can do with his own hands. For people who are little familiar with car design and engine repair technologies, such work can be overwhelming. Before starting independent work, you need to prepare tools, buy spare parts and find a room for work.
To speed up the replacement process, some owners simply install a new chain without removing the front cover, but such a change is unacceptable. It is necessary to change the drive gears, since the teeth on them are already worn and will interact poorly with the new chain. Chain tensioning devices should also be changed.
Tools and materials
To carry out the repair you will need the following:
- special wrench or socket for pulley nut (38 mm). A number of owners make such a head themselves, using a wheel wrench for truck wheels (32 by 38 mm) as a blank;
- keys or heads of sizes 8, 10, 13, 17, 22 mm;
- brake pipe wrench;
- spark plug key;
- pliers;
- hammer;
- flat blade screwdriver;
- rags for wiping;
- a clean rag to cover the engine head.
To replace the timing chain on a 2006 Chevrolet Niva, you will need new parts:
- a chain and three gears for driving shafts (on the main shaft, on the camshaft and on the oil pump shaft);
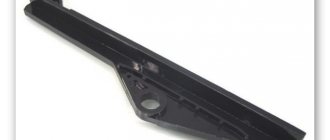
- chain tensioner and damper;
- frontal oil seal on the crankshaft;
- timing cover and pump cover gaskets.
Algorithm of actions when changing the chain
The following actions must be taken:
- Place the car in the pit, put on the handbrake and place wheel chocks under the wheels.
- Remove the engine crankcase and gearbox protective screen.
- Drain the coolant and remove the radiator with the fans installed on it. If your machine has an air conditioner, drain the refrigerant from the system. You can avoid draining liquids by carefully moving the radiator block to the side.
- Disconnect the throttle control drive.
- Remove the air filter housing by lifting it off the throttle body.
- Remove the crankshaft position sensor and loosen the generator.
- Remove the accessory drive belt.
- Remove the tension and idler rollers.
- Remove the top camshaft cover and cover the top of the engine with a clean rag.
- Use a screwdriver to bend the lock washer and remove the 17mm bolt.
- Unscrew the pump mount and remove it from the engine.
- To begin removing the front cover, unscrew the two nuts on the top and seven bolts around the perimeter.
- Remove one bolt securing the generator bracket.
- Place the car in fourth or fifth gear and remove the 38mm nut on the pulley.
- Unscrew the spark plugs and set marks on the crankshaft and camshaft gear.
- Remove the pulley and unscrew the three nuts for the lower fastening of the front cover. They are located on the engine sump.
- Unscrew the two bolts securing the damper and remove it.
- Bend the washer clamps on the oil pump gear and remove the 17 mm mounting bolt.
- Remove the oil lines from the tensioner using a brake pipe wrench.
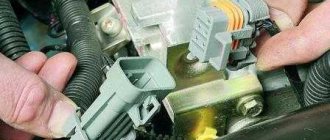
- Unscrew the 22 mm nut of the low oil pressure sensor from the tee. This operation is necessary when planning to install the Pilot tensioner.
- Using a spark plug wrench, remove the tee and install the pressure sensor in its place.
- Unscrew the two 10mm nuts securing the tensioner and remove it. The most convenient way to remove the top nut is with a tubular wrench and pliers.
- Remove the chain and all three gears.
- Using a screwdriver, remove the old crankshaft oil seal from the front cover.
- Thoroughly wipe the cover and oil seal seat from dirt with a rag.
- Press in a new oil seal. To make the task easier, you can lubricate it with oil and use the old part as a mandrel.
- Install a new tensioner shoe. When installing, it is necessary to ensure a minimum gap between the body and the bolt - the tensioner should move easily over the bolt, but have no play. Only in this case will the correct chain tension be ensured.
- Install the oil pump and crankshaft gears. When installing parts, it is necessary to install spacer and lock washers.
- Bend the tenon of the lock washer at a right angle and tighten the bolts. If the locking pin does not fit well into the gear hole, then it needs to be sharpened a little.
- Place the gear on the valve drive shaft. The mark on the gear (on the back) should be located opposite the mark on the head.
- Install the damper.
- Set the crankshaft to TDC (top dead center). To do this, there is a mark on the gear located opposite the keyway.
- Put on a new chain, after moistening it with engine oil. The chain should be correctly put on from the crankshaft, then through the oil pump to the camshaft. This method will allow the chain to be evenly tensioned between the gears. In this case, it is necessary to ensure that the marks on the gears match; only the oil pump shaft can be rotated.
- Install the tensioner, lubricating the mating surfaces with sealant. The hole in the tensioner housing, through which the working spring is visible, should be directed upward.
- Check marks and degree of tension. Pull the pin out of the tensioner, placing it in its working position.
- Rotate the motor shaft several revolutions to check the marks.
- Tighten the camshaft and pump gear bolts and bend the stoppers.
- Install the front cover, having previously lubricated the mating surfaces and gasket with sealant.
- Tighten the mounting nuts and install the generator bracket.
- Reinstall the pulley and tighten all cover bolts.
- Reinstall the valve cover.
- At the same time, you can repair the drive of auxiliary units by replacing the tension rollers and the belt itself.
- Install the pump with a new gasket. To ensure reliability, the surface must be coated with a sealant.
- Tighten the 38mm pulley nut.
- Put on the accessory belt and connect all the removed connectors.
- Replace the radiators. It is recommended to check the condition of the hoses and clamps. Worn parts must be replaced with new ones.
- Fill with coolant.
- Carry out a test run of the engine. If it starts up normally, then it needs to be warmed up.
- Stop the engine and make sure there are no leaks through the pipes.
- Install the remaining parts.
- If the car is equipped with air conditioning and the refrigerant has been drained, it must be refilled at a specialized service center.
The photo shows some points when replacing a chain on a Chevrolet Niva.
Nuts and pulley removed
The front cover has been removed
Removed cover with seal
New oil pressure sensor
Chain length difference
New oil seal installed
The nut retainer is inserted into the gear holes
Timing belt replacement completed
When installing the pulley, it is necessary to check the correct installation of the ignition, which can be aligned along the crown on the pulley. There is a section on the toothed rim of the pulley that is missing one tooth. When the piston of the first cylinder is at TDC, this section is in the lower position. In this case, the twentieth tooth, when counting counterclockwise, should be opposite the crankshaft position sensor.
The relative position of the marks on the pulley
Algorithm of actions when changing a belt
Replacing a belt is a more complicated procedure, so you will need the following tool:
- a complete set of wrenches and sockets;
- screwdrivers with flat and Phillips blades;
- camshaft stopper, although this part is optional. If desired, you can purchase a set of shaft clamps JTC-4186.
The Opel engine needs its own spare parts:
- original (or analogue) timing kit for the Z18XE engine (belt and three 3 pulleys);
- original (or similar) coolant pump.
The process of replacing a belt on a car equipped with an Opel engine with power steering (hydraulic power steering) is as follows:
- Dismantle the engine and air conditioner radiators with fans installed on them. This will drain the coolant.
- Remove the air filter housing.
- Remove the generator and compressor drive belt. At the same time, the belt tension mechanism is also removed.
- Remove the upper part of the plastic timing case.
- Set the marks on the shaft gears - they should coincide and be opposite. In this case, the mark on the pulley should coincide with the notch on the engine crankcase.
- Unscrew the screws and remove the crankshaft position sensor, as well as the timing belt tension roller. The roller fastening usually does not unscrew easily; it is often knocked down with a chisel.
- Remove the pump mounted on three bolts.
- Clean the mating surfaces, lubricate them with high-temperature sealant and install a new pump.
- Install a new drive belt and tensioners. Check the alignment of the marks on the shafts, crank the engine several times and re-check that the marks match.
- Install the removed parts.
- Fill with new coolant.
- Contact a specialized service and refill the air conditioning system.
The photo shows the stages of replacing the timing belt on a Chevy Niva with an Opel engine.
Preparing to start work - radiator removed
Pump installation location
New and old pumps
New parts installed
New pump on the engine
Everything is ready to install the radiators in place
The video from the author Alexander Dizer shows the complete process of replacing a belt on a Niva with an Opel engine.
What's next?
The car is placed in fifth gear. Use a special 38 mm wrench to remove the nut on the crankshaft pulley.
Unscrew the spark plugs and make marks on the crankshaft, as well as on the camshaft gear. Then dismantle the pulley and unscrew the fastenings of the lower frontal cover. They are located on the engine sump. Unscrew the two damper mounting bolts. The last one is removed too. The oil pump gear clamps are bent. Then the bolt is unscrewed with a 17mm head.
The oil lines are removed from the tensioner using a brake pipe wrench. Afterwards you will need to unscrew the nut of the low oil pressure sensor from the tee. To do this, you will need a 22mm wrench. This procedure is required when using the “Pilot” tensioner.
Using a spark plug wrench, the tee is removed and a pressure sensor is installed instead. Using a 10mm wrench, unscrew the two tensioner nuts. The last one is removed from the place. The top nut is removed. It can be obtained with pliers or a tubular wrench.
The next step is to remove all three gears, as well as the chain. Use a screwdriver to remove the old crankshaft oil seal. It is necessary to thoroughly wipe the oil seal seat from dirt.
You will need a clean rag. It is also advisable to wipe the lid. After these procedures, a new oil seal is pressed in. To make it go in easily, you will need to pre-lubricate the elements with oil. An old oil seal is used as a mandrel (so that the part fits evenly into the hole).
Install a new tensioner shoe. In this case, it is necessary to ensure a minimum gap between the bolt and the body. The tensioner should move normally over the bolt without any play. This is the only way to properly tension the timing chain.
The oil pump and crankshaft gears are put on. At the same time, do not forget about installing locking and spacer washers. The tenon of the locking washer should be bent at a right angle. Afterwards the bolts are tightened. If the tenon is difficult to fit into the gear, it needs to be slightly sharpened.
The gear fits onto the camshaft. The marks on the back of the gear should match those on the head. A new damper is installed and the crankshaft is set to the top dead center position. There is a label for this. It is located opposite the keyway.
The new chain is wetted with engine oil before installation. You need to know how to put it on correctly. The chain is put on from the crankshaft, then passes through the oil pump and goes to the camshaft. This installation scheme will ensure uniform tension. In this case, only the oil pump shaft can be rotated.
The tensioner is installed. The mating surfaces must be lubricated with sealant. In this case, the hole that is in the tensioner body (the spring is visible in it) should be in the upward direction.
Replacement cost
The cost of replacing the chain will be 2,600 rubles when purchasing a ready-made kit. When purchasing parts separately, the cost of the parts will be 800 rubles for a chain, 1500 rubles for a set of gears, 240 rubles for a damper and tensioner, and 550 rubles for a tensioner. When purchasing a set separately, the owner must have an amount of at least 3,100 rubles. To this you need to add about 300 rubles for a new oil seal, about 1 thousand rubles for cooling fluid and up to 3 thousand rubles for refilling the air conditioner (if it is present and there is a need).
Buying a belt for Opel engines will lighten the owner’s wallet in the amount of 3,300 to 4 thousand rubles. The price of the pump ranges from 2800 to 6300 rubles. To this it is necessary to add about 1 thousand rubles for replacing the coolant and about 2-3 thousand rubles for refilling the air conditioning system in the cabin. The final price will be at least 10 thousand rubles. Purchasing a set of clamps for camshafts will cost another 2,500 rubles.
The cost of performing work at a specialized service depends on the city. In Moscow and other large cities, the price tag for work reaches 7,000 rubles. At the same time, in small regional centers the cost of replacement is more humane and does not exceed 2500-3000 rubles.
note
If you are replacing the timing chain on a Chevrolet Niva with a two-row one, it is important to check that the ignition is installed correctly. It is set along the crown on the flywheel of the internal combustion engine. There is a section on the crown that is missing one tooth.
If the piston of the first cylinder is at TDC, this section should be located at the bottom. In this case, the 20th tooth, when counting counterclockwise, is opposite the DPKV.
Consequences of untimely shift
When using a car for a long time with a stretched chain, a moment is inevitable when it slips over the teeth of the drive gears onto one or more links. In this case, the valve timing is disrupted and the minimal consequence will be a sudden stop of the engine. If the chain slips a few links, the valve plates will meet the piston crown. In this case, the motor receives severe damage, which can only be corrected by overhauling it. For a belt drive, the situation is more dangerous, since the belt simply breaks and the valves and pistons meet. Opel engines have 4 valves installed in each cylinder, so repairing such an engine will be even more expensive. To prevent such a problem, it is necessary to strictly follow the timing drive replacement regulations.
Peculiarities
It must be said that replacing the chain involves partial disassembly of the engine. Therefore, for those who have not yet had experience in repairing a car themselves, this procedure may seem overwhelming.
Some people replace the timing chain on a Chevrolet Niva without removing the front cover. But it is not recommended to do this, since the drive gears need to be changed. Since the teeth are worn, they will not interact well with the new chain. In addition, the chain tensioners must also be changed.
Photo gallery
A bent Opel engine valve is visible in the background
Bent valves of VAZ 2123 engine
Marks on the pistons
Broken guide bushing
Video
The entire process of replacing and setting phases is shown quite well in the video (this is the author’s channel).
Do you have any questions? Specialists and readers of the AUTODVIG website will help you ask a question
Was this article helpful?
Thank you for your opinion!
The article was useful. Please share the information with your friends.
Yes (100.00%)
No
X
Please write what is wrong and leave recommendations on the article
Cancel reply
Rate this article: ( 4 votes, average: 5.00 out of 5)
Discuss the article: