How to remove the tidy on a Grant sedan and liftback
Removing the torpedo with your own hands on cars of the specified versions before and after 2013 is simple. To do this, you only need a Phillips and flathead screwdriver.
The sequence of actions looks like this.
- Initially, you should turn off the power to the car and place it in a stable position.
- Remove the cover of the interior fuse box.
- Next, you will need to find the mounting screw and unscrew it. The fasteners for the instrument panel trim are also unscrewed.
- Now the decorative trim can be removed and the mounting of the tidy itself can be exposed.
- There are two screws at the bottom of the console that hold it in place. The screws need to be unscrewed and the tidy lifted.
- Next, you should reach under the panel and remove the wire terminal block from its back.
Removing the front panel of Granta Lux
Before removing the center console, you will need to arm yourself with a plastic spatula or a flat-head screwdriver wrapped in electrical tape. You will also need to find several clips in case the standard ones are broken during disassembly.
- Turn off the power to the car - all manipulations with the device are performed only after disconnecting the battery.
- Using a plastic spatula or screwdriver, remove the radio/radio plug.
- Pull the heater and air duct controls towards you. The procedure must be performed with extreme caution. There is a risk of damaging the regulator.
- Next you will need to remove the facing plastic of the beard by prying it off with a screwdriver. The design contains plastic latches that are easy to break. During reassembly, new ones are put in their place.
- At the end, you will need to lift the tidy and disconnect the contact groups of wires from the reverse side.
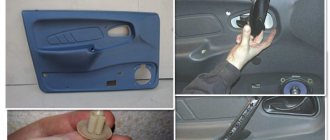
Removing the rear door trim
Open the hood and remove the negative terminal from the battery.
When equipping a car with manual window lifters, release the handle lock. We pry it off with a flat screwdriver and push it out to our side. The latch is released from the clutch grooves and the window lifter handle is removed. Unscrew the door lock button and pry off the trim on the door handle with a spatula. This opens up access to two screws, which we unscrew with a cross-head screwdriver. Using the same screwdriver, unscrew the screw located at the bottom of the door and remove the trim
Important! On vehicles with galvanic power windows, the control units are located only in the front doors. Thus, when dismantling the trim on the rear doors, various cables do not need to be disconnected
After removing the door trim, we have access to the rest of the car. This is necessary to replace components or the door completely.
First, we can remove the interior door handles. It's easy to do. Use a Phillips screwdriver to remove several mounting screws. The handle foot is released from the grooves and the clamp is removed. All is ready.
Secondly, we can do glass replacement. To do this, you will need to loosen several screws and remove the decorative trim panel. Afterwards, remove the seal. Unscrew the fastening bolt and remove the guide from the door panel. All that remains is to remove the seal from the front of the door. Otherwise, everything is ready to replace the glass.
The next thing we can do is replace the window regulators. There are times when we have mechanical window regulators and we need to replace them with electric ones. To perform this procedure correctly, you need to fix the glass. Remove the foam gasket and unscrew several nuts securing the window regulator, then unscrew the guide nuts and the upper mounting nut. Next, we can replace the window lift mechanism. Collection occurs in reverse order.
Granta FL
The modern version of Fl 2021 differs little structurally from its prototype. The car tidy is removed in the same way. Similar fasteners and identical clamps are used here.
How to remove a panel on a Grant to install a radio
In most configurations it comes with a plastic plug instead of a tape recorder.
Next, you will need to reach into the resulting groove and find a standard terminal there for connecting a sound reproduction device. It needs to be taken out.
After this, a short shaft is placed on the panel, intended for mounting a modern radio. At the end, the device is connected to the on-board network and inserted into the prepared shaft.
Removing the rear door trim
The rear door structures are secured with 10 plastic holders and 2 screws. The first fasteners hold the door panel, and the second fasteners hold the handles. Disassembly technique:
The handle of the mechanical window lifter is being removed.
It is important to note that this element is held in place by a plastic half ring. They carefully pry it up with an awl
The plugs on the door handle are removed, then the fasteners are unscrewed. The lower far corner of the panel is pulled back, and then the first piston is removed. Hold the door card with your hand and remove the remaining clips. The covering is changing.
Once the music system is removed, you can begin the main part of the repair. You need to remove the door trim on Kalina in the passenger seat in a certain sequence:
- The decorative panel is removed. To do this, unscrew 8 clips and 2 screws. The inner handle is held on by two self-tapping screws.
- An awl is used to pry up the edge of the plug for removal. There are two of them, so you need to remove both.
- The opening mechanism is pulled back to remove the securing screw. After this, two screws are unscrewed from the inside of the handle. They are located opposite the cavity of the plastic pocket.
- One edge of the panel is pryed off; you can use a screwdriver to do this. When it becomes possible to grab the edge, all that remains is to pull the element towards you.
- The wires from the electric window lifter are disconnected, the block is removed.
Analysis of the Grant panel
To completely disassemble the tidy, you need to follow a sequence of actions.
- Disconnect power from the battery.
- Remove the glove compartment cover and fuse box.
- Next, you need to unscrew the fastening screws of the instrument panel trim and in the glove box.
- Now you should proceed to removing the steering wheel and column cover.
- The MUS, the transmission tunnel, is also removed.
- After this, the center console trim is pryed off and removed from the car.
- Now you need to remove the instrument panel and the heating and ventilation system controls.
- After this, you should unscrew the screws securing the torpedo and lift it from its seat.
- Next, all wire chips and contact groups are disconnected.
- Now you can completely remove the dashboard from the car.
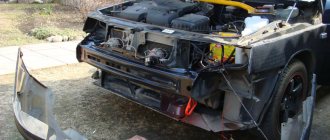
How to remove the dashboard for sizing
Recently a guy asked how to remove the dashboard for sizing. I want to share my impressions about this process. Suddenly someone wants to do this too. So here it is. I removed the panel last summer. Also for sizing. I did everything alone. I’ll say this: you can remove/install it alone, but it’s very messy. It's easier with two people, but I don't think it's much easier. Don't believe the repair book, it's much more complicated than it says. Too much will have to be removed in addition to the panel itself: the central trim, air duct tubes, gearbox housing, handbrake housing, floor tunnel, passenger airbag (if equipped), A-pillar trims, tidy. There are a lot of different screws and self-tapping screws, during assembly it is easy to get confused as to which ones were screwed in where. If I'm not mistaken, there are 26 screws alone for securing the panel itself! There are two treacherous screws on the left and right right under the windshield, which you can’t unscrew with a regular screwdriver, you can’t get under them. While the panel is being removed, you are left without glass blowing, and in current weather conditions this is fraught with consequences, including an accident due to fogged windows. If you just park the car. In terms of time: removal took 3 hours, installation took 4 kopecks. The steering wheel gets in the way. The left air duct pipe did not want to fall into place, it rested either on the body or on the windshield, it took me a whole hour just to do this. According to the results: the panel became a little more assembled, but after a WEEK it began to crunch again. In addition to this, the airflow on the windshield has become uneven - it blows weaker in the middle than at the edges. I’m generally silent about the numerous scratches on the dashboard and front door trims. You can remove them with an autogen lighter, but still the appearance is no longer marketable. Summarizing all of the above, from the bottom of my heart I HIGHLY DO NOT RECOMMEND doing this. You'll only make it worse. But this is purely my opinion, and then see for yourself. Maybe if you have experience in this matter, it will be easier for you. But I wouldn’t do this again now for any money, there are too many body movements and nuances
13 comments on “How to remove the dashboard for sizing”
Intelligibly,
Mikhail, thank you. I tried to describe the main difficulties of the process. This is just what I remembered, maybe there was something else, it was almost a year and a half ago
What if you give it to people who do it every day?
It's clear.
Dmitry, around 10k just for gluing the panel
Dmitry, taking into account the fact that it costs 25k to glue a car completely, not a lot at all
Diman, well, yes, well, I glued mine for 10k, except for the panel.
Dmitry, the service provides 25 materials and work (floors, doors, ceiling, trunk), and not yourself
Diman, well yes)
Dmitry, hemorrhoids with the panel from the viburnum went again
Dmitry, if you don’t mind 10 thousand, then you can do it that way. They will glue it as it should. But with this money you can buy something really useful for the car, for example a set of inexpensive tires. Therefore, I see no point in giving that kind of money for nothing
Well, that's it. this hemorrhoids? 4 t.r. I paid for the front skimmer and did the rest myself.
Replacing the Lada Granta heater radiator
If it's cold in the cabin when the heater is on, it means it's time to repair or replace the heater. Among the most typical reasons why you have to change the heater radiator on a Grant:
- clogging of channels due to the formation of scale or dirt;
- the occurrence of cracks or holes in the heating system.
In some cases, it is possible to get by with repair and restoration measures. For example, before changing the radiator, you can try flushing the system with a special liquid. There are means to get rid of scale inside the heating system, both by draining the antifreeze and the coolant inside. Such products, as a rule, do not harm sealants, gaskets, hoses, etc.
What is needed to replace a stove radiator?
When starting to replace the radiator, you need to prepare:
- set of clamps;
- sealant;
- antifreeze;
- Phillips screwdriver;
- key to 10;
- insulation (foam rubber);
- file.
Of course, you should purchase a new radiator in advance, and a “original” one, since the heat exchanger of other models will not work.
Sequence of steps when replacing a radiator
Work on dismantling the old radiator can begin from the engine compartment. Here, to create access to the elements of the heating system, it is necessary to remove the battery, the air duct pipe between the throttle assembly and the air filter, as well as the air filter itself.
Then you need to empty the system of coolant by draining it into a previously prepared container. Obviously, if a car owner intends to fill in new antifreeze at the end of the work, the old one does not need to be saved.
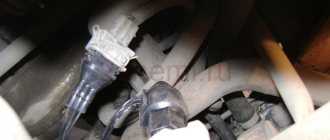
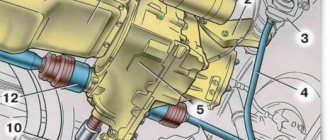
The next stage of work is carried out from the interior. To gain access to the heater radiator, you will first have to remove the gas pedal: without this, it is not possible to remove the heat exchanger. Dismantling the pedal, as a rule, does not cause any difficulties: using a 10mm wrench, unscrew the three fastening nuts and disconnect the brake light limit switch and the connector for the electronic gas pedal. In addition, you need to press the brake pedal and lock it in this position.
Next, the plastic cover covering the radiator is removed, after which access to the heat exchanger opens. After this comes the most crucial moment - sawing off the radiator pipes: you should saw off after bending so that the cut part can be removed through the hole into the engine compartment. After both pipes are removed, you can remove the radiator from the niche into the car interior.
The pipes on the new radiator should also be sawed off so that later hoses can be put on them and secured with clamps. The cut edges of the pipes should be processed with a file, the holes in the engine compartment are filled with foam rubber to provide additional fixation to the structure and to preserve heat in the cabin.
Akhmed Fazilov
https://grantaremont.ru/content/pechka
It is more convenient to carry out the work of replacing the heater radiator together: one supplies the pipes from under the hood, the second receives them in the cabin. Sealant should be applied to the pipes of the new radiator and, after connecting to the flexible hose, securely secured with clamps. After this, you need to assemble all the removed parts: gas pedal, battery, air filter, then fill the system with antifreeze. At the end, you should check how the new radiator works: you need to start the engine and let it run for a few minutes, then visually make sure that the antifreeze level has not dropped, there are no leaks, and the heat exchanger has warmed up.
There are no fundamental differences in the procedure for replacing the heater radiator on a Lada Granta with and without air conditioning (unlike replacing the cooling radiator).
Video: personal experience of the Lada Granta owner in replacing the heater radiator
Stable and uninterrupted operation of all vehicle systems can be achieved by constant monitoring of their condition. The serviceability of the Lada Granta heater radiator becomes especially important in winter, therefore, in the process of preparing the car for the cold season, it would be useful to check its readiness for the season, especially if the vehicle is expected to operate at a high intensity in winter conditions. Practice shows that with proper operation, a stove radiator can serve properly for many years, but if it still fails, it is quite possible to replace the heat exchanger yourself.
What creaks in the car interior, how to eliminate the squeak
The interior of a car consists of dozens of different parts. It is often not so easy to understand what exactly is creaking in the cabin. Most often, an unpleasant sound when driving a car is caused by:
- Instrument panel and dashboard;
- Doors;
- Trunk;
- Armchairs;
- Fastening of hanging elements.
Depending on what exactly is creaking, the advice on how to get rid of the problem changes:
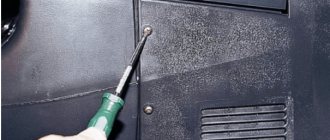
The creaking of car doors is very different from the creaking of plastic elements. It has a pronounced “iron character”, and the easiest way to determine it is by ear. The creaking of doors can be heard especially well when the car moves over uneven surfaces. Quite often, to get rid of squeaks in doors, it is enough to simply tighten the bolts. If this does not solve the problem, you can stick on vibration-absorbing materials to increase sound insulation. During the work, do not forget to thoroughly lubricate the door hinges, which can also squeak heavily;
- Creaking at the top of the door in the area of the seal is also quite common. You can diagnose it by pressing on the top of the closed door from the passenger compartment. Eliminating it is quite simple. The first step is to completely get rid of any dirt stuck to the seal. To do this, simply wipe with a damp cloth. If silicone was applied to the sealing elements in winter to prevent the door from freezing, it must be removed, which can be done using window cleaner;
- Seat squeaking occurs due to severe wear. Most often it is localized in the area of the headrest or fastenings. A radical solution to the problem is to remove the headrests. You can also put protection on the joints to prevent squeaking, or simply wrap them with electrical tape. If the mount at the bottom of the chair creaks, you should remove it and lubricate the bolts, and then tighten them well. For lubrication, you can use, for example, WD-40;
- Creaking in the trunk is most often localized at the place where the curtain is attached. If such a problem arises, you can simply remove it, or lubricate the mount with the body trim with silicone. If the hinges creak, they need to be tightened and lubricated well, or replaced with new ones.
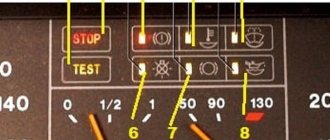
How to remove the instrument panel on a Lada Granta
Using a 13mm head, unscrew the bolt securing the right instrument panel bracket to the body bracket.
Also unscrew the bolt of the left bracket
Squeeze the two clips and disconnect the wire block from the brake light switch
Press the latch and disconnect the wiring block from the gas pedal module
Disconnect the instrument panel wiring harness from the clutch pedal position wiring harness.
On the right side of the panel, by pressing the latch, disconnect the harness block from the controller
Use a screwdriver to move the pad clamps
Disconnect the two wire blocks from the fuse mounting block
Disconnect the two connectors of the front wiring harness of the engine compartment
Using a 13mm socket, unscrew the two bolts securing the instrument panel frame to the front panel bracket
The figure shows with arrows the bolts securing the instrument panel frame to the front panel bracket
Using a 13mm socket, unscrew the two bolts securing the left fastening of the panel frame to the side panel bracket.
We also unscrew the two bolts of the right fastening of the instrument panel frame to the side panel bracket
We remove the instrument panel assembly with the heater through the doorway
To remove the instrument panel trim, use a Phillips screwdriver to unscrew the two screws under the instrument cluster
Under the mounting block cover, use a Phillips screwdriver to unscrew the three screws on the left side
Unscrew one screw on the right side
Using a screwdriver, unscrew the five screws on the right side of the instrument panel
Instrument panel assembled with frame and heater in Figure 34
The front panel of the car in Figure 35
Under the central panel trim, unscrew the two screws in the center
Unscrew one screw from the top
Using a Phillips screwdriver, unscrew the four self-tapping screws securing the heating control unit to the instrument panel trim.
Disconnect the wiring harness from the cigarette lighter
Unscrew the two screws of the lower fastening of the instrument panel trim to the frame