The backlighting of the VAZ 2109 instrument panel is often not satisfactory for drivers. You can change the color and its brightness yourself, without turning to the salon for help.
To improve the lighting, you need to install LEDs instead of conventional incandescent light bulbs. Their glow is much brighter, in addition, you can choose the color of the backlight at your discretion: blue, green, red or white. These are the main colors, but if you look, you can also find purple LEDs.
Replacement of light bulbs or sockets must be carried out carefully and carefully. If the car owner decides to use LEDs to illuminate the buttons, then you need to purchase a light bulb with a regular base. Soldering and a special cartridge are needed if there is a desire to replace the backlight of the instrument cluster. Among the many LEDs, there are also those that have a diffuse or, conversely, point glow.
These effects are achieved using a focusing lens configuration. A more uniform backlight is suitable for illuminating the scale on the instrument panel, and a brighter light is suitable for the button icon. Every driver should take into account the features of design changes when improving his car.
Designation of icons on the VAZ 2109 dashboard
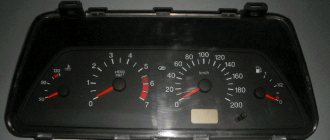
The indicator panel can be divided into 2 parts. The smaller half of the bulbs are mounted centrally at the top of the board. There are indicators on the bottom line of the instrument panel.
- The meaning of the light is simple - the indicator indicates that self-monitoring diagnostics of the alarms are being performed.
- Indicates that there are problems in the power plant. If the lamp is constantly on, you need to diagnose the motor.
- The brake system is in disrepair. Usually the light indicates a drop in fluid in the expansion tank or critical wear of the pads.
- Coolant level sensor lamp. If it lights up constantly, you need to add antifreeze to the system.
- The windshield washer fluid has run out.
- External lighting lamps are damaged. The thread may have burned out or the contact may have broken.
- The front brake pads are worn to the limit.
- The oil level in the engine crankcase has dropped. It may also indirectly indicate a malfunction of the oil pump.
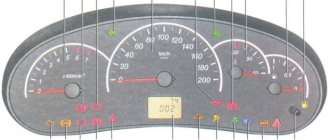
The photo below shows the sequence of light bulbs at the bottom of the dashboard.
| Number | Purpose |
| 2 | High beam indicator. |
| 3 | External lights are turned on and operating normally. |
| 4/6 | Turn signal indicators. On some car trim levels, when the hazard lights are turned on, they light up simultaneously. |
| 5 | The battery is not charging. It is necessary to check the wear of the battery itself and the wiring of the generator. |
| 7 | The engine oil pressure has dropped below normal. It is recommended to perform diagnostics. |
| 8 | The fuel level in the tank has dropped to a critical level. You will need to refuel immediately. |
| 9 | Standard engine fault indicator. |
| 10 | The parking brake is activated. |
What do the buttons on the panel mean?
Depending on the configuration and year of the car, 2 types of devices can be installed here. The keys and controls will vary.
Below is a description of the low tidy indicators.
| Number in photo | Decoding |
| 9 | Rear window defroster switch. |
| 10 | Likewise for the stern fog lights. |
| 11 | Emergency button. |
| 12 | External optics switch. |
| 13 | Interior ventilation control module. |
| 23 | Suction |
| 24 | Sound signal. |
| 25 | Daily mileage reset drive. |
| 26 | Button for turning on the instrument lighting. |
| 27 | Headlights corrector. |
| 29 | Switch for direction indicators and headlights. |
Next there is a decoding of the controls of a more modern - high panel.
| Serial number in the photo | Description |
| 2 | Hazard warning light switch. |
| 12 | Power window switches. |
| 14 | Interior ventilation control module. |
| 18 | Suction |
| 22 | Horn switch. |
| 23 | Instrument backlight key. |
| 24 | Hydrocorrector of headlights. |
| 25 | Optionally, a button to activate the heated front seats. |
| 26/27 | Rear/front fog lights included. |
| 28 | Rear window heating activator. |
| 31 | Head optics operating mode switch. |
Removal
Having familiarized themselves with the diagram of the high instrument panel of the VAZ 2109, many will probably think about the issue of removing it.
There are more than enough reasons to dismantle the panel:
- Repair, modernization of the heating system;
- Body repair;
- Replacing the old panel with a new one;
- Car painting;
- Body sound insulation, etc.
Dismantling process
This is not to say that removing the panel is a difficult process. The main problem is the time that needs to be spent on the work. The task requires concentration and increased attention in order to dismantle all elements, devices, and linings.
The process looks like this.
- Remove the steering wheel itself, otherwise it will seriously interfere with you when dismantling the panel.
- Pull the carburetor choke towards you. Injection engines do not have such an element. Then remove the plastic handle from the drive rod.
- Next, the decorative trim of the console is removed. To do this, simply unscrew the two mounting screws on the sides.
- Dismantle the ashtray and remove the cigarette lighter from its seat.
- Remove the handle that controls the speed of the fan motor.
- Using a screwdriver, pry the levers of the interior heater drive, which will allow you to remove these decorative elements.
- Disconnect the block with wires from the heater fan mode switch.
- Remove the two power wires for the backlight of the stove control panel from the contacts.
- Now you will need to get rid of several decorative control knobs - headlight hydraulic adjustment, instrument lighting control.
- The next step is to dismantle the hydraulic corrector itself and the lighting regulator. You will need a socket wrench that matches the diameter of the mounting nuts you are using. After unscrewing, push them inside. A little later you will be able to take them out.
- The air deflectors for heating the side windows are removed on the left and right.
- Here, using a Phillips screwdriver, you need to unscrew one mounting screw on each side that holds the upper panel covers.
- Remove the exterior light switch from the dashboard. To do this, you need to carefully pry the switch with a flat screwdriver and pull it out. Do not pull too hard as the switch is limited by the length of the wires used. Disconnect the power supply with the wires from the switch and set it aside. The block can still be pushed inside the panel.
- If you have an audio system, remove the radio. Now remove the standard socket from the radio. Of course, if you still have it.
- Unscrew the central fastener from the panel trim.
- Let's start by removing the dashboard trim. Before doing this, be sure to unlatch the latches located under the dashboard. This is done with a pair of flathead screwdrivers. Insert the tools along the edges and press down. By performing upward movements, the panel rises and then is completely removed.
- The cover has been removed, but that's only half the battle. Next, you can easily disconnect the power supply from the cigarette lighter and the cigarette lighter lamp.
- Also, without much difficulty, the wires from the alarm signal and the hazard warning lights are disconnected.
- Be sure to remember to remove the decorative trim from the front speaker and the heated glass switch, plus the rear fog light switch trim. If you also have a speaker, you will need to remove it.
- Reach through the hole under the speaker to disconnect the wiring harness from the fog light and rear window defroster switch.
- The instrument cluster is held on the panel by two mounting screws, which must be unscrewed. Pull it towards you, unscrew the nut and remove the flexible drive cable from the speedometer.
- That's it, the block with wiring from the instrument cluster can be disconnected and put aside for now.
- Do the same with the ignition switch - disconnect the block with wires, remove the ignition relay ground wire from the connector.
- Here, in close proximity, you will see a wire from the air damper warning lamp. But only for the carburetor VAZ 2109. Injection versions are not equipped with this wire.
- On each side of the panel, unscrew one bottom mounting screw.
- Disconnect the power supply wiring for the glove compartment lighting.
- Unscrew the heater panel fasteners and move it down. This way the panel will not disturb you.
- Remove the fasteners for the interior heater guide rod.
- Unscrew all the remaining side top and center fasteners, after which the panel can finally be completely removed.
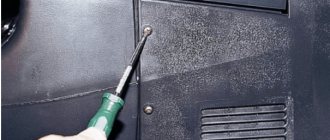
One of many screws
Your further actions directly depend on the reasons why you decided to go through this difficult path of dismantling the dashboard.
Tidy 21099 injector: icon designations
There are more lights and indicators here than on the carburetor. Additional light bulbs available:
- requirement to check the engine;
- STOP light.
Tidy 21099 carburetor: designations
The decoding described at the beginning of the article can be fully used as an example for this point.
Stop light on the dash 2109
The lamp signals the driver about the presence of unexpected problems in the on-board circuits. When such an inscription is activated on the device, it is recommended to immediately go to a service station and look for the cause.
Installation and repair instructions
If you are faced with the problem of a failure of the dashboard of a VAZ 2109 vehicle, then the best option would be to replace the dashboard yourself. To properly replace, you will need instructions for dismantling and installing the shield, which are given below. To perform these steps, you only need screwdrivers - flat-head and Phillips-head. The instructions are given on the example of a low panel, but in general they are identical for other versions of instrument panels. Don't forget to disconnect the battery!
As you can see, the procedure for replacing the instrument panel is not particularly complicated - just do everything in accordance with the instructions and there will be no problems in the further operation of the device.
High and low panel VAZ 2109 - the difference
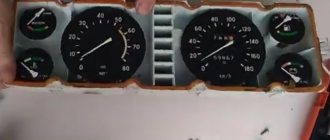
Depending on the year and modification of the car, two types of devices are applicable. The first is considered a low panel, used mainly on carburetor nines and modifications with an injector.
A more advanced version was brought to market in the last years of production. Here there are all the symbols used initially and several indicators of the engine fuel injection system have been added. The dashboard looks more modern, which makes it attractive to car enthusiasts.
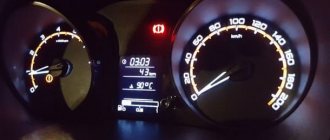
Features of the Europanel
Since 1996, Europanels began to be installed on the VAZ 2109. They have a trapezoid shape with strongly rounded corners, are ergonomic and, as a result, attractive. As in the “high” panel, most of the dashboard is occupied by the tachometer and speedometer, all other instruments - warning lights, indicators - are located around them. Trip counters have been replaced with electronic indicators.
Europanel
Errors on the panel
VAZ versions of on-board computers have a self-diagnosis option, which allows you to read codes yourself without the use of additional equipment. The following is a list of common problems encountered on cars.
| Number | Decoding |
| 1 | Motor control unit malfunction. |
| 2 | The voltage in the on-board circuit is too high. Usually occurs during short circuit. |
| 3 | Fuel level sensor - open circuit or damaged wiring. |
| 4 | The antifreeze level controller is faulty. |
| 5 | The external temperature controller is faulty. |
| 6 | The engine has overheated, you should stop and let the engine cool. |
| 7 | Engine oil pressure is less than minimum. There may be two reasons for this. Loss of lubricant level or pump failure. |
| 8 | Critical voltage drop in the on-board network. |
| 9 | The battery is low. The serviceability of the generator and its mains should be checked. |
| E | EEPROM data packet error |
| 12 | The diagnostic lamp is faulty. |
| 13 | Lambda probe circuit open. |
| 14 | Increased signal coming from the antirfiz temperature sensor. |
| 15 | The coolant temperature controller is faulty. |
| 16/17 | Incorrect voltage in the on-board network. |
| 19 | DPKV refused. |
| 21 | The throttle position control is faulty. |
| 24 | The speed sensor is faulty. |
| 27/28 | The exhaust gas system sensors are sending incorrect signals. |
| 35 | Idle speed is set incorrectly. |
| 41 | The phase regulator is not working correctly. |
| 44/45 | Excessively lean or rich mixture in the cylinders. |
| 49 | Loss of tightness in engine lines. |
| 61 | Lambda probe is faulty. |