What the public loves about our cars is their simplicity of design, availability of spare parts and ease of repair. As a rule, all basic work is carried out with a standard set of tools, except in rare cases when some kind of puller is desirable. But, as a rule, they can do without it.
The need for dismantling work
This holy simplicity helps to save on the services of masters, and quite a lot. Moreover, given the age category of owners of the VAZ 2110 and others like it, such repair work instills diligence, a love of technology and develops hand motor skills. But seriously, in any garage, any person who is even remotely familiar with threaded connections will be able to dismantle and restore any unit.
The need to dismantle the VAZ 2110 gearbox arises not only when there is a problem in the gearbox itself, but also when for some reason you need to get to the clutch - change the disc, repair the basket, change the release bearing. Despite the fact that the car is inexpensive, the owners have very few complaints about it, which is why they choose the VAZ 2110 among the entire model range. Removing the gearbox is no exception. The work is carried out in several stages, and takes about an hour and a half.
Preparatory work
Before we start removing the VAZ 2110 gearbox, let's prepare for work on the material part. To withdraw you will need:
- set of open-end wrenches;
- set of spanners
- heads and knobs with cardan;
- without a hammer - nowhere;
- a skein of strong braid (although you can do without it);
- jack.
In order to avoid going under the car and getting up from the inspection hole a hundred times, we will try to organize the work according to this principle.
Work on removing the gearbox from the engine compartment
- We place the car on a flat platform with an inspection hole. If it is possible to use a lift, great, it will make the work much easier. We open and fix the hood in the open position, after which the first step is to remove the terminals from the battery, starter relay and speed sensor.
- Disconnect the mass from the clutch housing and disconnect its drive cable. Now you can unscrew the two uppermost bolts securing the clutch housing to the cylinder block and the upper starter mounting nut.
- Now we need to think about keeping the engine in the same position when we disconnect it from the mounting points. For this, the factory has provided a mounting eye, which should be on the manifold stud. We hang the motor with braid either on a beam in the garage, or on a traverse, or on a board laid across the car, resting it on the drainage grooves. We get down under the car.
Work carried out under the car
- remove the engine splash guard and the protective cover of the clutch housing;
- drain the transmission oil from the gearbox, having previously unscrewed the plug;
- we find the reverse switch and disconnect the terminals from it; loosen the clamp securing the linkage, remove it from the selector;
- find and disconnect the jet thrust;
- we disconnect the internal CV joints, make sure that the unfixed side gear does not fall into the gearbox;
- use a hammer to knock out both hinges;
- move it to the sides of the drive to the maximum possible distance;
- if it is not possible to dismantle the CV joints on the car, then you will have to remove them along with the box and then knock them out in a vice, if there is such a need;
- unscrew the rear engine mount, the engine is already hanging;
- unscrew the left engine mount;
- unscrew the remaining starter mounting nut;
- dismantle the starter;
- We put a spacer under the gearbox so that you can remove the load from the mating plane, slightly loosen the braid on which the motor is attached;
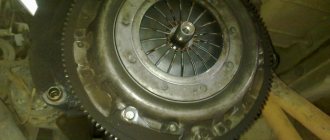
- unscrew the last bolt securing the box to the crankcase, move it back and remove it together with the clutch housing.
The box has been dismantled. When carrying out work, you must take into account that in no case should you rest the gearbox on the input shaft in order to avoid its deformation, and when removing it, you must carefully remove the shaft from the clutch, there is a danger of damaging the petals of the basket.
Installation of the box is carried out in the reverse order, the only thing that can be strongly recommended is to be sure to change the retaining rings on the inner CV joints. Happy work!
Repair manual for VAZ 2110, 2112, 2111 (Lada 110)
You will need: keys “10”, “13”, “17”, a large screwdriver with a flat blade.
Place the vehicle on a lift or inspection ditch. Raise the engine hood and lock it in this position. Before removing the gearbox, disconnect the wire from the “–” terminal of the battery, drain the oil from the gearbox and remove the starter (see “Removal and installation” in the “Starter” subsection).
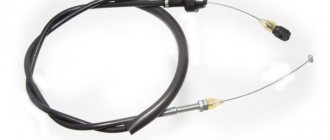
1. Disconnect the clutch cable from the clutch release fork and remove it from the bracket on the box (for more details, see “Replacing the clutch cable”).
2. Disconnect the block with wires from the speed sensor by squeezing the spring clips.
3. Remove bolt 1 securing the ignition module bracket to the gearbox and two bolts of the upper mounting of the gearbox to the engine. Bolt 2 (front of the car) is short, bolt 3 is long.
4. From the bottom of the car, disconnect the block with wires from the reverse light switch.
5. Two bolts securing the torque arm to the gearbox.
6. Loosen the bolt of the gear shift rod clamp and disconnect the rod from the gear selector rod hinge by sliding it back.
7. Remove the wheel drives (see “Front Wheel Drives”). Tie the plug inserted in place of one of the drives with a rope or wire so that it does not fall out when removing the box. The right drive does not need to be completely removed. It is enough to disconnect it from the gearbox and, moving it to the side, hang it from the body.
8. To make it easier to remove the box, unscrew the two fastening bolts and disconnect the left ball joint from the steering knuckle (for more details, see section 6 “Chassis”, subsection “Replacing the ball joint”).
9. Unscrew the nut of the lower right mounting of gearbox 1 to the engine (engine side)
Please note that on models with a fuel injection system, a support bracket 2 for the intake pipe is installed under this nut, which must be removed from the stud
10. If necessary, loosen the upper nut securing this bracket.
11. Unscrew the three fastening bolts and remove the lower cover 1 of the clutch housing 2.
12. Remove the bolt from the lower left mounting of the gearbox to the engine.
13. Hang the engine using a hoist or board (for more details, see Section 4 “Engine”, subsection “Removing and installing the engine”).
14. From the bottom of the car, unscrew the nut securing the left power unit support.
15. Unscrew the two nuts securing the rear support of the power unit to the body.
16. Unscrew the two bolts securing the rear support of the power unit to the gearbox, holding the nuts with a second wrench from turning, and remove the support.
17. Inserting a screwdriver between the clutch housing and the cylinder block, slide the gearbox off the guide bushings. Be sure to hold it while doing this.
18. Move the gearbox as far back as possible, passing the rear cover of the box over the front suspension brace (the input shaft should disengage from the clutch). If the input shaft cannot be disengaged from the clutch, push the engine to the side. Lower the front end of the box and remove it from under the car.
19. Install the gearbox in the reverse order of removal. For more details on installing front wheel drives, see “Front Wheel Drives”. After installation, fill in oil, adjust the clutch release drive (see “Adjusting the clutch drive”) and the gear shift lever (see “Adjusting the gear shift control drive” in the “Gearbox” subsection).
Replacing the box is a responsible matter
VAZ 2110 gearbox replacement
If the decision to disassemble and repair the gearbox yourself is unshakable, it is necessary to at least study the car’s instructions and its technical specifications. When a car is purchased second-hand, these instructions may not be available, so it is necessary to help with repairing the VAZ 2110 gearbox. To carry out the work, you will need a few simple tools, a set of wrenches, sockets and open-end wrenches. It is necessary to stock up on patience, attentiveness and a considerable amount of time.
Removing the device from the car
Replacing the VAZ 2110 gearbox
To replace the mechanism, it must be removed from the car. To replace the gearbox in a VAZ 2110, you must do the following:
- The first step is to disconnect the mudguard.
To do this you need:
- Using a 10mm socket wrench, unscrew the five mounting nuts for the front mudguard mounting and the mudguard mounting to the engine.
- Next, replace the socket wrench with a similar one, but with an 8mm stroke. The location of the four bolts is located. These bolts secure the mudguard to the mudguard of the engine compartment.
- The socket wrench is changed again and the previous one with the number “10” is selected. It unscrews two bolts. They are located on the rear wall of the mudguard mount.
Replacing the gearbox on a VAZ 2110
- All that remains is to remove the mudguard itself and remove it from the car. Care must be taken to disengage it from the mudguards.
Note: The splash guard must be installed after completion of work. Installation of the mudguard in its original place should be carried out in sequence, but the first point will be the last point of disassembly. It is necessary to gradually move to the top of the list of analysis of this device.
Removing the VAZ 2110 box
Properly drain the oil from the gearbox
Next, you need to drain the gearbox oil. This operation is carried out in the following way:
- The car is installed on an overpass or inspection hole.
Note: Before draining the oil, you need to drive the car a little. The oil will warm up and it will be easier to drain. Heated oil can reach a temperature of 90 degrees Celsius. You should be extremely careful when draining it, as you can get burned.
- A special heat-resistant reservoir is installed under the drain hole (the place from which the oil will drain).
- Using a key with the number “17”, unscrew the drain plug.
Note: This part can only be accessed through the hole in the engine splash guard. The first stream of oil hits the mudguard. The oil spreads over the entire surface. For convenience, you can slightly bend the mudguard, but since it was removed to access the gearbox, this item can be omitted. It is ideal for those who have not yet removed the mudguard.
- We wait until the last drop of oil drains into the container.
- After the final draining procedure, the device cover is returned to its original place.
How to remove the box of a VAZ 2110
Note: The appearance of the drained oil can determine the efficiency of the transmission. When the oil has metallic impurities and is dark in color, the gearbox needs to be cleaned. You can buy special filling oil in stores. It should be purchased. Pour it into the gearbox, lift one of the driven wheels, turn on the engine and engage first gear. The engine should run for 10 minutes. Next, turn it off and drain the oil.
- The measuring probe is removed. The dipstick is necessary to check the oil level in the gearbox.
- Its surface should be wiped with a clean cloth. Until the remaining oil is completely eliminated.
- In the place where the dipstick was installed, it is necessary to fill the oil with a syringe (using a small dosing funnel or with a rubber tube tip). Its volume should not exceed 3.3 liters. In order not to overfill the oil, when approaching the mark, you need to check with a dipstick.
- The dipstick, after filling with oil, returns to its previous position and location.
- After draining the oil from the gearbox, it is necessary to disconnect the battery.
Note: The battery should only be removed if further repairs cannot be made without this procedure. When the battery is disconnected, all engine settings are reset. The first step should always be to remove the negative terminal. When installing the battery, you should always install the positive terminal first. It is forbidden to remove the battery with the engine running. If you have an alarm or central locking, you should never leave the key in the ignition.
- Using a socket wrench with a 10 mm socket, loosen the tightening nut securing the wire terminal with “minus” indicators. The terminal is removed.
- The protective cover that stores the plus terminal is removed.
- Using the same key, you need to unscrew the nut that holds the positive terminal.
- Using a socket wrench set to “13”, remove the battery mounting nuts.
- Using the same wrench, you need to remove the nut of the lower battery fastening. The bar is removed.
- The battery is removed from the vehicle.
Note: Installing the battery is done in reverse order. If you mix up the position of the terminals when attaching them, you can burn the entire electrical system of the car.
- Next, the air filter is removed.
- The clamp securing the crankcase ventilation system hoses is loosened. The same must be done with the air supply hose. The box of wires from the air flow sensor is disconnected.
- Using a 10mm socket wrench, unscrew the air intake bolt.
- The base of the three rubber posts is removed.
- The same operation is necessary to remove the rear mount.
- The air filter housing is removed along with the sensor, hose and throttle valve.
- Using the key with the number “13” you need to remove the battery shelf.
Removing the VAZ 2110 gearbox is easy
- Next, the starter is removed (see Repairing the VAZ 2110 starter - we do everything ourselves).
- The traction relay must be disconnected from the wire block.
- The nut is removed with a 13 mm wrench. It secures the tip of the starter power wire.
- The starter nuts are unscrewed by 15 millimeters with a wrench.
- The starter is removed from the vehicle.
- The clutch cable must be disconnected from the gearbox.
- Both nuts, fasteners and locknut are slightly unscrewed. The nuts at the fastening of the cable sheath to the crankcase bracket are also loosened.
Removing the VAZ 2110 gearbox
- The shell is carefully removed from the bracket.
- The seal is removed from the hole in the engine compartment partition.
- The expansion tank is dismantled. The hoses must remain connected.
- The left side of the engine compartment trim is removed.
- The rubber boot is secured with a small bolt. It must be removed.
- The left edge of the cover moves to the side for access.
VAZ 2110 gearbox removal
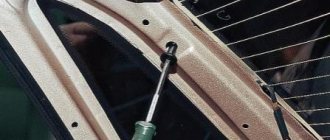
- The cable mounting axis has a specific spring bracket that must be removed.
- The end of the axle cable is removed.
Note: Be careful not to lose the bushing that is located on the tip of the axle.
- Inside the car you should find a nut that secures the cable sheath bracket.
- The cable is routed through the vehicle interior and removed.
- The next step is to disconnect the wire block. It is connected to the reversing light and the vehicle speed sensor.
- There is a special clamp on the crankcase, which secures these wires. The fastening nut can be disconnected with any key with the number “13”.
VAZ 2110 remove the gearbox with your own hands
- The wire box is removed from the crankcase. The bracket should remain on the box with the wires.
- The next step is to disconnect the jet rod, freeing the gearbox.
- The jet rod is mounted on the buffer in the form of two nuts. They need to be unscrewed.
- The staple is removed.
Note. The rod is attached to the holder with two bolts that need to be unscrewed. The rod is attached to the gearbox with two more bolts, which must be removed from the system and disconnected.
- The rod can be left in the car, but it can also be removed, since nothing holds it inside.
- The gear shift drive rod is disconnected from the hinge.
- The left engine mount is removed. For this procedure you will need to make a support for the engine.
- The mounting eye has a nut. It needs to be removed.
- The mounting eye is removed.
- There are three bolts on the lower crankcase cover that secure it. They need to be unscrewed and set aside.
- The lower crankcase cover is removed.
- Three bolts must be removed before removing the gearbox.
- A special nut is also located here. It should also be removed.
Note: One of the bolts securing the gearbox to the engine is smaller. It should be marked to be used in the same slot. To remove the gearbox, you may need to support it on an object. Do not make a support from the diaphragm spring of the input shaft. Under significant load, it can become deformed, which will lead to equipment failure.
- There are guide bushings near the gearbox. Using gentle rocking, remove the gearbox from its previous position.
- The gearbox is removed.
It is up to the driver to decide what to do with the gearbox. You can always go to the store for a new device. This video will help you do everything right.
VAZ 2110 gearbox device
The Volzhsky Automobile Plant's 10th series vehicles are equipped with a five-speed manual gearbox. It is two-shaft, has five gears for forward movement and one reverse gear for reverse. The main gear, differential and the gearbox itself are combined in one housing. When connecting the crankcase to the cover, it is possible to seal it with a gasket or sealant that is resistant to gasoline and oil.
The two-shaft system is represented by a primary and secondary shaft. The first is a block of driving gears, the second contains driven gears that provide forward movement. The two groups of gears are in constant mesh. The secondary shaft parts can be removed for replacement or repair.
The secondary shaft is made empty inside to lighten the weight of the structure. At the locations of the gears there are circular grooves that ensure the supply of lubricant to the surface of the shaft during operation. The rotation of the fifth gear gear is carried out through the bushing. The shaft splines are used to install synchronizer hubs. The shafts themselves are installed in the box body on bearings - a pair of roller bearings on one side and a pair of ball bearings on the other.
The differential uses two satellites. The pretension of the bearings in it can be adjusted by changing a special ring from thick to more or less thin. This ring can be found under the outer differential bearing cover. The speed sensor is connected to a plastic gear located on the gearbox housing, which, in turn, is driven by the drive gear on the differential housing.
When driving on a bumpy road, the engine experiences vibrations, which, if the rubber dampers are worn out or sagging, can lead to displacement of the gearbox shafts. This can result in unpredictable transmission disengagement when the gears on the two shafts become disengaged. To compensate for such vibrations, a reaction rod is provided in the connection between the gearshift handle support and the gearbox housing. It is equipped with a rubber gasket to dampen vibration from the engine, which causes the gearshift lever to shake.
You can read more about the clutch design in a car here: https://vazweb.ru/desyatka/transmissiya/sceplenie.html
You can find out how much oil is in the gearbox by checking the dipstick. According to factory standards, the gearbox holds 3.5 liters. If the oil level drops, it is necessary to add it, otherwise accelerated wear of the gears can lead to breakdown. Technical regulations require routine oil changes every 90 thousand kilometers.
Malfunctions
Every car owner with experience begins to feel a malfunction in the car’s gearbox based on characteristic signs. Most gearbox breakdowns are associated with wear of rubbing parts, because they experience constant significant load while driving. However, such wear rarely reaches a critical state immediately. This is usually a gradual process, which is why a novice driver is always advised to learn to “listen” to the car. The sooner you notice a problem, diagnose it accurately and fix it, the less repair work will need to be done and the less it will cost.
It is recommended to regularly check where the vehicle is parked for stains to monitor leakage of technical fluids.
You can classify signs that indicate breakdowns as follows:
- Noise in manual transmission. This may be a crackling, knocking, rustling, grinding, as well as beating of the gear shift lever. Knocking can occur during different phases of the box's operation. An experienced motorist can even determine from such a rustle which parts are at risk. For example, noise when a car turns into a turn indicates wear on the differential gears.
- Gears are hard to engage. In addition to the wear of parts of the gearbox itself, the malfunction may also lie in the clutch. In addition, there is a risk of deformation of the gearshift control rods. Remember that plastic parts break much more easily than metal parts.
- Spontaneous “dropping out” of the gear while driving. Over time, gear teeth become chipped and worn down, becoming shorter. The slightest vibration disengages them and the transmission “flies out”. In this case, it is also necessary to check the engine mounting.
- A sharp click and loss of smoothness when changing gears. If the clutch is working properly, then the cause of such a problem is most often the failure of the synchronizer blocking ring of the desired gear.
- The box “eats” a lot of oil. Increased oil consumption is primarily a leak. It can occur through a depressurized crankcase, as well as worn oil seals, which are located on almost any hole in the box body.
Malfunctions also include rattling of the gearshift lever. More information can be found here: https://vazweb.ru/desyatka/salon/boltaetsya-rychag-kpp.html
Most of these faults cannot be solved in any other way than by replacing worn parts. The gearbox is close to the center of mass of the car and breaks down much less often than the engine or suspension.
Such gear failures cannot be eliminated in any way except by replacing the unit
Therefore, if something happens to it, repairs will definitely be required. In order to find out which wear parts cause noise or interfere with the smooth movement of the lever, you need to remove and disassemble the gearbox.
In what cases should the gearbox be removed?
Before removing the gearbox, you should make sure that the malfunctions are related specifically to it and are not caused, for example, by insufficient oil level, loose gearbox mounts, or defects in the clutch release drive.
Gearbox VAZ 2110
The need to remove the gearbox occurs when the following malfunctions occur:
- transmissions switch off spontaneously;
- unclear gear shifting;
- increased noise, appearance of extraneous sounds;
- when overtaking, the clutch disappears;
- gears are difficult to shift;
- oil leaks.
Instructions for removing the gearbox
The procedure for removing the gearbox is labor-intensive and time-consuming. It’s easier to replace it with a VAZ 2110 by visiting a car service center, but you can do it yourself.
Tools
To carry out the procedure, you will need tools consisting of:
- a set of wrenches, socket or open-end wrenches;
- set of heads with extensions;
- flat screwdriver;
- mounts;
- pliers;
- jack;
- clean rags.
In addition, you should prepare a container to drain the used oil. You can use a plastic 5 liter bottle.
Tools should be prepared in advance so that they are nearby while working.
Sequencing
To remove the gearbox, you need access to the underbody of the car, so it needs to be lifted. This can be done using a lift, or driving the car onto an overpass or inspection groove.
Since the removal work is quite complicated, you will need an assistant.
The following video demonstrates replacing the clutch, the first step of which is removing the gearbox.
Removing the gearbox from a VAZ 2110 car consists of a sequence of steps:
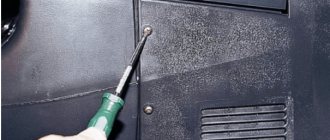
- First, you should remove the engine mudguard (protection). To do this, use a socket wrench to unscrew the mudguard mounting bolts and remove the protection.
- Next, we dismantle the engine compartment shield on the right.
- The next step is to drain the oil from the gearbox. To ensure high-quality drainage of oil, it is recommended to warm up the engine before draining, allowing it to run for several minutes. Next, place a prepared bottle or other container under the drain hole and unscrew the drain plug.
Draining oil from the box
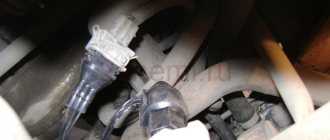
When the oil has completely drained, clean the plug and hole from dirt. Then screw the plug back. After draining the oil, you need to turn off the power to the car by disconnecting the negative terminal from the battery. Next, you need to dismantle the air filter: disconnect the hoses of the crankcase ventilation system, air supply and air flow sensor. The air filter housing is removed along with the throttle valve, sensor and hose. Then you need to remove the starter from the car. First you need to unscrew the nut that secures the tip of the clutch wire connecting the starter to the positive terminal of the battery. Next, you need to remove the tip from the contact bolt. Now you need to disconnect the traction relay control wire, unscrew the fastening nuts and remove the starter. At the next stage, we disconnect the clutch drive cable from the gearbox bracket and the gear shift fork. To do this, you need to pull the clutch cable out of the fork lever in the engine compartment. Then you should loosen the fastening nut of the cable sheath to the bracket on the gearbox. While holding the sheath, you can pull the cable end out of the bracket. Now you need to disconnect the wire connector from the speed sensor, as well as from the reverse sensor.
Disconnecting the reverse sensor connector
Next, disconnect the jet rod. It is attached to the buffer using two nuts. After unscrewing the nuts, remove the bracket. Now the rod can be dismantled. Now we disconnect the gear shift rod from the hinge. Then we tighten the fastening bolts on the clutch housing cover and remove the cover. Now we remove the wheel drives. A wooden plug should be installed on one drive to avoid any problems during installation. Moment of insertion of the plug into the hole
Then we remove the right drive, but you can simply move it to the side and not remove it.
To simplify the removal procedure, you need to loosen the ball joint bolts. After unscrewing the mounting bolts, you need to remove the lower crankcase cover. Then you need to unscrew the lower bolt securing the gearbox to the engine. Next, we hang the power unit using the prepared support. You can use a board as a support. After unscrewing the fastening nut, remove the left engine mount. Having unscrewed the nuts that secure the rear engine support to the body, and the bolts securing it to the gearbox, holding the nuts from turning, we dismantle the rear support. To move the box from the guide bushings, you need to insert a screwdriver between the cylinder block and the clutch housing. When moving the box, it should be held so that it does not rest on the crankshaft diaphragm spring. Due to significant load, the spring may become deformed, which will lead to malfunction of the unit.
How to remove and install a manual transmission
The procedure for removing the gearbox must be carried out by driving the car onto an overpass or into a garage with an inspection hole. The wider and more spacious the pit, the easier it will be to do the work. Provide good lighting for the underside of the car, because all work will take place in semi-darkness.
The gearbox in the “ten” weighs about 30 kg, provided that the oil is drained. The weight does not seem very large, but keep in mind that you will need to hold the gearbox and unscrew the nuts. There are two options: work with an assistant or build a device into which you can rest the box when removing it and then grab it with both hands to remove it.
This article will help you make the right choice of gearbox oil: https://vazweb.ru/desyatka/transmissiya/maslo-v-korobku.html
List of tools required for dismantling:
- Set of wrenches;
- Set of socket heads with extension;
- Flat and figured screwdrivers;
- Pliers;
- Mount;
- Jack;
- Clean dry cloth for wiping.
Further work is carried out in the following order:
- Remove the plastic engine protection by unscrewing the bolts with a socket wrench. We also remove the shield covering the engine compartment.
First you need to remove the crankcase protection - Drain the oil from the box. Any container is suitable for this, for example, a plastic 5-liter bottle with a cut off neck. We unscrew the plug, wait until everything drains, then wipe the plug and drain neck and tighten the hole.
- We de-energize the car by removing the terminal from the battery
- Remove the air filter along with the throttle valve. We also remove the air flow sensor and crankcase ventilation hoses.
- We remove the starter. To do this, you need to remove all the rubber caps from the large bolt with the plus from the battery and the small bolt of the solenoid relay, disconnect all the terminals, and then unscrew the bolts securing the starter to the engine housing.
- We remove the clutch cable by releasing it from the fork and loosening the outer nut.
- We disconnect the wiring from the box - this is the speed indicator sensor and the reverse gear lights.
- You can remove the reaction thrust by unscrewing the two nuts holding the bracket to the buffer.
- Disconnect the gear shift rod from the joint
- Next, you need to unscrew the bolts on the clutch housing cover and move the cover to the side.
- The next step is to remove the right and left front wheel drives. You can insert a plug into the hole of one of the drives so as not to mix them up during assembly. We remove the left drive completely, move the right one to the side so that it does not interfere. The bolts that secure the ball joint must be loosened.
You need to insert a homemade chopper into the hole located under the inner CV joint. - Then we remove the lower crankcase cover and unscrew the lower bolt that secures the gearbox to the engine.
Unscrew the gearbox mounting bolt - After this, the engine must be lifted to free the box for removal. You can throw a cable with a hook over the ceiling beam. A handy option is to use a strong board as a support.
- The next step is to remove the rear power unit mount. First you need to unscrew the bolt holding the engine to the left side support, then unscrew the bolts securing the rear support to the body and gearbox. Hold the bolt heads with a second wrench, otherwise they will turn. After this, you can remove the support itself.
In order to remove the rear power support of the assembly you will need two keys - The box must be removed from the guides while holding it in weight. To obtain a good breaking force, you can insert a flathead screwdriver between the cylinder block and the clutch housing. The input shaft gears should disengage. If this does not happen, slightly shake the engine by pressing it with a stop board.
A thick screwdriver can be used as a crowbar to remove the gearbox from the guides. - Be careful! The heavy body of the box should not rest on anything. Moving it back as far as possible, tilt the assembly with its front edge forward and pull it out from under the car.
After removing the box, it should be disassembled to carry out a visual inspection of the shafts and gears. If necessary, replace worn parts with new ones. When assembling the box, pay special attention to sealing the crankcase and replacing the seals.
Reinstallation of the box is carried out in the reverse order. If this is your first time carrying out a similar procedure, take photographs of each step, the location of parts and fasteners. This will help restore the sequence of actions.
Video: dismantling the gearbox on Lada 2110
After repairing the gearbox, you need to run in the new gears for some time, especially if you changed them block by block, in groups. During the break-in period, refrain from aggressive driving style. When switching to a higher speed, pause for one or two seconds, and when downshifting, on the contrary, engage a new one immediately. Always monitor the oil level - if it drops, take the time to crawl under the car and inspect for leaks at the junction of the cover and crankcase. Handle your vehicle carefully and the service life of the gearbox will increase.
How to remove the gearbox on a VAZ 2110
Car repair is a rather complex and time-consuming operation, and it is usually entrusted to car service professionals. Certain machine components do not generally require dismantling and repair by the driver in a garage. However, repair services are becoming more expensive, and vehicles break down more and more every year. Owners of products from the domestic automobile industry are not yet deprived of the opportunity to troubleshoot problems in their “iron horse” on their own. Transmission breakdown is one of the common problems that cause headaches for the owner of VAZ cars. Today we will talk about how to remove the box on a VAZ 2110, diagnose it and carry out feasible repairs.
The procedure for removing the gearbox on a VAZ 2110
To begin with, you should definitely decide whether you really want to remove the VAZ 2110 gearbox without the help of an experienced specialist. These works are quite complex, so we cannot do without the proper knowledge, skills and equipment.
If you still decide to get down to business on your own, then you should call a friend for help - for some actions one pair of hands will not be enough, and the work will be more fun. The tools we need are, first of all, wrenches and screwdrivers.
In addition, it is worth reading the instructions on how to change the box on a VAZ 2110. Don’t be too lazy to do this, because the process itself is quite complicated, so you can damage the device during dismantling work.
First, we drive the car into the pit. If you want to know how to remove a box on a VAZ 2110 without a pit, then everything happens exactly the same, but the work will be more difficult. After all, having straightened up to your full height, all movements are easier and more convenient. Next, install supports for the wheels. After making sure that the car is immobilized, we begin removing the VAZ 2110 gearbox.
Clutch adjustment on a VAZ 2110 after replacement
Setting up the transmission system will help to complete the repair efficiently. To do this, loosen the adjusting nuts on the cable. The clutch pedal will rise. We take a ruler and measure the distance from the front wall to the pedal in the cabin. The working stroke, regulated by the operating instructions, should be 120 mm (±5mm).
Press the pedal several times. Then, tighten the adjusting nut, simultaneously measuring the distance between the pedal and the wall. As soon as the desired value of 12 cm is reached, tighten the nut, holding the lock nut with another wrench. A similar adjustment operation, after replacing the clutch with your own hands, can be performed on a VAZ 2110 with a 16-valve engine.
Which clutch is better to put on a VAZ 2110
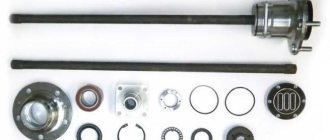
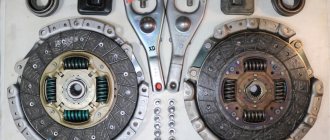
Below are the most famous companies that produce clutches for the VAZ 2110, I suggest you familiarize yourself with them and make your choice.
KraftTech – there is no marking on the factory release bearing, but the thrust bearing is designated as X2200C; driven disk – Y 3200A B0206. Main features: four damper springs, there are 18 petals on the diaphragm spring. The box bears the designation: 2110 W3200C B2240.
Luk – the kit does not include a release bearing, its marking is: SKF 500 063820; the pressure plate is branded 2 D24 120 0252 10, and the driven disk is branded 320 030810. The latter has marks for precise orientation during installation. The driven disk has six springs, the basket has 18 petals. The side is last marked.
Valeo - marking is applied only to the bearing: Valeo SNR BB 126 18S50. The kit includes a mandrel for precise installation. The spring element of the pressure plate consists of 18 petals. There is a mark on the package - 21102-21103-21108-2111-2112 826622.
VIS - there are no marked parts, the only special sign is the approval mark - AYA70. The pressure plate spring has 12 lobes, the driven disk has 4 large and 3 small damper springs. On the box: 2110-1601180.
Pilenga - there are no markings or designations on the parts, but on the packaging it is noted: CK-P-4005 2110. The driven disk is equipped with 4 small and 4 large damper springs. The pressure plate spring includes 18 lobes.
FINWHALE and QML - smooth start of vehicle movement from a standstill; uniform movement of the car without jerking; the softness of the clutch pedal ensures comfortable driving and reduces driver fatigue; high safety properties make it possible to increase the service life of gearbox synchronizers and other transmission parts; predictable stable resource, reliability and durability; ease of installation, the clutch kit includes a centering mandrel and lubricant, it is possible to replace the clutch in the absence of special tools and materials, there is no need to buy them; and, finally, an excellent price-quality combination. High quality clutch kit at an affordable price.