The need to remove and replace the dashboard on a VAZ 2110 car may arise when repairing devices and parts located under its surface. In particular, it is with the removal of the dashboard that the car’s air intakes are inspected. Sometimes they can become clogged and prevent your heating or air conditioning systems from working properly. The process of removing and replacing the dashboard on a VAZ 2110 is not particularly simple. To carry it out, you will need to be patient and master the skills of masterly working with instruments.
In today's article we will tell you how to remove, replace, install, modify and improve the dashboard on a VAZ 2110 with your own hands. In addition to all this, we will give you a photo report of the work done and show you an interesting thematic video.
What should be considered when replacing a torpedo on a VAZ 2110
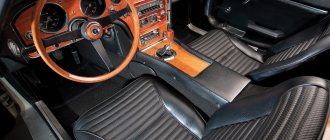
Replacing the torpedo on a VAZ 2110 will not only add some charm to the car, but can greatly improve the ride comfort not only for the passenger, but also for the driver. After all, you can replace the dashboard with a torpedo. When replacing it, the following points should be taken into account:
- What exactly does the car owner want to achieve with a replacement? This could be an increase in space in the cabin in front of the front seat.
- Just to give, so to speak, an expensive look to the car.
- Organize a place to install additional devices - radios, screens, and so on.
In any case, you can get the most beneficial effect from such an undertaking.
The first thing to consider when selecting a torpedo for a VAZ 2110 is its size and the shape of the car’s interior.
It is also worth considering the category of people, passengers, who will be in the car. This will sometimes improve the safety of the vehicle.
Once the type of torpedo is determined, it is worth thinking about what additional functions it should perform. This could be the installation of additional equipment, space for mobile phones, space for a car audio system - speakers, or a radio.
The next stage is choosing a coating. It is best to get it as universal as possible and try to install torpedoes with the following coatings:
- Plastic. The torpedo is made entirely of plastic without unnecessary inserts.
- Plastic with wooden or leather inserts.
These are the two most popular types of torpedoes for the VAZ 2110, which are the most practical to use and will best suit almost any type of interior.
Replacing a car speed sensor
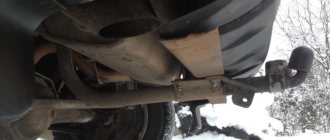
As for its location, look for the DS in the engine compartment in close proximity to the exhaust manifold. To be honest, the place where it is installed cannot be called ideal. While the car is running, the manifold heats up. The sensor wires rub against it, which over time leads to malfunctions and short circuits. Therefore, experts recommend that the first step is to properly insulate the wiring, and also use some kind of clamps so that the wires do not come into contact with the collector. This significantly extends its service life.
If the check shows that the DS is faulty, it needs to be replaced. Repairing sensors and similar small electronic devices is a thankless task. In a garage environment, this is unlikely to be possible, and the only thing that can be done is to clean the contacts from oxidation (this can be a problem).
It doesn’t matter whether you have an injection car or a carburetor with a Europanel - the connection of the speed sensor to the instrument cluster is identical.
Replacing the VAZ speed sensor: step-by-step instructions:
- Drive into the pit - it will be more convenient to work from below - and wait until the engine cools down.
- Turn off the vehicle's power by removing the cable from the negative terminal of the battery. Do not close the hood after this, this will provide you with lighting.
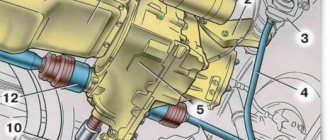
- Locate the speed sensor on the transmission. Clean it and everything near it with a rag to remove any dirt.
- By pressing the spring clip, disconnect the wire block from the sensor.
- Dismantle the sensor itself by unscrewing it counterclockwise - with your fingers or an open-end wrench to “22”.
- Carefully, so as not to break anything, install a new part in place of the removed part. Connect the wire block to it and the procedure for replacing the speed sensor can be considered complete.
How to properly connect a new DS? It is important here that the device rod fits correctly into the fixing sleeve, otherwise rotation will not be transmitted to the sensor. If the sensor fits into the socket the first time, then everything is in its place, and if something prevents it from moving, then the rod did not fit into the bushing.
How to remove the dashboard on a VAZ 2110 with your own hands - step-by-step instructions + photo report
In order to remove a torpedo on a VAZ 2110, you must perform the following procedure:
- Unscrew 2 screws on the right and 2 on the left on the central tunnel.
- Next, remove the covers on both sides.
- Remove the plug near the handbrake.
- Unscrew the screws on the left and right of the central tunnel.
- Unscrew the screws at the back of the central tunnel.
- Removing the plastic of the central tunnel.
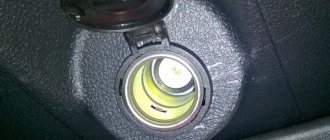
- Disconnecting the cigarette lighter wires. Mark so as not to get confused when connecting to the assembly.
- Remove the gearshift knob cover.
- Using a wrench, unscrew the interior heating air duct.
- Removing the air duct.
- Unscrew the fastenings of the central panel from the front.
- Unscrew the fastenings of the central panel at the back.
- We finally remove the panel.
- We unscrew the screws of the glove compartment.
- We remove the glove compartment.
- Disconnect the glove box light wires.
- We unscrew the screws inside the space in place of the glove compartment.
- Unscrew the remaining screws on the sides of the torpedo.
- Unscrew the torpedo bolts as follows as in the photo.
- Removing the air duct.
- Unscrew the nut on the dashboard under the air duct.
- We lower the torpedo from the pins.
- We disconnect the wires from the front panel and mark them so as not to get confused during assembly.
As you noticed, if you follow our instructions, the process becomes much easier. You can remove the VAZ 2110, 2111, 2112 torpedo with your own hands, but it is better to do it with an assistant.
With panel disassembly
The first stage is carried out according to the plan already described. Next, we proceed like this:
- We assemble the trim, installing our instrument cluster, air duct panels and those accessories included in the kit;
- At the base of the panel we carefully attach the wiring harness;
- We connect the wires from the Euro pad to this harness, tightening everything with mounting ties;
- We connect devices to the required buttons using connectors;
- We secure the cover with self-tapping screws.
This method, although it takes more time, provides high-quality sound insulation to eliminate all annoying squeaks.
We also recommend replacing light bulbs with high-quality analogues or LEDs. So, the updated panel will look even more solid.
Installing a torpedo on a VAZ 2110 - step-by-step instructions
In order to install the instrument panel of a VAZ 2110 (torpedo), you must perform the following steps:
- Install the instrument panel so that the guide pins fit into the holes on the instrument panel.
- At the same time, move the steering column adjustment knob into the hole on the instrument panel.
- Using a screwdriver, drive the threaded rods into the holes on both sides of the panel.
- Install the foot warmer air duct so that the air duct fits into the hole in the air distributor housing.
- Connect all terminals to wires in reverse order. Secure the panel and reinstall all components that were removed during disassembly. After completing the work, check the operation of all devices.
With panel disassembly
The first stage is carried out according to the plan already described. Next, we proceed like this:
- We assemble the trim, installing our instrument cluster, air duct panels and those accessories included in the kit;
- At the base of the panel we carefully attach the wiring harness;
- We connect the wires from the Euro pad to this harness, tightening everything with mounting ties;
- We connect devices to the required buttons using connectors;
- We secure the cover with self-tapping screws.
This method, although it takes more time, provides high-quality sound insulation to eliminate all annoying squeaks.
We also recommend replacing light bulbs with high-quality analogues or LEDs. So, the updated panel will look even more solid.
Improvement and tuning of the dashboard on the VAZ 2110
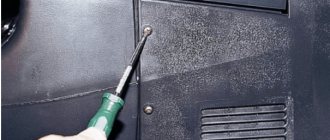
One of the most popular ways to improve the dashboard on a VAZ 2110 is its sound insulation. In order to do this, you must perform the following steps:
- We remove the tidy, I already told you how to do this earlier
- Next we foam, but under no circumstances should you pile up a huge pile of foam at once, it won’t dry out in a week.
- Don’t forget to try it on so that later it doesn’t turn out that your steering wheel touches it, or it’s just too high.
- In principle, all the work consists of two things, you cut, foam, cut again and so on many times.
- Next, we apply the cheapest putty we could find.
- Next we cover the dashboard with Shumka.
- We install the torpedo back.
You can modify the dashboard of a VAZ 2110 in different ways, someone covers it with leather, someone inserts an LCD monitor into it, in tuning a car it all depends on you and your fantasies and desires.
Components
When purchasing, you will receive what is included in the kit, namely:
- Europlate;
- Inserts for switches (buttons) of devices;
- Trim on the instrument panel;
- Since your instrument combination may differ from those whose installation is structurally provided, there should also be six plugs; they can be inserted instead of buttons;
- The buttons themselves and two pads for them: • Double – for low beam and dimensions; • To turn on the fog lights; • Heated rear window.
- Air ducts;
- Block and wiring harness designed to connect a double button for side lights and low beam;
- Brackets securing the instrument panel.
In addition, if you are not entirely satisfied with this combination, and you need more buttons for other devices, then they, as well as the pads for them, can be purchased separately.
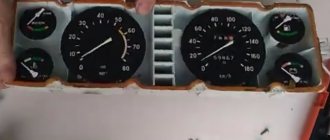
Removing and installing the shield
1. From the bottom of the panel, unscrew the two screws using a Phillips screwdriver.
2. On top of the panel, unscrew two screws, also for a Phillips screwdriver.
3. After unscrewing the screws, remove the plastic cover of the instrument panel.
4. Disconnect the connectors on both sides that go to the buttons of the plastic cover and put it aside.
5. Unscrew the two screws securing the shield at the edges.
6. Separate the two latches of the shield and pull it slightly towards you.
7. Disconnect two connectors.
8. After disconnecting the connectors, remove the instrument panel.
In what cases is disassembly necessary?
Removing the dashboard may most often be required in several cases:
- the surface of the panel has received some scratches or abrasions from a long time of use, paint chips are visible, signs of wear are noticeable, which can be restored after dismantling;
- the information unit was damaged mechanically from an external impact, for example, after hitting a hole or in another way, because the strength of the standard unit is initially low, which leads to similar consequences;
- The car owner wants to modernize the interior by replacing the standard panel with a custom model with a modern design, original lighting, and LED inclusions.
When purchasing a new dashboard, you need to make sure that its dimensions will fit neatly into the allotted space and that the fastenings will be in optimal positions.
If you select a new panel incorrectly, unsightly gaps will form at the joints, extraneous creaks, friction sounds, etc. will appear. In some areas, models that do not match the dimensions will form unwanted tensions, deforming the mating elements. It is advisable to purchase products from manufacturers certified by the automobile plant. It is also important that the new panel has all the indicators from the previous model.
Stories from our readers
“Fucking basin. "
Hi all! My name is Mikhail, now I’ll tell you a story about how I managed to exchange my two-wheeler for a 2010 Camry. It all started with the fact that I began to be wildly irritated by the breakdowns of the two-wheeler, it seemed like nothing serious was broken, but damn it, there were so many little things that really started to irritate me. This is where the idea arose that it was time to change the car to a foreign car. The choice fell on the melting Camry of the tenth years.
Yes, I had matured morally, but financially I just couldn’t handle it. I’ll say right away that I am against loans and taking a car, especially not a new one, on credit is unreasonable. My salary is 24k a month, so collecting 600-700 thousand is almost impossible for me. I started looking for different ways to make money on the Internet. You can’t imagine how many scams there are, what I haven’t tried: sports betting, network marketing, and even the volcano casino, where I successfully lost about 10 thousand ((The only direction in which it seemed to me that I could make money was currency trading on the stock exchange, they call it Forex. But when I started delving into it, I realized that it was very difficult for me. I continued to dig further and came across binary options. The essence is the same as in Forex, but it’s much easier to understand. I started reading forums, studying trading strategies. I tried it on a demo account, then opened a real account. To be honest, I didn’t manage to start earning money right away, until I understood all the mechanics of options, I lost about 3,000 rubles, but as it turned out, it was a precious experience. Now I earn 5-7 thousand rubles a day. I managed to get the car buy after half a year, but in my opinion this is a good result, and it’s not about the car, my life has changed, I naturally quit my job, I have more free time for myself and my family. You’ll laugh, but I work directly on the phone)) If If you want to change your life like me, then here’s what I advise you to do right now: 1. Register on the site 2. Practice on a Demo account (it’s free). 3. As soon as you get something on the Demo account, top up your REAL ACCOUNT and go to REAL MONEY! I also advise you to download the application to your phone, it’s much more convenient to work from your phone. Download here.
- Top lining
- Central part (the most massive)
- The lower plastic cover, which is attached to the bottom of the central
Repair of a peeled off corner of a VAZ 2110 panel
There are usually two reasons when a panel corner protrudes:
- The screws that attach the top trim to the panel have come loose
- The soft part of the panel has come off the metal part of the top cover