There are a large number of different types of car repair or tuning work that require first removing the bumper protection from the car. Although different models of different vehicles have some differences in the mounting of this part, the basic principle of operation will be approximately the same. In this review we will try to answer the question regarding how to remove the bumper, front and rear.
In what cases do you have to remove the bumper?
Removing and installing a car bumper is required in strictly defined cases; it is not recommended to simply remove it from its standard place and install it back, since in this case its standard fasteners will wear out and become loose.
Among the situations in which such an operation must be performed are:
- repair after an accident.
- performing repair work and periodic maintenance of other components and assemblies of the vehicle.
- performing tuning work.
- damper modernization.
- the need to carry out repair work on standard fastenings.
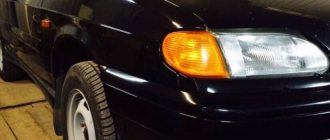
Most often, replacement of the rear bumper is required, since it is the one that usually suffers in accidents and various types of emergency situations. The front bumper is usually replaced after it has been seriously damaged for various reasons, mainly a collision with an obstacle. In addition, the front damper often undergoes a tuning procedure and that is why it must be removed periodically.
Articles
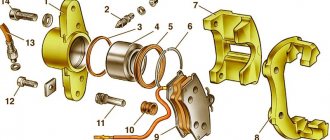
Here are the part designations for first generation machines:
- 622230010R or 622231300R or 622236764R – mounting bracket, left side;
- 622220011R or 622229216R or 622223926R – the same, right side;
- 8200597650 or 6001549321 – right PTF holder;
- 8200597649 or 6001549322 – left PTF holder;
- 620220030R – bumper “under PTF”;
- 620220025R – bumper without PTF holes;
- 620931777R – absorber (plastic liner).
We recommend: Renault Logan tire and wheel sizes
Of course, each of these parts has branded analogues:
- 620220025R – Api DC6000000-0000; Breckner BK71303; NPA NP513-07211;
- 620220030R – Api DC6000000-1000; NPA NP513-07212;
- 622230010R – ASAM 80133; NPA NP513-07235;
- 622220011R – ASAM 80132; NPA NP513-07236;
- 620931777R – Body Parts RNDUS10-240 (Taiwan).
ASAM is a supplier to Dacia. Well, Breckner and NPA are well-known brands from Germany.
Clarifications for restyling
We will talk about the second generation of crossovers. The designations will be as follows:
- 620224960 R – bumper;
- 622229960 R – right bracket;
- 622239404 R – left bracket;
- 620931777R – absorber (inherited from generation I);
- 622542036R – lower grille.
It is difficult to find analogues, since we are talking about a new product. There are a couple more items:
- 623103564 R or 623827948 R – radiator grille assembly (generation II).
The last node has analogues, but they differ from the original (tuning).
How to remove the front bumper
The dismantling procedure occurs according to a certain algorithm. It can be described step by step as follows:
1. placing the car on a jack or inspection hole. 2. dismantling the front wheels.
3. de-energizing its electrical wiring. 4. removing the radiator grille, and this procedure directly depends on the design of the damper installed on a particular car model.
5. in the case when there is a hole in it for the towing cable, use a hex wrench to find the heads of the fastening bolts and unscrew them. 6. in the case when the arch protection is screwed to the car body, you need to unscrew three of them and remove it. 7. The part is carefully “torn off” from the latches located on the wings.
8. All existing fastenings of the described device to the body and energy-absorbing beams are checked. These could be the lower bumper mounts, other types of screws located under the fender liner, as well as in the radiator area.
What is important to know when purchasing new products for VAZ 2113, 2114 and 2115
Unlike foreign-made cars, it is easy to buy the necessary spare parts for the VAZ 2113, including new bumpers. In the retail chain, these parts are found in two forms:
- black, without painting;
- painted in any color of your choice.
Body kits of different colors and shapes
Advice. If you decide to change body kits because of their unpresentable appearance, then it is easier and cheaper to buy ready-made products painted in the color of the car. The difference in price is 700-900 rubles. will not allow you to save a significant amount on painting a black bumper.
Unpainted parts are usually taken during a major body repair with full painting or in the case of repainting the car in some individual color. It is also appropriate here to remember those owners whose cars were equipped from the factory with unpainted elements, which, if they break down, are easily replaced with similar ones.
Standard front bumper VAZ 2113—2115
When choosing a new bumper for VAZ 2113 (2114, 2115), consider several recommendations:
- There are several manufacturers on the market that use various raw materials, including recycled ones, to produce plastic body parts. Therefore, when purchasing, pay attention to the elasticity of the plastic. If it is initially rigid, then at negative temperatures it will become very brittle.
- Before purchasing a new product, remove the old body kit to check the condition of the amplifier underneath. If the disassembly was caused by the plastic breaking due to an impact, then the amplifier could also be damaged. In addition, it will be possible to compare the factory bumper with the part offered in the store.
- Check the element for minor paint defects. It happens that plastic parts are damaged during transportation.
- If you notice that the design of the new bumper is additionally reinforced from the inside, then buy it with confidence, since such products are more reliable in operation.
- Please note that there are openings for installing fog lights. There are products on sale for the VAZ 2114 that are not equipped with holes.
- When purchasing, make sure that the items fit your car in size. You should not purchase bumpers for a VAZ 2115 from a VAZ 2114 and vice versa, since they differ in dimensions, although they are mounted in the same way.
Factory bumper VAZ 2113—2115
Wanting to give their cars individuality, their owners often do partial styling, replacing the stock (factory) body kits with more original and attractive ones that differ in shape. As a rule, such elements can be easily installed on standard mounts and do not require modifications.
Reference. The prices of serial styling bumpers are not much higher than stock ones and start from 3,500 rubles. (for an unpainted product). Original works can cost significantly more.
The rear styling kit looks impressive
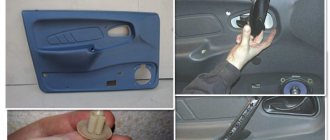
Installing the front bumper
Installation of the front bumper of the car occurs in the reverse order, and it is necessary to thoroughly clean the seats and fastening points of this element of the car's structure from dirt and rust. It is worth installing it back with the help of an assistant, since you need to correctly place the product in the fastening areas and its normal location. As a last resort, this procedure can be performed independently, but in this case there is a high risk of damaging the fragile antennae of the plastic latches.
Functions
The front bumper has three main functions that it performs:
- Decorative;
- Protective;
- Covering other elements of the car.
In addition to the front bumper that we see, there is a beam or reinforcement hidden behind it. It creates the necessary degree of protection that allows you to avoid serious injuries and damage in collisions. Therefore, if the front end was broken, you should definitely pay attention to the current condition of the amplifier. This will allow you to understand whether, in addition to the plastic lining, you also need to change the beam.
Removing the rear bumper
Removal of the rear bumper is also carried out according to a specially developed algorithm and step by step it looks like this:
- The car is placed on a jack or driven into a viewing hole.
- The rear wheels are being removed.
- The electrical wiring is de-energized.
- The fastening of the arch protection to the bumper is unscrewed, if this is provided for by its design. To do this, use a screwdriver to remove self-tapping screws or a wrench for “8” and “10”.
- The rear light is removed.
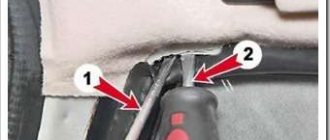
- Under the lantern two latches snap off.
- the condition of all types of fasteners is checked, with special attention paid to the bracket, the fastening of which has a complex structure. Those of them that are secured with screws and self-tapping screws are unscrewed.
- Using moderate physical force, the rear damper is removed.
It is worth noting that the repair algorithm is general and not always worth following. The fact is that on many car models, gaps are specially left so that you can carry out the necessary technical work on your own. As a result, there is no need to dismantle the device, spending a lot of effort and time.
Instructions for dismantling the front body kit with your own hands
To disassemble the bumper mounts you will need the following tool:
- Phillips screwdriver;
- 8 mm socket wrench;
- the same, size 10 mm.
Disassembly tool
Advice. Instead of separate keys during disassembly, it is more convenient to use heads with an extension and a wrench equipped with a ratchet.
It is more convenient to work with sockets and a ratchet wrench
Since most threaded joints are likely to be rusty, you will need to use WD-40 spray lubricant to rotate them. Apply it to all bolts and nuts before unscrewing.
It is more convenient to work with the lower mounts of the front body kit from the inspection ditch, from where they are clearly visible, although if necessary, you can dismantle the bumper without a pit. At the final stage, when the element is removed from the machine, it is worth having an assistant support the part by the second edge.
This material will help you install and dismantle the bumper on VAZ 2110, 2111 and 2112 cars:
If the car is equipped with fog lights, the process begins by disconnecting the battery from the on-board network. Further work is performed in the following sequence:
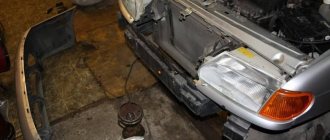
- Open the hood and use a screwdriver to unscrew the 4 screws holding the upper part of the radiator grille. Remove it from the car.
- The lower part of the radiator grille is held in place by 4 self-tapping screws - a pair from the outside and two more from the engine compartment. Unscrew them and remove the grille part.
- Unscrew the 6 screws of the lower body kit mounting. They are located on the rounded parts of the element, 3 on each side.
- Remove the plastic protection installed under the wheel arches by unscrewing the bolts and nuts with a 10 mm wrench. For greater convenience, you can remove the wheel. Unscrew the front part of the fender liner.
- Now you have access to the bracket, where you need to loosen and unscrew 2 10 mm nuts. Don't forget to treat the joints with WD-40.
- Remove the license plate, underneath it you will find 2 more front mounting bolts. Unscrew them, as well as the 2 screws located near the air intake opening.
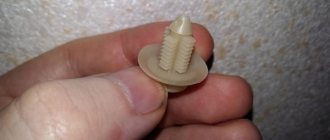
After disassembly, you will see plastic latches on the horizontal plane of the body kit. Unlock them and, together with an assistant, remove the bumper from the car, pushing it forward and holding it on both sides. Before doing this, disconnect the power wires for the fog lights so that you don’t have to do it while hanging.
Note. After dismantling the element, access to the plastic amplifier mount will open. If it is damaged and needs to be replaced, you need to unscrew the 4 nuts with a 13 mm socket and remove the part from the studs.
If you need to install a new body kit instead of a broken one, then you need to twist the metal brackets from the latter. To do this, just unscrew the 3 fastening screws. The brackets themselves should be cleaned of rust and painted so that they do not rot prematurely. The bumper is installed in the same way, only in reverse order.
The order of work in the photo
3 screws for bottom fastening
The top panel above the radiator is held on by two screws
Protection attachment points
The plastic panel above the radiator is removed after unscrewing 2 screws
2 nuts holding the bracket to the bracket on the body
2 screws securing the bottom of the grille
There are 2 screws under the license plate, and two more below
This is how the bottom part of the grille is removed
The amplifier is attached to the body with 4 13 mm nuts
This is what the side bracket looks like