Adjusting the valves of vases
Many myths and legends have developed around such a necessary procedure as adjusting the valves on the VAZ 2109, 2114 and 2108. At first, carburetor ones then became injection ones, but the design of the gas distribution mechanism did not change.
Until the 2011 release, even the thermal gaps remained the same. Only with the advent of the light ShPG did the gaps become a little larger. The seats are metal-ceramic, and the pistons are light. The frequency of valve adjustment remains the same at 30,000 km. On a new car, it is necessary to adjust the valves in the first 3,000 km, then at 15,000 and every 30,000 km. If you do not adhere to periodicity, the valves may burn out and the seats in the head may sag. In addition, traction is lost and fuel consumption increases. Thermal clearances on vases 2108, 21083, 2109, 21099, 2110, 21102, 2111, 21114, 2112, 2113, 2114, 2115, 1113, 11113, 2170, 2190, Priora, Granta (with engine 1118 3), should be like this:
- Graduation 0.35;
- Inlet 0.20 mm.
Thermal clearances on new modifications since 2011 for VAZ 8 valve Lada Granta, Kalina 2, Priora, with engine 21116
- Graduation 0.4 mm;
- Inlet 0.25 mm.
Tool for work
In addition to the everyday set of sockets and spanners, which the owner of a VAZ 10 should already have, a few more tools will be required:
- A device that presses out pushers for removing adjusting washers from them. You can get by with a couple of powerful screwdrivers, but the price issue here is not so great that you pay for the savings with less convenience. You can completely remove the camshaft - but then you will have to remove the timing belt as well, again there is no gain in time.
- A set of feeler gauges - we will use them to measure the gaps.
- Micrometer - This is not necessary, but is very useful. When adjusting, the thickness of the new washer is calculated based on the thickness of the old one and the measured gap, but what to do if the thickness marking on the washer is erased (and no one has canceled the wear?). You can borrow a 0-25 mm micrometer, fortunately you can trust it by simple mixing without calibers.
Something else useful for you:
Setting rules
Every car owner can refer to the manual regulations. It is worth saying that the nominal installation of valves on the VAZ 2110 8-valve injector occurs at the factory. According to the operating instructions, it is recommended to carry out the first adjustment at 10,000 km. This mode is called running-in. And then, adjustments should be made every 45,000 km. In some cases, engines operate properly up to 80,000 km.
For reference! The installation of valve pusher washers on VAZ 2110-12 vehicles (8 valves), with injection and carburetor engines, is completely identical.
conclusions
The valve adjustment of the 16-valve VAZ-2112 engine should be carried out once every 12-15 thousand kilometers or when the engine noise increases. Often, a metallic knock is heard at low speeds. Adjustments must be made on a cold engine and with all the tools available. If a car enthusiast is not sure that he is able to do this on his own, then it is recommended to contact a car service center, where everything will be done quickly and efficiently.
During the operation of the car, periodic adjustment of the valve on the VAZ-2110 is required; every owner of this brand needs to know where they are located. If necessary, you can contact the nearest car service center, but you will have to pay for this. Meanwhile, adjusting the VAZ valves of the “tenth” family is not so complicated that it cannot be done with your own hands, thus saving money.
Do-it-yourself valve adjustment
If your engine valves are knocking, it's time to adjust them. Don’t rush to go to a service station for this; try to perform this simple procedure on your own. If you learn to adjust the valves yourself, then you will save from 500 to 1000 rubles on this procedure, this is exactly the amount that the service station asks for. Osipov Mikhail, VAZ 2112, Toyota Camry, driving experience 11 years.
Hi all! My name is Mikhail, now I’ll tell you a story about how I managed to exchange my two-wheeler for a 2010 Camry. It all started with the fact that I began to be wildly irritated by the breakdowns of the two-wheeler, it seemed like nothing serious was broken, but damn it, there were so many little things that really started to irritate me. This is where the idea arose that it was time to change the car to a foreign car. The choice fell on the melting Camry of the tenth years.
Yes, I had matured morally, but financially I just couldn’t handle it. I’ll say right away that I am against loans and taking a car, especially not a new one, on credit is unreasonable. My salary is 24k a month, so collecting 600-700 thousand is almost impossible for me. I started looking for different ways to make money on the Internet. You can’t imagine how many scams there are, what I haven’t tried: sports betting, network marketing, and even the Vulcan casino, where I successfully lost about 10 thousand ((The only direction in which it seemed to me that I could make money was currency trading on the stock exchange, they call it Forex. But when I started delving into it, I realized that it was very difficult for me. I continued to dig further and came across binary options. The essence is the same as in Forex, but it’s much easier to understand. I started reading forums, studying trading strategies. I tried it on a demo account, then opened a real account. To be honest, I didn’t manage to start earning money right away, until I understood all the mechanics of options, I lost about 3,000 rubles, but as it turned out, it was a precious experience. Now I earn 5-7 thousand rubles a day. I managed to get the car buy after half a year, but in my opinion this is a good result, and it’s not about the car, my life has changed, I naturally quit my job, I have more free time for myself and my family. You’ll laugh, but I work directly on the phone)) If If you want to change your life like me, then here’s what I advise you to do right now: 1. Register 2. Practice on a Demo account (it’s free). 3. As soon as you get something on the Demo account, top up your REAL ACCOUNT and go to REAL MONEY!
I also advise you to download the application to your phone, it’s much more convenient to work from your phone.
Adjusting engine valves (VAZ 2110-12 engine 8 valves): 1. Open the valve cover and remove the timing belt cover (instructions).2. We install a device for adjusting the valves. You can buy it at any Auto store for 500 rubles.
3. Place marks on the crankshaft and camshaft. Then check the timing belt tension, if necessary, tighten and turn the camshaft 2.5 teeth clockwise.
Place your mark. Then we count the teeth 11-mark, 10.5-mark, 11-mark and proceed to adjustment starting from the first mark
5. Determine the gap using a feeler gauge.6. We take out the puck and look at what is written on it. Next, we take a special kit, or we count and write down which washer is needed. There is nothing complicated, and the whole process took no more than 30 minutes. Technology:
- remove the valve cover;
- lift one wheel with a jack;
- install a device for pressing the valves;
- We consider where the intake and exhaust valves are;
- turn the wheel until the shaft elbow is at the top, measure the clearance of the first valve;
- We consider what kind of washer is needed, if there is one, we install it. For this purpose, there is a special cam that holds the seat pressed, thereby providing almost free access to the washer. We take it out with tweezers or a clamp.
We work similarly with all other valves. The gap is adjusted by selecting the thickness of the adjusting washers. To do this, measure the thickness of the washer with a micrometer. The thickness of the new adjusting washer is determined by the formula: H = B+(A–C), mm,
- where A is the measured gap;
- B – thickness of the removed washer;
- C – nominal gap;
- N – thickness of the new washer.
The thickness of the washer is marked on its surface with an electrograph. We install the new washer in the pusher with the marking down and remove the lock. Check the gap again. When adjusted correctly, a 0.20 or 0.35 mm feeler gauge should fit into the gap with slight pinching. Consistently turning the crankshaft half a turn, we adjust the clearances of the remaining valves in the sequence shown in the table:
| Angle of rotation of the crankshaft from the alignment of the marks, degrees. | Fists | |
| exhaust (gap 0.35 mm) | inlet(gap 0.20 mm) | |
| 40–50 | 1 | 3 |
| 220-230 | 5 | 2 |
| 400-410 | 8 | 6 |
| 580-590 | 4 | 7 |
Valve adjustment on a VAZ 2110-12 with a 16-valve engine is not performed because hydraulic compensators are installed there. If knocking noises occur, replace it. Our readers recommend!
In order to get rid of constant fines from cameras, many of our readers successfully use Special Nano Film for license plates. A legal and 100% reliable way to protect yourself from fines. Having familiarized ourselves and carefully studied this method, we decided to offer it to you.
Our readers recommend!
In order to get rid of constant fines from cameras, many of our readers successfully use Special Nano Film for license plates. A legal and 100% reliable way to protect yourself from fines. Having familiarized ourselves and carefully studied this method, we decided to offer it to you.
| Valve adjustment work |
| Adjust the valves yourself... |
- How I adjusted the valves from the my2110.ru forum
- engine
- engine repair
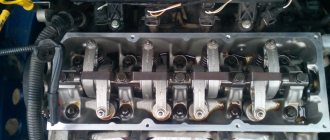
Valve adjustment process
The process of adjusting valves on an engine
Before moving directly to the adjustment process, it is worth noting that this operation is carried out only on a completely cooled engine. Experienced VAZ drivers recommend waiting at least one night.
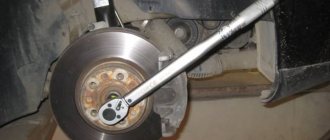
To make the adjustment, you will need a few tools, namely a set of keys and sockets, as well as a valve cover gasket and a special feeler gauge.
So, let's proceed directly to the operation:
- We disconnect and move to the side the tip of the throttle valve drive.
We dismantle the cable and bracket for fastening the throttle position
Unscrew the clamps and remove the crankcase ventilation hoses.
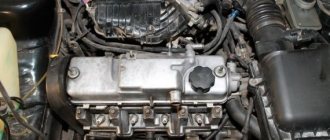
Remove the valve cover and bearing caps to adjust the valves
We dismantle the timing belt protective cover to get to the crankshaft pulley
Turn the crankshaft clockwise
We adjust the gaps using feeler gauges
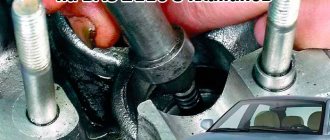
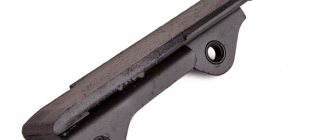
Special tool for adjusting valves and replacing shims
Using tweezers, remove the adjusting washer
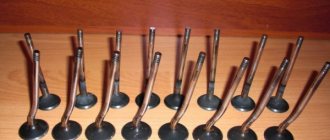
What types of shims are there?
A set of adjusting washers for all occasions
For cars of the VAZ family there are 125 sizes of shims, but not all are used.
Therefore, let’s consider the most popular sizes of spare parts that are installed on these engines (if you don’t want to run to the auto store again later): 3.30, 3.35, 3.40, 3.45, 3.50, 3.55, 3.60, 3.65, 3.70, 3.75, 3.80, 3.85, 3.90, 3.95, 4.00, 4.05, 4.10, 4.15, 4.20, 4.25, 4.30, 4.35, 4.40, 4.45, 4.50;
Adjusting washers in two sizes: 3.95 and 3.30
What are the consequences of untimely valve adjustment?
When the entire replacement process is considered, it is worth recalling what the consequences of untimely adjustment of the valve mechanism may be:
- Wear of camshafts. Thus, incorrect clearance can lead to premature wear of the camshaft cams.
- Damage to valve tappets when adjusting washers hit them.
- General wear of all elements of the head and timing mechanisms.
- In some cases, it may happen that the timing belt breaks and bends the valves.
After using the car for a long time, its owner may notice that the engine is no longer performing as well as it was before. In principle, all changes in engine operation should always alert the driver, since this is often fraught with quite serious consequences. In most cases, adjustment of the VAZ-2110 valves (8 valves) is required if the following symptoms are present:
- excessive noise when starting the engine after the car has been idle for a long time;
- lack of compression in the cylinders (a noticeable decrease in engine power);
- oil leaks through the cover gasket;
- regular “shots” in the muffler or carburetor;
- increased fuel consumption.
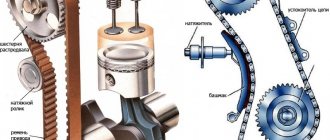
Operating principle of the valve mechanism
It is not at all difficult to understand how the valve mechanism in an engine works. Its operation is based on the torque that appears when the crankshaft of the cylinder block rotates. A timing belt is installed on its pulley, which transmits rotation to the camshaft of the cylinder head. Throughout the entire structure of the shaft there are special bulges that are located on different parts of it. The camshaft rotates and with these bulges acts on the valve bushings, which press them. As soon as the shaft stops its impact, the valve, under the action of the spring, returns to its original position.
The process of closing and opening the valves is clearly synchronized with the operation of the crankshaft. The valves should only close when the piston reaches top dead center. Once the mixture explodes, the piston moves down and the valves open to allow the exhaust gases to escape. If you violate this sequence of actions, the engine simply will not work, and the valves will certainly deteriorate.
The operating conditions of the valves are extremely difficult. They are susceptible to high temperatures and tend to burn out. Some engines that rely on a small combustion chamber to increase power run the risk of valve bending if the camshaft and crankshaft are out of synch due to a timing belt break or improper installation.
Preparing and disassembling the mechanism
To carry out the work, you will have to purchase a special device for pressing the pushers and a set of adjusting washers of various thicknesses - you will not be able to do without them. If you constantly plan to make adjustments yourself, then this purchase will help you save money on car service costs. With a one-time promotion, purchasing devices is impractical; it is better to immediately contact the specialists.
To disassemble and adjust the clearances under the cams, you will need the following tools:
- a pair of flat probes with a thickness of 0.2 and 0.35 mm;
- a regular plumbing kit with screwdrivers and pliers;
- tweezers;
- sets of ring and open-end wrenches;
- spark plug wrench.
Since during the adjustment process you will have to repeatedly turn the crankshaft, to facilitate rotation it is recommended to unscrew all the spark plugs, having first removed and put the high-voltage wires aside. Further disassembly includes:
- Disconnecting from the valve cover all pipes that interfere with its removal.
- Unscrewing the valve cover and removing it. You need to make sure that the rubber bushings do not get lost from the holes.
- Removing the gasket.
- Removing the plastic timing belt cover.
After wiping off any oil stains on the cylinder head flange where the gasket was located with a rag, you can begin tuning.
Remember that adjustment is carried out only on a cold engine.
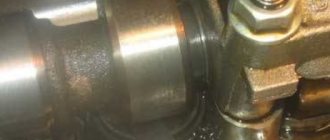
Causes and signs of wear of rubber seals
During engine operation, oil removal seals are subjected to serious loads, because the valve performs more than 1000 operating strokes per minute. If we add to this the factor of the chemical effects of hot oil and exhaust gases, then it is not at all surprising that the rubber does not withstand and wears out.
And the point here is not the quality of the product, although this is important, it’s just that the seal is a consumable material that should be changed after a run of about 100,000 km.
If you detect the wear of valve seals in time and replace them at an early stage of the malfunction, you will be able to avoid problems with the internal combustion engine. The primary signs of failure of rubber seals include the following symptoms:
- The candle thread is coated with oil.
- Smoke from the oil filler neck.
- Smoke coming from the exhaust pipe.
- The electrodes of the spark plug are covered with carbon deposits.
- Increased fuel consumption.
- Rapid oil contamination.
The presence of oil on the threaded part of the spark plugs does not always indicate the need to urgently change the seals. It happens that the thread is still dry, because a small amount of lubricant still gets into the chamber, and it has time to burn.
Adjusting the clearances in the valve drive:
1. First, loosen the clamp and remove the ventilation hose from the cylinder head cover pipe.
2. Remove the hose of the main ventilation branch from the fitting of the cylinder head cover, first loosen the clamp.
3. Next, you will need to unscrew both bolts that secure the accelerator cable bracket and, without disconnecting the cable from the bracket, move it to the side.
4. Remove the hose of the small ventilation branch from the fitting of the cylinder head cover, also first loosening the clamp.
5. Unscrew the cap nuts that secure the block head cover. Remove and, if necessary, replace rubber bushings and washers. Remove the cylinder head cover.
6. After all the manipulations described above, use feeler gauges to measure the gaps on the valve actuator numbers four, six, seven and eight (those with the cams pointing upward). Important: write down the measured gaps.
7. The next step is to get the adjusting washer. To do this, you should turn the pusher by the groove to such an extent that you can pry the washer off. To make removal convenient, there are two grooves in the pusher. For more convenient operation, we recommend cleaning the oil around the pushers.
8. Install the head cover mount, a special device for compressing valve springs onto the studs.
9. Place the studs on the washers. To avoid jamming the flanges, turn them over and tighten the cap nuts.
10. Press the pusher downwards. Replace the adjusting washer on the pusher and insert it under the camshaft. Insert the retainer.
11. The latch should be inserted so that it leaves the pusher in the recessed position.
12. Next, you should pry the adjusting washer with a screwdriver and pull out (you can use tweezers) the washer from the pusher.
13. We recommend that you remember (or better yet, write down) the thickness of the adjusting washer. This data should be on one side. If the mark is not visible, measure the thickness with a micrometer.
14. Calculate the thickness of the new washer using the formula H=B+A–C.
- A is the value of the measured gap;
- B is the thickness of the old washer;
- C—nominal clearance;
- H is the thickness of the new washer.
Installation Tips
Before installing the shafts, the piston of the first cylinder must be at the “top dead center”. To achieve this, rotate the crankshaft, grabbing it by the screw securing the generator pulley. Here you need a key “17”.
Alternator pulley and two timing shaft pulleys
The camshafts have spikes and the pulleys have grooves. Each pulley is equipped with a mark that should face up. The diagram shown in the photo corresponds to the upper position of piston 1. This is how the shafts are installed during installation.
You can set the crankshaft according to the mark located on the gearbox assembly (photo 1). This is done before installing the belt.
Various auxiliary elements
To set the tension correctly, use basic tips. Or you can do it simpler: when dismantling, note at what angle the tension roller was fixed. The key plate (photo 2) is set at the desired angle and the fixing nut is tightened (force 40 N*m).
How to screw the cylinder head
The threaded part of the screws is lubricated with engine oil. Then, maintaining a force of 20 N*m, the screws are tightened in the required order (see photo).
Recommended sequence (montage)
Second pass - each screw is turned at an angle of 90 degrees. On the third pass, the screws are turned another 90 degrees.
Chemistry
The bearing housing will be connected to the cylinder head cover. The connection itself must be airtight. A sealant is applied to the edge of the body around the perimeter: KLT-75M, Loctite-574, etc. During installation, the cylinder head gasket is not lubricated in principle - graphite or grease will only cause harm. Someone smears valve stems with graphite lubricant, which is also not correct. You need to use motor oil.
Do-it-yourself valve adjustment for VAZ 2110 8 cl.
Despite its age, the good old eight-valve engine in all its variations not only does not leave the roads, but also continues to be produced in new incarnations by the Togliatti plant. But despite its unpretentiousness and sufficient resource, in some ways it has long been outdated - and to a large extent the gas distribution mechanism is outdated. No matter how simple and “indestructible” the “camshaft-pushrod-valve” system is, wear in it is inevitable, and hence the need for regular adjustment of thermal clearances.