Hello!
Guys, tell the blonde step by step the process of adjusting the valves on Kalina 2 16 valves. No matter how strange it may sound, BUT I want to do it myself, because I really like tinkering with cars, even though I don’t really understand them)))) Thank you! Initially, the question arises: why do you need valve adjustment at all? If this operation is carried out correctly, then:
- the engine starts easily;
- the motor runs quietly;
- fuel consumption is minimal;
- there is no carbon deposits in the combustion chamber;
- the total engine life before major overhaul increases.
If the car is new, the first valve adjustment must be done after the first 20 thousand kilometers, when the factory settings begin to be violated. There is no point in postponing the procedure, as this can lead to burnout of the valves.
Gap adjustment
Work is carried out only on a cold engine.
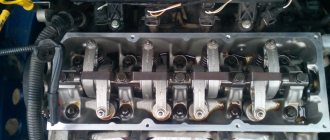
Remove the valve cover by unscrewing the bolts securing it. Remove the timing belt cover. Remove the spark plugs to make it easier to turn the engine.
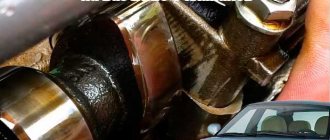
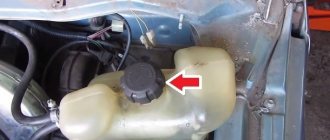
Remove oil from the head. It is better to do this with a syringe so that no debris gets on the head.
We inspect the camshaft cams. They should not be heavily worn out or damaged in any way.
Install the pusher tool onto the valve cover studs, tightening it with the nuts from the cover.
Using a wrench, turn the crankshaft clockwise until the marks located on the pulley and the timing belt cover match. After the marks match, turn the shaft approximately 3 more teeth of the camshaft pulley. At this moment, the piston in the first cylinder should be at TDC (top dead center).
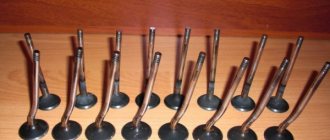
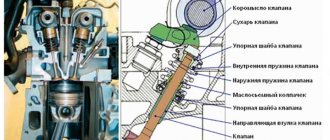
Using feeler gauges 0.2 and 0.35, check the clearances of the first and third shaft cams. If the probes pass freely, then it is necessary to replace the washers (In order to remove the washers from the pushers, grooves are provided on the upper edges). To do this, turn the pushers with the groove towards you. Using the tool, press the valve down, holding the pusher with a screwdriver inserted into the groove so that it does not rotate.
Fix the pusher in the lower position. Using tweezers, pull out the washer. We select and insert a new one of the appropriate size, with the markings facing the pusher. The dimensions are written on the washer itself. We remove the latch. Check the gaps again.
Preparing for work
You will need a set of tools and accessories:
- a set of socket heads with a wrench and a ratchet;
- syringe for removing engine oil;
- figured and flat screwdrivers;
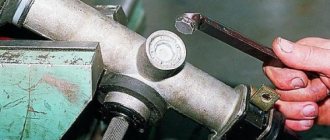
- special tool for recessing valves;
- a series of special probes;
- tweezers;
- long-nose pliers;
- adjusting washers.
The procedure is actually simple and can be done independently, without the participation of specialists. To save time or if the process seems too complicated, it is better to use the services of a car service. Such work does not cost that much: the standard figure does not exceed 800–1000 rubles, depending on the region.
Instructions for adjusting gaps
Before starting this operation, it is necessary to cool the engine. Afterwards, the bolts securing the cylinder head are unscrewed and the latter is dismantled. Further work looks like this.
- Remove the casing that covers the timing gear drive.
- Unscrew the spark plugs (this will make it easier to rotate the engine crankshaft).
- The surface under the head is cleared of oil using a syringe.
- If the camshaft has severe wear on the pusher cams, damaged and worn elements must be replaced.
- In place of the block head, a special device should be installed on the mounting studs, which will help to push the valves down.
- The pistons are set at dead center. To do this, the crankshaft is turned with a knob until the mark on the rear timing cover coincides with the mark on the pulley.
- After the marks match, the crankshaft rotates a few more teeth, and the first piston will be installed at top dead center.
- Using a feeler gauge, the gaps are measured first on the first cam, and then on the third. To do this, take a probe whose size is no more than 0.35 mm. If the dipstick passes without resistance, you should select another washer.
- Through a special groove in the upper edge, the washer is picked up and removed. In order to see the groove you need to move the pusher a little.
- Using a special device, the valve is recessed downwards; in this case, you should hold the pusher with a flat-end screwdriver, inserting it not into the groove, thus preventing its arbitrary rotation.
- After fixing the pusher with tweezers, the washer is removed and another one of suitable thickness is installed in its place. On one side of each washer there is a special marking indicating the size. The washer change is completed, the screwdriver is removed, the valve is returned to its place, and the gap is measured using a feeler gauge.
Ideal valve adjustment on Kalina involves inserting the dipstick into the gaps with little force (within reason). After this, you need to turn the engine again by one revolution of the crankshaft pulley and carry out a control measurement of the gap. Thus, all clearances are checked and adjusted, with the obligatory rotation of the crankshaft before each measurement. After the operation, you need to fill the engine oil to the required level, you will also need to replace the Kalina valve cover gasket, and then secure the valve cover and timing drive with fasteners.
The operation, if you look at it, is simple. You must strictly follow the step-by-step instructions, and even a beginner can handle this procedure.
Correct adjustment is immediately noticeable: the gas distribution mechanism works smoothly, the engine does not make noise, which means the car’s “heart health” is in order. At least for the next 50–60,000 kilometers, thermal gaps will not have a negative impact and no additional work will be required. And they will certainly be the result of incorrect or untimely adjustment.
| The valve will begin to heat up. | Thermal expansion is not compensated by the gap, and the plate will begin to fly out of the mounting location. |
| There is a decrease in compression. | The answer is a reduction in power. |
| Heat removal is not carried out in normal mode. | There is a negative impact on the operation of the catalyst. |
| During combustion of the air-fuel mixture, part of the burning composition goes into the exhaust manifold. | Thus, the plate and chamfer are destroyed faster. |
The procedure for adjusting valves on a Lada Kalina engine with eight valves
The required gap between the shims and the camshaft should be 0.15-0.25mm for the intake group and 0.30-0.40mm for the exhaust group. Valve counting starts from the camshaft pulley.
First we adjust the pair: the first exhaust – the third inlet.
Then the fifth graduation - the second intake.
Then the eighth graduation - the sixth intake.
Latest: fourth graduation – seventh induction.
After adjustment, pour oil into the cylinder head and install a new gasket, replace the valve cover and timing belt cover.
Required tool:
- tweezers;
- set of probes;
- device for adjusting gaps;
- oil syringe;
As can be seen from the above, adjusting the valves of the Kalina Lada does not seem to be a difficult task. Following these instructions, any unprepared car enthusiast can perform it.
If the work is carried out correctly and the adjustment procedure is followed, the gas distribution mechanism of the car will work properly without causing any trouble.
The issue with adjusting thermal clearances is a classic one: everyone should be able to change the washers on the pushrods of an 8-valve valve. But there is “bad advice” that applies to the VAZ-21116 engine: they say that for exhaust valves it is better to make the gap equal to 0.40, and let the tolerance be 0.05 mm. In fact, the requirements have not changed since the 11183 engine: the average numbers should be 0.20 and 0.35. Following “bad advice”, you get one thing - the engine “knocks” when cold. And this is for a value of 0.40! You still need to be able to set it, but it may turn out to be 0.45... And then our adjustment will kill 4 of the 8 valves on the Lada Kalina. We are talking about the Kalina 2 family, where the only 8-valve engine was the 21116 engine.
The following is a video where valve knocking is recorded.
Replacing the Kalina Cylinder Head Gasket Do-It-Yourself
When and how to properly grind valves?
Replace the head gasket on the balloons on Kalina
Russian-made cars cannot be as reliable as foreign cars, and in order to save on their maintenance, motorists have to perform many tasks themselves. Self-replacing cylinder head VAZ 2112 16 cl. Replacing the cylinder head gasket step by step: what. Replacing the Gasket Cylinder Cover Guelder-rose 8 valves can be DIYed and you don't need to be a top auto mechanic.
There is no weakness in the design of the cylinder head gasket for an 8-cell engine. However, even with careful monitoring of the vehicle, it may be necessary to replace it. DIY guru repair of Ford Focus 2 Replacing the Ford Gur pump Ford Focus 2 The power steering for the Ford Focus is an integral part of the control unit. This can be done without the help of others, but if you are hesitant and want to do this work for the first time, then invite a friend who has similar experience (replacing the pad) Cylinder cover) Be sure to carefully read our material and you will definitely succeed. Tell me right away what replacing the cylinder head gasket is. Kalina devices with 8 and 16 cells are very similar, but there are some nuances in tightening the cylinder head bolts. Replacement of the cylinder head gasket. Replacement of the ZMZ 409 cylinder head gasket. Clutch assembly of the milking unit AD-01 UAZ. Correct oil change in a Volvo/automatic transmission or how not to kill an automatic transmission with your own hands. Volvo's coveted premium channel. So be careful.
When is the time to change?
Replacement of the cylinder head gasket may be required if:
- a lubricant leak was detected;
- burner pads;
All steps for adjusting valves inside and out
First, taking a Phillips screwdriver, loosen the clamps on the three supply hoses. These hoses are connected to the cylinder head cover. Each clamp is clamped with a Phillips screw (see photo).
We remove everything unnecessary
After disconnecting all the hoses, you can remove the receiver mounting bracket. You will need a 10mm socket wrench to unscrew the three nuts.
The second extra part is the bracket
If even the studs are turned out, it doesn’t matter, they can be screwed back in. Use the same “10” wrench to unscrew the nuts on the cover.
Articles and regulations
When installing the cylinder head cover, it is recommended to replace the rubber gasket. Its article number is 21080-1003270-1 0. The last numbers may differ:
- 11 – BRT manufacturer (Balakovo);
- 12 – ELRING;
- 14 – CJSC VRT (Volzhsk).
All adjustment devices are universal. They don't have articles.
The pressure device can be replaced with a screwdriver. The latch is also a screwdriver, only a thin one. The interval between adjustments is 30 thousand km. Good luck!
Engine types
The first Lada Kalina cars received a 1.6-liter power unit and a timing belt with 8 valves. On these models, periodic adjustment of valve clearances is necessary. Later, the manufacturer offered a car with a 1.4-liter engine capacity and 16 valves, the clearances of which practically do not need to be adjusted. The next design option is a car with a 1.6 liter engine and a timing belt with 8 valves, which need to be adjusted periodically. And the “hit” model is the Lada Kalina with 16 valves and a 1.6 liter power plant. Here, adjustment is required very rarely: but if the timing belt breaks, the valves will bend.
Process Features
Lada Kalina of the first and second generations differ not only in appearance, but also in the engine. The adjustment is also, albeit slightly, different. It is only needed on an engine with 8 valves, the design of which has not changed, so there is no difference in the procedure for installing thermal clearances on the first and second generations. On engines with 16 valves, this process does not make sense, since from the factory the design includes hydraulic compensators that maintain the optimal clearance without additional intervention.
Adjusting valve clearances
It is carried out only on a cold engine: the optimal ambient temperature is +20 degrees. Prepare in advance:
- narrow nose pliers;
- flat screwdriver;
- heads;
- oil removal syringe;
- tweezers;
- valve desiccant (device);
- probe (0.2 and 0.35 mm);
- adjusting washers.
Remove the bolts securing the valve cover, remove it and remove the spark plugs. At the same time, inspect the camshaft cams to make sure there is no wear. Next, use a syringe to remove the oil from the head. Attach a valve recess tool to the studs. Next steps:
- Rotate the crankshaft and ensure that the marks on the timing cover and the pulley match. Next, rotate the shaft another three pulley teeth.
- Use a 0.2 mm (intake) and 0.35 mm (exhaust) feeler gauge to check the clearances. For reference, to determine which are the intake and exhaust valves, count from left to right: exhaust-intake, intake-exhaust, and so on. The adjusting washers must be replaced when the dipstick passes easily. To do this, lower the valve down using the tool, while simultaneously holding the pusher from turning with a flat-head screwdriver.
- Secure the pusher at the bottom and use tweezers to remove the old washer and install a suitable new one.
- Remove the retainer and check the gap again: the feeler gauge should pass with little effort.
Adjustment order: 1 outlet - 2 inlet, 5 outlet - 2 inlet, 8 outlet - 6 inlet, 4 outlet - 7 inlet.