Articles
- 2 Causes of noise
- 3 Distribution methods
- 4 Consider the materials
- 5 Procedure for performing the operation
5.1 Moving on to the doors
Soundproofing grant doors for better music sound
Soundproofing Lada Granta doors is an operation that anyone can do independently and without any difficulties. As you know, noise is a disturbing, annoying and completely unnecessary thing in the interior of a car. Soundproofing the entire car is the solution to this problem, but it’s up to you to decide whether to overpay for this service at a service station or do it yourself.
What is the danger of noise?
The basic configuration of the Lada Granta car has everything you need, but the level of comfort of the vehicle is average. Unnecessary sounds can be removed only through comprehensive sound insulation. It will give the following results:
- will reduce the negative impact of noise on some organs;
- will allow the driver to clearly react to situations on the roads and quickly take the necessary actions;
- will protect against the development of dangerous diseases, including mental ones (high noise levels negatively affect the nervous system).
For example, a large number of unpleasant sounds leads to a narrowing of the lumen of blood vessels, activates the work of the heart muscle, causes a sharp jump in blood pressure, angina pectoris. Therefore, noise becomes a source of chronic stress.
Causes of increased noise
Soundproofing of Grant doors is done to eliminate all types of noise:
- Intermittent - they are created by a faulty heater motor, less often cooling or air conditioning.
- Constant - here we are talking about external noise that enters the cabin from the outside, causing problems with the suspension, tires, and transmission.
- Pulse ones are creaks, knocks, clicks.
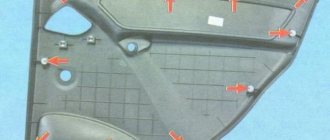
It is impossible to exclude sources of noise, but it is possible to minimize their negative manifestations. To do this, it is enough to soundproof Grant's doors according to the diagram below.
Distribution methods
Soundproofing Granta doors, if done correctly, will remove all unnecessary noise. It is necessary to work comprehensively, since there are many channels for the penetration of extraneous sounds into the cabin. The first method of noise transmission is airborne. The volume in this case depends on the presence of obstacles on the way - if there are many of them, the intensity of the waves will be low, and vice versa.
The structural diagram of noise progression involves the transmission of waves to various body parts that generate vibrations. Metals transmit vibration effects best.
When soundproofing the doors of Grant's cars, two types of materials need to be used - sound absorbers will eliminate noise transmitted through the air, and vibration absorbers will cope with vibrations.
Lada Granta Liftback Silver Bullet › Logbook › Soundproofing doors, cheap and cheerful
I think every car owner would like to increase the comfort of his iron friend, to create an isolated and calm little world in the cabin. At the same time, few people want to spend serious amounts of money, especially if it is a budget car. Acoustic comfort is one of the most important factors. The simplest, most effective and not too expensive way to improve the situation is soundproofing doors. It is through the doors that most of the noise penetrates into the interior; work on the mechanical adjustment of this part of the body is quite simple and does not require disassembling most of the interior - only the door cards are removed, and as a bonus to silence we get a significantly improved sound of the audio system even with standard components. In general, it is from the doors that you should start soundproofing your iron friend.
Of course, first of all we remove the plastic door trims. There a surprise awaits us in the form of factory vibration insulation on the outer sheet of metal; it is good to remove it, as it may not be glued well and corrosion will begin under it. In my case, it was glued very well, but once I started, I had to finish it. This is where I suffered. In the end, I found a simple method with which things went like clockwork: we warm up the inner cavity of the door with a gun and scrape off the hot vibration insulation with a wide plastic spatula from a kit for removing trims. We clean the residue with a rag and diesel fuel, degrease it and begin gluing the vibration insulation.
We cut out pieces of the desired shape and preheat them (I used a cardboard box and a heat gun for this).
We lightly press the heated sheets to the place of gluing and carefully roll them with a roller - the most important stage, it is necessary to prevent air bubbles under the vibration insulation so as not to rust and roll them tightly so that they do not come off.
The next step was to apply mastic to the joints between the vibration insulation and the metal, as well as to the places where moisture accumulated inside the door.
Next, we roll up the technological holes with 3mm vibroplast, 2mm sheets are used for the plastic door trim.
We cover the entire inside of the upholstery with bitoplast, and on the edges and other places where friction may occur and, as a result, creaking, we use madeleine.
You can wrap the wiring with the same madeleine - it will no longer jingle.
We put everything back together in reverse order and are happy with the result. In the car it becomes much the same, the doors acquire a pleasant heaviness, they close better, the sound of the audio system becomes deeper and clearer.
Source
Recommendations from manufacturers
Door insulation reduces external noise and increases vehicle comfort. When working with Granta doors, special attention should be paid to the clanking and ringing parts of window regulators and locks. They can be treated with special materials to eliminate the problem.
Work should begin by disassembling the interior - use plastic spatulas and clip lifters. You can replace the tool with regular screwdrivers. Cutting is done using a stationery knife or scissors; after application, the material is rolled using a metal roller.
The doors are treated in 4 layers. The first is a vibration isolator 2 mm thick. To increase work efficiency, the foil is rolled with a roller. The second layer is a sound absorber with a moisture-resistant sealant, the third covers the holes on the door body. The fourth, when soundproofing doors (cards, frames), Grant absorbs unnecessary sounds. Visually, it looks like a foam-like substance that is applied to the plastic door trim from the inside.
Preparing for work
Before starting work, you should prepare the car: remove door trims, protective films, remnants of old sound insulation or anti-corrosion coating. In general, there is no need to remove the window regulators and door locks. However, to ensure comfortable working conditions, it is recommended to do this. » alt=»»> The internal surfaces of the doors are cleaned of dirt and dust. Areas where rust is present are cleaned to bare metal. Taking into account the fact that such places are hidden from view, they can be treated with a rust converter and anti-corrosion mastic. Sound insulation cannot be installed on rusty areas.
Before installing sound insulation, all surfaces on which materials will be glued should be degreased with special compounds, gasoline or alcohol. Pasting begins only after the surfaces have completely dried.
Tools and materials
For vibration insulation of rear and front door areas, stp plates and other materials are used. A complete set of tools and raw materials for work includes:
- set of acoustic plugs;
- a couple of sheets of insulators 460*700 mm;
- bitoplast sheet 1000*700 mm;
- 50 cm corrugations for wires;
- 3 sheets of Visalis 460*700 mm;
- industrial dryer;
- degreaser;
- gloves;
- knife;
- screwdrivers;
- keys.
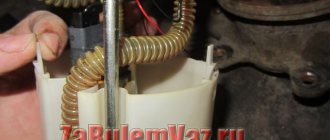
If the old vibration isolation pad is very worn, it is recommended to install a new one. Visalis is cut into equal pieces, the fragments are laid out in piles and heated using a hairdryer.
Lada Granta Liftback Mamomobil AS › Logbook › Light insulation grants up to the car level.
It was a weekend with bad weather, and I decided to stretch my hands by pumping the Shumka Grants to the level of a regular car.
Moreover, I had already done the roof earlier. ATTENTION!
This entry is not about complete thermal and noise insulation of 100,500 layers of the entire body.
But only a small update with minimal investment to the level of modern B class cars. And so, what is the difference between soundproofing grants and modern B-class cars, such as the same Koreans, or the same Vesta from the factory.
1. The rear arches do not contain any vibration.
Typically, in all modern cars, a small piece of vibration is applied to the rear wheel arch; it does not affect the weather, but it eliminates the splashing of water in the rain or the sound of pebbles hitting the arches, and slightly reduces the sound of rubber on asphalt by reducing the resonant vibrations of the metal.
2. The door trim, including the trunk door, does not contain any noise.
If we remove the door card of the Vesta, we will find a layer of synthetic padding on the plastic; for the Solaris, a piece of material similar to acoustic felt. This is all done for a reason; porous and fibrous materials absorb noise, such as the noise of wheels from the road and the whistle of the wind. In addition, the door card is insulated.
3. Vibration isolation of the bottom.
As a grant, vibration insulation was applied to the floor of the car from the factory. But under the driver’s feet, there is no vibration, apparently to contrast with more expensive cars of the brand. Because in West and XRAY everything is in place.
Because of all these, as I believe, specially made moments, the car is noisy in comparison with any other B-class cars. At the same time, the vibrations on other elements, for example on the interior doors, are sufficient; the doors do not ring like a bucket. The spare tire niche and trunk floor are also not poorly made. There is a thick layer of batting on the floor that adequately removes noise.
In general, I decided to remove the above-mentioned shortcomings in order to increase the acoustic comfort in the car to the level of budget competitors.
The budget was allocated in the amount of 1500 rubles, so let's try!
To do this you will need 4 small sheets of vibration insulation (600 rubles), 2 large sheets of bitoplast (900 rubles) and the remains of foam rubber and acoustic felt that I had in the garage, some glue and scissors.
1.
We start with the trunk, remove the trim, it’s not difficult to do, 4 self-tapping screws, one of which is very muddy, and is located behind the headlight cover at the top, so that whoever invented it there will crap. We pull off a piece of black plastic, and the filling appears before us. To my surprise, the trunk lining has about 1 cm of noise, something like batting. But there is no vibration on the arches. For comparison, here is a photo of a factory-selected Skoda Rapid Liftback. It can be seen that there are standard pieces of vibration on the arches. I also applied several pieces of vibration insulation, and also glued a piece of bioplastic onto the plastic, since I have padding polyester glued to my vest in these places.
Source
Vibration isolation
Vibration-absorbing materials (vibration for short) are applied to the iron parts of the body of a Grant or other car. The transmission, power unit, suspension elements - all this and uneven road surfaces, a certain air resistance, cause the parts to creak and make other sounds that are not particularly pleasant to the ear.
The operation of vibration is explained by the laws of physics, which determine the parameters of internal friction. As a result, the vibration energy is converted into heat. The basis of the compositions is mastic or bitumen.
Application rules
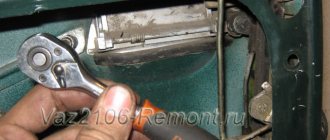
To remove interior parts, all visible screws are unscrewed. The element is pryed off from one edge and then along the entire perimeter to snap off the plastic or metal clips. To remove load-bearing elements such as seats or seat belts, you have to use wrenches and sockets. The surface to be treated is thoroughly cleaned of dirt and anti-corrosion coatings, dried and degreased.
Many people strive to cover the entire surface of the metal with vibration insulation. This is a pointless waste of time and expensive material. It is necessary to paste over extended flat surfaces that are capable of resonating. By default, 70% of the surface is covered. Never seal service or ventilation openings. They allow moisture to escape and air to circulate. The plugs must be left open; they will be needed to perform technological operations.
It is always better to cover a smaller area, but with thicker material. An exception must be made for vertical and ceiling surfaces. There, material that is too thick may not adhere well. Horizontal surfaces are covered with vibration insulation with a thickness of about 4 mm, for vertical and ceiling surfaces - 1.5-2.5 mm. Thin steel surfaces, being weighted by an amorphous material that does not have its own rigidity, cease to resonate.
After removing the protective film or paper, the vibration insulation is carefully pressed against the metal from the middle to the edges and rolled with a roller. It is imperative to get all the air out from under it. In most cases, porous sound insulation sheets are glued over vibration insulation and bare metal. Such technology should be treated as a necessary measure. On surfaces with complex terrain, a fairly thick material is springy and does not hold well, blocking drainage and circulation holes.
Cutting them out is a dubious matter. For Shumka, continuity of coverage is key. It is better to glue Shumka onto mats, factory soundproofing mats or plastic cladding. An example would be the trunk area. Shumka glued to the raised floor will give a better effect and will be cheaper than a continuous pasting of the spare wheel niche and the sides around it.
For the most part, they use Shumka with a thickness of 6-8 mm. On surfaces with complex terrain you have to go to 4 or even 2 mm. Sometimes it is necessary to glue 2-3 layers of thin insulation, since thicker ones spring back and come off.
The sealant is glued along the joints of mating parts to prevent mutual friction and beating. They can be used to wrap rods and bundles of wires. Clamps provide additional fixation of the wiring. There is no need to get rid of factory sound insulation. You've already paid for it, and it does its part to suppress noise. Reassembling the interior is done in the reverse order. It is convenient to use mastic to treat arches. It can be applied to the surface under the fender liners in 2-3 layers. This increases the corrosion resistance of the metal.
How to apply correctly
Soundproofing of Grant doors is done in stages, first one part of the car is treated, and then all the rest.
The first stage is door processing. It can be the only one or the main one - noise on the doors is required, but it alone will not be enough to achieve optimal performance. The treated door space will make a good enclosure for the speaker. Work options:
- processing of the door card, outer panel;
- sheathing with dense thick materials;
- The standard scheme is the most popular.
When performing work using standard technology you need to:
- Provide access to work surfaces that will be soundproofed.
- Prepare surfaces for applying sound insulators - first of all, degrease and clean.
- Cover the panel with a vibrating layer of materials.
- Place an air absorber on top to serve as a heat insulator.
- Treat the frame with or without sealing the holes. The first option is preferable, but not always possible. Cover the holes with materials from the “Viek” set, cutting them according to the shape and size of the windows.
- Treat the door trim, coat the joints with sealant or hot melt adhesive. When choosing a composition, it is not so much the price that is important, but the characteristics and their compliance with the specified parameters.
To eliminate vibrations, it is recommended to use Bimast or Vibroplast M1 plates. Ideal sound absorbers - Accent and Splen. It is better to lay the material overlapping in horizontal stripes - this will increase the degree of rigidity of the working panel.
Installation of sound insulation
In the maximum version, the first layer of vibration insulation is glued to the inner surface of the outer layer of the door. It is recommended to glue the material in long strips, with a slight overlap on each other. The entire accessible surface is glued.
The second layer is a sound absorber. It should be installed in the widest possible layers. The result is a two-layer coating that dampens vibration and traps sound waves.
For better insulation, the inner layer of the door is treated in the same way. In this case, the technological holes in the doors are sealed with special aluminum foil, on top of which layers of material are applied. When carrying out processing, you should take into account the trajectory of the lock’s cables and drives.
The door trim itself is also treated. All its joints must be filled with sealant. Afterwards, the inner surface of the skin is glued with a noise-absorbing coating. This allows you to avoid squeaks from the trim itself, which sometimes occur on budget models of cars.
Comparison of treatment zones
When soundproofing Granta doors, a number of points need to be taken into account. Basic:
- the side parts of the body are processed in a similar way to the doors;
- Hard, not soft, slabs are laid on the floor - Bimast is the best option;
- Shumka can be of 3 types, as is the case with doors;
- the partitions of the engine compartment and wheel arches are covered with Barrier-type materials; ordinary vibrations are powerless in this case;
- The ceiling is usually large, the metal on it is thin - Vizomat is used for sound insulation.
You need to work with the ceiling carefully so as not to get the opposite effect. Be sure to improve the rigidity of the panel by gluing B-polystyrene strips or a special profile.
Do-it-yourself surgery technique
As you know, sound insulation on Grant is carried out in stages. First one part of the car is processed, then the others.
Doors
How to properly soundproof Granta doors
As a rule, the soundproofing process begins with the doors. Some, after completing the “noise” of the doors, stop there and do not continue, others carry out complete sound insulation. If you treat only the doors, this will be called partial sound insulation, but it gives a good result, especially in terms of improving acoustic properties.
Note. Thus, the doors of Lada Grants often become the location for installing the front speaker. And in this regard, this part of the car must first of all be soundproofed. The untreated door itself makes a poor speaker enclosure. On the other hand, a well and correctly processed door does not “sing along” with the dynamics, but is “silent”.
Options for “shumming” doors, in turn, can also be different:
- The minimum option, when only the outer panel and door card are processed with materials;
- Standard version, which will be described in detail below;
- The maximum version of execution, which is of more competitive interest. More dense and thick materials are used here.
Technology for soundproofing doors Grants according to the “Standard” version
Here's what to consider:
- First we need to provide access to the surfaces that we will soundproof;
- Then you need to prepare these same surfaces for applying sound insulation materials, which means cleaning and degreasing them.
Processing begins with the door panel:
- First, it is covered with “vibro”;
- Then a sound absorber is placed on top, which simultaneously serves as a heat insulator.
Note. It is recommended to use “Vibroplast M1” or “Bimast” as a “vibro”. As for the sound absorber, “Spleen” or “Accent” will do an excellent job with this role. On the other hand, with the release of new materials, such as Gold and Silver, doors can be processed with them. It will also be useful to know that it is better to lay the “vibro” overlapping (not completely) in horizontal stripes to increase the rigidity of the panel.
The next process involves processing the door frame:
- The frame can be processed with or without sealing the holes. The first method looks more preferable, but it is not always possible to implement and it is not always suitable;
- It is advisable to cover the holes with material from the Viek kit. It must be cut to the size and shape of the windows and pasted over (the material consists of aluminum foil and an adhesive base).
Note. You need to know that after gluing the material, the latter must form, together with the door frame, one single surface, smooth and without protrusions.
It will also be useful to know that it is necessary to ensure the functionality of the rods and cables located inside the door.
Doors and their sound insulation
Next we move on to the “vibro” pasting:
- You can use either “Vibroplast M1” or “Bimast”;
- We make sure that we get a surface consisting of 2 solid sheets of metal, between which a vibration-absorbing layer is installed.
Go ahead:
- Now we need to process the door trim;
- It is advisable to seal the joints of its parts with sealant or some kind of hot-melt adhesive;
- In some areas, such as pockets and other flat surfaces, it is recommended to install Vibroplast M1;
- We cover the entire surface of the casing from the inside with “Bitoplast 5” or other cushioning material.
Note. Again, do not forget about the wires and rods located on the mating parts.
Processing of other parts of Grants
Here's what you need to know:
- The side parts of the Lada Granta car body are processed in a similar way;
- The floor is treated with hard materials, not soft ones. The heavy Bimast looks more preferable;
- As with the processing of doors, the “noise” of other parts of the car can imply three options. And the standard option looks more preferable;
- It is advisable to cover the engine compartment partitions and wheel arches with “Barrier” type material. Conventional “vibrations” in these parts of the car may not provide the desired effect of eliminating noise;
- The Granta's ceiling, as a rule, has a larger area than the rest of the car. The metal in this area is thinner. For this reason, it is recommended to glue “Visomat PB” here.
Note. In addition, there is a possibility of getting the opposite effect after “shuttering” the ceiling, which is explained by not taking into account the added mass in relation to the hardness of the surface. In order to avoid this, it is recommended to increase the rigidity of the panel by treating it with strips of B-polystyrene or some special profile.
- After the “vibro” layer, “Spleen” is glued to the ceiling;
- The “noise” of the luggage compartment and engine compartment completes the soundproofing procedure for the Lada Granta.
How to improve sound insulation in the Lada Granta
Video review and photos - materials will only help consolidate the information. When working with your own hands, it is recommended to look at the instructions more often. As a rule, the price of materials for the “Shumka” Grants is not so high, which allows you to save a lot of money.
- Author: Grigory Romanchuk
Grigory adored cars since childhood, and in his teens, when he independently connected the car radio in his father’s nine, he realized that cars would be his job, hobby, calling. Rate this article: (5 votes, average: 3.2 out of 5)