Symptoms
To understand that the valves on the VAZ 2110 engine need adjustment, it is enough to know the behavior of the engine.
After prolonged use, the car owner may notice that the engine has begun to work somehow differently. This fact should alert you, because the consequences can be serious. The main symptoms of a faulty valve mechanism adjustment on a VAZ 2110 look like this:
- the engine is noisy when starting up after a long period of parking (clacks);
- compression in the cylinders disappears (the engine loses its former power);
- Valve cover gasket leaks oil;
- “shots” appeared in the carburetor or muffler;
- fuel consumption has increased.
The listed signs can be diagnosed independently, without resorting to the services of a car service. Before you put the VAZ 2110 in for repairs and begin adjusting the valves, you should prepare a mechanic’s tool: a micrometer, a rack for pressing the pushers and a multi-part feeler gauge. The last thing to measure is the thermal gap between the camshaft cam and the adjusting washer. Instead of a rack, it is possible to use two powerful slotted screwdrivers. An installation kit (clamp and probe) is sold in most Auto Parts stores. Its cost varies from 200 to 500 rubles. Correct installation of valves on a VAZ 2110 8 valve injector or carburetor is the key to success.
Setting rules
Every car owner can refer to the manual regulations. It is worth saying that the nominal installation of valves on the VAZ 2110 8-valve injector occurs at the factory. According to the operating instructions, it is recommended to carry out the first adjustment at 10,000 km. This mode is called running-in. And then, adjustments should be made every 45,000 km. In some cases, engines operate properly up to 80,000 km.
For reference! The installation of valve pusher washers on VAZ 2110-12 vehicles (8 valves), with injection and carburetor engines, is completely identical.
Reasons for replacement
As mentioned above, the reason for replacing the valves may be a broken timing belt, but this is not always the only reason. Often the valves need to be replaced due to the motor chain jumping. When this happens, the valves simply turn out and it is clear that their further operation becomes impossible. After this, the valves look like this:
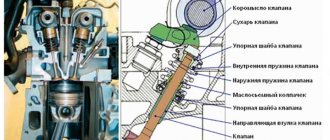
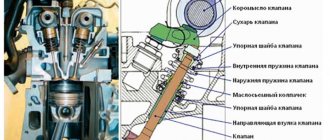
Replacing valve guides for VAZ 2110
In addition, the valves themselves may wear out. More precisely, it is the valve stem, which has a certain size, that is subject to wear. The leg is specially measured with a micrometer to check compliance with the standards. So, if the valve stem has a size that is less than 7.97 mm, then this is wear and tear and such a valve should be sent to the trash bin. Finally, a burnout or crack in the plate itself may cause the valves to be replaced.
Replacing valve guides on a VAZ 2110
Valve adjustment frequency
After using the car for a long time, its owner may notice that the engine is no longer performing as well as it was before. In principle, all changes in engine operation should always alert the driver, since this is often fraught with quite serious consequences. In most cases, adjustment of the VAZ-2110 valves (8 valves) is required if the following symptoms are present:
- excessive noise when starting the engine after the car has been idle for a long time;
- lack of compression in the cylinders (a noticeable decrease in engine power);
- oil leaks through the cover gasket;
- regular “shots” in the muffler or carburetor;
- increased fuel consumption.
It is not necessary to go to a specialized car service in order to diagnose the above problems.
Symptoms of problems
So, the need for intervention is indicated by the following signs:
- You can hear the valves knocking;
- Compression in the engine drops, it, as they say, “does not hold up”;
- Oil “drives” from under the valve cover;
- The engine response decreases, it pulls poorly;
- “Shots” are heard through the muffler;
- The carburetor “sneezes”;
- Fuel consumption increases.
All of the listed symptoms can arise both for other reasons and “thanks to” poorly adjusted valves of the VAZ 2110. In order for them to close tightly and not knock, they need to be “brought back to normal.”
Preparatory stage
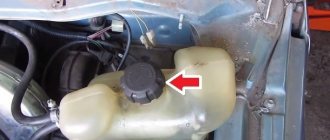
It starts with turning off the on-board power supply to the car, for which the terminals are removed from the battery and it is necessary to drain the old engine oil into a prepared container through a service plug and coolant from the engine crankcase, this is done by disconnecting the lowest radiator pipe from the cylinder block, the only precaution is Carrying out the procedure on a cooled engine, otherwise you can get your hands burned!
Spare parts and tools for work
Before starting work on replacing valves on a VAZ 2110, high-quality new parts are purchased, the names and original articles of which are as follows:
- Set of gaskets: valve cover (art. 2108-1003270/77) and cylinder head (art. 21083-1003020), intake and exhaust manifolds (set art. 21083-1008081), exhaust gas intake pipe (art. 2103-1203020-04) , as well as an oil seal (art. 2108-1005034) and oil flinger rings (art. 2108-1007026-86) (the so-called cylinder head repair kit)
- New valves for the fuel mixture intake system 4 pcs. (art. 21083-1007010)
- New exhaust system valves 4 pcs. (art. 2108-1007012)
- Valve guides 8 pcs. (art. 2108-1007032-87)
- Engine coolant
- New bolts securing the cylinder head to the cylinder block (art. 2108-1003271Н/О)
- Timing belt (art. 2108-1006040-86) and generator drive belt (art. 1000012562)
- Engine oil and oil filter
Repairs to replace worn-out parts are carried out using a standard set of tools, which are usually sold as a set, namely:
- a set of open-end wrenches marked from 8 to 21 mm;
- set of internal hex keys;
- a set of sockets with a diameter from 8 to 24 mm;
- valve desiccant;
- screw valve guide puller;
- torque wrench (needed for proper tightening of the camshaft, cylinder head and camshaft gear bolts);
- Screwdriver Set;
- electric drill;
- specialized lapping paste of two types (for rough lapping of valves to their working surface of the combustion chamber and for finishing grinding);
- gloves to protect hands from possible damage.
This is interesting: What are cylinder misfires, as well as the reasons for their occurrence?
The presence of tools, parts and a covered room will allow you to carry out troubleshooting work yourself, since the price of replacing 8 valves on a VAZ 2110 in non-certified services in the fall of 2021 varies from 30 up to 45 thousand rubles. At a certified service station of official dealers, such work will cost more than 50 thousand, which will greatly affect the financial situation of the car owner.
Valve adjustment instructions
- Open the hood. We find the bracket with the throttle valve drive cable. We remove its tip and use a 10mm wrench to unscrew the two fastening nuts.
- Then remove the bracket.
- Using a Phillips screwdriver, loosen the clamp and disconnect the crankcase ventilation outlet hose from the valve cover fitting.
- Using the same screwdriver, loosen the clamp and remove the crankcase ventilation supply hose.
- The valve cover is secured with two nuts. Unscrew them.
- Having unscrewed them, we remove our cylinder head cover.
- Be careful, there are rubber seals (fungi) in the holes of the valve cover, do not lose them.
- After this, remove the valve cover gasket. If it was placed on the sealant, then carefully clean it from the surface to prevent chips from getting inside the valve mechanism.
- Next, you will need to remove the front timing cover and install the first cylinder at TDC. To do this, align the marks on the camshaft pulley and the rear timing belt cover.
- Now we turn the crankshaft another 40-50 degrees, which corresponds to 2.5-3 teeth on the camshaft pulley. In this position, using a set of feeler gauges, we measure the gaps at the first and third camshaft cams. The gap at the intake valve should be 0.20 mm, at the exhaust valve - 0.35 mm with an error of 0.05 mm.
- If the gap does not fit within the norm, then install a device on the studs of the camshaft bearing housings to adjust them.
- We insert the “fang” of the device between the pusher and the cam.
- After this, we unfold the pusher with a slot in its upper part forward in the direction of movement of the car and, pressing the lever of the device, install a clamp between the edge of the pusher and the camshaft that will hold the pusher in the lower position.
- Fixing the valve pusher is clearly shown in this figure.
- Now we raise the lever, holding the valve pusher with a device.
- Using tweezers, remove the adjusting washer from the pusher and install a new one, which will fit within the thermal clearance standards.
- If you suddenly don’t have a device at hand, then you can try adjusting the valves on a VAZ 2110 without tools. To do this, you will need two powerful screwdrivers (one with a tip of at least 10 mm). Using one screwdriver, leaning on the cam, press the pusher down. By inserting the tip of another screwdriver between the edge of the pusher and the camshaft, we fix the first one.
- And using tweezers, remove the adjusting washer.
