A special filter is used to filter the air entering the cabin. During the operation of the VAZ 2110, gradual contamination and clogging of the consumables occurs.
To restore normal air flow into the cabin, the filter element requires replacement. Installing a new consumable is not a very labor-intensive process, so it is easy to do it yourself.
Changing the cabin filter on a VAZ-2110 with your own hands
A cabin filter is found in almost every modern car. The VAZ-2110 is no exception. Another name for this filter element is a stove or heater filter. Some car enthusiasts not only do not change cabin filters, but do not even know where it is located. This is a fundamentally wrong approach, since air enters the cabin through this device.
Replacement frequency
The service life of the cabin filter is directly related to the operating conditions of the VAZ 2111, and therefore does not have any strict intervals. On average, the frequency of installation of a new consumable is in the range of 12-17 thousand km. However, there are a number of factors that may cause replacement to be required sooner. These include:
- increased dustiness of the roads on which the vehicle travels;
- there is abundant flowering of plants;
- the car often moves in dense city traffic or is stuck in traffic jams;
- there is sand and other small particles in the surrounding air;
- The route runs near a plant that emits harmful substances.
Location of the cabin filter on the VAZ-2110
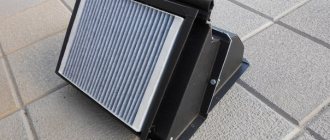
On a car, the cabin filter is located under the windshield on the passenger side.
The cabin filter is hidden under this decorative grille.
On models produced since 2003, this element is located horizontally, but before 2003 it was located vertically. At the same time, these consumables are not interchangeable, so when purchasing, be sure to specify which filter is needed.
In order to find this element on the car, you should carry out the following manipulations:
- Open the hood.
- Find the protective grille on the passenger side.
- This is where this filter element is located.
Replacing an old style filter
Now let’s figure out how to change the cabin filter of the VAZ-2110.
First, we will describe the process of replacing this element on cars manufactured before 2003.
To complete the work, you will need a socket and a 10mm wrench, a wrench, a Phillips and flat-head screwdriver.
The car's hood opens. There is a plastic decorative panel installed near the windshield, so you need to unscrew it and then move it to the side.
It is held in place along the edges by 10 bolts, and further along the entire length with self-tapping screws. The bolts and screws are unscrewed and the panel is removed from its place.
Under this panel there is another one, the popular name of which is “jabot”.
To remove the frill, you will need to turn the wipers.
You will also need to unscrew the frill fastening screws, which are located near the windshield under the plastic plugs.
The plugs are pryed off with a flat screwdriver and removed, then the screws are unscrewed.
There is no need to remove the pipelines of the windshield washer system, just move the frill slightly towards the engine.
After this you will be able to get to the filter. It is located on the left side inside the ventilation system and can be reached through a volumetric opening.
A hand is inserted into this hole, the used element is taken by the edge from the interior side and turned towards itself to release it from its seat, and then it is removed through the hole.
The new filter is inserted into the hole, installed with one edge into the seat, then moving away from you, the other edge is installed.
Next, the element is adjusted so that it fits tightly into place.
It is important to ensure that the cleaning element is on the correct side; for this purpose, marks are placed on its ends indicating how it should be positioned.
Next, the frill, wipers and decorative panel are put in place and secured.
How to determine if the filter needs replacing
Dust flying out of the air ducts indicates the terrible condition of the cabin filter.
The cabin filter needs to be changed periodically. If, when purchasing a car, it is not known when the previous owner changed the filter, it is better to replace it immediately, since it is inexpensive. If you don’t want to spend even a little money, you can make a list when replacement is necessary:
- If the air inside the car has acquired a damp smell.
- Along with the air, a large amount of dust begins to fly out of the ventilation holes.
- The filter membrane has become dirty, which is immediately noticeable by its grayness.
Car manufacturers recommend replacing this element based on the total mileage. For the city, this figure is equal to 10–15 thousand mileage, for rural areas – up to 25 thousand.
Signs of a clogged cabin filter
The task of any air filter is to clean the air from all unnecessary impurities. In the case of a salon, this is:
- dust;
- microorganisms;
- plant pollen;
- foul odors;
- gases, etc.
Drivers suffering from allergic diseases should take timely replacement of the cabin filter very seriously. So, you can change the element twice a year: at the end of spring and at the beginning of winter.
When buying a car second-hand, the driver should replace the cabin filter immediately, without waiting for signs or kilometers traveled. Finding out when the seller changed consumables is sometimes difficult.
Many car owners are sometimes careless about replacing the interior air purifier. Both they and the passengers suffer from this. In addition to the regulations and established deadlines, there are a number of signs indicating the need to replace the cabin filter in the VAZ 2110:
- poor performance of the ventilation system, which becomes worse over time;
- There are constantly unpleasant odors in the cabin, the stench intensifies when the ventilation is turned on;
- in winter the stove does not heat sufficiently, and in summer the air conditioner does not cool to the required temperature;
- The windows in the cabin sweat more often, and a dirty coating forms.
Does the filter need to be changed or can it be cleaned? It depends on what product we are talking about, as well as what material it is made of.
Conventionally, all filters are divided into 3 main types:
- paper based;
- synthetic;
- coal.
Paper ones are inexpensive, accessible, and can be cleaned with a strong air flow. Car owners do this using a vacuum cleaner with a small brush. Washing is not recommended, as the product will completely lose its functionality and shape.
Synthetic ones are higher in price and have a longer service life. To extend its service life, it is necessary to remove large contaminants using a vacuum cleaner. Next, handling the product carefully, you can wash it in warm water with a foaming agent. After the manipulations, rinse the product with running water and let it dry completely. You will slightly, but in this way, be able to extend the service life of the element.
Carbon filters are the highest quality cabin filters. They not only prevent large and small debris from entering the car interior, but also retain and neutralize harmful mixtures, toxins and gases. Prevents unpleasant odors from entering the interior. It is not recommended to wash this product, as this will wash away the activated carbon particles and the product will lose its original cleaning ability. Cleaning is done by blowing the element with a stream of compressed air.
If the driver does not pay attention to the signs of the need for replacement and ignores them, he will inevitably face breakdowns and unnecessary waste of money.
What types of damage can occur due to a clogged filter?
A driver whose car has a climate control system will have to deal with serious damage. Continuing to drive with a clogged filter, the driver will spend money on upcoming repairs and here's why. As a result of deterioration in the operation of the air system due to a clogged purifier, the evaporator radiator fails (due to freezing). Subsequently, the frozen dirt will thaw, which will provoke unpleasant odors in the car interior and the development of microbes (negatively affecting health, especially in people with respiratory diseases).
Once the problem starts, replacing the filter will not help. The dust and dirt that the cleaner missed reached the stove and air conditioner. Therefore, the car owner must dismantle the evaporator and repair it, or take it to a service station and carry out repair work there. But the second option costs much more.
Types of filters
Carbon filter.
Cabin filters come in simple and carbon types. Currently, it is not recommended to install simple filters that do not contain carbon, as it absorbs unpleasant odors. As for the choice, it is quite wide. The main thing is not to forget to mention in the store what kind of filter is needed. Cars before 2003 need one filter, and cars after 2003 need another.
Articles
The most popular elements are those with the following article number:
- 21110-8122021-83. This modification is suitable for VAZ-2110 after 2003 release.
- NF-6001c "Nevsky Filter". This filter can be installed on cars up to 2003.
Changing the new cabin filter
Cabin filter cleaning, rinsing, replacement.
Is it possible to wash the cabin filter? Replacing the cabin filter of a VAZ 2110 injector of a new type is fundamentally the same simple procedure, but there are small differences that are worth mentioning. The fact is that here the filter element is installed not vertically, but horizontally, and this is an obvious design flaw: while protecting the interior from dust, the filter is not able to provide protection from water ingress - for example, in rain. In other words, in wet weather, the windows in the car will quickly fog up, and along with moisture, the honeycombs will quickly become clogged with dirt, which will impair the effectiveness of dust removal.
The dismantling itself is just as simple: remove the frill, unscrew the casing, and gain access to the filter element. When we install a new filter, we need to make sure that the air flow direction corresponds to what is indicated on the label. Experienced motorists also advise to improve the design a little: instead of the original frill, install an analogue from Priora - with it there is much less hassle, and accordingly, the operation itself will take place many times faster.
More about upgrading the new cabin filter
Many car owners complain that when installing a new filter, problems often arise with the tightness of the connections. How to change the cabin filter on a VAZ-2110 to avoid the entry of polluted air through such leaks? Since we are talking about the VAZ family, there are a huge number of options for improving the design, and due to the cheapness of the components, it will not be difficult to try many of them in order to settle on the most acceptable method. Gaps and cracks that arise due to imperfections in the design and non-compliance with the geometry of the final product can be sealed with suitable available material. Some manage to use plasticine, others use rubber pads, and still others use regular foam rubber. The main thing is that the access of air into the cabin outside the filter element itself is closed.
If the product’s manufacturing material does not have moisture-proof characteristics, then you can protect the VAZ 2110 cabin filter from water yourself. To do this, just replace the standard removable casing with a plastic one cut from an ordinary bottle. Fine mesh nets will provide protection from plants, insects, and dirt (even nylon from tights or stockings will do). This modernization looks like a “partisan” approach, but it is effective and will provide the new type of filter element with a long life with excellent filtering characteristics.
Of course, such folk methods of improving the products of the domestic automobile industry are a direct hint at its inferiority or even insolvency - AvtoVAZ designers are well aware of all the shortcomings, but for some reason they do not strive to get rid of them. It’s good that the aphorism “need for invention is cunning” still works in our country.
Removing the cabin filter on a VAZ-2110
To replace the filter, do the following:
- First you need to remove the windshield wipers. To do this, you need to unscrew a nut on each device. After this, you need to pull the wipers up and remove first one, then the second.
We turn off the wipers with a key of 10.
- The next step is to remove the decorative caps that cover the screws of the wind decorative grille.
Remove the plugs and unscrew the 4 Phillips screws.
- First you need to unscrew all the screws of the grille, then unscrew the two nuts securing the grille at the bottom.
We unscrew the screws securing the heat and sound insulation.
- After all the manipulations associated with unscrewing, you need to remove the wind grill.
Having removed the trim, we see the cabin filter under the grille.
After this procedure, you will see a filter, but this will only happen if your car was manufactured after 2003. If the filter is visible, you need to unscrew all the screws holding the cover and remove it. After this, all that remains is to install the new part.
Here he is, all dirty and covered in dust.
Location, necessary tools for replacement
The exact service life of the cabin filter of a VAZ 2110 car can be found in the operation and maintenance manual. Experts recommend this “consumable” to me after 20-25 thousand kilometers. The cabin filter is located on the left side of the engine and can be reached after removing the protective cladding. It will be quite simple to determine that it is time to change the elements - it will be black.
Cabin filter location
For work you will need the following tools and materials:
- Replacement part. It is not necessary to buy a standard part; now there are carbon options that have a longer service life, as well as improved filtration.
- Socket wrench "10".
- Rags.
- Phillips screwdriver and star.
Features of the “vertical arrangement”
If after removing the wind grille you do not see the filter, do not be upset. This means that it is vertical and can only be found by touch.
In older models, the filter is located deeper in the housing, but can be easily reached by hand.
Before installing a new filter element, you need to make sure that there is no dirt at its location. Any debris found there should be removed immediately. If you have an old vacuum cleaner, it is ideal for this procedure.
If you do not clean the location of the element, then dirt will immediately fall on the new part, which will make the entire procedure practically useless.
Upgrade of a horizontal filter
The VAZ 2110 cabin filter is vulnerable to moisture and street debris
An unpleasant feature of a horizontal filter is its vulnerability to moisture in the form of snow, rain, and all kinds of debris, such as fallen leaves. To ensure that the filter lasts longer and there is a normal flow of air to the heater, you can slightly improve the design by making an anti-debris mesh. This will become a reliable barrier to the litter of a large faction. An additional shield will, in turn, protect the filter from getting water on it. Along with the fact that everything can be done from improvised means, there are also factory models for tuning on the market.
Installing a new part
Before installing a new filter, wipe the housing from dust!
The new part is simply placed in place of the old one.
In this case, you need to make sure that there is no moisture at the installation site. Installation of the wind grill occurs in the reverse order.
We insert a perfectly clean new filter into place.
Installation
It all depends on what cabin filter your VAZ 2110 is adapted for. If the car is old enough, then the element here will need an old model. If the “ten” was released in 2003 and later, then you have a new model of an air purifier in the cabin. Accordingly, the replacement procedure is slightly different.
Old style
- Remove the frill.
- Five self-tapping screws and 2 nuts are used for fixation.
- Remove them with a flat-head screwdriver, pry the latch, which will allow you to move the frill.
- Now look at your filter. Is it vertical? Great. Then turn it towards you to remove it.
- Before installing a new element, be sure to clean the compartment using a vacuum cleaner.
Since you have already removed it, experts recommend slightly modifying the interior. The process takes literally a few minutes, but it is beneficial.
- Mark with a marker where the filter is positioned relative to the casing.
- Make a hole in the casing through which the filter can fit.
- Again, make an overlay on the casing and place it on two self-tapping screws.
- Subsequent replacements can be made by simply removing the cover plate from the screws. Therefore, it will take you literally 5 minutes to change the filter.
New sample
New model
In fact, replacing the cabin filter in an old-style VAZ 2110 is not very different from the new one, but there are some nuances.
- The car owners themselves consider the new type of filter to be unsuccessful when compared with the old one.
- The filter protects the interior from dust, but at the same time it itself needs protection from moisture and, most interestingly, pollution.
- Removal includes dismantling the frill, unscrewing 4 screws, removing the cover and dismantling the filter itself.
- When installing a new element, make sure that the air direction matches the designation on the filter label.
- In order not to suffer with such a frill and its disassembly, take an analogue from the Priora model. It's easier to work with him. Especially if you plan to keep your VAZ 2110 for a long time.
