How to find out what exactly the pump on 2109 has failed
The main problem that prevents the continued use of a water pump is its loss of tightness, which leads to the leakage of working fluid. Slightly less often, problems are caused by bearing wear.
In the first case, the pump remains suitable, therefore the easiest way to protect the power unit from overheating is to regularly restore the volume of liquid in the cooling system. This measure, however, gives only a temporary effect, since the leak will intensify day by day.
Bearing damage is much more serious. At first, this element signals its wear and tear with a fairly loud noise. If you do nothing, the destructive process will accelerate, and, most likely, the matter will end in the complete destruction of the part. The backlash formed in it is manifested by the following signs:
- loud grinding noise;
- pump jamming.
Ultimately, the likelihood of the drive belt breaking or even damaging the engine valves increases.
The pump installed on 2109 cannot be repaired, and therefore, if its improper operation is detected, the unit is dismantled and a new one is installed in its place.
The procedure, fortunately, is not particularly complicated, which means that replacement with a VAZ can be done without going to a car repair shop. The pump is located in an easily accessible place and no overall engine components (for example, a carburetor) will have to be touched.
Signs of pump wear
As for the latter, the main problems with the pump are leakage of working fluid from under the housing and severe wear of the bearing.
And if the presence of leaks only affects the fluid level, in the presence of such a malfunction you will have to constantly monitor the fluid level and periodically top it up. Moreover, over time the leak will increase.
But bearing wear can lead to more serious consequences. With slight wear, at first there will only be increased noise. If you do not pay attention immediately, wear will quickly increase until the bearing fails. In this case, the pump will jam and a strong grinding noise will appear. All this can lead to rupture of the drive belt and damage to the valves.
The design of the pump is such that it is non-repairable, and if any malfunction occurs, it must be replaced.
A positive fact in the design of the power plant of this car is that this element is external equipment, so replacing the VAZ-2109 pump is not a particularly complicated operation and does not require significant disassembly of the engine. Almost no other elements of the power unit, for example, a carburetor or generator, are affected.
What you need for work
To replace the pump on your VAZ-2109, you need to prepare some tools and materials. In particular, you will need:
- heads and wrenches (socket and socket) 17 mm and 10;
- knob;
- wide flat-tip screwdriver;
- sharp knife;
- wiping ends;
- capacity up to 10 liters for liquid;
- silicone neutral sealant;
- jack and additional support for the car;
- new pump with gasket.
Replacing the VAZ-2109 carburetor pump should be carried out on a level surface. In summer it is not forbidden to work outdoors, but in winter it is better to use a warm garage.
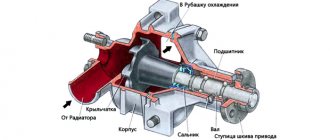
Replacing the coolant pump (pump) on a VAZ 2108, 2109, 21099 car
We replace the coolant pump (pump) of the engine cooling system of VAZ 2108, 2109, 21099 cars and their modifications when there is a coolant leak, extraneous noise during operation or high mileage (more than 100,000 km).
— L-shaped wrench or high socket “10” — New pump with gasket
— Drain the coolant from the cooling system
— Remove the timing belt
Preparatory activities
First of all:
- position the car in a place convenient for you and be sure to set the handbrake;
- make sure the gear lever is in neutral;
- If the machine has been used recently, wait until its power unit has cooled down.
Next, drain the coolant from the system. For this:
- move the heater adjustment lever to the right until it stops;
- remove the ignition mechanism with the bracket holding it;
- in the engine compartment, unscrew the coolant reservoir cap;
- find the drain hole (it is located at the bottom of the cylinder block);
- place the container;
- remove the plug;
- wait until the antifreeze has completely drained out;
- Wipe the engine dry if liquid gets on it.
An important point is that when the coolant is very dirty, it would be advisable to flush the entire system.
Symptoms of a problem
To avoid problems with your pump, it is important to know the signs and symptoms of malfunctions:
- Constant loss (decrease in level) of coolant in the system
- This is the main symptom, but in this case it is recommended to check the pipes and taps of the system
- The second sign is fluid leaking through the vent
- The second sign indicates a malfunction of the oil seal.
- To check this, you need to remove the timing cover and inspect this hole.
- The failure of the oil seal is indicated by brown deposits that appear around it.
- The third sign is a howling sound that appears when the engine is running.
- This may be a sign that the pump bearings need to be checked and replaced.
- If the rotor is destroyed, the sign is overheating of the motor, or rapid heating to a critical point (this can be seen from the temperature sensor on the dashboard)
- To identify the destruction of the rotor, you need to remove the pump from the engine and inspect the rotor itself; you may need to replace the VAZ 2109 pump
Pump check
The problem that VAZ 2109 owners face is how to check the pump. There are two ways to check the serviceability of the pump: external inspection and removal. The check procedure is as follows:
- The simplest way is this: you need to squeeze the upper radiator hose with your fingers, while the engine must be started and warmed up to operating temperature (about 80 degrees). When the pump is working properly, pulsations of coolant will be clearly felt inside the pipe
Attention: When performing such a check, it is important to take precautions - in particular, do not touch the blades of the cooling system fans, and also do not touch the motor housing, as you may get burned
- When the seal leaks, fluid begins to ooze from the pump vent. Here you need to remove the timing cover and visually inspect the hole. When brown deposits are visible around it, indicating that the seal is leaking and needs to be replaced. This operation is not difficult, and any car enthusiast can handle it with his own hands.
- If the pump shaft bearings fail, you can hear a howling sound while the motor is running in the front part. To determine bearing wear, you need to check the play by rocking the pump drive sprocket (removing the timing belt)
- When there are no external signs of damage on the pump, then you need to remove the pump. For a visual inspection of the unit, you can often find severely damaged (due to corrosion) blades on the reverse side. Such a malfunction seriously complicates the operation of the entire unit.
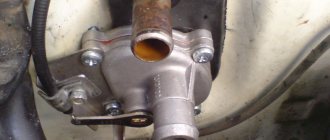
Replacing the VAZ-2109 pump
To carry out the replacement, it is necessary to remove the timing belt protective cover. It is held in place by 3 bolts - unscrew them with a 10 mm wrench. Next, the cover is dismantled and placed next to it, since there are marks on it that help set the TDC of the first cylinder.
Now, holding the crankshaft by the pulley, turn it until the notch on the camshaft gear coincides with the convex point located on its rear cover. Upon completion of the described manipulations, the casing is returned to its place, but not screwed, since you only need to make sure that the marks on it coincide with the position of the pulley.
It is also advisable to look into the inspection slot of the clutch housing - there the notches should similarly coincide. If this does not happen, you will have to turn the crankshaft some more.
At the next stage, arm yourself with a 17 mm wrench and use it to unscrew the nut holding the tension roller. The last element must be completely removed - be sure to check its functionality (unimpeded rotation and absence of play indicate serviceability).
Remove the transmission belt from the camshaft gear and throw it down. Now, using the same 17 mm wrench, remove the bolt holding the above-mentioned sprocket. To prevent it from spinning, wedge it with a screwdriver. Carefully remove the gear and be careful not to lose the locking key.
All that remains is to remove the nut and 3 more bolts that secure the rear camshaft cover - here you will need a ten key. After dismantling the named part, the pump can be removed quite easily - you just need to unscrew the elements that secure it.
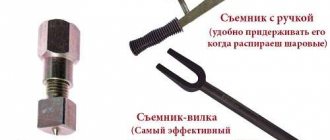
Proceed to remove the pump - you will not be able to do this with your bare hands. First, it is pryed up with a screwdriver and torn from its place, and then a jack is placed under the engine (exactly where the failed unit is located). The 2109 engine is raised a little - this allows you to increase the gap between it and the fender liner, without which it is simply impossible to move the pump.
When the assembly is dismantled, the installation site should be cleaned, since often part of the old sealing gasket sticks and peels off. This can be done conveniently with a regular knife. Upon completion of the action, everything must be wiped thoroughly with a dry, clean cloth.
The new unit is mounted with the marking facing up (it is located at the end). Tighten the retaining bolts thoroughly, but be careful - they are screwed into the aluminum. Further work is performed in the reverse order to that described.
How to check the condition of the water pump?
- Warm up the engine to operating temperature. Compress the hose that runs from the pump to the radiator. If the pump is in working condition, then you will feel shocks due to the cooling pressure. When checking the pump this way, be careful because the coolant temperature is high and you can burn your hand.
- The bearings could break. In this case, you will hear a hum while the engine is running. It will come from the bearings. The condition of the bearings can be determined by the play of the pump star.
- If the water pump seal is faulty, liquid will be noticeable pouring out of a special technical hole or valve. If you observe them, remove the timing cover and check for leaks or brown deposits at this hole. If present, replace the oil seal.
- If there are no signs listed above, then you should still remove and inspect the pump; perhaps corrosion has formed on the back side of it, which can destroy the blades. This has a bad effect on the operation of the entire cooling system.
Assembly nuances
When returning drive belt 2109 to its place, make sure that all marks on the crankshaft are in the correct position. If they move, you will have to spend additional time adjusting both the ignition and the gas distribution system.
When the tension roller is put in place, do not forget to also make sure that the belt does not dangle on it.
Sometimes, after the reassembly is completed, the car does not want to start or starts poorly. This symptom indicates that the belt is installed incorrectly. To fix the situation:
- remove it from the gear;
- turn it literally a couple of millimeters;
- put the belt back in place.
Assembly Features
When installing the drive belt, you must again make sure that all the marks match, otherwise the gas distribution and ignition system will be disrupted. After installing the tension roller back, it is important to properly tension the belt.
If the car does not start after complete assembly or starts poorly, it means that the belt on the camshaft gear is misaligned by one tooth. To eliminate such a malfunction, you will have to remove the belt from the gear again, turn the gear a little so that it moves relative to the belt by one tooth, and then put the belt back.
The operation of replacing the liquid pump is shown more clearly in the video:
When is repair needed?
The first thing you need to decide is the time for replacing the VAZ 2109 water pump. The Nine has not been produced for more than 10 years, which means that the frequency of replacing the timing belt and pulley is best reduced to 40-45 thousand km. Therefore, replacing the water pump must be done “through one belt.” But this is only if there are no leaks or other malfunctions.
It is also necessary to mention the frequency of replacing the fluid in the system - it has its own resource, since many additives lose their properties when heated. As a rule, the average service life of a liquid is about 2-3 years, no more. Roughly speaking, the antifreeze should be replaced simultaneously with the pump - once every 90 thousand km. It is highly advisable to also flush the system from the inside to get rid of possible contaminants.
Replacing the VAZ 2109 pump is required in the following cases:
- The appearance of damage on the body (chips, cracks) through which liquid leaks.
- The appearance of play in the pump rotor, which can also cause a leak. But the worst thing is the timing belt slipping and partial damage.
- The bearing is destroyed, resulting in play or difficult movement. The rotor may even jam. The reason is the high tension of the timing belt.
- Destruction of the impeller and oil seal occurs much less frequently, but it is still worth mentioning these breakdowns.
What happens if the VAZ 2109 liquid pump breaks? Its price is about 800 rubles, but how much liquid can escape through it in the event of a breakdown? The kit contains the following elements:
- VAZ 2109 pump.
- Pad.
- Three mounting bolts.
Regardless of whether the injector or carburetor is installed on the engine, replacing the VAZ 2109 liquid pump will be carried out according to the same scheme.
Instructions for replacing the water pump
Repair work should only be carried out when the engine is completely cool. Drive the car into the garage in the evening and replace it in the morning. Use the following algorithm when performing repairs:
- Drain the liquid from the radiator expansion tank into a clean canister. To do this, open the tap at its bottom.
- Using a spanner, remove the protective cover from the timing belt.
- Rotate the timing belt pulley until it loosens, then remove it.
- Use a screwdriver or other wrench to secure the camshaft gear and unscrew the nut that holds it in place.
- Remove the inner part of the timing case.
- The pump is hidden under it. Carefully remove it from the cylinder block using a screwdriver. Remove from the seat.
- Clean the seat, replace the gasket, coat the pump with sealant and install a new spare part.
- Reassemble in reverse order, fill with antifreeze.