Generator Daewoo Matiz.
The generator on Daewoo Matiz fails very often.
Many owners of Daewoo Matiz have encountered this problem. Neither the car itself nor the car owner is to blame for this, the reason is in the design features. The fact is that the diode bridge of the Daewoo Matiz generator with its negative plate does not directly touch the generator housing, but the contact passes through the studs for fastening the diode bridge and the rivets on which the Matiz diode bridge itself is assembled.
The contact turns out to be extremely unreliable; the rivets usually burn out. As a result, the diode bridge burns out. This is the cause of approximately 90% of Daewoo Matiz generator failures.
So, the actual repair of the Daewoo Matiz generator itself.
Necessary tools: 7mm head or wrench, E5 or regular 4mm head, soldering iron up to 100W, tester,
1. Remove the plastic cover of the generator. It is held on by 3 latches.
2. Using a 7mm head, unscrew the 3 screws securing the Daewoo Matiz diode bridge. And three screws with an E5 or 4mm head.
3. Unsolder the three stator leads that go to the diode bridge. We remove the diode bridge along with the relay regulator.
4. Unsolder the terminal connecting the diode bridge and the relay.
5. We check the rotor with a tester - it should be approximately 3.5 Ohms. Stator - the conclusions should be connected to ground in MegaOhms or infinity. Diode bridge - we check each diode separately, the tester is in the “diode check” position. If at least one is broken, we change the diode bridge. There is no way we can test the generator regulator relay at home, only with the help of a special relay tester, or with a working generator on a test bench.
6. We assemble everything in the reverse order, but with the new Daewoo Matiz diode bridge.
7. We can check the functionality of the generator under such circumstances only on the machine after its installation. Don't forget to charge the battery in advance!
8. The charging voltage of the generator on the Matiz should be 13.6-14.8 V, the charging indicator lamp should go out.
9. There is no point in looking for and buying a generator for a used Daewoo Matiz, since repairing a generator for a Matiz is not expensive, and even an already rebuilt Daewoo Matiz generator is about 2 times cheaper than new ones. Same quality and 6 month warranty. The price for repairing a Matiz generator (Matiz generator price), a refurbished generator for Matiz can be found by calling the numbers on the main page of this generator repair site. Generators are always available.
Buy a generator for Daewoo Matiz 0.8 at a price of only 2900 rubles! at the Rscenter-vostok service center.
Suitable for all Daewoo Matiz and Spark with a 0.8 liter engine.
When purchasing a Daewoo Matiz generator, the generator comes with a half-year warranty.
A factory defect in generators associated with frequent failure of the Daewoo Matiz diode bridge has been eliminated! It won't break anymore!
Generator Daewoo Matiz
The price for a Daewoo Matiz generator is indicated on the condition of handing over the old unit.
We can replace the Matiz generator on your car.
We can repair your Daewoo Matiz generator.
Generator numbers Bosch .0986049051 Valeo 440122 600001 AB165104 TA000A52202 Delco 219170 219251 96380673 DRA3824N DRA3824N.
Service center Rs Center-Vostok – repair of generators in Moscow. You can consult on any issue. Call us by phone, or.
How to remove a Daewoo Matiz generator
Profile Group: Old people Posts: 746 User No.: 11562 On the forum since: 08/15/2008
Profile Group: Assistants Messages: 160 User No.: 8561 On the forum since: 12/21/2007
| Quote (Terkin @ 02/17/2009 - 14:29) |
| Guys! Tell me urgently how best to remove the generator on the Matiz. (Uzbek, if that matters.) The starter does not start sideways, but upwards I rest against the bracket and the tanks. Is it really necessary to remove the starter? |
Profile Group: Assistants Messages: 196 User No.: 10676 On the forum since: 03/12/2008
Profile Group: Old people Posts: 746 User No.: 11562 On the forum since: 08/15/2008
Profile Group: Assistants Messages: 112 User No.: 12927 On the forum since: 01/23/2009
Profile Group: Old people Posts: 2941 User No.: 809 On the forum since: November 4, 2005
The generator can only be removed by removing the starter.
Terkin, think about it, I filmed it without a hole.
Profile Group: Old people Posts: 746 User No.: 11562 On the forum since: 08/15/2008
| Quote (cxal @ 02/17/2009 - 23:02) |
| The generator can only be removed by removing the starter. |
Profile Group: Car enthusiasts Messages: 64 User No.: 946 On the forum since: 12/20/2005
Good people, the generator, even on a car with air conditioning, can be removed quite easily in two ways, not counting through the bottom:
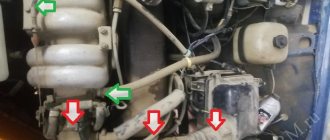
1. Through the top: - disconnect the terminal from the battery - remove the plastic tank for antifreeze by lightly pressing it upward - disconnect the upper pipes from this tank - disconnect the fuel supply hose (by lightly pressing the side ears on the sides) - unscrew the bolts securing the generator (2 from the bottom and 1 from above) - unscrew the battery charge wire (from the generator) - disconnect the plug with the excitation wires (from the generator) by cleverly prying the fixing ear with something flat and sharp - unscrew the 2 bolts from the top of the engine that fix the bracket with which the tension of the generator belt is adjusted - cross yourself three times and there it is: pull it gently but surely
2. Through the wheel: - remove the battery terminal, - unscrew the 12mm tension bolt of the generator from the top with a wrench, - remove the front wheel, - protective cover 2 10mm nuts and unscrew one self-tapping screw from the bottom, - from under the wing unscrew one 12mm bolt on the lower axle generator, - unscrew the pillow bolt from below by 17mm and release the upper pillow bolt by 17mm, - unscrew the power wire 10mm nut on the generator and remove the connector by bending the latch, - unscrew the second bolt of the lower axle with a 12mm nut, - unscrew the 2 lower bolts of 12mm mounting the bracket generator and loosen the upper bracket bolt. Turn the bracket and remove the generator towards the passenger wheel.
Of course, this is not as easy as on other cars, but it is still quite doable in 15 minutes.
Profile Group: Old people Posts: 2941 User No.: 809 On the forum since: November 4, 2005
#cxal, I'm blown away by your enthusiasm. Work as an on-call electrician, lie under a car outside in winter. I insulated my garage and installed a potbelly stove in it in order to work in human conditions. And for you, as in Vysotsky’s song: “My friend went to Magadan. Take off your hat. “I, too, can only take off my hat to you. No.
The problem is that there is no garage, I also worked for rent, but the owner of the garage can send one. changing the point is a problem.
Shaman is still easier in the pit.
Profile Group: Car enthusiasts Messages: 64 User No.: 946 On the forum since: 12/20/2005
Winner of the vote “The most useful participant of 2012.”
Profile Group: Old people Posts: 3740 User No.: 121 On the forum since: 10.10.2004
Profile Group: Car enthusiasts Messages: 64 User No.: 946 On the forum since: 12/20/2005
Profile Group: Old people Posts: 2941 User No.: 809 On the forum since: November 4, 2005
So what's wrong with you? No. One diode has broken. No. or No. It seems that the regulator has died. Just before his death, the charge lamp stopped burning. No.
this may be due to the diode bridge.
Profile Group: Car enthusiasts Messages: 64 User No.: 946 On the forum since: 12/20/2005
Profile Group: Old people Posts: 2941 User No.: 809 On the forum since: November 4, 2005
No. Got it, tomorrow I’ll check the lamp circuit, change the diode and report back. No.
what diode? figured out what was wrong with you.
Replacing a Daewoo Matiz generator of one type with another.
Now let's talk about replacing the generator with a different type. If the car previously had a Delphi (Type “A”), and you want to install a Mando (Type “B”), you will have to replace the drive pulley. The fact is that the rotor of the Mando generator is driven by a toothed V-belt, while in Delphi it is driven by a flat poly-V-belt (ribbed belt). Changing the crankshaft pulley for such a task is expensive and pointless.
In such cases, they take the pulley from the old generator and put it on the new one. Since the pulleys are cast and massive, they last a very long time and will work with the new generator for more than one year. The pulley is removed from the generator by unscrewing a single nut.
If we talk about time, replacing a Matiz generator takes from 20 to 40 minutes, depending on skill and experience. Produced alone.
Important Notes
If repair is not possible, then this spare part must be replaced. At the same time, we are talking not only about the standard model, but also about the JA1600 (JA1600IR) generator from HC-PARTS, as well as some others under numbers 96289030, 96380673, 96566261 and 96567255. In addition, it is possible to use non-original models from EAI under number 56938 , from JAPANPARTS under the number ALZ460, from LAUBER under the number 11.1600, as well as some others. Their characteristics are almost completely identical to the original generators, which can be easily replaced by them.
14.8.3 Replacing generator brushes and voltage regulator
Since the warehouse ran out of diode bridges, we had to disconnect the entire bridge in order to press out and replace the broken diode. It is more convenient and easier to press out diodes using a hydraulic press or in a large bench vice, you need to take mandrels to replace the brushes of the Daewoo Matiz generator diode size, or, if you are repairing in your garage and there is no press with mandrels, then you can use the heads from the set for mm and you can use any from 4 to 7 mm, replacing Daewoo Matiz generator brushes, the wire lead freely entered the head, and its walls were wide enough so that the force did not destroy the diode, but was calmly distributed over the surface and when the jaws of the vice were compressed, and the head 13 rested on the radiator plate , and the second, on the other hand, rested on the plastic part of the body.
Removing the generator for Daewoo Matiz
But I put it back together in 15 minutes. This method is for those who do not have a pit. Maybe someone will need it for 6 years Tags: There is not much space there, but it is quite enough to perform this operation. View of the generator from under the hood. Upper bolt of the generator. Next, we remove the engine protection. We unscrew the positive wire from the generator with a key set to “10”.
Removing the chip later is inconvenient and the lock of the chip is not visible. Then, using keys set to “12”, we unscrew the two bolts of the lower hinge of the generator, with the right bolt screwed into the body of the generator from the wheel side, the other bolt is through and locked with a nut.
Bracket for mounting the generator and engine mount We move on to the mounting bracket for the generator. It is secured with three bolts. The top bolt is unscrewed with an elongated head at “12”, the rest can be unscrewed with sockets. We remove the bracket, the generator now hangs on the top bolt.
Daewoo Matiz generator repair
Two types of generators were installed on Matiz cars; the easiest way to distinguish them is by the drive belt; if the generator drive belt is poly-V-ribbed, then perhaps the generator will soon make itself felt. If the belt is a regular V-belt, then a second type generator is installed, which is rarely complained about.
According to the owner, it started when the battery discharge lamp came on; they did not pay due attention to this, as if this had happened before and then went away on its own. But not at this time. The short trip ended with the battery completely drained. As it is not difficult to imagine, the generator turned out to be of the first type with a design defect inherent in the factory.
Removing the generator
The generator is not particularly conveniently located; removal is done from below. Before starting work, be sure to disconnect the battery.
First, remove the right front wheel and unscrew the side plastic protection of the engine compartment
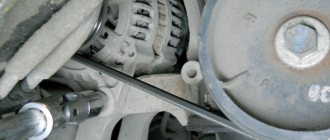
Then the generator belt tension fixing nut is unscrewed from above, the rest of the work is carried out from below.
The two bolts of the lower axis of the generator are unscrewed, the “guitar” of the longitudinal fixation of the engine is unscrewed (photo in the foreground)
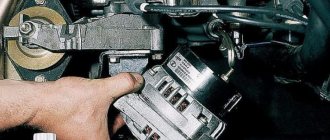
The positive wire is unscrewed from the generator and the connector is removed (it is more convenient to remove the connector when the generator is freed from its mounts)
Then the bracket securing the generator and engine guitar is unscrewed from the cylinder block. The fastening is on three bolts, the top one is the most inconvenient, so it is possible to not remove the bracket completely, but leave it on the top bolt, loosening it a little, then it will be possible to move the bracket to the side when removing the generator.
In the photo below the bracket has been completely removed. The generator is removed downwards and placed into the right wheel arch.
Generator diagnostics and repair
Let's start disassembling and checking the generator elements.
The plastic cover on 4 diametrically opposite latches is removed, and the diode bridge and voltage regulator with brushes are unscrewed, which requires a key for 7 and E5. The diode bridge is soldered to the stator windings - for dismantling you will need a soldering iron of at least 60 W, and preferably 80-100 W.
The source of the problem is already visible in the photo, but to be completely sure, all elements of the generator must be checked.
The brushes are in good working order. The stator and rotor windings have normal resistance and are also in good condition. The diodes are fine, all have the same resistance in the right direction, but in the opposite direction it is high. All that remains is to check the regulator. We connect it to an adjustable voltage source and measure the voltage on the brushes, for 12 and 13.5 V it is equal to the applied voltage, at 15 V it sharply decreases to 3 V
The regulator behaves as it should, all elements of the circuit are in good working order, it's all about the brass rivets that connect the minus of the diode bridge to ground. Brass and aluminum form a galvanic couple, as a result of which a film of oxides is formed at the point of contact, preventing normal electrical contact. The solution to the problem is to drill out the protruding parts of the rivets from the negative terminal of the diode bridge, clean the oxidized areas, apply a thin layer of oil and place steel washers under the bolts.
On the way to the generator
Next, disconnect the fuel line from the fuel rail. To do this, press two clamps on both sides of the fuel line. Raise the clamps up until they click and lower them back. So, we disconnected the fuel line from the rail.
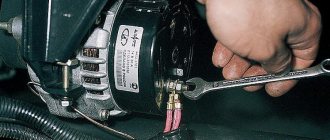
The generator has one electrical connector that goes to the battery charge indicator light. We will need to disconnect it. A wire (plus) is attached to the nearby nose terminal, which can be disconnected by unscrewing the nut using a 10mm wrench. We need to unscrew the generator tension bolt and two bolts securing the generator bar.
We remove the top bar and monitor the fuel rail, the tube of which can bend if not handled carefully. The generator itself has a bolt and a bracket fastening. To dismantle them, you need to use a 12mm wrench. Next, remove the boot under the generator, which is held on by two nuts with a 10mm head and one bolt.
How to replace the timing belt on a Daewoo Matiz
If you are the owner of a Daewoo Matiz car, then this photo report was prepared especially for you. Here are detailed and clear instructions on how to replace the GPM belt with your own hands.
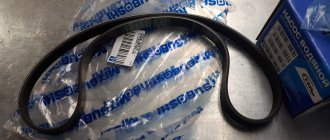
Now let’s determine what kind of belt you can buy.
If the engine volume of your Matiz is 0.8 liters. then you can buy the following belts for shegov:
- Gates 5434XS;
- BOSCH 1987 948;
- Contitech CT910;
- And the cheapest option is Dayco
In principle, the GPM belt does not need to be changed often, but at the same time there is no need to delay replacement until the moment when the belt bursts. The average mileage of a GPM belt is 90,000 km. However, every 30,000 km a continuity wire is required. And if suddenly during the inspection any cracks, creases, traces of oil or tears are discovered, then immediately replace the belt. The only tools we need are a set of standard wrenches and socket heads.
It is also necessary to say about the GPM belt for Daewoo Matiz that if the belt suddenly bursts or breaks while driving, the valves will bend because of this, and the guide bushings will also need to be replaced.
First, we need to remove the top protective cover. This can be done with a ten-point head. You shouldn’t be afraid that everything is very tightly located under the hood, it won’t hinder you in any way, and I don’t think you should have any unnecessary problems.
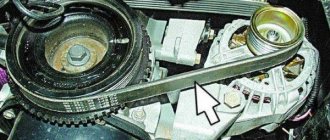
The next step we will have to remove the top cover, after which we must first loosen and then completely remove the drive belts of the generator, main control unit and air conditioner.
Next we need to remove the right one. front wheel and protective casing, which is located behind the wheel. We also need to unfasten the generator, but since its fastening may oxidize, we first need to loosen the bolt from below.
So now we can get to the bottom of the engine.
Next you need to remove the hanging belts, then you need to set marks on the camshaft pulley.
Now it's up to the generator drive pulley, do you see any risk on it? It should coincide with zero on the GPM housing cover.
Then we need a bolt from the crankshaft and then remove the pulleys using the attachment drive.
To remove the lower belt we need to remove the tube and dipstick. Next, you need to remove the cover; to do this, we unscrew the bolts with a socket wrench with a 10-mm head. We also unscrew the tension roller, after which we remove the timing belt itself.
This is the tension roller and belt we used.
Since our roller is semi-automatic, to install it completely we only have to tighten the bolts, it fixes the roller. You need to tighten it with a force of 15-23 Nm. After tightening the roller and installing the belt, we need to wrap the crankshaft two turns. Make sure the marks match. The mark is located on the lower GPM pulley.
Required tools and materials for DIY replacement
To replace the timing belt on a Daewoo Matiz car with your own hands, you need tools, the list of which is presented in the table below.
We recommend: Detailed instructions for qualified replacement of the Chery Fora timing belt
Table - Tools and materials required to replace the timing belt
| Name | Note |
| Spanners | Set |
| Head | "on 10" |
| Vorotok | With extension and ratchet |
| Torque wrench | To control the tightening of threaded connections |
| Screwdriver | Flat blade |
| Penetrating lubricant | For example, WD-40 |
| Rags and wire brush | To clean dirt |
| Chalk, stroke or paint | For applying your own marks to simplify the process of replacing the timing belt |
| Jack | To lift the car |
| Balloon wrench | For removing and installing the right front wheel |
Typical generator problems
The vast majority of cars produced by Daewoo have two main types of generating devices. This is a generator Matiz, Nexia CS130 and CS121. A similar model is in Gentra's car. There are no fundamental differences other than the size of the stator. They are even interchangeable.
Unification allows basic repairs to be carried out according to the same scheme, regardless of which model is installed on the Daewoo Matiz. As practice shows, the stator and rotor are both reliable models. In most cases, failure of their operation is caused by mechanical damage.
The most common troubles include:
- destruction on the rear cover of the generator bearing;
- burnout of the diode bridge due to improper washing, contact with oils and technical liquids on the housing.
- scorching of the working surface;
- generation of generator brushes.
These problems can lead to others. Thus, the destruction of the bearing leads to strong shock loads on the rotor and stator. Also, because of this, a short circuit of the “plus” of the brushes to ground may occur - and as a result, the relay-regulator will burn out.
Replacing the starter bendix (from Daewoo Matiz) — logbook Geely CK 2008 on DRIVE2
Greetings to everyone! With the onset of cold weather (in the summer, sometimes this sound would occur), when starting the engine, I began to notice an extraneous sound. The sound was precisely when the starter was turned. I went to an electrician, who immediately gave a verdict - replacing the Bendix.
I wanted to have it replaced by the same electrician, but he was always busy... well, we’ll change it ourselves)) I watched a lot of videos about how to remove the starter on a Geely CK. They said that one of the bolts there is very insidiously located and a cardan for the crank (ratchet) is needed. Nothing of the sort, I unscrewed it without any problems using a 16 mm wrench and head.
To remove the starter and replace the bendix you need: - a 8, 10, 13, 16 socket, - a wrench, - a Phillips screwdriver (you can also use a flat head), - a metal brush.
To dismantle the starter, you need to remove the battery, unscrew the three bolts, 10, securing the battery plate. This will give you access to the top starter bolt. The bottom bolt is unscrewed from the pit (photo below).
Starter lower bolt
Before unscrewing the fastening bolts, you need to unscrew the positive terminal of the starter and remove the connector (done from the pit). After this, remove the starter (also from the pit).
After dismantling, on the workbench, you can start getting to the bendix. It doesn't take much work to get to it. I won’t describe it, I’ll share the video I followed.
Of course, I carried out troubleshooting of the armature, brushes and retractor - everything is fine with them (mileage 157,000 km).
Starter on a workbench
Planetary starter mechanism
The most interesting. I went to the store for a new Bendix, but it didn’t fit. It differs both externally and in the internal diameter of the bushing (my Bendix axle did not fit into the hole of the new Bendix). There is a Deu counter nearby. They offered Bendix from Matiz, tried it on - everything fell into place. I bought it from Matiz, what’s more, it’s Korean =))
The sound of the engine starting has changed beyond recognition. Now the engine starts like a full-fledged foreign car))
All the best and smooth roads))
Price tag: 510 UAH Mileage: 157000 km