Many car owners of the wonderful classic VAZ-2107, especially those who like to upgrade their cars, do not like the design of the steering wheel due to its large size.
Due to the fact that the steering column on this car is not height adjustable, the large diameter of the steering wheel makes it difficult to sit comfortably in the seat. Surely tall drivers have encountered this problem.
Therefore, replacing the “original” steering wheel, which is more similar to the steering wheel of a steamship, with a smaller steering wheel with a “sporty” design helps solve this problem.
To replace this vehicle control, you must remove the factory one, and you may also need to remove the steering wheel if the sound signal does not work.
To remove the steering wheel you will need the following tool:
- flat screwdriver;
- 24mm head with wrench and extension.
Step-by-step replacement of the steering wheel
You can remove the steering wheel in a VAZ-2107 yourself, but in order for the process to be completed correctly, you need to do it step by step:
- The battery lock must be done first to prevent short circuit. To do this, it will be enough to disconnect the negative terminal from the battery.
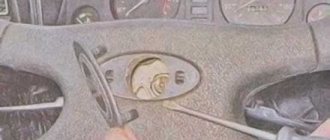
- Using a small screwdriver, you need to pry off the Lada logo, which adorns the middle of the steering wheel. This logo is not only a decoration of the steering wheel, but also an original plug that covers the fastening element.
- After the plug is removed, you can see a 24-size nut inside, which must be unscrewed. Before unscrewing, you need to set the steering wheel to a position in which the wheels of the car will “look” directly from the body.
- A size 24 socket must be inserted into the extension so that it is convenient to put the tool on the fixing nut. Next, you need to insert such a device into the so-called knob and try to turn the latch with a sharp counterclockwise movement. In this case, you should hold the steering wheel with your knees so that the structure does not turn when unscrewing the lock. If the nut does not come off the first time, you need to repeat the whole process again, but experts do not recommend completely unscrewing the lock. This is explained by the fact that the steering wheel is quite firmly attached to the shaft, and if it is removed with a sharp jerk, the structure can hit a person hard in the chest.
- Once you feel that the fastener has become loose, you need to start swinging the steering wheel in different directions. You can completely remove the steering wheel from the shaft after you hear a peculiar click. This will indicate that the steering wheel is starting to hit the nut, so the clamp can be completely unscrewed without fear.
Such simple manipulations and a minimum of tools will help VAZ-2107 owners remove the steering wheel without much effort for further replacement of the structure or troubleshooting any problems.
Unnatural sound in the car
After a while, the beep may sound intermittent or quiet.
The reason for this action is mainly considered to be a problem with the sound element or poor contact at the terminals. Often water, dirt, and foreign particles can penetrate into the element. As a result, the device is subject to rust, the membrane moves under tension or jams. In addition, it is possible that the problem lies in the winding of the horn coil, although this happens very rarely. For diagnostic purposes, the sound element is connected directly to the battery. To do this, use auxiliary wires or remove the sound element itself.
Malfunctions of the steering column of VAZ 2107
Given the simple design of the column, there are few options for malfunction. It is important to monitor its condition and promptly eliminate problems when they arise. There are several main types of faults:
- Column creaking. The cause of the squeak may be wear of the column parts, deformation of the trim panels, or malfunction of the steering switch unit.
- Steering wheel play. There are probably two reasons for this. The first is that the steering wheel fastening nut has been loosened. Fixing this problem is easy. But if this is not done in time, the splines on the shaft will break and the steering wheel may turn, leaving the car uncontrollable. Another reason is wear of the steering gear worm gear. Then it is necessary to adjust the gearbox or repair it.
- Play in the plane of the steering wheel or column axis. This is a dangerous malfunction that appears when the elements of the mounting bracket or spline connections are worn (loose).
Loosening the nuts and bolts of the spline fasteners over time leads to the abrasion of the splines, causing the car to lose control. Therefore, the column play must be eliminated immediately.
We recommend: Everything about replacing the cylinder head gasket on a VAZ 2112 car
How to disassemble the steering wheel of a VAZ 2107
The VAZ-2107 car in its own design is equipped with such an indispensable control element as a steering wheel. The appearance of the steering wheel on the “seven” is pleasant, but its large size spoils the whole picture. The size of the steering wheel can only be compared with the steering wheel of a steamship, which is not always comfortable to operate. It's another matter when the car has a small and careful steering wheel, which is a pleasure to drive. Many car enthusiasts already on the 2nd day after purchasing a VAZ-2107 car change the standard steering wheel from a steamship to more comfortable models, both sports and ordinary formats. But the need to remove the steering wheel on the “seven” appears not only to replace it, but also to carry out repairs, because the structural elements of the unit tend to wear out. In the material we will pay attention to how to remove the steering wheel on a VAZ-2107, and the features of its repair.
Installing power steering
If a motorist wants to install power steering on a VAZ-2107 with his own hands, which the manufacturer did not consider necessary to install in one of the most budget cars in the whole world, he can take one of two possible paths. Firstly, you can select the optimal steering rack that has power steering and then decide on its further location in the car. True, such an action will require enormous labor and money. Secondly, which is more expedient, you can buy a ready-made kit at an auto parts store that allows you to perform all possible most useful manipulations on the stationary steering rack.
The purchased power steering for a VAZ-2107 will consist of many parts: a pump, a pulley, a steering gear, a hydraulic cylinder, an expansion tank and a hose system.
To install power steering on a VAZ-2107, you need to start with a pump, through which pumping is carried out and a certain pressure is created in the unit. This pump must be placed on the cylinder block, since it will operate due to a belt drive. The next step is to determine where to install the crankshaft pulley. Then the steering gear is replaced. The car owner should check the size of the purchased device in advance, since it will most likely differ from the factory analogue, which may require modification of the installation location of the device.
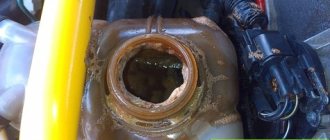
When installing power steering in your car, you should pay close attention to the hydraulic cylinder, which should be located in the car according to the instructions. Further modernization consists of the location of the expansion tank and the sequential connection of a set of parts with high-pressure hoses. The installed reservoir must be equipped with a special fluid intended directly for the power steering. As a result of the manipulation, it is worth pumping the system.
Types of power steering
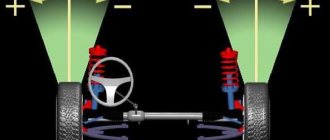
Modern cars use two types of power steering: hydraulic and electric (electromechanical) power steering. Abbreviated as power steering and power steering.
The operation of power steering is based on the use of working fluid (oil) pressure. The power steering system includes a pump, supply pipes, a reservoir and oil. The pump creates oil pressure, which acts on the mechanism, making it easier to turn the wheels when turning the steering wheel. The design of such an amplifier is quite complex, installation is labor-intensive, and the amplifier itself requires regular maintenance. Only if these conditions are met, the power steering will delight you with ease and smoothness of operation.
Installing power steering on a car that does not have power steering is a complex and very expensive procedure that requires the installation of additional parts and major changes to the steering design. Therefore, installing a hydraulic booster on the VAZ 2107 is not justified.
The electromechanical amplifier copes well with its functions and costs almost half as much as power steering. Installation of the EUR on a VAZ 2107 is not very labor intensive and does not cause any particular difficulties. Electric power steering does not require periodic maintenance and is more reliable and durable than power steering. It does not require special fluids or pumps to operate; simply connecting the unit to the vehicle’s on-board network is sufficient. Therefore, it is this type of power steering that owners of “sevens” install in their cars.
Replacement
This must be done in the following sequence:
- We disconnect the negative terminal of the battery just in case.
- Carefully, using a screwdriver (preferably the screwdriver slot is small), pry up the “Lada” badge in the middle of the steering wheel, which is a plug, and pull it out. As a result, we see a 24 nut inside.
- We put the steering wheel in a position so that the wheels “look” straight.
- We take the head of the required size, insert it into the extension, and then put it on the nut. We insert the crank into the extension, rest our knees on the steering wheel so that it does not turn when unscrewing the nut, and with a sharp movement of the crank counterclockwise we try to twist the nut. I don’t recommend unscrewing the nut completely, because... The steering wheel sits firmly on the shaft and, if removed abruptly, can hit you in the chest painfully.
- Then we take the steering wheel in both hands and rock it, from side to side, pulling it up. Moreover, it is desirable that the range of movements be frequent. When our steering wheel hits the nut, unscrew it completely and completely remove the steering wheel from the shaft.
With these simple manipulations and using a simple tool, you can remove the steering wheel on a VAZ-2107.
After removing the steering wheel, you need to inspect the copper horn contact located on the steering column. If necessary, clean it and bend it.
If your horn does not work, you must first remove the steering wheel in the sequence indicated above, and only then unscrew the screws on the back of the steering wheel to remove the panel along with the fasteners and contact plate, placing the steering wheel on the workbench.
Because it is easier to do this in the public domain than to look for holes by touch in the limited space of the car interior. And, as a rule, the sound signal does not work precisely because of the contact that is located on the steering column, so it may not be necessary to completely disassemble the steering wheel.
Good luck to everyone and safe driving!
We recommend: How to change the fuel filter on a Chevrolet Niva
Features of dismantling
VAZ-2107 cars are equipped with two versions of steering wheels, which have minor differences. The main difference is the appearance and fastening of the front decorative part, which performs the additional function of turning on the sound signal. Let's look at both options for removing the steering wheel on a VAZ-2107, and let's start with the new model steering wheel.
- Disassembling the VAZ-2107 steering wheel begins with the fact that it is initially necessary to remove the minus terminal from the battery. This is done to prevent the creation of an unintentional short circuit.
- Using a screwdriver, you need to pry off the “Lada” badge, located in the center of the product, behind which there is a central nut at “24”.
- It is advisable to align the wheels so that they are straight. This is necessary so that during assembly it fits into the same slots, and the steering wheel also stands straight.
- Using a wrench with a 24mm head, remove the nut. To unscrew the nut, you must rotate the knob to the left. To unscrew the nut, you need to rest your feet on the steering wheel, protecting the product from turning, or ask a friend for help.
- Once the nut is loosened, it is not recommended to unscrew it completely. Now you need to carefully knock the steering wheel off its seat (the spline joint may stick). As soon as the product moves from the shaft, you can unscrew the nut completely and dismantle the steering wheel.
After removing the product, it can be replaced or repaired. If you need to replace the shaft bearing, you will have to remove the decorative trims and bracket to gain access. If it is necessary to remove the old-style steering wheel, this is done according to the following scheme:
- On the back of the steering wheel, unscrew the 2 screws in the holes using a screwdriver.
- Remove the decorative panel together with the fasteners and the horn contact plate.
- Next, unscrew the nut a little, knock the steering wheel off the splines, unscrew the nut completely and remove the part.
Old-style steering wheel without lining
Once the repair work is completed, the product must be installed in place. Be sure to set the steering wheel in the correct position. This is done for the purpose of driving convenience and so that during a trip part of the steering wheel does not block the view of the instrument panel.
The cover plate itself with signal contacts
There are marks on the steering shaft and contact plate that need to be aligned. After the product is put on the slots, you can begin to tighten the nut in a clockwise direction. Installation of decorative elements occurs in the reverse order of removal.
Repairing the horn switch on the steering wheel
If the sound alarm does not work, then after dismantling the steering wheel it is necessary to inspect the contacts. Often, for repairs, it is enough to clean and lubricate the contacts and then install the parts in place.
You can look for the cause of the malfunction of the signal without removing the main mechanism, but you will have to struggle with unscrewing the bolts that secure the decorative trim of the steering wheel. Most often, the reason for the signal not working is in the contacts located in the steering column, so it may not be necessary to completely disassemble the steering wheel.
This material will help you understand the question of how to remove the steering wheel for repair work. If you plan to replace the steering wheel, then it is imperative to select a new product so that it matches the splines of the car shaft. When replacing a standard product with a new one, a problem may arise only in connecting the signal, since not on all models the contacts will coincide with the steering column. To install a new steering wheel, you will need to disassemble it and connect the horn.
Doing it right
To begin with, it is worth noting that there are two types of steering wheels - one new, the other old. They differ only in the decorative overlay on the horn button. We will not consider removing them separately, since apart from this element everything happens identically. To work, you will need a 24mm socket and a wrench, as well as a slotted screwdriver. It would be a good idea to use common sense, then the repair will be done without injury. The removal process is quite simple. Just a few steps required
:
- Disconnect the battery. You will need to turn off the power to the sound signal. Lack of power will avoid short circuit;
- Turn the steering wheel so that the wheels point straight ahead;
- On an old-style wheel, you should pry off the lining latches; they are located on the spokes. On new steering wheels, the pad is smaller and is attached by a simple insert into the body. Pry it with a slotted screwdriver and carefully remove it;
- Next, disconnect the wiring from the button that powers it;
- We take the head and unscrew the nut, it is located in the center of the steering wheel. We hold the steering wheel with our hand from turning, usually there are no problems with this action. Do not completely unscrew the nut;
- Take the part with both hands and pull it hard towards you. This is usually enough to rip the steering wheel off its splines. If this does not work, then you can carefully tap the wheel using a mallet. Sometimes the splines get stuck;
- Unscrew the nut completely and remove the steering wheel.
How to return the sound signal yourself
If the steering wheel needed to be removed because the sound signal stopped working, then the removal process is carried out in the same sequence as previously described. Next you will need to do the following:
- Be sure to check the steering play, which should not exceed 5 C, and the copper contact of the horn. The contact is located on the steering column; if traces of oxidation or other types of contaminants are noticed on its surface, they are carefully removed;
- Next, the connecting fasteners on the back of the steering wheel are unscrewed so that the entire panel assembly can be removed, including the contact plate;
- The removed steering wheel with the panel should be placed on a table or workbench to find the failed contact. The latter is most often the main reason why the sound signal disappears;
- if the contact is disconnected, you just need to solder it back to its original place and install the panel with the steering wheel.
We recommend: Silent locks for VAZ 2107: how to install it yourself?
Checking operation and repairing in case of sound signal malfunctions
There are three malfunctions: it doesn’t sound when needed; works when not needed, or sounds intermittently, hoarsely, quietly. Unlike the high-voltage ignition system, which is little affected by the quality of the connection, the horn system is low-voltage. This means that the film of oxides and rust significantly impedes the passage of current. But signals are a powerful current consumer. The current in the circuit is at least 4-5 A.
The quality of all contacts must be perfect, otherwise repairs will be needed constantly. Remember that the car body itself is a “negative” contact, and in the direction of current movement, all oxides settle on the “plus”. Pay special attention to stripping the terminals of the red, “positive” wire.
The “negative” part of the chain is longer. Therefore, most often this is where malfunctions occur. Therefore, it is immediately necessary to check the serviceability of the signal and look for an open circuit. To do this, you need to attach the gray-black “negative” wire from the sound signal to a cleaned place on the case, i.e., “short to ground,” and the “positive” wire directly to the battery. Then turn on the ignition. If there is sound, it means there is a break somewhere in the negative circuit. If there is no sound and the positive terminals are cleaned, then the signal itself is faulty.
Common faults:
- fuse blown (replace)
- The contacts have oxidized, or the relay has burned out (needs replacement).
- if there is a jumper, the contacts have oxidized and weakened; clean or change;
- the paddle on the switch under the steering wheel is broken, the slip ring on the steering wheel has worn out (this happens when the car wears out significantly, and also among those who like to honk constantly).
Here repair is hardly possible; the steering wheel needs to be replaced, since the slip ring is rarely found on sale.
Figures 5 and 6 show the replacement of a fuse and relay (using the example of another fuse) on a new mounting block for VAZ 2107 injection engines. Installation is carried out using plastic tweezers included in the delivery kit.
In conclusion, we will give some advice. When the radiator cooling fan is running (in the VAZ 2107 this is noticeable both by ear and by instruments), it is not advisable to use the signal! The VAZ 2107 circuit provides for the presence of a common fuse, which is not designed for such a load. Therefore, it is better to install a 25 A fuse.
Replacing the steering column of a VAZ 2107
Replacing a steering column is a rather difficult task, but it can be done independently if you have some experience in car repair. You will need the following tools:
- Wrenches 17 (socket and open-end).
- Socket heads for 17 and 30.
- Handle with ratchet.
- Mount.
- Hammer.
- Collar.
The column is removed in the following order:
- Disconnect the battery.
- Remove the steering wheel.
- Remove the steering shaft housing.
- Remove the wire block from the ignition switch.
- Remove the ignition switch.
- Remove the steering column switches.
- Remove the steering shaft clamped in the column.
- Using a 30mm socket and a powerful wrench, unscrew the steering column mounting nut. The tightening force here is significant, so the knob must be a fairly long lever. If you can’t unscrew it, you can lengthen the knob by putting a piece of pipe on it.
- Unscrew the 3 bolts securing the column to the body. The procedure is not easy - the distance between the parts and the body is too small, the bolts are difficult to keep from turning. A handle with a ratchet will come in handy here, which will speed up the process.
- Remove the column from the shaft. To do this, you need to knock the column off the tie rod splines using a pry bar. This must be done in jerks, resting your feet on the body.
- Unscrew and remove the shaft seal installed at the bottom of the column.
After dismantling the old column, it is necessary to clean the seat from dirt. Before installing a new column, you should check the condition of its hinge joints and needle bearings. If everything is in order, you can begin installation, which is done in the reverse order of removal.
When installing a new VAZ 2107 steering column, you must pay special attention to ensure that all fastening bolts and nuts are well tightened. Considering how important this unit is for driving a car, play, and even more so, slippage of the steering column splines can lead to tragic consequences.
When installing the steering wheel, pay attention to the position of its spokes.
After completing the installation of parts and connecting the wire block to the ignition switch, you can connect the battery. Column replacement is complete.
Tuning the VAZ-2107 steering requires time, money, effort and certain knowledge from the car enthusiast. However, competently carried out modifications to the steering system of the vehicle improve the behavior of the car on the road, making the car more maneuverable and controllable by the driver.
Installation Rules
The power steering is hard to turn: possible reasons. power steering repair
Installing the steering wheel is a dismantling process in reverse order. If you can handle the removal, then you will be able to install it.
- Installation begins by transferring the mark from the old steering wheel to the new one. Be extremely precise: the correctness of further control of the machine depends on this. The mark on the new part should be exactly in the same place as on the previous one.
- Put the steering wheel back in place. Make sure that the mark on it and on the front panel match the same as in the case of the old part.
- Replace the central nut and tighten it. If it does not fit tightly in the socket head, insert the wire strands between them. When the nut is in place, remove the wires and secure the nut tightly.
- Replace the steering wheel cover and tighten all screws.
- Make sure the steering wheel is straight. If even a slight displacement is observed, the part will have to be reinstalled.
- Replace the battery terminals and test your new steering wheel by driving it away from major roads. At first, its diameter may be unusual, but the ease of driving should remain the same.
if the nut falls out of the socket, use the wire strands
The most difficult thing in the process of replacing the steering wheel on a VAZ 2114 and 2115 is choosing the right parts
Pay attention to the markings on the steering wheel, covers and, if necessary, adapters. In some cases, it may be necessary to replace the steering column switches
But dismantling and installing a new steering wheel itself will not cause you any particular difficulties if you strictly follow all the instructions.