Recently they brought us a car with a broken cylinder head gasket, and since when replacing the gasket we would have to remove the timing chain, we decided to change it along with the sprockets. We’ll talk about replacing the gasket in another article, but here we’ll look at replacing the timing chain of a VAZ 2107, as well as sprockets and a tensioner with a damper, with your own hands in an ordinary garage. In principle, the procedure is applicable to all cars of this family, because all classics were equipped with one chain motor with a slight difference in volume.
This engine is equipped with a double-row chain, which lasts a very long time; 100 thousand kilometers is not the limit for it, provided that the original Lada parts are in place. It is very simple to diagnose a stretched chain by the characteristic sound from the front of the engine; at the end of the article we will look in detail at how to diagnose and tension the timing chain.
Replacing the timing chain
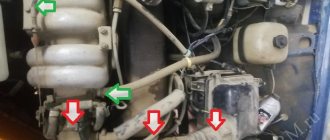
- We remove the throttle valve pipe, the vacuum brake booster and crankcase exhaust pipe, and the throttle cable. 10mm socket and Phillips screwdriver for clamps.
- We remove the radiator by disconnecting the two pipes from it and unscrewing the two bolts located in the upper right and left corners. The head is 10. The radiator from below is inserted into the grooves in which rubber gaskets are installed, do not lose them.
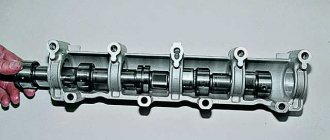
- Remove the valve cover by unscrewing the eight nuts by 10.
Valve cover fastening. - Loosen the nut of the tension element of the generator and move it towards the cylinder block. Remove the generator V-belt. The key is 17.
Alternator belt tension.
Set top dead center (TDC)
- Turn the crankshaft clockwise until the marks on the pulley and the marker on the front timing chain cover match. Key or socket 38.
Crankshaft pulley mark. - The marks on the sprocket and the marker on the camshaft bearing housing should also match.
Camshaft marks.
Removing the old timing chain
- We lock the crankshaft by tightening the handbrake, placing chocks under the wheels and engaging fifth gear, unscrew the pulley nut. Head 38.
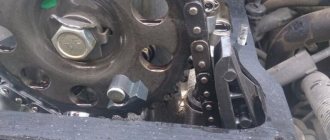
- Unscrew the two nuts by 10 and remove the timing chain tensioner.
Timing chain tensioner. - We bend the stopper petal and unscrew the camshaft sprocket bolt.
Fastening the camshaft sprocket. - Remove the sprocket along with the chain. Please pay attention to the wear of the teeth if you suddenly decide to keep the old ones. If the teeth become sharp, replace the sprocket.
- Remember which hole on the sprocket the key on the camshaft is inserted into. There was once a case when his comrades mixed them up and it’s good that before starting it he manually turned the crankshaft, naturally the valves rested on the cylinders, after which he had to disassemble everything again.
- Having unscrewed three nuts and seven bolts, three of which are on the side of the pan, remove the front timing chain cover, you can immediately change the crankshaft oil seal. Head for 10. We loosen the adjacent bolts on the pallet so that it sinks down a little and when installing the cover back, the gasket does not interfere with us.
Fastening the front timing cover. - The mark on the crankshaft sprocket must match the mark on the block.
Crankshaft sprocket mark. - Unscrew the bolt securing the middle gear and tensioner shoe.
- We unscrew the limiting pin and remove all the sprockets and the old timing chain. The key is 17.
- In the bustle, we forgot to take a photo of the mounting location of the damper, but you can easily find it on the right side of the cylinder head, secured with two 10mm bolts.
Installing a new timing chain
- Be sure to lubricate the new timing chain with engine oil.
- We put it on the crankshaft sprocket and the middle sprocket, install them in place, be sure to tighten and lock them.
- We install the limit pin, tensioner shoe and damper in place. We stretch everything out.
- Check the crankshaft mark.
- We put the chain on the camshaft sprocket, but it is not the camshaft. The descending branch of the chain must be tensioned and the marks must all match. If during installation the mark on the camshaft does not match, simply move the chain the required number of links onto the sprockets, having first removed it.
- Tighten the camshaft bolt, lock it, and bend the tab on the washer.
Timing chain tension
- We install the new tensioner in place; automatic ones are available for sale; I recommend using them. It is better to lubricate the gasket with sealant, tighten the two nuts to 10.
- We remove the pin for automatic or unscrew the cap nut 13 for a regular semi-automatic, you will hear a characteristic click, this means that the tensioner has worked. The chain will be taut. Timing chain tensioner.
- If you are using an old tensioner, it must be cocked before installation. Unscrew the cap nut several turns until the plunger moves freely. Push it all the way into the tensioner body and tighten the nut. You'll have to get the hang of it because the spring is quite powerful.
- In the case of a semi-automatic tensioner, turn the crankshaft slightly clockwise and tighten the nut to 13.
Be sure to turn the crankshaft two turns and check that all marks match.
We install all the parts in the reverse order of removal, fill in antifreeze. We start the engine and enjoy. Everything is quite simple, replacing the timing chain on this car with your own hands is quite possible, the only condition is the presence of an inspection hole.
DIY chain replacement
To replace the chain and gears from the car, you will need to drain the coolant and remove the radiator. Loosen the generator and remove the drive belt.
Remove the valve cover and align the marks on the crankshaft and camshaft with the marks on the engine, to do this, align the mark on the crankshaft pulley with the largest mark on the front timing cover.
Having engaged fifth gear and the parking brake, use a 38 key to break off the ratchet (fastening bolt) of the crankshaft pulley.
Remove the crankshaft position sensor (for injection engines) and the front engine cover.
ATTENTION! In addition to the 9 bolts at the top of the cover, there are 3 more that are screwed in from the side of the pallet.
If the car has a carburetor, then the oil pump gear drives the ignition distributor (distributor), and to make work easier, it is recommended to put a mark on the block and on the gear so as not to additionally adjust the ignition.
After removing the cover, bend the locking pins on the oil pump gear (if it needs to be removed) and loosen the locking nuts.
Remove the camshaft gear cotter pin and loosen the nut.
Unscrew the chain tensioner nuts and remove it.
After removing the tensioner, the chain will weaken and it will be possible to easily remove the gears, and behind them the entire chain.
Check the condition of the crankshaft gear, tensioner shoe and chain guide, replace if necessary.
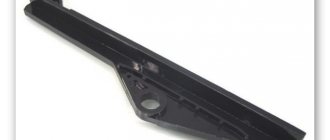
Chain damper
Reassemble everything in reverse order, but with some special features:
- if the oil pump gear is changed on a carburetor engine, put a mark on the new one in the same way as on the old one;
- First, the damper and chain tensioner shoe are installed;
- next is the crankshaft gear, onto which a new chain is thrown;
- the chain is passed from top to bottom, after which it is wound onto the crankshaft gear;
- then the oil pump gear is inserted into the chain and seated on the shaft (for a carburetor engine according to preset marks);
- last of all, the camshaft gear is inserted into the chain and installed on the camshaft;
- when installing the camshaft gear, the marks on the crankshaft and camshaft gears must coincide with the marks on the block and the canister; if this does not happen, you need to rearrange the chain by teeth until they match; A slight deviation is allowed, because on new gears during manufacturing, the marks are not always accurately marked;
- after aligning the marks, install the chain tensioner, first pushing it all the way and fixing it in this position by unscrewing and tightening its lock;
- After installing the chain tensioner, tighten it by releasing the tensioner lock and turning the crankshaft 2 turns, then tighten the lock;
- after the chain is tensioned, use a torque wrench to tighten the camshaft and oil pump gear bolts with a force of 4-5 kgf∙m and bend the tongues of the cotter pins;
- install the front cover with a new gasket and, if necessary, replace the front crankshaft oil seal, install the pulley and tighten its bolt (ratchet) with a force of 10-12 kgf∙m.
Everything else is assembled in reverse order.
Diagnostics of timing chain VAZ 2107i
Over time, the timing chain stretches, resulting in lateral vibrations in the downstream section of the chain. These vibrations can break the damper, and in extremely advanced cases, lead to the chain jumping on the sprocket and, as a result, damage to the engine. When the chain is stretched, a characteristic metallic sound appears in the front part of the engine, increase the speed a little and if the sound becomes weaker or disappears altogether, this is a clear sign of wear on the timing chain. If you have a semi-automatic tensioner installed, try tensioning the chain. The procedure is described above. If this does not help, you will have to change all elements of the gas distribution mechanism.
It is recommended to carry out the tensioning procedure every 10 km.
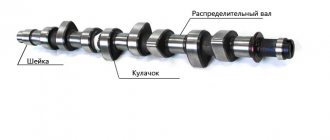
Basic functions of the camshaft
The camshaft opens and closes the valves, allowing the fuel mixture into and out of the cylinder. There are cams on the camshaft. These are the protrusions that transmit torque to the levers. One arm of the rocker (lever) receives torque from the camshaft, the other transmits it to the valves. Thus, the valves open. When the cam rotates further, it stops acting on the rocker, and the springs return the valve to its original position, that is, it closes. The camshaft is driven by the action of the crankshaft. They are connected by a timing chain or belt. If we draw an analogy with a bicycle, then the crankshaft is the pedals, the camshaft is the rear wheel, and the timing chain is the same on a two-wheeler. While the crankshaft makes two revolutions, the camshaft makes only one.
Checking the alignment of the timing marks
If you do not match the crankshaft and camshaft marks, the engine will not operate correctly. Setting timing marks on a VAZ 07 injector is no different from the same procedure on carburetor engines. The mark on the crankshaft pulley should align with the mark on the front engine cover. And the point on the rim of the camshaft sprocket should be opposite the beacon on the bed.
Align the mark on the star with the protrusion
When you put on the sprocket, lock the camshaft so that it is stationary. Do not tighten the star nut all the way. Align the marks on the camshaft by turning the sprocket. The chain should remain in its original position, so throw the links until you reach the alignment of the mark and the ebb on the bed. Then use the wrench to move the crankshaft a quarter turn counterclockwise. Turn the crankshaft back so that the marks on it match. When the marks are aligned on both the crankshaft and the camshaft, tighten the nut on the camshaft sprocket with a torque wrench. Tightening torque – 5 kgf*m. Adjust the chain tension using the tensioner.
Read, it may come in handy: Why does the VAZ-2107 twitch - let’s understand the operation of the “distributor”