For the novice motorist
12/03/2014 Roman
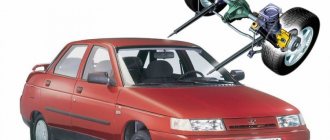
Sometimes situations happen that it is necessary to remove the generator from a Daewoo Matiz car in order to repair or replace it. However, we do not always have access to an inspection hole, overpass or lift. Therefore, now we will learn how to replace the generator without additional tools. Thus, we will not need to lift the car , instead working only in the engine compartment. All actions will be performed from the right wheel.
- 3 Important notes
- 4 Video about alternative ways to access the generator
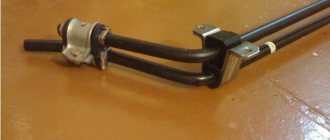
Generator Daewoo Matiz.
The generator on Daewoo Matiz fails very often.
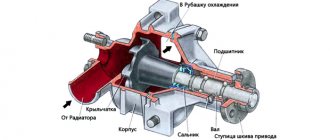
Many owners of Daewoo Matiz have encountered this problem. Neither the car itself nor the car owner is to blame for this, the reason is in the design features. The fact is that the diode bridge of the Daewoo Matiz generator with its negative plate does not directly touch the generator housing, but the contact passes through the studs for fastening the diode bridge and the rivets on which the Matiz diode bridge itself is assembled.
The contact turns out to be extremely unreliable; the rivets usually burn out. As a result, the diode bridge burns out. This is the cause of approximately 90% of Daewoo Matiz generator failures.
So, the actual repair of the Daewoo Matiz generator itself.
Necessary tools: 7mm head or wrench, E5 or regular 4mm head, soldering iron up to 100W, tester,
1. Remove the plastic cover of the generator. It is held on by 3 latches.
2. Using a 7mm head, unscrew the 3 screws securing the Daewoo Matiz diode bridge. And three screws with an E5 or 4mm head.
3. Unsolder the three stator leads that go to the diode bridge. We remove the diode bridge along with the relay regulator.
4. Unsolder the terminal connecting the diode bridge and the relay.
5. We check the rotor with a tester - it should be approximately 3.5 Ohms. Stator - the conclusions should be connected to ground in MegaOhms or infinity. Diode bridge - we check each diode separately, the tester is in the “diode check” position. If at least one is broken, we change the diode bridge. There is no way we can test the generator regulator relay at home, only with the help of a special relay tester, or with a working generator on a test bench.
6. We assemble everything in the reverse order, but with the new Daewoo Matiz diode bridge.
7. We can check the functionality of the generator under such circumstances only on the machine after its installation. Don't forget to charge the battery in advance!
8. The charging voltage of the generator on the Matiz should be 13.6-14.8 V, the charging indicator lamp should go out.
9. There is no point in looking for and buying a generator for a used Daewoo Matiz, since repairing a generator for a Matiz is not expensive, and even an already rebuilt Daewoo Matiz generator is about 2 times cheaper than new ones. Same quality and 6 month warranty. The price for repairing a Matiz generator (Matiz generator price), a refurbished generator for Matiz can be found by calling the numbers on the main page of this generator repair site. Generators are always available.
Buy a generator for Daewoo Matiz 0.8 at a price of only 2900 rubles! at the Rscenter-vostok service center.
Suitable for all Daewoo Matiz and Spark with a 0.8 liter engine.
When purchasing a Daewoo Matiz generator, the generator comes with a half-year warranty.
A factory defect in generators associated with frequent failure of the Daewoo Matiz diode bridge has been eliminated! It won't break anymore!
Generator Daewoo Matiz
The price for a Daewoo Matiz generator is indicated on the condition of handing over the old unit.
We can replace the Matiz generator on your car.
We can repair your Daewoo Matiz generator.
Generator numbers Bosch .0986049051 Valeo 440122 600001 AB165104 TA000A52202 Delco 219170 219251 96380673 DRA3824N DRA3824N.
Service center Rs Center-Vostok – repair of generators in Moscow. You can consult on any issue. Call us by phone, or.
Replacing a Daewoo Matiz generator of one type with another.
Now let's talk about replacing the generator with a different type. If the car previously had a Delphi (Type “A”), and you want to install a Mando (Type “B”), you will have to replace the drive pulley. The fact is that the rotor of the Mando generator is driven by a toothed V-belt, while in Delphi it is driven by a flat poly-V-belt (ribbed belt). Changing the crankshaft pulley for such a task is expensive and pointless.
In such cases, they take the pulley from the old generator and put it on the new one. Since the pulleys are cast and massive, they last a very long time and will work with the new generator for more than one year. The pulley is removed from the generator by unscrewing a single nut.
If we talk about time, replacing a Matiz generator takes from 20 to 40 minutes, depending on skill and experience. Produced alone.
Important Notes
When operating a Daewoo Matiz, problems with the generator may occur.
If repair is not possible, then this spare part must be replaced. At the same time, we are talking not only about the standard model, but also about the JA1600 (JA1600IR) generator from HC-PARTS, as well as some others under numbers 96289030, 96380673, 96566261 and 96567255. In addition, it is possible to use non-original models from EAI under number 56938 , from JAPANPARTS under the number ALZ460, from LAUBER under the number 11.1600, as well as some others. Their characteristics are almost completely identical to the original generators, which can be easily replaced by them.
14.8.3 Replacing generator brushes and voltage regulator
Since the warehouse ran out of diode bridges, we had to disconnect the entire bridge in order to press out and replace the broken diode. It is more convenient and easier to press out diodes using a hydraulic press or in a large bench vice, you need to take mandrels to replace the brushes of the Daewoo Matiz generator diode size, or, if you are repairing in your garage and there is no press with mandrels, then you can use the heads from the set for mm and you can use any from 4 to 7 mm, replacing Daewoo Matiz generator brushes, the wire lead freely entered the head, and its walls were wide enough so that the force did not destroy the diode, but was calmly distributed over the surface and when the jaws of the vice were compressed, and the head 13 rested on the radiator plate , and the second, on the other hand, rested on the plastic part of the body.
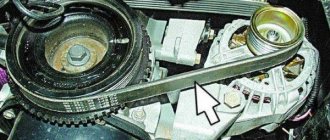
Removing the generator for Daewoo Matiz
But I put it back together in 15 minutes. This method is for those who do not have a pit. Maybe someone will need it for 6 years Tags: There is not much space there, but it is quite enough to perform this operation. View of the generator from under the hood. Upper bolt of the generator. Next, we remove the engine protection. We unscrew the positive wire from the generator with a key set to “10”.
Removing the chip later is inconvenient and the lock of the chip is not visible. Then, using keys set to “12”, we unscrew the two bolts of the lower hinge of the generator, with the right bolt screwed into the body of the generator from the wheel side, the other bolt is through and locked with a nut.
Bracket for mounting the generator and engine mount We move on to the mounting bracket for the generator. It is secured with three bolts. The top bolt is unscrewed with an elongated head at “12”, the rest can be unscrewed with sockets. We remove the bracket, the generator now hangs on the top bolt.
Let's start work
Opening the hood, we find an expansion tank with coolant. We will need to drain it so that during further dismantling we don’t spill it on the floor. First prepare a small container to collect the coolant. A sparkling water bottle will suffice.
Remove the connector from the generator and the boot near the right wheel
So, we disconnect the pipe that leads from the expansion tank to the throttle valve. To do this, we compress the clamp with pliers, pulling it back a little. This will allow us to remove the already mentioned upper pipe. We move the clamp closer to the engine shield for convenient removal and drainage of liquid from the pipe into a bottle or canister that we previously prepared. Since there is practically no pressure in the pipe, you don’t have to worry about it jumping out of the container. To drain the liquid more efficiently, start the engine and wait until all the antifreeze is drained.
Now we can remove the expansion tank. We remove the terminals from the battery to avoid a possible short circuit. Now you can remove the second upper pipe, as well as lift the power steering reservoir. This will allow you to move the expansion tank slightly towards you and dismantle the lower pipe by moving the clamp clamp with pliers. Now you can completely remove the tank, which is what we do. We remove all the pipes to the side to gain free access to the generator.
You can also use non-original generators when replacing
On the way to the generator
Next, disconnect the fuel line from the fuel rail. To do this, press two clamps on both sides of the fuel line. Raise the clamps up until they click and lower them back. So, we disconnected the fuel line from the rail.
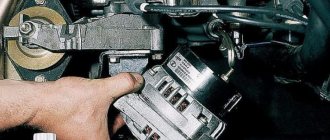
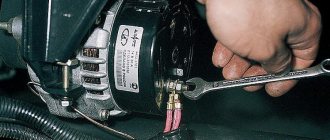
The generator has one electrical connector that goes to the battery charge indicator light. We will need to disconnect it. A wire (plus) is attached to the nearby nose terminal, which can be disconnected by unscrewing the nut using a 10mm wrench. We need to unscrew the generator tension bolt and two bolts securing the generator bar.
We remove the top bar and monitor the fuel rail, the tube of which can bend if not handled carefully. The generator itself has a bolt and a bracket fastening. To dismantle them, you need to use a 12mm wrench. Next, remove the boot under the generator, which is held on by two nuts with a 10mm head and one bolt.
Self-replacement
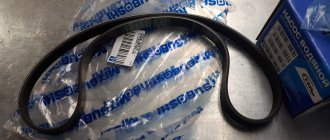
Changing the Daewoo Matiz alternator belt is quite difficult. To do this you will need to do the following:
- Open the hood and drain the coolant from the reservoir. Therefore, before starting the procedure, it is recommended to prepare an appropriate container (a soda bottle will do).
- Holding the clamp with pliers, disconnect the pipe going from the reservoir to the throttle valve.
- Connect the disconnected pipe to the prepared container, start the engine and wait until the liquid has completely drained. There is no pressure in this system. Therefore, after dismantling, the liquid will not immediately begin to flow.
- Remove the terminals from the battery. This must be done to avoid electric shocks.
- Remove the remaining pipe and lift the power steering reservoir.
- Move the expansion tank aside and, by sliding the clamping clamp, remove the lower pipe.
- Remove the tank, thereby opening direct access to the generator.
- Loosen the top and bottom bolts.
- Remove the old belt drive and install the new one.
After completing the above manipulations, you need to perform all the steps in reverse order. In a similar way, you can adjust the belt on the Daewoo Matiz.
The instructions described above are suitable for those cases when it is impossible to tighten or replace a part in a pit or using a jack. If the car can be placed on an overpass, then the procedure becomes much easier.
On the overpass
To tighten the part, you will need to remove the right front wheel, behind which the generator is hidden. After this, you need to check the tension level. To do this, you need to press on the belt in the area between the generator and crankshaft pulleys. If, as measured by a ruler, the deflection exceeds 10 mm, then the part should be tightened by performing the steps described below:
- Using a 12mm wrench, loosen the bottom nut. At this moment, you need to use the same tool to hold the left bolt securing the generator from turning.
- Loosen the top bolt.
- Loosen the bolt that secures the generator to the adjustment bar.
- Using a mounting spatula inserted between the part to be disassembled and the bracket, press out the generator.
- Tension the belt, and then tighten the fastening bolt that secures the parts to the bracket.
- Recheck the tension force.
How to replace the timing belt on a Daewoo Matiz
If you are the owner of a Daewoo Matiz car, then this photo report was prepared especially for you. Here are detailed and clear instructions on how to replace the GPM belt with your own hands.
Now let’s determine what kind of belt you can buy.
If the engine volume of your Matiz is 0.8 liters. then you can buy the following belts for shegov:
- Gates 5434XS;
- BOSCH 1987 948;
- Contitech CT910;
- And the cheapest option is Dayco
In principle, the GPM belt does not need to be changed often, but at the same time there is no need to delay replacement until the moment when the belt bursts. The average mileage of a GPM belt is 90,000 km. However, every 30,000 km a continuity wire is required. And if suddenly during the inspection any cracks, creases, traces of oil or tears are discovered, then immediately replace the belt. The only tools we need are a set of standard wrenches and socket heads.
It is also necessary to say about the GPM belt for Daewoo Matiz that if the belt suddenly bursts or breaks while driving, the valves will bend because of this, and the guide bushings will also need to be replaced.
First, we need to remove the top protective cover. This can be done with a ten-point head. You shouldn’t be afraid that everything is very tightly located under the hood, it won’t hinder you in any way, and I don’t think you should have any unnecessary problems.
The next step we will have to remove the top cover, after which we must first loosen and then completely remove the drive belts of the generator, main control unit and air conditioner.
Next we need to remove the right one. front wheel and protective casing, which is located behind the wheel. We also need to unfasten the generator, but since its fastening may oxidize, we first need to loosen the bolt from below.
So now we can get to the bottom of the engine.
Next you need to remove the hanging belts, then you need to set marks on the camshaft pulley.
Now it's up to the generator drive pulley, do you see any risk on it? It should coincide with zero on the GPM housing cover.
Then we need a bolt from the crankshaft and then remove the pulleys using the attachment drive.
To remove the lower belt we need to remove the tube and dipstick. Next, you need to remove the cover; to do this, we unscrew the bolts with a socket wrench with a 10-mm head. We also unscrew the tension roller, after which we remove the timing belt itself.
This is the tension roller and belt we used.
Since our roller is semi-automatic, to install it completely we only have to tighten the bolts, it fixes the roller. You need to tighten it with a force of 15-23 Nm. After tightening the roller and installing the belt, we need to wrap the crankshaft two turns. Make sure the marks match. The mark is located on the lower GPM pulley.
Typical generator problems
The vast majority of cars produced by Daewoo have two main types of generating devices. This is a generator Matiz, Nexia CS130 and CS121. A similar model is in Gentra's car. There are no fundamental differences other than the size of the stator. They are even interchangeable.
Unification allows basic repairs to be carried out according to the same scheme, regardless of which model is installed on the Daewoo Matiz. As practice shows, the stator and rotor are both reliable models. In most cases, failure of their operation is caused by mechanical damage.
The most common troubles include:
- destruction on the rear cover of the generator bearing;
- burnout of the diode bridge due to improper washing, contact with oils and technical liquids on the housing.
- scorching of the working surface;
- generation of generator brushes.
These problems can lead to others. Thus, the destruction of the bearing leads to strong shock loads on the rotor and stator. Also, because of this, a short circuit of the “plus” of the brushes to ground may occur - and as a result, the relay-regulator will burn out.
Instructions for replacing the alternator belt
Another common problem is the alternator belt. Fortunately, replacing it is one of the easiest operations. It is not particularly difficult even for those who are not very well versed in how the Daewoo Matiz generator works.
Periodicity
Checking the condition of the generator belt and its tension should be carried out regularly. As practice shows, this part is one of those that fail most often. Therefore, experienced craftsmen recommend checking the condition of the strap once a year and replacing it if necessary.
Unlike timing belts, there is no clear data on how far a car travels before it needs to replace the alternator belt. It is necessary to check its tension. But in most cases, under severe operating conditions, replacement is required every 80 thousand kilometers. Under normal conditions, the Daewoo Nexia generator belt will withstand 120 thousand km or more.
Stages
The scheme of your actions for replacing the generator strap with Nexia should be as follows:
- first remove the air-conducting sleeve, which is assembled with an additional muffler for the intake air noise;
- then check the belt tension by pressing it with your finger between the pulleys;
- with a pressing force of 10 kgf, the belt deflection should be in the range from 10 to 15 mm;
- to adjust the tension, loosen or tighten the bolt attaching to the tension bar;
- If you have a car without air conditioning, then removing the belt is done simply after loosening the tension by removing it from the pulleys:
- if the car has air conditioning, you need to remove the drive belt of its compressor; to do this, loosen the nut;
- to install a new belt, all parts are mounted in a ritual manner;
- At the same time, tighten the compressor drive belt so that at a pressure of 10 kgf it bends by 5-8 mm.
Replacing the starter bendix (from Daewoo Matiz) — logbook Geely CK 2008 on DRIVE2
Greetings to everyone! With the onset of cold weather (in the summer, sometimes this sound would occur), when starting the engine, I began to notice an extraneous sound. The sound was precisely when the starter was turned. I went to an electrician, who immediately gave a verdict - replacing the Bendix.
I wanted to have it replaced by the same electrician, but he was always busy... well, we’ll change it ourselves)) I watched a lot of videos about how to remove the starter on a Geely CK. They said that one of the bolts there is very insidiously located and a cardan for the crank (ratchet) is needed. Nothing of the sort, I unscrewed it without any problems using a 16 mm wrench and head.
To remove the starter and replace the bendix you need: - a 8, 10, 13, 16 socket, - a wrench, - a Phillips screwdriver (you can also use a flat head), - a metal brush.
To dismantle the starter, you need to remove the battery, unscrew the three bolts, 10, securing the battery plate. This will give you access to the top starter bolt. The bottom bolt is unscrewed from the pit (photo below).
Starter lower bolt
Before unscrewing the fastening bolts, you need to unscrew the positive terminal of the starter and remove the connector (done from the pit). After this, remove the starter (also from the pit).
After dismantling, on the workbench, you can start getting to the bendix. It doesn't take much work to get to it. I won’t describe it, I’ll share the video I followed.
Of course, I carried out troubleshooting of the armature, brushes and retractor - everything is fine with them (mileage 157,000 km).
Starter on a workbench
Planetary starter mechanism
The most interesting. I went to the store for a new Bendix, but it didn’t fit. It differs both externally and in the internal diameter of the bushing (my Bendix axle did not fit into the hole of the new Bendix). There is a Deu counter nearby. They offered Bendix from Matiz, tried it on - everything fell into place. I bought it from Matiz, what’s more, it’s Korean =))
The sound of the engine starting has changed beyond recognition. Now the engine starts like a full-fledged foreign car))
All the best and smooth roads))
Price tag: 510 UAH Mileage: 157000 km