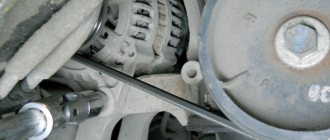
The Vesta alternator belt is one of the consumables without which it is impossible to operate the car. A break is an unpleasant malfunction that will quickly discharge the battery and immobilize the car. In such cases, the battery powers the car's electrical network alone, without help from the generator, and it does not last long.
Changing a part yourself is not easy; you need skills. It is better to choose original spare parts or products from well-known brands. The cost of work is 900-1500 rubles. Belts are offered at an average price - from 800 to 1,400 rubles, tension rollers - from 800 to 2,000 rubles.
Generator design and functions
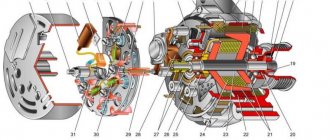
A car generator is one of the auxiliary devices without which the operation of a vehicle is impossible. Its task is to provide sufficient electricity to all consumers on the car and charge the battery.
Malfunctions lead to the fact that the battery is left without an assistant; on its own, it can only provide movement for a short distance. To avoid such situations, manufacturers install a battery charging indicator lamp that signals a breakdown.
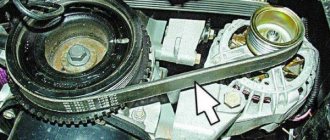
Generator belt. Photo source: https://www.drive2.ru/l/503533995397480550
The generator is a mini power plant that produces three-phase alternating current. Then it is converted into a permanent one that powers the vehicle's electrical network. The device operates synchronously with the engine, driven by a poly-V-belt that transmits rotation from the crankshaft to the rotor. This generates electromotive force in the stator windings.
To assemble such a device, more than 20 parts are required. Main nodes:
- Rotor. It is an electromagnet whose winding is located around a rotating shaft. Contact between them is ensured by graphite brushes.
- Stator. These are 3 fixed windings made of copper. They are wound on a magnetic core and connected to each other.
- Relay regulator. Its function is to control the voltage at the output terminals at a level of 13.5 V. The relay has overload protection functions. More complex designs have a built-in temperature sensor, which provides a higher voltage supply in winter. At low temperatures, electricity consumption in a car increases. It is installed on the housing using a special brush holder, or inside the generator in one block along with the brushes.
- Rectifier (diode bridge). Its functions include converting an alternating signal into direct current.
- Frame. Made from light metals or their alloys to reduce weight. Since a running generator is subject to heat, the housing has many ventilation holes to ensure that the device is cooled by air currents.
An additional impeller is provided, the blades of which rotate along with the rotor and provide more efficient cooling by increasing air flow.
Self-replacement of parts
The procedure for replacing the belt drive on Vesta is made difficult by the compact arrangement of the units in the engine compartment. Access to the belts is limited by the closely located side member of the body, so the removal of additional elements is required.
To complete the work you will need:
- lift or inspection hole,
- additional supports to support the power plant.
Carrying out the work requires knowledge of the car's design; if the owner does not have repair skills, it is recommended to transfer the car to a specialized service center.
Required Tools
A set of tools required when replacing timing drive parts on a VAZ Vesta:
- 10, 13, 15 and 17 mm socket wrench;
- 17 mm spanner;
- hex key size 5 mm;
- Torx heads T30, T55 and E12 and a key for installing the nozzle;
- hydraulic or mechanical jack;
- set of flat blade screwdrivers;
- an original key for changing the position of the tension roller (it is permissible to use a tool to remove the retaining rings);
- mounting blade.
Preparing the car
- Open the hood of the car and remove the decorative plastic cover.
- Remove the protective fender liner installed in the arch of the right front fender.
- De-energize the on-board network by removing the terminal from the negative pole of the battery.
- To access the mounting points, you need to jack up the car and then remove the wheel.
- Install a safety support under the body sill to prevent the vehicle from falling if the jack slips or breaks.
- Using a 10 mm socket, unscrew the bolts securing the protective screen located under the engine.
- Loosen the bolt securing the pulley to the engine crankshaft. To perform the operation, you will need the help of a second person who presses the brake pedal.
If there is no assistant, then you need to unscrew the 3 mounting bolts and then remove the starter. To fix the crankshaft, use a screwdriver, which is inserted into the gap between the clutch housing and the ring gear on the flywheel.
- Place a jack under the engine crankcase, having previously installed a wooden spacer, and then remove the cover of the auxiliary drive belt tension roller. To reduce the tension, use a Torx T55 wrench and turn the roller bracket clockwise.
- Unscrew the bolts securing the engine mount; the power unit must be lowered to the ground by 50-70 mm, which will allow you to dismantle the roller and remove the belt from the pulleys. It is recommended to inspect the parts; if worn, a new set (belt and roller) is installed.
Removing the timing belt on VAZ 21129 and 21179 engines
The procedure for removing worn parts on a VAZ-21129 engine:
- To change the belt, you will need to unscrew 5 bolts securing the top plastic cover covering the timing drive.
- Unscrew the bolt and remove the pulley from the engine crankshaft; under the part there is a guide disk, which is also removed from the machine. When removing, it is necessary to control the position of the pulley, which can damage the shaft position sensor.
- Remove the 3 bolts securing the bottom of the protective screen.
- Set the timing marks, turn the engine crankshaft using a bolt with a set of spacer washers screwed into the toe of the crankshaft. It is possible to rotate the shaft by rotating the suspended wheel when 5th gear is engaged. There are marks on the camshaft gears that align with mating parts on the rear of the belt guard. To fix the camshaft gears, devices made of polyurethane bushings with a bolt are used.
- Check the alignment of the mark on the crankshaft gear with the counter rib on the oil pump housing. Loosen the bolt securing the tension roller; the mechanism will rotate automatically under the force of the tensioned drive.
- Pull the belt off the pulleys; if further use of the part is planned, then a mark is first applied to it indicating the direction of movement during operation. If you plan to replace a part, then a set of rollers (tensioner and intermediate) is installed at the same time.
- Check the condition of the pump; if bearing play or antifreeze leakage is detected, the unit must be replaced. Before removing the pump, the coolant is drained from the engine jacket (through a special hole in the block).
What kind of generators are installed on the Lada Vesta?
The Volzhsky Automobile Plant does not produce automobile generators. The provision of Lada Vesta vehicles with such devices is the responsibility of suppliers. The main manufacturers carrying out conveyor deliveries are Bosch and Valeo.
Drive belt. Photo source: https://www.zr.ru/content/articles/779188-lada-vesta-proverka-i-zamena/?
The original generators produced by these companies are sold under the Lada brand. Article number - 8450006900, output current - 120 A. For equipment with a heated windshield, a version producing 150 A is available.
There are many analogues on the market. Among the domestic ones, the most widely used products are those with an output current of up to 200 A.
Troubleshooting
In fact, there is nothing special to write about here, since all problems arise from worn slip rings and bearings. We simply replace them with similar ones
Repairing the rotor is more problematic, but even here everything is quite simple if you know what to do. Replacement of slip rings is carried out as follows: using a chisel and pliers, remove the old rings, carefully cutting off the wires welded by resistance welding
New slip rings must be carefully pressed onto the shaft, and the wires must be tucked into place and soldered. Before installing the bearings and assembling the generator, be sure to check the integrity of the windings with a multimeter
What belts are installed on Lada Vesta
The article number of the Lada Vesta alternator belt with air conditioning is 8450006328. Modifications 6PK1039 are used for cars equipped with an air conditioning system, and 6PK778 for the Vesta alternator belt in the configuration without air conditioning. The official suppliers of these parts to the VAZ conveyor are Gates and Contitech.
Vesta generator tensioner roller. Photo source: https://doktormobil.ru/katalog/roliki/330889/
On cars with 1.6 16v and 1.8 liter engines equipped with air conditioning, the necessary tension is provided by the support roller of the Lada Vesta generator under number 8450006996. Its design is such that if the part is in good working order, no adjustments are required.
Motor VAZ 21129
Let's talk about the first of two Russian models. There are quite a few differences between the 129 engine and the 127 Priorovsky, the youngest in the model range. In comparison with the VAZ-11186 engine, with a volume of 1.6 liters, it has a power of 106 horsepower. This difference is due to 16 valves instead of 8 in the previous version. Ambient temperature sensors and absolute pressure sensors are installed as standard. Characteristics of this Lada Vesta engine.
Power - 106 horsepower, spins up to 5800 rpm. Volume - 1.6 l. A highly modernized engine mount has been installed. Drive and timing type: standard DOHC timing belt. Torque characteristics - 148\4200. Motor weight - 109.2 kg. Cast iron cylinder block Electronic ignition system controlled by a processor. Adds dynamics to the car. Fuel type is unleaded gasoline with an octane rating of 95, but 92 is also possible. Power supply is via a distributed injection system. The car will accelerate to 100 km/h from 21129 in 12.8 seconds. With a 129 engine, Vesta consumes gasoline: in the city - 10.2 liters, mixed driving - 7.5 liters, on the highway - 6.2 liters.
Toxicity is at a level characteristic of the Euro 5 standard.
The running life is set at 200 thousand km.
Innovations compared to the design of the previous model monitor the quality of fuel, and do not idle. The damper system regulates the air supply at different speeds, which gives traction to the engine from the bottom and at the top.
Changes in the design of the 129 motor, facilitating long-term operation:
— a cylinder block with increased rigidity is installed, and other engine systems are improved. Compared to previous models, it shows an increase in quality indicators and meets European quality standards;
— the piston has one oil scraper ring and two thin compression rings, which reduces loss of performance due to friction;
— extensive opportunities for improving the power unit, tuning increases power to 145-150 hp.
The only noticeable drawbacks of the 129 engine are the high, uneven tone noise level. It may appear after prolonged use and at the very beginning. When the timing belt breaks, like most VAZ engines, it suffers from the fact that the valves bend.
How to check the belt
The technical regulations provide for checking the condition of the drive of mounted units every 15,000 km, replacement - after 90,000 km. The surface condition and tension are checked visually. It is checked as follows:
- A thin metal plate is applied to the longest straight section.
- Using your fingers, applying medium force (no more than 10 kg), pull the belt.
- Measure the resulting gap, which should not exceed 10 mm.
Alternator belt tensioner. Photo source: https://www.lkforum.ru/showthread.php?t=67012&page=44
In this case, the Vesta generator belt is tensioned according to the rules. Over-tightening is also unacceptable; it leads to accelerated failure of bearings on rotating shafts.
Refueling volumes
As mentioned above, three different engines were installed on the Lada Vesta - 11189, 21129 and HR16DE-H4M. It was also equipped with different gearboxes - 2180, 2182 and JHQ. Based on this, some Vesta filling containers have different volumes, while others are the same for everyone.
The following table will help you figure out how much of a particular technical fluid needs to be filled:
| Nominal filling volumes of Lada Vesta | |
| Capacities | Volumes (l.) |
| Engine lubrication system (including oil filter): 11189/21129 (stamped oil sump) 11189/21129 (cast oil sump) HR16DE-H4M | 3,2 (2,9) 4,4 (4,1) 4 |
| Cooling and heating system* : 11189/21129 HR16DE-H4M | 5,95 7,0 |
| Gearbox : Gearbox 2180/2182 JHQ | 2,25 3,34 |
| Hydraulic clutch and brake system | 0,559 |
| Hydraulic brake system (for cars with AMT) | 0,517 |
| Washer reservoir | 4,7 |
| Expansion tank (for cars with 21129 | 5.75 (max) 5.35 (min) |
| Air conditioning system (freon R134 “A”) | 0,475 (± 20) |
*A mixture of coolants of different brands should not be allowed.
In the same repair and maintenance manual for Lada West there are also the following volumes of coolant for the engine cooling system:
- for 11189/21129 with pre-heater - 9.3 l., without heating - 8.7 l.;
- for HR16DE-H4M with pre-heater – 7.6 l., without heating – 7.0 l.
Signs of belt and tensioner wear
There are a number of characteristic symptoms that indicate an abnormal drive condition:
- Whistle when starting the engine. Appears due to insufficient tension caused by a worn belt or a faulty roller (on cars with air conditioning). If it rotates freely, there are no visible signs of wear, the cause is looked for in the belt. It has a polycline structure. The surface consists of several longitudinal ridges, called wedges, and depressions, “streams,” located between them. When the ribs are ground down, the wedges sink deeper into the pulley grooves, thereby reducing the internal diameter of the drive. The increase in length at a certain stage goes beyond the limits that the tension roller can compensate for.
- Cracks on the surface. With use, transverse cracks appear, often on the inner surface. Several of these are a warning sign; when there are many of them, the drive must be replaced immediately.
- Worn roller surface. An evenly ground pulley is not so bad if the sagging is compensated by moving the roller. Otherwise, the belt will slip and may even jump out of the groove. Uneven wear can create edges that cut the belt.
There are no effective ways to restore the functionality of the mechanism. The only way out is to replace worn parts.
Replacement
Removal
Next you need to remove the front right wheel, fender liner and plastic shield to get to the belt and rollers.
Then remove the alternator belt, marked No. 5 in Fig. 5-1.
Afterwards, you need to unscrew the 2 nuts (No. 1 in Fig. 5-2), as well as the bolts (No. 5) that secure the spar to the subframe (No. 6), and then remove these bolts. To work you will need a wrench, a 10mm socket and a 13mm ring wrench.
Next, unscrew the mounting bolt (No. 3) of the radiator frame (No. 2) and the spar, and then remove the additional right subframe spar (No. 4). For this you will need a wrench and a 16mm socket.
The traverse hook (No. 2) must be inserted into the eye (No. 3) of the eye (right) and the motor should be hung on the right side.
Then, in the process of replacing the tension roller of the Lada Vesta generator belt, you need to unscrew and remove 2 bolts (No. 1 in Fig. 5-4), which secure the engine to the right engine mount. To work you will need a ratchet, an extension and a Torx E12 bit.
Then you need to unscrew the nut (No. 1 in Fig. 5.1), which is used to fix it, and remove the roller (No. 2). To work, you will need a wrench and a 13mm socket.
Installation
After removing the worn part, a new tension roller for the Lada Vesta generator belt is installed.
First you need to put the tension roller (No. 2 in Fig. 5-1) on the stud, securing it with a nut (No. 2), but you do not need to tighten it right away. To work, you need a ratchet and a 13mm socket.
Then you need to lift the traverse hook (No. 2 in Fig. 5-3), from which the engine is suspended, screw in 2 bolts (Fig. 5-4), which secure the motor to the right suspension support. The bolts are tightened with a torque of 53-71 Nm. For work – ratchet, Torx E12 bit, extension, torque wrench.
The right side member of the subframe is installed (No. 4, Fig. 5-2). Tightening the fasteners (tools – torque wrench, ratchet, 16mm socket):
- nuts (No. 1) bolts (No. 2) fixing the spar (No. 4) to the subframe (No. 6) – 18-24 Nm;
- bolt (No. 3), which secures the spar (No. 4) to the radiator frame (No. 2) - 18-24 Nm.
Next you need to install the alternator belt (No. 5 in Fig. 5-1).
When everything is done, you need to tighten the tension roller mounting nut with a torque of 30-36 Nm, for which you need a wrench, a torque wrench and a 13mm socket.
This completes the independent replacement of the tension roller of the Lada Vesta generator belt. All that remains is to install the plastic shield, locker and put on the wheel.
How to replace the alternator belt on Vesta
The engine compartment of the car is arranged quite tightly. Removing and replacing the alternator belt on a Vesta requires freeing up space in the engine compartment to provide access to the unit. First, prepare the tools.
Replacing the alternator belt tensioner on a Lada Vesta. Photo source: https://www.zr.ru/media/?media=photo&p=594
To work you will need:
- Torx keys T-55,T-20, T-30;
- slip-on “13”;
- set of open-end wrenches;
- Phillips and flat screwdriver;
- wheel wrench;
- jack (in the absence of a lift or inspection hole).
The sequence of actions depends on the vehicle configuration: type of gearbox, presence of an air conditioning system, tension roller.
Sequencing:
- Hang the right front wheel, or use a lift or inspection pit.
- Remove the fender liner. First unscrew the fastening screws.
- Remove the metal engine protective shield.
- On vehicles with a manual transmission, unscrew the hydraulic clutch cylinder and hang it on a service hook.
- Dismantle the clutch hydraulic cylinder mounting bracket.
- Unscrew and hang the starter without disconnecting the wires. This will open access to the flywheel and allow you to lock it with a large screwdriver or a special insert;
Then the differences begin. For a car without air conditioning:
- Disconnect the crankshaft damper by unscrewing the mounting bolt.
- Use a screwdriver to remove the plastic plug on the roller.
- Use a 13mm spanner to loosen the tension roller nut.
- Using a Torx T-55 wrench, rotate the roller counterclockwise until the top position is reached.
- Remove the loose drive belt.
The belt is installed on the device pulleys in the following order:
- damper;
- air conditioning compressor;
- generator;
- tension roller.
After installation is complete, the alternator belt must be tensioned. On Vesta, the tension roller is moved to the lower position by rotating clockwise. Once the desired position is reached, the position of the roller will be fixed, and the belt will receive the necessary tension. Then tighten the fastening nut.
Replacement
Removal
Self-replacement of the tension roller of the Lada Vesta generator belt begins with preparing the car. First you need to turn off the engine, put the car on the handbrake, and then jack it up or put it on a lift.
Next you need to remove the front right wheel, fender liner and plastic shield to get to the belt and rollers.
Then remove the alternator belt, marked No. 5 in Fig. 5-1.
Afterwards, you need to unscrew the 2 nuts (No. 1 in Fig. 5-2), as well as the bolts (No. 5) that secure the spar to the subframe (No. 6), and then remove these bolts. To work you will need a wrench, a 10mm socket and a 13mm ring wrench.
Next, unscrew the mounting bolt (No. 3) of the radiator frame (No. 2) and the spar, and then remove the additional right subframe spar (No. 4). For this you will need a wrench and a 16mm socket.
When this is done, you need to place a crossbar on the machine (No. 1 in Fig. 5-3), which is necessary to hang the engine.
The traverse hook (No. 2) must be inserted into the eye (No. 3) of the eye (right) and the motor should be hung on the right side.
Then, in the process of replacing the tension roller of the Lada Vesta generator belt, you need to unscrew and remove 2 bolts (No. 1 in Fig. 5-4), which secure the engine to the right engine mount. To work you will need a ratchet, an extension and a Torx E12 bit.
Next, you need to release the traverse hook so that you can remove the roller from the pin (No. 2 in Fig. 5-3).
Then you need to unscrew the nut (No. 1 in Fig. 5.1), which is used to fix it, and remove the roller (No. 2). To work, you will need a wrench and a 13mm socket.
Installation
After removing the worn part, a new tension roller for the Lada Vesta generator belt is installed.
First you need to put the tension roller (No. 2 in Fig. 5-1) on the stud, securing it with a nut (No. 2), but you do not need to tighten it right away. To work, you need a ratchet and a 13mm socket.
Then you need to lift the traverse hook (No. 2 in Fig. 5-3), from which the engine is suspended, screw in 2 bolts (Fig. 5-4), which secure the motor to the right suspension support. The bolts are tightened with a torque of 53-71 Nm. For work – ratchet, Torx E12 bit, extension, torque wrench.
Next, the traverse hook (No. 2, Fig. 5-3) is removed from the eye of the right eye (No. 3), and the traverse itself is removed.
The right side member of the subframe is installed (No. 4, Fig. 5-2). Tightening the fasteners (tools – torque wrench, ratchet, 16mm socket):
- nuts (No. 1) bolts (No. 2) fixing the spar (No. 4) to the subframe (No. 6) – 18-24 Nm;
- bolt (No. 3), which secures the spar (No. 4) to the radiator frame (No. 2) - 18-24 Nm.
Next you need to install the alternator belt (No. 5 in Fig. 5-1).
When everything is done, you need to tighten the tension roller mounting nut with a torque of 30-36 Nm, for which you need a wrench, a torque wrench and a 13mm socket.
This completes the independent replacement of the tension roller of the Lada Vesta generator belt. All that remains is to install the plastic shield, locker and put on the wheel.
How to replace the tension roller
The manufacturer recommends replacing the roller together with replacing the belt.
Belt tensioner key. Photo source: https://mashintop.ru/dvigatel/kak-i-kogda-pomenyat-remen-grm-na-lada-vesta-lada-vesta-metki-ustanovka-i-natyazhenie.html
This is a labor-intensive operation. The roller rests on the spar and it is impossible to dismantle it without hanging the engine. After removing the alternator belt used on the Vesta, it is necessary to carry out the following operations:
Engine Maintenance 21129
For normal operation of the Lada Vesta and other models, it is necessary to carry out regular maintenance. For this:
After covering 10,000-15,000 kilometers, it is necessary to replace the lubricant. The oil filter is replaced at the same time as the oil;
- After every 20,000 mileage, you should check the functionality of the spark plugs, DC generator drive belt, battery, and crankcase ventilation;
- When the Lada Xray and other models reach 45,000 mileage, it is necessary to check the functionality of the thermostat, the elasticity of the cooling system pipes and replace the antifreeze. Fuel filters are being replaced;
- After 100,000 miles, it is necessary to check the condition of the timing belt. If there is damage, a new belt should be installed.
List of works for maintenance 6 (90,000 km or 6 years)
- Repeat all the procedures prescribed by TO 1, TO 2 and TO 3 - change the engine oil and oil, air and cabin filters, as well as spark plugs and brake fluid.
- Replacing the alternator belt for cars without air conditioning. Article 8450006327, price - 800 rubles.
- Replacing the accessory drive belt for vehicles with climate control. Article 8450006328, belt price - 1100 rubles. If the belt tensioner roller (automatic) is worn out, then we change it too: article number - 8660001575, price - 3500 rubles.
- Replacing the coolant. The manufacturer recommends using Antifreeze Sintec LUX G12 red-orange, article number 614500, and the price is for 5 liters. canister - 460 rubles.