Let's be honest - the VAZ 2110 does not have the most beautiful “native” instrument panel, either on the first cars or on the “improved” ones. Therefore, many owners of this model are trying to make it more modern and somehow decorate it (with LEDs, beautiful lights, etc.).
But, before you decide on some kind of upgrade, it is necessary that you have before your eyes the pinout of the instrument panel for the VAZ 2110, otherwise you can simply get lost in a heap of wires, sensors and buttons. Moreover, it will be useful regardless of whether you completely change the panel, or simply make some additions to the dashboard of your VAZ 2110.
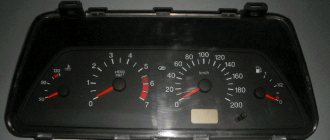
Instrument panel VAZ 2110
Connection knowledge
Before starting dismantling work, you need at least a conventional pinout on paper, otherwise it will be very difficult: you will need to “trace” every wire and every connection that is on the “path” from the devices to the power button.
In fact, the pinout of the VAZ 2110 dashboard is not so difficult to understand, but there are differences between cars produced in different years and at different factories. There is an old model, there is one with a mechanical odometer, and a new (Euro) model, so there are differences in the pinout of the instrument panel, depending on the type to which it belongs.
Instructions for installing the Europanel on a VAZ 2110 can be found here:
Why you should know the pinout
But before you start this kind of upgrade, you need to understand which wire leads where. The pinout of the instrument panel of a VAZ-2110 car is a very important point when “tuning”. Without this, you risk simply getting confused in a fairly large number of wires, buttons and various sensors. The pinout will be useful in any case - both when making minor improvements and when completely replacing the instrument panel.
The process of installation and dismantling itself is quite labor-intensive, but if you know the correct sequence of actions, then there is nothing particularly difficult about it.
For these works you will need a minimum set of tools - a screwdriver and pliers.
For those who are doing this for the first time, it is best to stock up on self-adhesive pieces of paper, like those on which prices are written in stores, and a pen. With their help, at the time of disassembly, you will indicate, firstly, the sequence of dismantling the parts, and secondly, which wire is connected where. At first glance, this may seem time-consuming, but in fact, for beginners, such markings will help them put the panel back together faster.
General diagram of devices
If you look from the back of the instrument panel, here it is in sequence - from top to left to right:
- Fuel level indicator;
- Combination of instrument lighting lamps;
- Right turn control;
- Left turn control;
- Tachometer;
- Next is the block, there are a lot of plugs in it;
- And the top part of the dashboard is completed by an antifreeze temperature indicator.
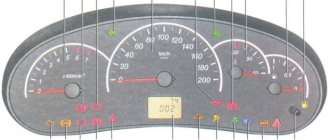
VAZ 2110 dashboard connection diagram
The lower part of the dashboard (also from left to right and from the back of the dashboard). The following part of the instruments is located here:
- high beam controller (bulb);
- alarm controller;
- brake fluid level control lamp;
- speedometer;
- CHECK ENGINE controller;
- battery charge control;
- parking brake controller;
- oil pressure controller;
- air damper controller in the carburetor;
- outdoor lighting controller.
You can familiarize yourself with speedometer malfunctions in this material:
White block
The connector number, wire color and the unit (assembly) to which it goes are located in the white block as follows:
- The first connector has a black wire. Its purpose is the body (mass);
- In the second - red-brown - this is a low-voltage supply from the electronic control unit - tachometer;
- The third, yellow one is also a tachometer, but this is a high-voltage supply from a coil;
- The fourth, red-blue is Const from the battery + 12V, going through the sixth fuse;
- The fifth, green-white - it is intended to indicate the coolant temperature;
- Sixth, green-yellow – for size fuse F1;
- The seventh connector does not have its own color and goes to the “choke”, the throttle valve;
- Eighth, red and white - CHECK ENGINE light;
- In the ninth and tenth there are 2 orange wires each, leading to 2 power fuses F19+12V;
- In the eleventh there are 2 blue-brown wires leading to the “BK” terminal of the parking brake;
- The twelfth, brown-white is the output “D” of the generator;
- Thirteenth, gray and blue – for the oil pressure sensor.
White block (X1) and Red block (X2) of the VAZ 2110 instrument panel
Red block
The number is the connector according to the account, followed by the color of the wire and an indication of the device to which it goes in the red block of the VAZ 2110:
- Blue and red go to the sensor showing the external temperature;
- Orange - power fuse F19+12V;
- Black, 2 wires – ground, body;
- White - light switch for all devices;
- Blue - right direction indicator;
- Blue and black - left turn signal;
- Blue with pink - TJ level;
- Brown – leading to the trip computer;
- Gray - speed indicator;
- Pink - Fuel gauge (terminal “T”);
- 2 black-green wires - high beam fuse (F3);
- Blue and white - emergency light switch;
- White - leading to the ignition switch (terminal 50).
An article dedicated to tuning the dashboard backlight can be found here:
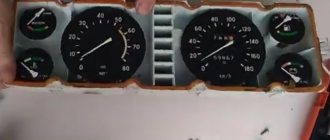
Indicators
Dashboard
At the moment of ignition, all the lights on the instrument panel light up; after the engine starts, most of the indicators go out. Sometimes, even after starting the engine, one light continues to glow or even blink. This alarms drivers, because it is difficult to say which component in a VAZ 2110 car is malfunctioning; diagnostics are required to determine the breakdown.
We know that the “ten” can be old or new. In both versions, the designations remain identical, the only difference is the location of the light bulbs and their diagram.
At the bottom of the instrument panel there are indicators that indicate a malfunction in the operation of various systems of the VAZ 2110. If they continue to light when the engine is running, it means that repairs will have to be carried out.
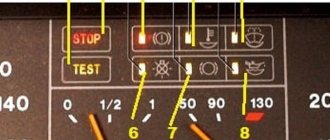
This is what the indicators of a VAZ 2110 look like with the ignition on
We go from left to right:
- The leftmost light, located on the instrument panel, refers to the air damper - the indicator is present in models with a carburetor engine;
- Oil can icon. If the indicator lights up or flashes, it means that the oil compression in the power unit has dropped and the pump is not working properly;
- The letter "P" inside a circle. The dashboard tells you that you forgot to turn off the parking brake;
- A light indicating a faulty battery or generator. Perhaps the alternator belt has broken, there is an open circuit in the circuit, charging is not performed;
- When the “high beam” is working, the headlight icon lights up on the panel;
- On light bulb icon – the indicator shows the lights on;
- "Check Engine" indicator. If it burns, then it is urgent to carry out diagnostics and subsequent repair of the VAZ 2110 engine; serious defects have appeared in the operation of the power plant. The best solution is to stop moving;
- Directly above the faulty engine sign is a warning light.
In addition to these indicators, the front part is equipped with a display showing mileage. Also in this area are the clock and setting keys for it. In the “tens” of the new generation, the screen may be of a narrow format, but the layout remains the same.
Additional panel
New cars have an additional panel with useful indicators. A flashing icon depicting a person with a seatbelt informs you that you should fasten your seat belt - this applies to both the driver and his companions. While driving, the wheel icon may light up; there is a possibility that the pads are worn out and require repair.
- Oil light - lights up when the oil level drops below normal - you should check the level as soon as possible.
- Windshield washer - it tells us that the washer fluid is almost empty.
- The thermometer above the container indicates an increased temperature of the coolant.
- A crossed out arrow icon means the parking or brake lights are not working.
Nuances of work
However, these pinout diagrams for the VAZ 2110 are, so to speak, basic, mostly the same, but there are also differences in color markings (especially by manufacturer). Therefore, you need to either use the instruction manual that came specifically with your car, or, armed with a marker and self-adhesive labels, “write everything out” in detail and not get confused when installing a new instrument panel.
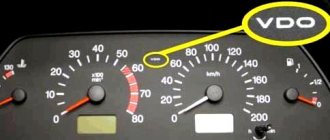
Connecting wires to the VDO panel on a VAZ 2110
Connecting wires to the “Schetmash” panel in Kursk on a VAZ 2110
Connecting wires to the “AP” panel in Vladimir on a VAZ 2110
Connecting wires to the panel from the Kalina car to the VAZ 2110
During subsequent assembly, there will probably be a lot of devices that are not taken into account here, and, taking into account modern realities, many car owners plan to install them on the updated dashboard.
Possible malfunctions: signs and causes
What problems can a car owner encounter:
- Some of the light bulbs on the dashboard do not work. If one or more light sources fail, then most likely this is due to burnt-out lamps. The problem is solved by replacing devices.
- The backlight has stopped functioning altogether, while all instruments and indicators light up. Apparently, the reason must be sought in the inoperability of the brightness control itself; it could have broken down. With constant use of this regulator, its connection contact with the on-board network may have come loose, so you need to check the wiring. The reason may also be a blown fuse located in the mounting block.
- The backlight does not turn on, and none of the indicators or sensors work. Perhaps the panel itself was “covered” or the block with the wires connected to the panel was damaged. You need to remove the device and carefully check all circuits.
- The speedometer does not work - the needle does not rise or rises, but very slowly and jerkily. With such a problem, the cause should be sought in the speed sensor, which can be electronic or mechanical. If it is mechanical, then check the condition of the tips that go into the speedometer itself and the gearbox. The end of the cable connected to the speedometer often wears out; you can try to solve the problem by wrapping a piece of food foil around this end. If the sensor is electronic, then you need to check the quality of the contacts.
- Indicators, for example, turn signals or optics, do not turn on. It is necessary to check the functionality of the steering column switches for low and high beam headlights, as well as turns.
- The fuel volume sensor does not function, the needle does not move or has risen all the way and does not fall. In the first case, the reason may lie in the failure of the controller itself, located in the fuel tank. You need to find the sensor and check its functionality. In the second case, the possible cause is a short circuit in the electrical circuit; you will need to test the wiring with a tester.
- The tachometer does not work. Again, the reason must be sought in the crankshaft position sensor - it could have failed, or the contact could have come loose from it. Most often, the reason for the malfunction of the sensors on the device is associated with oxidation of the contacts; they should be checked first.
Connecting the trip computer
The mentioned diagram took into account only one, brown wire leading from the red block to the trip computer, but this is clearly not enough. Therefore, let's see how the pinout occurs here.
- The fuel consumption signal from the electronic control unit is indicated by a green wire;
- Orange leads to terminal “15” in the ignition switch;
- Red and white - to terminal “30” in the ignition switch;
- Black, which is common, goes to ground;
- The speed indicator corresponds to brown;
- The positive terminal of the fuel sensor is green and red;
- Responsible for lighting the dashboard white, it leads to the light control.
Make sure that the board is not damaged, on which, in fact, uninterrupted reading of information from your VAZ 2110 depends, and providing it to you through all those sensors and devices that you always see in front of you.
- Author: ratico19
Rate this article:
- 5
- 4
- 3
- 2
- 1
(14 votes, average: 3.4 out of 5)
Share with your friends!
Instructions for replacing the tidy yourself
Instructions for replacing the shield yourself:
- First, you need to turn off the ignition and turn off the power to the Tens electrical network; to do this, open the hood and disconnect the terminal from the battery.
- The switches located on the sides of the tidy are removed.
- Then use a Phillips head screwdriver to unscrew the bolts that secure the device.
- Next, you need to dismantle the mountings of the tidy to the trim. After this, the shield can be easily removed from its seat, and the glass can also be removed.
- The next step is to disconnect all the connectors and connectors connected to the dashboard.
- When the connectors are disconnected, the panel is dismantled. It is repaired or replaced with a new one, the assembly steps are performed in the reverse order (the video was filmed by the channel In the Garage).
Tidy indicator lamps 2110
Lamps 3 and 4 indicate that the direction indicators on the outside of the vehicle are turned on and they light up and flash immediately after the right or left indicators are turned on. At the end of the maneuver, the power key returns to its original position and the pointer should turn off automatically. If this does not happen, you should look for the reason in the return mechanism of the pointer switch key.
The lamp that deserves special attention is located in the center of the tidy and is indicated by the number 14 in our diagram. This is a warning lamp that signals malfunctions and incorrect operation of the electronic engine management system; it is otherwise called the Check Engine lamp, by analogy with imported cars. When this warning light is activated, computer diagnostics of the engine should be carried out and error codes identified. Some errors are removed by software, while others require intervention in the engine control systems: the power supply system, ignition and other systems that could lead to errors.
Which wire goes where?
First, let's look at the back of the instrument panel. At the top there are:
- fuel level indicator;
- dashboard lighting lamps;
- control of right and left turns (separately);
- tachometer;
- block with many plugs;
- coolant temperature gauge.
As you can see, there is really nothing particularly complicated here. At the bottom of the instrument panel on the back side there are controllers:
- high beam;
- "emergency lights";
- CHECK ENGINE;
- battery charge;
- parking brake;
- oil pressure;
- air damper (for models with a carburetor);
- outdoor lighting work.
Which wires go where on the VAZ 2110 instrument panel pinout
Let's be honest - the VAZ 2110 does not have the most beautiful “native” instrument panel, neither on the first cars nor on the “improved” ones.
Therefore, many owners of this model are trying to make it more modern and somehow decorate it (with LEDs, beautiful lights, etc.). But, before you decide on some kind of upgrade, it is necessary that you have before your eyes the pinout of the instrument panel for the VAZ 2110, otherwise you can simply get lost in a heap of wires, sensors and buttons. Moreover, it will be useful regardless of whether you completely change the panel, or simply make some additions to the dashboard of your VAZ 2110.
Instrument panel VAZ 2110