The direction of the light stream that the car's head optics emits is directly related to the mass of the cargo that the car is carrying. If there is a lot of it, the rear part of the body sags, the headlights begin to rise up, poorly illuminating the road and blinding oncoming drivers. As a result, the motorist has uncertain control of the situation, where an accident is not far away. The necessary change in the angle of light flow is provided by the headlight hydraulic corrector. And you can do this without leaving your car. According to European standards, the corrector must be on all cars manufactured after 1999. What is this device and how does it work?
The headlights must be correct
What is a headlight hydrocorrector?
Light control is carried out from the cabin by changing the position of a special switch. Similar devices are installed on classic VAZ 2105-2107 models, front-wheel drive 2108-2109, and more modern 2110-2115. Structurally, an auto-corrector operating on hydraulics is a series of connections where the main cylinder, controlled by an adjusting bolt from the passenger compartment, is connected to the worker through a tube. The last one is on the headlight. The entire structure is non-demountable.
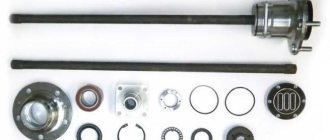
Headlight hydraulic corrector: complete set
Where is it located and what does it look like
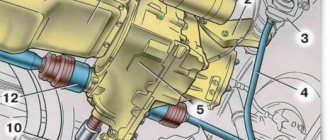
If we take the VAZ 2114 headlight hydraulic corrector as an example, the working cylinders are located under the headlights. The master cylinder is located under the adjustment knob in the passenger compartment. It turns manually. In the lower position, the light flux is directed downward (the pressure in the system is greatest), in the upper position it is directed upward. The cylinders are connected to each other by plastic tubes containing a non-freezing liquid (most often it is antifreeze or “anti-freeze”). The hydraulic corrector is sold as a kit: everything is assembled - plastic cylinders along with tubes.
Design and principle of operation using the example of the VAZ 2114
The usual standard design, installed, for example, on a VAZ 2114, includes:
- the main block (the place under the “torpedo”), where the hydraulic cylinder with the switch is located;
- hydraulic drive with plastic tubes;
- working cylinders with mechanisms that regulate the headlight reflector;
- non-freezing liquid.
If it is necessary to redirect the light flux at the desired angle, a low-pressure hydraulic system is activated, which can be changed manually. The driver turns the handle, and the rod of the actuator cylinders moves by 6-7.5 mm, which is quite enough to achieve the desired lighting angle.
Location of the working cylinders of the VAZ 2114 hydraulic corrector
Adjustment
There are 2 types of settings:
- Lamb - left, right.
- Plastic white nut - up, down.
You need to rotate it through the hole shown in the photo.
To do this, you will need a long hex wrench with a ball on the end, since the hole does not coincide slightly with the location of the nut. Therefore, the ball will help turn the key at a certain angle. You can use a hexagon with a small cardan, size H6.
We insert it into the indicated hole, get into the nut and rotate it. First, adjust the low beam of the left headlight. It is recommended to do this on the road with an oncoming car. The beam of light must be raised up so that it does not hit the windshield of an oncoming car. Otherwise, your headlights will blind the driver.
The light should fall approximately at the level of the bumper with a small margin in height. If there are passengers in the rear seats, the car will sit down and the beam of light will rise. For this you need a headroom.
In what cases is replacement or repair required?
It is not difficult to understand that the headlight corrector is not functioning or is working poorly: when you try to change the direction of the light beam, you notice that the head optics do not respond to turning the hydraulic corrector knob and the light is directed in one position. Moreover, both headlights and one of them may not work. If there is a problem, you will have to dismantle the device. The next stage is a complete replacement of the headlight hydraulic corrector: its components are non-separable and cannot be restored.
Reasons why the hydraulic corrector does not work and troubleshooting methods
Most often, the corrector stops working due to fluid leaking from the working, master cylinder or connecting tubes. This may be due to cracking of rubber seals (sometimes due to a sharp drop in air temperature during frost). As a result, the cylinder pistons become stuck in one position, and it becomes impossible to adjust the headlights when the load in the car changes. If the light is adjusted, but within a very small range, the culprit may be one of the cylinders, where the piston stroke has decreased. Another reason why the headlight hydraulic corrector does not work is the loose engagement of the rod with the lever in the actuator. There is only one method for troubleshooting - replacing worn-out or worn-out components and parts.
How to properly adjust GF
For various reasons, during prolonged operation, the device settings “move away” from the original factory settings, which requires manual adjustment of the headlight hydraulic corrector during scheduled maintenance. That is, the device is working properly, but it is no longer possible to set the position of the head optics in the correct direction only with the help of a switch. This usually occurs due to the lack of good engagement between the rod and the lever (we are talking about the head cylinder). This situation arises due to the imperfect design of the hydraulic corrector. It is easy to fix - just return the lever to its seat. Another thing is that this is unlikely to prevent the possibility of a reoccurrence of damage, so it is worth thinking about how to strengthen the connection without compromising its mobility. The problem is partially solved by unscrewing the adjusting screw, since it is this that often causes the lever to jump out if it is screwed in completely. But here you need to take into account the fact that the screw is set in such a way that the headlights lower/raise, ensuring the correct angle of illumination set on the stand.
What to look for when choosing a new concealer
These devices come in three types: manual, hydraulic, pneumatic or electric. The last option is considered the most technologically advanced. Devices of this type are installed on almost all latest VAZ models. Nevertheless, many car owners prefer to install hydraulic correctors: it’s all about the cost, which is 4-5 times lower than other types of devices or more, if we also remember automatic systems. And since the headlight hydrocorrector is not repaired, in any case you will have to purchase a new set. There is actually only one manufacturer of hydraulic systems on sale - the DAAZ plant. Modifications of correctors for various VAZ models:
- for “classics” 2105-07 number 2105-3718010;
- for front-wheel drive 2108-2199 - No. 2108-3718010;
- for 2110-2112 - No. 2110-378010 and 378010-10;
- for 2113-2115 - No. 2114-3718010;
- for Niva - No. 21213-3718010.
Expert advice
Experienced car enthusiasts give some advice to those who want to independently adjust the headlights on a VAZ-2107 in a garage.
- The entire procedure must be performed in the dark.
- All equipment must be in good condition, special attention must be paid to the voltage regulator and generator.
- If the headlight bulb is cloudy, then the reason for this may be a broken seal of the optical assembly connection, and this affects the level of light flux. To restore its tightness, you will have to glue all damaged fragments with sealant.
- After completing the adjustment procedure for both headlights, it is necessary to carry out a check: drive out onto the road at night and check the car lighting devices in operation.
- Self-adjustment of headlights can only be done for yourself, because such adjustment is not suitable for technical inspection. For proper adjustment, the car owner must contact a car service center with qualified specialists.
Driving at night in a car with unadjusted headlights is just as dangerous as driving a car without lights. When driving at night, the driver must have a clear view of the road, since not only his life, but also the safety of other road users depends on this. To increase the safety of movement at night, you need to adjust the headlights on the VAZ 2107, and every owner of this vehicle can do this.
Replacing headlight hydraulic corrector
If you decide to install a hydraulic corrector, which is installed standard on Lada cars of previous years of production, you can do the work yourself. On more modern cars (Priora, Kalina, Granta, etc.) electrical systems can be installed.
Parsing and removing old
Algorithm of actions for dismantling the hydraulic corrector:
- unscrew the screws on the clamps securing the tubes to the corrector parts;
- disconnect the actuators attached to the snap-on latches from the headlight units;
- from the passenger compartment, remove the rotating handle of the hydraulic regulator from its place (it is located directly on the main cylinder);
- unscrew the plastic nut with which the main cylinder is screwed to the “torpedo”;
- pull it out (after pushing the rubber seal into the cabin) complete with plastic tubes and actuators.
Hydraulic corrector in the cabin with the handle removed
Installation and connection of a new
Installation of a hydraulic corrector instead of a faulty one is carried out in the reverse order of dismantling - nothing complicated is observed here.
If you decide to install an electric device (it is ideal instead of a hydraulic one), the algorithm of actions will be slightly different:
- remove the negative terminal from the battery;
- dismantle the old hydraulic corrector along with the pipes, main and working cylinders;
- replace it with an electrical device;
- dismantle the lever of the old mechanism in the cabin;
- connect the “plus” of the electrical corrector to the 20th contact of the block, the “minus” can be “found” under any body stud in contact with the metal;
- instead of plastic tubes, lay the wires from the kit and, for reliability, secure them with dielectric clamps to the common wiring harness;
- attach the actuators to the headlight housings;
- Replace the removed negative battery terminal and check the operation of the system.
Installing a new device (master cylinder)
During the installation of the electric corrector, it makes sense to simultaneously check the efficiency of the optics. If you notice condensation inside the headlamp, it is better to replace it, because in the future the level of road illumination will only worsen.
More:
- a black coating inside indicates that the light bulb does not have long to “live”, so it needs to be replaced and it is better to do this in advance, and not on the way;
- if you notice peeling of the reflective layer, you will also have to buy a new headlight (it is better to change both units together);
- inspect the block lens - if the scratches and chips are serious, it is recommended to replace the old glass, using a special sealant when installing a new one;
- Before installation, clean the protective caps from dirt.
The best and most expensive option is to install an automatic correction system. In this case, the driver does not need to do anything: the device will automatically adjust the beam of light. The design includes sensors installed at the front and rear. Their task is to determine the ground clearance on both axles of the car. This allows you to “calculate” the tilt of the body and send the necessary information to the electronic control unit. He gives a command to the actuators, and, taking into account the speed of movement, the latter, through a gear motor, change the angle of inclination of the head optics. The system is quite complex and requires a professional approach during installation.
A simpler option involves installing one ultrasonic sensor at the rear. It is suspended on a hinge and secured. The shortest distance to the road surface is 25 cm. You can install the system yourself.
Light adjustment
After installing a new corrector (no matter hydraulic or electric), it makes sense to adjust the light beam. To do this, you need a flat wall, which must be marked in accordance with the manufacturer’s recommendations (see the car’s operating instructions). The marking can be done independently, in accordance with the figure below.
Further:
- stop the car five meters from the marked wall;
- use the hydraulic corrector handle to set the correct light beam;
- Each headlight can be adjusted individually;
- if the “efforts” of the hydraulic corrector are not enough, use the mechanical levers located on the headlight unit.
Wall marking scheme for light adjustment
Let's sum it up
This completes the replacement. Some cases were also noted that the LADA Granta lacks complete headlight adjustment when one of the existing rods in the system is broken. Then the repair is carried out by extending the broken rod. The work is also not difficult, but it requires attention and time.
Car enthusiasts often complain about such a specific breakdown as “falling headlights” in the Lada Granta (VAZ-2190). Sometimes this is quite a serious problem. Of course, without headlights or with crooked lighting, you can get to your destination, but for the driver himself this will certainly be associated with considerable stress. Why take the risk? If you are not satisfied with the headlights, it is better to bring all the lighting fixtures on the Lada Granta into working order as quickly as possible.
We will not touch upon the actual process of general adjustment of the headlights in a Lada Granta (VAZ-2190), we will only consider the case of a malfunction when one or both headlights seem to be looking down. And, as a result, the light beam from the headlights illuminates not the road ahead, but, roughly speaking, the asphalt in front of the bumper, which is not good.
Price
A hydraulic corrector for VAZ cars is quite inexpensive - from 300 to 500 rubles. An electromechanical device will cost approximately 1800-2000 rubles.
There are also universal types of autocorrectors suitable for installation on any make of car. For example, a system from the manufacturer Hella will cost from 14 thousand rubles.
Do not forget: for xenon headlights, regardless of the make and model of the car, only the installation of an automatic corrector is required.
If you have any questions, leave them in the comments below the article. We or our visitors will be happy to answer them
Electric corrector
If, using methods for searching for defects in power wiring, you still cannot solve the problem of a faulty electromechanical corrector, you should start by diagnosing the gearmotor.
By assembling the circuit shown in the figure, you can check the smooth operation of the servo drive. If the gear motor does not respond to power supply, you can safely proceed to replacing or disassembling it. In most cases, the housing is secured with plastic latches. If the latches cannot be snapped off, they can be carefully cut off, and when installing part of the body, they can be joined with dichloroethane (special glue for plastic). The electric motors themselves fail extremely rarely, but they are also sold separately.
Sensors, controls
The control board inside the case will also be secured with latches. Armed with a magnifying glass, carefully inspect the board for microcracks in the solder joints - this is the most common cause of failure. To eliminate the defect you will need a soldering iron, rosin and some solder. It is also possible for the resistive layer of the rod position sensor to wear out. Due to the appearance of a constant mismatch error, the electronic control unit overheats and fails. If desired, the microcircuit can be replaced separately. For example, the tda3619 microcircuit is the basis for controlling the electric headlight leveler on a Daewoo Lanos car. It's worth looking for it separately on eBay or just buying a used spare part at a disassembly site - it's up to you.
On systems with automatic headlight control, the body position sensor most often fails. Typical faults: broken tie rod attachment points, souring of rods inside silent blocks, oxidation of connector contacts and sensor insides.
More articles from the Car Repair category
How to clean the air conditioner in a car yourself