Why are guide bushings needed?
At the beginning and middle of the last century, car cylinder heads were made of cast iron, and the valves were simply inserted into precisely drilled holes. But subsequently, manufacturers abandoned cast iron heads due to their heavy weight and insufficient removal of excess heat, and they were replaced by lightweight cylinder heads made of aluminum alloys. These metals have excellent thermal conductivity, but have little resistance to wear from friction.
To solve the problem, a guide sleeve was invented - an intermediary between the soft alloy of the cylinder head and the steel valve stem, which constantly moves up and down during operation. Made of cast iron or special bronze, it is securely pressed into the cylinder head body, and the valve is inserted inside with minimal clearance.
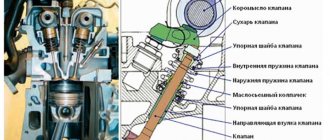
The engine diagram shows the location of the guide bushings
The bushing itself is a hollow cylinder, made exactly to size for a specific car model. The outer surface is polished and smooth to the touch, and the inner surface has a spiral-shaped groove in the form of a thread. Motor oil moves along it, lubricating the valve axis and reducing friction. A shallow recess is made in the upper part of the guide part, into which a retaining ring is inserted.
On the left is the bushing for the exhaust valve, on the right is for the intake valve
Important point. The guide elements for the intake and exhaust groups of valves differ in design, although they may look the same in appearance (for example, parts for Russian VAZ 2108-09 cars). The difference is this: in the bushing for the exhaust tract, the oil groove is made along the entire length of the hole, and for the intake tract - only halfway. But products for the “classic” VAZ 2106 also differ in size; with the same diameter, the exhaust elements are longer than the inlet elements.
Bronze bushings for VAZ 2109 all look the same
Bushings perform the following functions:
- as the name implies, they direct the movement of the valve so that its plate is clearly aligned with the seat and fits tightly to it;
- take on the load from the friction force that occurs during the translational and reciprocal movement of the valve stem;
- the valve cup gets very hot in the combustion chamber, and the bushing transfers this heat to the aluminum alloy of the cylinder head;
- Thanks to a special groove, the part provides lubrication of rubbing surfaces.
Cast iron parts of VAZ 2106 - intake bushings are shorter than exhaust bushings
When the element is pressed into the cylinder head hole, its upper part of smaller diameter protrudes several millimeters above the surface. This is necessary to install an oil seal on it (also known as a valve seal), which prevents lubricant from the upper part of the engine from entering the combustion chamber through the inner hole of the bushing.
This is what the protruding part looks like where the oil seal is put on
Causes of parts failure and their consequences
A characteristic feature of the guide elements is that they do not fail at once, but wear out gradually. The lifespan of parts on budget cars ranges from 180 to 300 thousand km, and on more expensive foreign cars it can reach 1 million km. The wear process is influenced by several factors that can accelerate it:
- the quality of the motor oil used and the timeliness of its replacement;
- temperature conditions of the power unit, the more often the engine overheats, the faster the rubbing surfaces wear out;
- the quality of the fuel and combustible mixture, whose vapors penetrate into any leaks and contribute to the process of slow destruction of parts.
Carbon deposits on the rod destroy the bushing quite quickly
Note. The working life of all elements of the gas distribution mechanism is also affected by the serviceability of the power supply and ignition system. When, as a result of a malfunction, pops occur in the fuel or exhaust manifold, the lubricant between the valve-bushing pair is washed off with unburned gasoline, which is why the mechanism runs “dry” for several seconds.
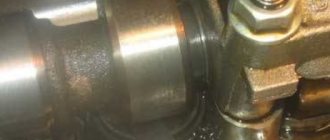
A worn part is characterized by a “broken” internal hole, as a result of which the valve stem begins to move too freely in it, and then play appears. The rod warps during operation, and the plate does not fit well with the seat, the tightness of the interface is gradually lost. Gases escape from the combustion chamber into the mechanism, and oil enters from above, resulting in the formation of carbon deposits. It also accelerates wear, quickly rendering the part completely unusable.
Spare parts and tools for work
Before starting work on replacing valves on a VAZ 2110, high-quality new parts are purchased, the names and original articles of which are as follows:
- Set of gaskets: valve cover (art. 2108-1003270/77) and cylinder head (art. 21083-1003020), intake and exhaust manifolds (set art. 21083-1008081), exhaust gas intake pipe (art. 2103-1203020-04) , as well as an oil seal (art. 2108-1005034) and oil flinger rings (art. 2108-1007026-86) (the so-called cylinder head repair kit)
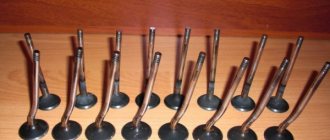
- New valves for the fuel mixture intake system 4 pcs. (art. 21083-1007010)
- New exhaust system valves 4 pcs. (art. 2108-1007012)
- Valve guides 8 pcs. (art. 2108-1007032-87)
- Engine coolant
- New bolts securing the cylinder head to the cylinder block (art. 2108-1003271Н/О)
- Timing belt (art. 2108-1006040-86) and generator drive belt (art. 1000012562)
- Engine oil and oil filter
Repairs to replace worn-out parts are carried out using a standard set of tools, which are usually sold as a set, namely:
- a set of open-end wrenches marked from 8 to 21 mm;
- set of internal hex keys;
- a set of sockets with a diameter from 8 to 24 mm;
- valve desiccant;
- screw valve guide puller;
- torque wrench (needed for proper tightening of the camshaft, cylinder head and camshaft gear bolts);
- Screwdriver Set;
- electric drill;
- specialized lapping paste of two types (for rough lapping of valves to their working surface of the combustion chamber and for finishing grinding);
- gloves to protect hands from possible damage.
The presence of tools, parts and a covered room will allow you to carry out troubleshooting work yourself, since the price of replacing 8 valves on a VAZ 2110 in non-certified services in the fall of 2021 varies from 30 to 45 thousand rubles. At a certified service station of official dealers, such work will cost more than 50 thousand, which will greatly affect the financial situation of the car owner.
When do you need to change guides?
The main symptom indicating that the valve bushings have become unusable is increased engine oil consumption. When the rod has lateral free play (play), the valve stem seals are no longer able to prevent the penetration of lubricant into the cylinders from the upper engine compartment, where the camshaft is located. It flows into the increased gap between the valve stem and the inner diameter of the bushing and freely enters the combustion chamber.
Blue smoke coming out of the exhaust is a sign of oil combustion.
Signs of oil consumption due to problems with the guides are:
- bluish smoke from the exhaust pipe from escaping combustion products of lubricant that constantly enters the cylinders;
- the car practically does not lose in dynamics, but smokes a fair amount;
- light “fluffy” carbon deposits on the spark plug electrodes;
- liquid oil is observed on the skirts and threaded parts of the spark plugs.
Advice. By the carbon deposits on the spark plugs, you can determine the cylinder into which the largest amount of lubricant gets. This will be useful for performing diagnostics.
This is oil deposits on the spark plug.
Since oil can also penetrate into the chambers due to the fault of the cylinder-piston group, it is necessary to carry out diagnostics to accurately determine the malfunction. As an example, it is proposed to take the popular VAZ 2106 car:
- Measure the compression in the cylinders. The goal is to ensure that the piston rings are in good technical condition.
- Remove the valve cover, loosen the chain and unscrew the camshaft gear, first aligning the marks.
- Dismantle the camshaft along with the bed and remove the rocker arms. Unlock the valve springs of the cylinder whose spark plug is more heavily covered with carbon deposits.
- Carefully remove the oil seal and try to rock the rod sideways with your hand, while moving it up and down.
To feel the play, the valve must be pulled out by the stem and rocked to the sides
If there is play, you can safely continue disassembly, since to replace the bushings you need to remove the cylinder head. If you have no doubts, check the other valves, the picture should be approximately the same.
The procedure for replacing guide valves on a VAZ 2106
The whole procedure is divided into several stages:
- Preparation of tools.
- Partial disassembly of the engine, namely, removal of the cylinder head.
- Selection and purchase of new parts.
- Dismantling worn elements and pressing in new ones.
- Reassembling and starting the engine.
The first step is to disconnect the battery from the on-board network
Advice. It is worth following exactly this sequence of actions - first disassembling the engine, and then purchasing spare parts. The dissection will show you exactly what parts you need. If you recently changed the valves (5-10 thousand km ago), then you need to pull them out to try them on with the new bushings in the store. The old valve group will have to be replaced.
Preparing the necessary tools
To disassemble and replace the guides, you will need:
- standard set of open-end and ring wrenches;
- a set of sockets with a powerful wrench and ratchet;
- a torque wrench for tightening the cylinder head bolts and camshaft nuts during assembly;
- screwdrivers, pliers;
- 36 mm wrench for manual rotation of the crankshaft;
- mount;
- puller for unlocking valves;
- heavy hammer;
- mandrel for knocking out and pressing in bushings;
- 8.025 mm reamer with knob;
- container and hose for emptying the cooling system;
- rags.
You can’t do without a ratchet wrench and sockets when removing the cylinder head.
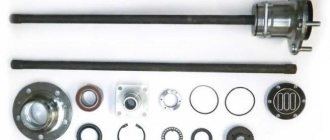
The mandrel for working with guides is a steel rod, the end of which is machined to fit the inner diameter of the bushing. The second part of the mandrel is a nozzle for pressing, the size of which is adjusted to the wide outer part of the part (the so-called cap), since it is impossible to hit the end. The kit can be ordered from a turner or purchased ready-made; it is inexpensive.
The mandrel for knocking out and seating bushings can be machined according to the drawing
Advice. In the process of replacing the guides, you will have to re-grind the valves, or even trim the seats. This work requires a special tool and appropriate skills, so it is better to entrust the operation to a master. In addition, the purchase of devices for cutting and lapping will reduce to zero all the benefits of repairing the cylinder head with your own hands.
This is a scan used on the cylinder head of VAZ 2101-07 cars
A reamer is a bench tool designed for precise adjustment of the internal diameters of holes. In this case, it is necessary to rotate the inner part of the bushing under the valve stem with minimal clearance.
Removing the cylinder head and old bushings
This stage is the most labor-intensive and time-consuming; it begins with disconnecting the battery and emptying the water jacket of the engine (there is no need to drain the liquid from the radiator). Perform further operations in this order:
- Disconnect the starter cable, gasoline hose and accelerator drive, then remove the air filter housing and carburetor.
- Unscrew the valve cover and align the notch on the crankshaft pulley with the long notch on the block. Disconnect the wires from the spark plugs and remove the distributor, remembering the position of the slider. Remove the wire from the temperature sensor.
- Loosen the chain by unscrewing the tensioner, then unlock the camshaft gear nut and unscrew it. Remove the gear and secure the chain so that it does not fall inside the block. Unscrew the nuts securing the camshaft bed and remove it from the studs.
- Disconnect all cooling system pipes and exhaust pipe “pants” from the cylinder head.
- Loosen the 11 cylinder head bolts in random order and remove them. Using both hands, lift the cylinder head and remove it along with the manifolds.
Removing the filter housing
Advice. Immediately after dismantling the head, clean the block of the old gasket and cover it with a clean cloth so that dirt does not accidentally get inside the cylinders.
Place the removed cylinder head conveniently on the table and remove the springs with the rocker arms (it is advisable not to mix them up), then use a puller to unlock the valves and pull them out. At the same time, do not lose the “crackers” - small half-cylinders inserted into the slot of the rod. Then turn the head over with the combustion chambers facing up, place wooden blocks along the edges and knock out all the bushings with a mandrel. Strike with medium force, clearly and accurately. At the end, clean and thoroughly wipe the entire cylinder head from carbon deposits and deposits.
The carburetor must be removed from the manifold so that it does not interfere
Recommendation. Take this opportunity to inspect the disassembled engine for other faults in order to eliminate them immediately. Involve a mechanic - a motor mechanic with a device - a bore gauge, so that he can check the output in the cylinders and advise you on all issues. This is important if you are disassembling the VAZ 2106 power unit for the first time.
It is important to align the marks before disassembling
Photo instructions for removing the cylinder head
To get to the camshaft, you need to dismantle the valve cover. Removing the distributor. The camshaft gear must be unscrewed and removed without disturbing the position of the marks. After unlocking, the springs can be easily removed. The cylinder head must be carefully removed with both hands. To remove the valves, you need to use a puller to unlock the cylinder head springs in disassembled form. Removing the camshaft housing. Disconnecting the wire from the temperature sensor From the cylinder head, you need to remove all the pipes of the cooling system. The bushing is knocked out with a hammer through a mandrel. Removing the rocker arm springs (rockers).
How to dismantle the cylinder head of a VAZ 2106 - video
Selection of new parts
Guide bushings for the "six" engine can be purchased in two versions - cast iron or bronze. When choosing, you should adhere to the following recommendations:
- If you have a normal driving style and are not into car tuning, there is no point in installing bronze products. Buy inexpensive cast iron guides and they will last quite a long time.
- It is better to install bronze parts together with lightweight chrome-plated valves (for example, from the AMP brand).
- Considering the price of cast iron products and your first experience of replacing them, it is recommended to purchase 2 sets of parts. The reason is the fragility of the material, which can accidentally crack if handled improperly.
- Select the bushings in such a way that the valves are inserted into them with difficulty or do not fit at all. Do not take products with incorrect holes where the rod fits freely.
- If after disassembly you find that one or more bushings are spinning or dangling in the cylinder head sockets, you need to select repair products. Their outer diameter is 0.05-0.1 mm larger than the standard one, which will allow such parts to fit into broken holes in the cylinder head. Here it is worth using measuring instruments - a micrometer and a bore gauge.
Advice. Do not listen to assurances that bronze bushings resist wear better than cast iron ones, this is not true. Cast iron is much harder than most metals, including bronze, it just transfers heat less well. Hence the conclusion: both parts are good, but they must be used for their intended purpose.
It is also worth purchasing a new valve group (if it has not been changed recently), gaskets for the cylinder head and various pipes, and 1-2 liters of antifreeze for topping up. Buy the rest of the parts based on the results of the previous troubleshooting.
Fitting bushings and reassembling
To press the guides into the sockets, turn the cylinder head over with the combustion chambers facing down. Then place the retaining rings on the elements, pulling them from the top end. If you start putting the ring on from the bottom, be sure to leave deep grooves on the surface where oil can subsequently leak.
Important! Before planting, lubricate the outer surface of the parts with a thin layer of engine oil.
The new bushing is driven all the way through the spacer
To press fit, insert the end of the first bushing into the hole, put the nozzle on the mandrel and attach it to the wide part of the part. Using precise blows of a hammer on the spacer, drive the bushing in until it stops, which is characterized by a change in the sound of the blows (a slight ringing will appear). Hit with medium force so as not to crack the cast iron. Repeat the action with all the elements, and if one of them breaks, take a spare one.
Reference. You can often hear recommendations that the cylinder head should be heated in a bucket of water, and the bushings should be placed in the freezer before driving. These activities really make pressing easier, but take a lot of time. Any knowledgeable mechanic will tell you that fitting cast iron into an aluminum alloy with an interference fit of 0.04-0.06 mm can be easily done without any heating.
The bushing holes should be driven through with a reamer
After pressing is completed, you need to drive the inner diameter of the bushings with a reamer so that the valve stem slides in it with minimal clearance. The operation is performed as follows: secure the tetrahedral end of the reamer in the driver, lubricate the working part with engine oil, insert it into the hole and rotate clockwise. The tool must go along the entire length of the part. Now all that remains is to install and grind the valves, which is recommended to be entrusted to a specialist. Then reassemble the engine in reverse order, but taking into account the key points:
- If you want to improve the tightness of the gasket between the head and the block, treat it with a thin layer of graphite lubricant. High temperature sealants cannot be used.
- Tighten the 10 main cylinder head mounting bolts with a torque wrench in 2 steps in the sequence shown in the diagram. The first time tighten them to a torque of 41 Nm, the second time - 118 Nm. The eleventh bolt of a smaller size is tightened at a time with a torque of 39 Nm.
- The camshaft bed is also pulled according to the scheme, maintaining a torque of 22 Nm.
- The gear and chain must be installed so that the round mark on the sprocket coincides with the boss on the camshaft housing. You aligned the marks on the crankshaft before disassembling, check them.
- Do not forget to adjust the gaps between the rocker arms of the valve group and the camshaft cams (its value should be 0.15 mm).
- When installing the distributor, restore the original position of the slider so as not to disable the ignition.
Cylinder head bolt tightening diagram
Advice from experienced people. After tightening the cylinder head bolts, old craftsmen often let the engine sit for 12-24 hours, and then tightened the head again. If you have time, follow this recommendation; in a day you will see for yourself that the nodes have “settled” and the bolts have loosened a little.
Procedure for tightening the camshaft nuts
After completing assembly and filling with antifreeze, start the engine, warm it up and rotate the distributor housing to set the optimal ignition timing.
Aligning the round mark on the gear with the boss on the body
Tool for adjusting VAZ valves
Before adjusting the VAZ-2110 valves (8 valves), you should acquire all the necessary plumbing tools:
- a rack with which the pushers will be pressed out;
- micrometer;
- multi-part probe.
The latter is required in order to measure the thermal gap formed between the adjusting washer and the camshaft cam. If you couldn't get the rail out, you can replace it with two powerful slotted screwdrivers.
Today, you can easily find all the necessary installation kits in any store that sells spare parts for cars. The cost of such a set in most cases ranges from 200 to 500 rubles. You should definitely get a kit, since having the necessary tools will greatly affect the success of the adjustment.