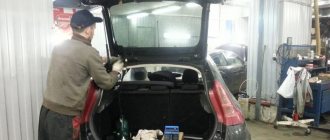
- Trunk lock repair
- Replacing door locks
- Useful video
A car door lock is a simple and reliable device, but even it fails after very long use. In today's article we will talk about how to change the cylinder in the door lock of a VAZ 2114 with your own hands, as well as how to properly configure newly repaired locks.
Cylinders and trunk lock of VAZ 2114
Reasons for replacing the VAZ 2114 lock cylinder
The mechanism is silent, but if an extraneous sound appears when opening the door element, the device will have to be dismantled or rebuilt. Replacing the front door lock cylinder on a VAZ 2114 is required for a number of reasons:
- a sharp drop in temperature;
- failure of the locking ring;
- loss of the fixing column;
- destruction of the plastic rod cap;
- wear of internal pins and teeth.
In winter, the locking devices freeze, causing the key to turn with difficulty or not move. If a person makes an effort, then there is a risk of breaking the opening element in the core of the lock.
When individual parts wear out, they will cling to each other, blocking the rotation function. The main factor indicating a repair is turning the key.
Varieties
The Lynx Euro pens have a factory designation, which determines the differences between the sets.
- IN 1 . This designation indicates that the package contains four handles - two rear and two front. In this case, the front larvae do not have.
- AT 2 . There are also four handles, a pair for the rear and front doors. Only here the larvae are present.
Which one should I choose? The question is purely individual. On the one hand, B1 have a solid, smooth structure that is not spoiled by key holes. For external tuning they are simply perfect.
The second option is preferable for those who value quality, visual appeal, but at the same time reliability. After all, the presence of a cylinder will give you the opportunity to open the car with a key if problems arise with the alarm or key fob.
Recommendations
Reassembling and lubricating individual parts will not work if the fragments are heavily worn. It is better to remove the cylinder from the core and install a new one. Recommendations for replacing the VAZ 2114 door lock:
- Partial repairs or lubrication will only temporarily restore life to the closing mechanism. If problems arise, it is better to replace the entire cylinder.
- After installation, it is necessary to periodically lubricate the mechanism. Experienced motorists use silicone substances for this.
- The repair procedure is carried out in a well-lit room at a comfortable temperature.
- To change the element, you will need a set of screwdrivers, pliers and lubricant.
- Sometimes the springs have to be replaced along with the cylinder. They are purchased separately.
The cylinder fragment is sold as a set. The price depends on the manufacturer. If you buy a cheap Chinese version, it will cost about 150 rubles. It is better to give preference to VAZ spare parts. The cost of such a kit is 400-500 rubles.
Withdrawal procedure
Depending on the reason, a complete or partial replacement is performed. It is not recommended for the average person to engage in reassembly, since there are too many nuances in this process, but almost anyone can replace the mechanism. Step-by-step instruction:
- Three screws are unscrewed. They are located on the inside of the handle. To do this, use a Phillips screwdriver to remove the cover.
- The front trigger glass position switch is removed along with the wiring harness block. To do this, the wires are first disconnected.
- The plug on the armrest handle is removed, the element is picked up with a thin corner of a screwdriver.
- Unscrew the 2 screws on the handle that hold the inner panel.
- The plastic clips are pressed out to remove the lining.
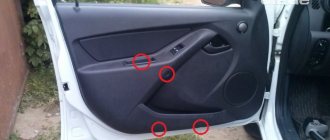
- 6 pistons are removed to remove the door card.
- The external fastenings are removed, the nuts are unscrewed with an 8mm wrench.
The last action is to gain access to cravings.
How to remove cravings
To remove this piece, you will need an impact screwdriver and a size 8 wrench. The piece is attached to the internal locking mechanism and the lock switch. Algorithm of actions:
- The internal lock of the outer handle rod is completely disconnected.
- The handle is removed along with the rods.
- The pin is removed from the end of the rods.
- The plastic tip is removed from the core of the cylinder device.
- The return spring is removed. The old larva is being removed.
Usually the rods are fixed with plastic hinges, so they can be disconnected with a flat-head screwdriver.
Installing a new part
The removal and assembly algorithm is the same, although the instructions for installing the cylinder mechanism have its own nuances. Before inserting a new cylinder into the core, the part is lubricated with a silicone substance and only then inserted into the handle. Further algorithm of actions:
- The return spring is inserted next to the cylinder.
- The functionality of the key is checked. It should turn easily in all positions.
- A pin is installed on the tip of the rotary rod. Connection is being made.
- The inner and outer panels are screwed on, the handles are fixed, and the plug is returned to its place.
- The main three screws are tightened from the inside.
You won’t have to change the lock cylinder for a long time if you carefully use the opening mechanism.
Tools required for repairs
To work you will need the following tools:
- jack;
- pliers;
- a set of keys;
- calipers;
- puller;
- "liquid key";
- hammer;
- mount.
Do-it-yourself work is economically feasible: replacement and repair of VAZ 2114 steering ends, the price in car services as of July 21, 2019 per unit is an average of 400 rubles. At the same time, you will be able to assess the control condition of your vehicle.
Step-by-step replacement of the lock cylinder on a VAZ 2114
Let's say the key in the VAZ-2109 lock does not turn or, conversely, turns and does not unlock the door. Repairing car locks involves one of the following actions: replacing the cylinder (cylinder), replacing or repairing the internal lock. In official manuals, by the way, it is recommended not to repair the internal lock mechanism, but to replace it. Be that as it may, you first need to get to it, for which you remove the door trim. Each of the actions required for dismantling is further illustrated in the photo. The entire sequence must be considered in order.
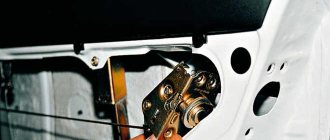
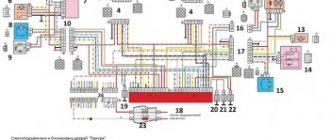
Door lock device
Theoretically, the lock mechanism can be divided into 3 parts: a handle with a cylinder and a button, the main mechanism, and the inner door handle. All nodes and connections between them are shown in the diagram.
Door lock mechanism VAZ-2109
The node labeled “2” looks like this.
Internal mechanism (not collapsible)
4 rods fit to it, that is, to this node. Two of them are connected to the external handle, and in order to dismantle it, the rods are disconnected.
If there is no electrical wiring inside the door, you do not need to disconnect the battery before performing repairs.
In other cases, that is, when power windows or locks are installed, the battery must be disconnected. To do this, as many people know, it is enough to remove the “negative” terminal. This means that before repairing locks, the hood is opened first, not the doors. Anyone who violates such a requirement will, at best, have to change burnt fuses.
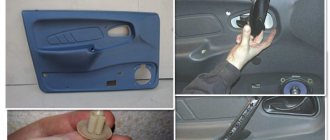
Replacing the door lock cylinder
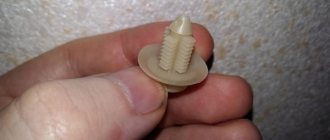
To gain access to the locking mechanism, you need to remove the trim. On the “Nine” it is quite simple to remove it - the casing is held in place by plastic pistons. These pistons are located around the perimeter; they are simply pressed out and, if necessary, replaced with new ones.
Performing dismantling of the main part
First, as is easy to understand, you need to dismantle three elements: the side handle, the window lifter handle, the socket of the inner handle of the lock. The “dog” must be pulled up, but it is better to remove the seal that protects the glass during the dismantling of the casing.
Removing the rubber seal
Removing and disassembling the door handle
When the door trim is missing, you can freely disconnect the two rods that go from the door handle to the lock. The following shows exactly what elements we are talking about.
Wire rods “handle-lock”
By squeezing the plastic tab with a screwdriver, the rod is disengaged. We will assume that all of the above actions have been completed. Then, you can move on to the next stage.
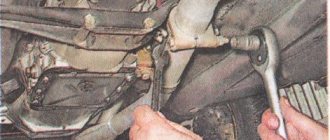
The outer handle is attached to the metal using two nuts. One of them is located under the trim, the second is on the back side of the door. Both nuts need to be unscrewed.
Attaching the outer handle assembly
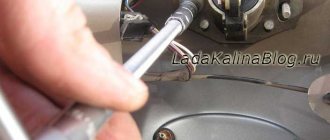
After dismantling the specified unit, it will be easy to remove the cylinder. This is done like this:
- Push out the pin holding the outer plastic cap;
- Dismantle the mounting spring (see figure);
- By installing the key and turning it, the cylinder is pulled out.
The appearance of the spring holding the cylinder and the handle together is shown below.
The round spring is completely dismantled
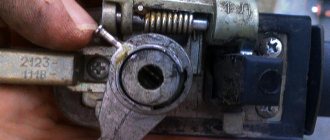
It is important to know that the knot itself, called the “larva,” needs careful handling.
Experience shows that it will be easy to lose the metal pins that ensure secrecy. The cylinder is secured inside the handle body and the pins remain in place. But if you pull the cylinder out, each pin is “free.”
Installation
Installing Euro handles on a VAZ 2114 is a lengthy process. Get ready to devote a whole day to this issue. It is best to learn the disassembly and assembly sequence using visual videos.
The stages of installing euro handles are as follows:
- The door trim is removed. This is a rather lengthy task that can take up the most time among all other processes. Don’t forget, the casing still needs to be put in place later.
- There is no need to drill, saw or cook anything. The only exceptions are those Euro handles that are not intended for the VAZ 2114. They are adjusted, something is cut out. Complex and sometimes pointless tuning. Today there are many excellent Euro handles that fit perfectly on the “fourteenth” model without unnecessary manipulations during the installation process.
- Each new part is installed in place of the standard one.
- It is advisable to arm yourself with additional fasteners for the trim in advance, since an inexperienced car owner can damage them during disassembly or reinstallation. They are cheap, but can come in handy at any time when replacing Euro pens.
- After removing the old handles, be sure to clean the socket and treat the surfaces with polish. After this, proceed to install new elements. There is nothing complicated there if you remember the dismantling process well.
- The penultimate stage is reassembly.
- The process of installing Euro handles on a VAZ 2114 is completed by cleaning new accessories and putting things in order inside and outside the car.
Euro pens are a simple but effective way to look at your car differently. Initially, it seems that installing such elements will have little effect on the appearance. But after installation you realize how different the car looks. Such a small accessory has a very positive effect on the VAZ 2114. This is a good and fairly simple type of tuning.
Replacement of all door locks, rods and cylinders on VAZ 2113, VAZ 2114, VAZ 2115
The door consists of a cylinder, a rod, an external lock, an internal lock, etc., thanks to which the door of the car is kept in place while moving, preventing it from opening; over time, the locks or the cylinder itself become unusable and when inserting the key into the cylinder, turning it in it, the door may not open or not close, this will indicate that either the cylinder, or the rod, or the internal lock has become unusable and it’s time to change them, this is not very difficult to do and Even an ordinary car owner can cope with this if he does everything carefully and follows the instructions that we outlined in this article.