VAZ 2107 SALON - DESCRIPTION
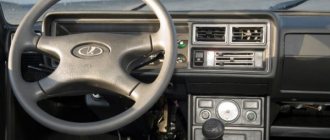
The “Seven” is equipped with a relatively comfortable interior, in comparison with other cars of the classic rear-wheel drive VAZ series. It has anatomical seats with high backs and headrests, an anti-glare dashboard and an electrically heated rear window.
The plastic from which the instrument panel and other interior elements are made is not of high quality and has a chemical smell that does not really erode, especially on new cars.
The salon is quite spacious. It is illuminated by a lamp located on the roof of the car and controlled using a manual switch. In addition, there are door switches that are installed in the door pillars. Note that the interior of the VAZ 2107 has many ergonomic flaws. For example, the ignition switch is located to the left of the steering wheel, which is inconvenient for a right-hander. There is also no rubber seal around the door perimeter, which is why the doors close with a specific knock.
As for the dashboard, it has a simple design and provides the motorist with only the necessary information, namely: engine and oil temperature, amount of fuel and revolutions, as well as the current speed of the car. The center console contains only the most basic components, in particular: air deflectors, heater control unit and cigarette lighter.
A distinctive feature of the VAZ 2107 is the presence of an analog clock. The buttons for activating the headlights, heated rear window and fan are located under the gearshift lever, which is not very common. The disadvantages of the Seven's interior also include the fact that the steering wheel is not adjustable at all, and the seats can only be moved on a slide.
PHOTO GALLERY: VAZ 2107 SALON
Engineers endowed the VAZ 2107 with a four-spoke steering wheel, which is mounted on a polyurethane frame
VAZ 2107 interior after tuning
Once upon a time, “classics” were valued for their high-quality interior. Today, alas, even here there are plenty of reasons for criticism
INTERIOR TRIM
A special feature of using a salon is that it is exposed not only to external factors (for example, sunburn), but also to humans. Over time, the finish accumulates odor, gets dirty and wears out. Therefore, many car owners decide to reupholster the interior. The modern market is represented by many different materials for upholstery, which is why it is sometimes difficult for car owners to make the right choice. We suggest that you familiarize yourself with the table, which presents the materials that are used to reupholster the interior of the VAZ 2107.
TABLE: MATERIALS FOR INTERIOR UPHOLSTERY
| Material | Advantages | Flaws |
| Leather | Practical to use; resistant to mechanical stress, temperature and humidity changes; is a soundproofing material; improves the acoustic characteristics of the interior. | Dependence on temperature: in winter the interior freezes, and in summer it heats up; leather is expensive; Leather interior requires systematic care using special products. |
| Velours | Soft, warm and elastic material; easy to dry clean; resistant to damage; has an acceptable cost. | Wipes down with intensive use; real velor is produced by a limited number of manufacturers, so there is a risk of purchasing a simplified, low-quality analogue. |
| Alcantara | Elastic and repairable; practical to use; easy to clean; resistant to combustion; soft and comfortable; does not wear out and does not fade in the sun. | It has no disadvantages except high cost. |
| Dermantin | It is a budget alternative to genuine leather; It is easy to work with leatherette, as it is plastic and flexible. | It is short-lived and easily deteriorates as a result of mechanical stress. |
| Autocarpet | Stretches well; has a wide range of colors; has excellent thermal insulation properties, does not collect dust and does not fade in the sun. | Doesn't look very attractive. |
SEAT COVER
If you have already decided on the material for seat upholstery, think about what color your chairs will be. It is advisable to choose the color of the material to match the upholstery. The simplest option is to cover the seats with a single-color material. However, a combination of several colors will make your interior more original and exclusive.
Chair after reupholstery
Seat reupholstery is done as follows:
- We remove the seats from the car.
- Remove the standard cover from the chair.
- We separate the cover at the seams to transfer it to new material.
- We apply each part of the standard cover to the new material and press it with a weight. We outline with a marker.
- Use scissors to cut out the details of the new cover.
- Using glue, we strengthen the elements of the cover with foam rubber.
- We sew the reinforced elements.
- We glue the seam flaps and trim off the excess material.
- We beat off the seams with a hammer.
- We sew the lapels with a double finishing stitch.
- We put covers on the seats. We start stretching from the back.
VIDEO: VAZ 2107 SEAT UPHOLSTERY
DOOR TRIM
Decorative door panels and plastic elements on the VAZ 2107 are attached using disposable polymer clips. This is technologically advanced and cheap, but not reliable enough, so after a while the panels begin to creak.
Leather door trim for VAZ 2107
You can fix this problem yourself:
- First, the interior elements are dismantled (lock and window lifter handles, armrest and others). The door trim is removed using a screwdriver.
- Next, the door panel is removed and laid on a sheet of plywood 4 millimeters thick. The outline is drawn with a marker.
- The plywood blank is cut with a jigsaw, and the edges are sanded.
- The sheathing is made using a sewing machine.
- Foam rubber is glued to the plywood, on top of which the fabric is attached. Don't forget to make holes for the interior parts. The panel is attached to the door using decorative bolts.
VIDEO: DOOR MAP FOR VAZ 2107
REAR SHELF TRIM
To reupholster the rear acoustic shelf, you will first need suitable material. The shape of the shelf is uneven with indentations, so it is better to use materials that stretch well. Another important point is the glue. It is advisable to purchase a two-component version - this is what specialized studios use when reupholstering plastic and other interior elements.
Rear acoustic shelf VAZ
Work order:
- Remove the back shelf and take it to a well-ventilated area so that the glue smell dissipates faster.
- Clean the shelf from dust and dirt for better adhesion.
- Apply glue to the material and shelf. Wait until it dries a little (the waiting time is different for each glue, it should be indicated on the glue package).
- Apply the material and start smoothing from the middle to the edges.
- As a final step, leave the shelf to dry for 24 hours. You can put a weight on top to prevent the material from peeling off.
FLOOR COVERING
Many owners of the “Seven” mistakenly believe that linoleum can be installed instead of the factory carpet. This is the wrong decision, since linoleum absorbs moisture well, which is why the floor in the “seven” will rot very quickly. However, you can lay down linoleum for a while until you lay down carpet, which looks more aesthetically pleasing and has soundproofing characteristics.
It is better to choose the color of the car carpet dark gray - dirt is practically invisible on it
You can buy regular household carpet. It is better to choose synthetic material with short pile. For example, polyamide or nylon - it is easy to clean and can last more than ten years. Carpet made of polyester and acrylic will also work. They have a hard pile, so they don’t actually wear out. If you need a budget option, buy a polypropylene coating.
Instructions for installing carpet in a car:
- Dismantle the seats and remove the old covering.
- Before laying carpet, treat the floor with bitumen or rubber mastic. If there is rust, clean it and treat it with special anti-corrosion agents (for example, LIQUI MOLY).
- Make cuts in the rug where needed.
- Carefully lay the carpet on the floor. The cut parts should match the parts.
- Wet the carpet with water and shape it by stretching it.
- Remove the material from the interior and leave it to dry for a while.
- When the carpet is dry, reinstall it.
- Secure the material with double-sided glue or tape.
VIDEO: INTERIOR CARPET FOR VAZ CLASSICS
How to replace a door trim
The factory facing of Zhiguli is made of leatherette or leatherette. The first stage of work is the selection of material, only then begins the study of the instructions in order to understand how to disassemble the doors of a VAZ 2107 and replace the facing fabric. The canvas is measured, a list of necessary tools for dismantling, adhesive, and fasteners is compiled. Spare clips are also purchased, because when removing the old coating, the plastic elements break.
Materials for upholstery
You can replace the standard upholstery of door cards with the following materials, which differ not only in price, but also in quality:
This is interesting: Installing the ignition and explosive wires on a Kia Spectra car
Factory finish
- dermantine;
- Genuine Leather;
- auto fabric;
- alcatara;
- almara.
You can use any of the materials listed, but the most affordable and easiest to work with are: dermantine, leather and vinyl. In addition to the main material, 4 mm thick plywood will be required to replace the sheathing. It is recommended to replace standard fiberboard, as it is quite flimsy and wears out quickly. You will also need latches for attaching the upholstery, foam rubber and glue.
Manufacturing of panels
Refinement of the VAZ 2107 interior begins with the dismantling of interior parts; the upholstery is removed from the internal surfaces of the body using a regular screwdriver. First, the window lifter and lock opening handle, as well as the large plastic handle, are removed from it. A flat screwdriver is inserted between the panel and the body and, acting as a lever, the resistance of the piston is overcome.
The door panel is removed and laid on a sheet of plywood, and its outline is traced using a pencil. To make a durable base for upholstery with your own hands, use a jigsaw; after the workpiece is cut, its edges are processed with sandpaper. The production of two-color sheathing is carried out using a sewing machine, the fabric is stitched, a backing is glued to the base, on top of which leatherette is fixed.
Features of dismantling
Before work on reinstalling the door trim, you need to prepare a tool. You will need:
- Plywood sheet up to 4 mm.
- Door latches and clips are sold as a set, matching the interior color.
- Foam rubber, sheet up to 10-15 mm thick.
- Material.
- Glue.
To cover doors 2107, you can use an old part; if the factory plywood is not deformed, this will make the work easier.
Dismantling the panel proceeds in steps:
- Pull out the bracket securing the window regulator.
- Remove the window lifter handle. If the mechanics were reinstalled on the power window, remove the clamp covering the standard hole.
- Remove the plugs on the door handle, unscrew the armrest bolts, and remove the element.
- Remove the trim panel from the door handle.
- Remove speakers and adjacent electrical appliances, if installed.
- Carefully pull the door card towards you and remove the panel.
Dismantling takes up to 10 minutes, it is important to unscrew the bolts sequentially; if the interior has been modernized, and the door has additional clips along the edge of the card, remove them first.
How to remove the front door of a VAZ 2107
To remove the front door, you will only need basic knowledge about the structure of VAZ 2107 doors, thanks to which most owners of the “Seven” cope with such repairs on their own.
So, to remove the front door from the car, you will need to purchase a special impact screwdriver. With this tool, you can easily loosen tightly tightened screws on the door. In addition, to remove the front door you will need a ten-size wrench. Finally, before starting work, you will need to find an assistant - the fact is that the VAZ 2107 door is quite heavy and you definitely won’t be able to hold it without help.
First of all, you will need to remove the door opening limiter, and to do this you will need to use a hammer to knock down the locking pin, after which you will need to pull it out of the seat using pliers.
After this, take an impact screwdriver and use it to loosen the screws securing the door hinges. This is done quite simply: the screwdriver itself is installed in the desired position, after which it will be necessary to hit it several times with a hammer. Sharp blows of the hammer are repeated until the screws are unscrewed.
It is important not to completely unscrew the screws before an assistant comes to help - he will have to hold the door and help remove it.
To install the door in place, repeat all of the above steps in reverse order. Please note that before installing the door, be sure to lubricate the threaded connections of the screws.
How to remove a door lock
To dismantle the door lock on the “seven”, use the same tools as when disassembling the door. The process itself consists of the following steps:
- Remove the door trim.
- Use a flat-head screwdriver to disconnect the lock power button rod.
Using a flat screwdriver, disconnect the lock power button rod - Using a Phillips screwdriver, unscrew the groove fastener from the end of the door, and then move it away along with the seal.
From the end of the door, unscrew the groove fastener and remove the part along with the seal - Unscrew the fasteners of the interior door handle.
- Unscrew the lock fastener.
The door lock is secured with three screws using a Phillips screwdriver. - We remove the mechanism along with the handle and rod.
After unscrewing the fasteners, remove the lock along with the rod and handle
How to remove a door handle
To replace the external door handle, you will need to prepare the following set of tools:
- socket wrench 8;
- flat screwdriver.
The dismantling procedure consists of the following steps:
- Raise the door glass all the way.
You will need to lift the glass to get to the door handle mount. - We dismantle the door trim.
- Disconnect the outer handle drive rod from the locking mechanism lever.
Disconnect the outer handle drive rod from the locking mechanism lever - Using a socket wrench, unscrew the handle fastener, which consists of two 8-mm nuts.
The outer handle is secured with two 8mm nuts. - We dismantle the outer handle, removing the part from the hole in the door along with the rod and seal.
After unscrewing the fasteners, remove your hand from the door along with the seal and rod
Dismantling the door trim of a VAZ 2107
Old VAZ 2107 door cards are removed as follows:
- remove the window handle by pulling out the fixing bracket;
- Unscrew the bolts under the plugs and remove the door handle (armrest);
- remove the trim from the door opening handle;
- remove the speaker (if installed);
- remove the door card by pulling it towards you.
This is interesting: Installing the rear wing on a VAZ 2110 in the garage - The upholstery material should be laid face down on a flat surface;
- a door card blank is applied on top of the material;
- Initially, you should use a stapler to fix one side of the sheathing;
- after this, you can begin to stretch and fix the material on the opposite side;
- During the work, you need to ensure that there are no folds;
- The process ends with walking along the perimeter of the workpiece and fixing all the edges of the material.
Door card manufacturing process
It is very easy to make cards on the VAZ-2107 door with your own hands, especially if you have a handy tool. Before starting work, you will need to have patience and time, since it can take up to 3-4 hours to make one upholstery.
The standard card is used as a template for making a new one. To do this, just attach the template to a sheet of plywood, then mark and cut out the base (it is better to use a jigsaw for cutting). On the prepared base, you should mark and cut holes for attaching handles and levers. When tuning the doors of the “seven”, you can simultaneously install an electric drive on the window lifts.
During the work process, special attention should be paid to the correct marking of the holes for attaching the card. If you make a mistake by a few millimeters, the product will not fit well on the door.
After the base is ready, you should use sandpaper to process the sawn edges. This is necessary to ensure that the base is as smooth as possible. We continue tuning the door trim of the "seven", for which we take a piece of foam rubber (it is best to use two-layer foam rubber, consisting of a base and fabric) and cut it out according to the card template.
It is important to know! If tuning involves installing speakers and a shelf on the door, then you should first make the frame of these products. You can read how to make podiums for the VAZ-2107 in the corresponding material.
The shelf can be made separately, then sheathed and installed on the door card. It is much easier to make such a shelf than to make a whole product along with the door card.
Foam rubber is glued to the plywood using special superglue. After the foam rubber has been glued to the door card, you can begin covering it. You can sheathe it either with a single piece of material or in sections, you just need to sew them together with a “French seam”, which is durable and attractive in appearance. The pattern is made so that there are 50 mm allowances on all sides. This is necessary in order to avoid the appearance of “bald” places along the edges if there is not enough material.
The skin is stretched onto the card according to the following scheme:
After covering the card, you can trim off any excess material. To prevent the upholstery from tearing at the place where the brackets are attached during operation, it is recommended to leave a small margin on the back side. Tuning of this kind is quite simple, and is carried out by analogy for all remaining doors. Such a simple modification will significantly improve the appearance of the interior and transform the “Seven” for the better. Below is a photo of car doors with the trim altered. By analogy, you can do it for your car.
Necessary materials
To make your own VAZ 2107 door cards you will need:
- plywood 4 mm thick for making the base of the door card (if the base of the old door card is in good condition, you can use it, which will make the work easier);
- new latches for fastening the casing (old ones harden over time and do not perform their functions well);
- foam;
- leatherette;
- glue.
Installation of panels
On the VAZ 2107 door body, you install special bushings with internal threads yourself. Holes are pre-drilled on the panels in appropriate places, and decorative bolts are passed through them. When attaching the bushings, you must carefully follow the installation instructions to avoid turning the part. This mount allows you not only to visually tune the interior, but also to eliminate knocks and squeaks during the trip.
The door panels of the VAZ 2107 car are placed in place and attracted to the base using decorative bolts. This installation method is highly durable and provides optimal conditions for the operation of audio system speakers. Self-tuning by reupholstering the car interior with leatherette transforms the interior into a real work of art.
SOUND INSULATION OF THE INTERIOR
A significant drawback of the VAZ 2107 is the increased noise in the cabin when driving. To eliminate it, it is necessary to soundproof the interior. This is a somewhat costly procedure, although not complicated. Sound insulation materials can be divided into three groups: heat insulators, sound insulators and vibration dampers, but on the modern market there are universal products that combine all the properties.
Note that for ease of installation, virtually all materials are made on a self-adhesive basis. Some of them must be heated with a hairdryer during installation. The first to install is a vibration-insulating material (vibroplast), which dampens vibrations of the body, engine and suspension. Next comes a sound-absorbing layer (bitoplast), which prevents extraneous sounds from entering the cabin. In order not to separate into two layers, you can take a universal material.
In addition to soundproofing materials, you will need:
- Screwdrivers.
- Hair dryer.
- Degreaser.
- Roller.
- Scissors.
SOUND INSULATION OF BOTTOM AND WHEEL ARCHES
For external treatment of the bottom and wheel arches, you must do the following:
- Wash the car thoroughly, especially the parts being treated.
- Let the car dry, blow out the cavities with an air stream.
- Prepare the surface by degreasing it with special solvents, for example, white spirit.
- Apply sound insulation to the required surfaces of the car using a spray gun or a paint brush.
- Do not leave gaps; the mastic layer should be uniform.
- Install fender lockers in the wheel arches and secure them with self-tapping screws.
SOUND INSULATION OF DOORS
Soundproofing of doors is carried out in order to get rid of external noise and improve the sound quality of the acoustic system. This process is quite painstaking and requires dismantling the door trim and interior elements.
Do-it-yourself soundproofing of VAZ doors
The sound insulation kit includes only damping material, but surface treatment with sound absorbers will not be superfluous.
- After dismantling the door trim and interior parts, treat the surface with a degreaser.
- The first layer is to apply vibration insulation. The material is glued to the inside of the door through special technological holes. Silver vibroplast has proven itself well here. The material must be glued tightly, without missing a single millimeter.
As a rule, anti-corrosive coating is applied to car doors. Remove it, otherwise the vibroplast will not stick. Before gluing the material, adjust all locks and rods to avoid rattling.
- Next we glue the bitoplast, its thickness should be four millimeters.
- Then you need to tape the outside of the door under the cards. This is good for audiophiles. Completely seal the access holes to seal the part of the door where the speaker is located.
- Treatment with a vibration filter will make it possible to increase the rigidity of the door, which has a good effect on the sound of acoustics.
- Cover the outer sides with Visomat and then with Splen.
- After gluing, heat the vibroplast with a hairdryer, smoothing the material with a roller or palms.
VIDEO: SOUNDPROOFING DOOR CARDS
SOUND INSULATION OF ENGINE COMPARTMENT
The engine is one of the main sources of noise in a car. The work order is as follows:
- First of all, clean the inside surface of the hood from dirt and dust.
- Next, degrease the surface with solvents.
- Attach a sheet of finished sound insulation to the hood and cut along the contour.
- If you purchased material on a self-adhesive basis, simply stick it on the required surface, having first removed the protective film.
- Be sure to add a layer of foil to improve heat reflection, protect the soundproofing layer and increase the engine warm-up rate in winter.
VAZ 2107 hood treated with vibration material
Features of dismantling
Before work on reinstalling the door trim, you need to prepare a tool. You will need:
- Plywood sheet up to 4 mm.
- Door latches and clips are sold as a set, matching the interior color.
- Foam rubber, sheet up to 10-15 mm thick.
- Material.
- Glue.
Dismantling the panel proceeds in steps:
- Pull out the bracket securing the window regulator.
- Remove the window lifter handle. If the mechanics were reinstalled on the power window, remove the clamp covering the standard hole.
- Remove the plugs on the door handle, unscrew the armrest bolts, and remove the element.
- Remove the trim panel from the door handle.
- Remove speakers and adjacent electrical appliances, if installed.
- Carefully pull the door card towards you and remove the panel.
Dismantling takes up to 10 minutes, it is important to unscrew the bolts sequentially; if the interior has been modernized, and the door has additional clips along the edge of the card, remove them first
FRONT PANEL
Tuning the console is its optimization, which will result in the appearance of a number of advantages and useful little things in the car. The purpose of this modernization is to make the front panel more functional and original. You can replace the torpedo with a similar one from the VAZ-2115. But be prepared for the fact that during installation there may be a problem with gaps that need to be sealed with foam.
Instrument panel VAZ 2115
You can also install a front panel from a foreign car on the “seven”. The best option is a dashboard from a BMW E30. In addition, an analogue from TOYOTA Camry is often used. In this case, trim the element a little on the sides, install electric windows and select the correct cover for the steering wheel. As an option, you can sheathe a standard dashboard with carbon fiber or fabric, which will give it a bright and original appearance.
DASHBOARD
The car interior is equipped with a dashboard for the driver to monitor driving parameters, the health of the main units and detect emergency breakdowns. All the main elements on the instrument panel are placed under protective glass.
Possible ways to modify the instrument panel of the VAZ 2107:
- You can buy ready-made improved elements and install them in place of the standard ones.
- You can buy additional devices (on-board computer, thermometer, etc.) and organically fit them into the design of the VAZ 2107 dashboard.
- You can independently tune the instrument panel by installing LED lighting, as well as replacing the scale and arrows on the instruments.
PHOTO GALLERY: MODERNIZATION OF THE INSTRUMENT PANEL OF VAZ 2107
Modernization of the instrument panel by installing LED lighting on a VAZ 2107
Tuning the instrument panel using VAZ 2107 stickers
Original design of the VAZ 2107 dashboard
GLOVE BOX
The glove compartment is one of the weak points of the VAZ 2107 interior. Unlike previous VAZ models, the glove compartment on the seven opens downwards. And when the car is in use for a long time, the glove compartment often opens spontaneously on potholes and bumps. The reason for this is loose hinges and fastening of the lock. If nothing is done, over time it will not close at all. Not to mention the rattling sound when driving, which distracts the driver's attention and irritates him.
Perhaps all happy owners of VAZ 2107 know the problem of the glove compartment lid
To fix the problem, many car owners try to bend the lock tab on the lid, which does not give a positive result. You actually need to bend the tab on the panel. If this does not help, stick sponge rubber along the length of the lid, which will ensure that the lid is lightly spring-loaded when closing. If the hinges are worn out so much that the proposed methods do not help, try fixing them using furniture or other small-sized magnets.
GLOVE COMPARTMENT LIGHTING
The illumination of the glove box on the VAZ 2107 also leaves much to be desired: it is poorly implemented, practically does not shine and rarely functions correctly.
LED strip illumination of the glove compartment. Inside view
Installing an LED strip is the easiest option for upgrading the glove compartment lighting. It is advisable to give preference to insulated tape, since the light-emitting elements in it are protected from damage using a special composition. The optimal length of the LED strip is 10–15 centimeters. It is advisable to mount it in the upper part of the glove compartment so that the light is directed into the glove compartment.
SEATS
And although the seats of the “Seven” are considered the most valuable of the entire VAZ (classic) family, they have a significant drawback - the front seats are flimsy and break quite quickly. Over time, the back of the driver's seat begins to warp, and even if it is welded, this will not last long. In addition, the upholstery on the seat is worn out, which looks unattractive.
The simplest option for improving the seats is to purchase covers, but if the seats are very loose, you can replace them with new stock, “foreign”, sports or anatomical ones.
WHAT SEATS ARE SUITABLE FOR VAZ 2107
In addition to stock factory seats, the VAZ 2107 can be equipped with seats from foreign cars. For example, analogs from the 1996 Mercedes W210 and 1993 Toyota Corolla are perfect for this purpose. They are easily attached to the standard "seven" bolts.
Seats from MAZDA 6 in VAZ 2107
Seats from Fiat or SKODA are also a good option. But in this case, you will have to make two additional holes for more secure fastening. Elements from Nissan and Peugeot can also be used, but during installation you will encounter certain inconsistencies. Volkswagen seats fit well on the 7 without any modifications. They are comfortable, but too high, so it is better to abandon this option.
VIDEO: REPLACING SEATS ON A VAZ FROM FORD MONDEO
HOW TO REMOVE THE HEAD RESTRAINTS AND SHORTEN THE SEAT BACK
You can shorten the seat back by trimming it. To do this, the chair must be dismantled and disassembled. Using a grinder, a part of the frame is sawed off. This type of work is very labor-intensive, so it is better to turn to specialists. As for the VAZ 2107 headrests, removing them is very simple; to do this, you just need to pull it up until it stops and press the latch.
Features of dismantling
Before work on reinstalling the door trim, you need to prepare a tool. You will need:
- Plywood sheet up to 4 mm.
- Door latches and clips are sold as a set, matching the interior color.
- Foam rubber, sheet up to 10-15 mm thick.
- Material.
- Glue.
Dismantling the panel proceeds in steps:
- Pull out the bracket securing the window regulator.
- Remove the window lifter handle. If the mechanics were reinstalled on the power window, remove the clamp covering the standard hole.
- Remove the plugs on the door handle, unscrew the armrest bolts, and remove the element.
- Remove the trim panel from the door handle.
- Remove speakers and adjacent electrical appliances, if installed.
- Carefully pull the door card towards you and remove the panel.
Dismantling takes up to 10 minutes, it is important to unscrew the bolts sequentially; if the interior has been modernized, and the door has additional clips along the edge of the card, remove them first
INTERIOR LIGHTING
Refinement of standard lighting will increase comfort in the cabin and embellish it. You can take a lampshade from Priora, as it has the required characteristics and looks impressive. For materials you will need: masking tape, a sharp knife, a marker, a 12" wrench and a screwdriver. First you need to remove the front roof visor. Use a marker to outline the location for installing the new lampshade. Cut the visor along this contour. Then you need to attach the lampshade and fill the seams with sealant.
Priora interior lamp
As for the power connection, it is advisable to run the new wiring along the right pillar. The negative is connected to the body, and the positive is connected to the lamp contact. It is better to make wire leads in the area of the glove box.
Since the interior lighting in the “classic” is very poor, many car owners resort to upgrading it
UPGRADES OF THE VAZ 2107 OVEN
As you know, the efficiency of the VAZ 2107 heater is extremely low, which causes dissatisfaction among the owners of the “Seven”. Upgrading the stove will help solve this problem. There is no need to improve the heater radiator, since it gives off the optimal amount of heat. This means that to increase the efficiency of the stove it is necessary to improve the airflow system.
The simplest tuning, which does not require virtually any design changes, is to replace the standard fan motor with the one used in the VAZ 2108–2109. This motor has more power and higher speed. To install it, you need to slightly modify the stove body.
Modification of the VAZ 2107 stove
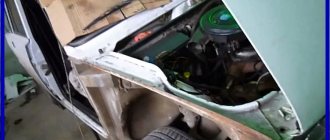
Replacing the standard stove tap will also not be superfluous. The tap is located in the passenger compartment of the “seven” in the passenger’s foot area. Sometimes car owners find out about it only when there is a coolant leak, which causes a lot of trouble. Replacing the faucet with a similar new product solves the problem only for a while. Therefore, experts recommend replacing it with a curved sealed tube. This will stop the leaks, but you won't be able to shut off the antifreeze flow to the radiator. Because of this, the cabin will be very hot in the summer.
As an option, you can install a regular water tap to supply coolant to the heater radiator in the engine compartment. The only inconvenience of such tuning is the need to open the hood in order to manipulate the tap.