Replacing outer and inner CV joints on Lada Kalina
CV joint (constant velocity joint - approx.) or popularly just a “grenade”, is designed to transmit torque to the wheels of a car. CV joints can be internal or external, and the devices themselves are quite simple in technical terms and consist of a ball bearing that rotates transversely to its axis.
In the video, replacing CV joints on a Lada Kalina:
Failure of the CV joint on the Lada Kalina is a very common occurrence, and the main reason for its failure is torn anthers. Because, together with dust and water falling under them, the lubricant turns into thick mud, and it is no longer able to fully perform its functions.
Replacing the outer CV joint
In the process of replacing the outer CV joint
The work of replacing an outer or inner CV joint is not very difficult and can be done by any motorist who has at least once repaired a car with his own hands. And in order for the repair to be easier and faster, you need to prepare the following tools:
- Socket heads for “17” and “30”.
- Driver or ratchet.
- Extension for the wrench.
- Jack.
- Wheel chocks.
- Hammer.
- Vise.
Step-by-step disassembly procedure
After you are convinced of the malfunction of one or another CV joint, you can begin to work.
- First of all, we tear off the mounting bolts from the wheel and the hub nut, then we set the wheel chocks under the rear wheels. (To make it easier to tear off the nuts, it is better to use an extension for the wrench - approx.).
- We put the car on a jack and hang the wheel.
- We remove the wheel and, for greater reliability, place it under the car next to the jack.
- Now that this picture appears before you, all that remains is to unscrew the 2 bolts that secure the ball joint to the steering knuckle.
Unscrew the bolts marked with a red marker on both sides.
CV joint VAZ. Lada grenade. Comparison of different manufacturers
They counterfeit everything related to the AvtoVAZ assembly line. Any part purchased at a car store can be a counterfeit...
BEWARE OF FAKE! CV joint LADA Image. features
CV Joint Review
(grenades) for VAZ 2108-2115.
Without causing strong blows, the CV joint will move out of place
If the internal CV joint is supposed to be replaced, then work 1 to 6 should be performed as well, after which, using a pry bar, we remove it from the gearbox and take out the entire assembly.
Replacing the outer CV joint of a Kalina with your own hands
CV joint (constant velocity joint - approx.) or popularly just a “grenade”, is designed to transmit torque to the wheels of a car.
CV joints can be internal or external, and the devices themselves are quite simple in technical terms and consist of a ball bearing that rotates transversely to its axis. In the video, replacing CV joints on a Lada Kalina:
Failure of the CV joint on the Lada Kalina is a very common occurrence, and the main reason for its failure is torn anthers. Because, together with dust and water falling under them, the lubricant turns into thick mud, and it is no longer able to fully perform its functions.
Replacing the outer CV joint
In the process of replacing the outer CV joint
The work of replacing an outer or inner CV joint is not very difficult and can be done by any motorist who has at least once repaired a car with his own hands. And in order for the repair to be easier and faster, you need to prepare the following tools:
- Socket heads for “17” and “30”.
- Driver or ratchet.
- Extension for the wrench.
- Jack.
- Wheel chocks.
- Hammer.
- Vise.
Step-by-step disassembly procedure
After you are convinced of the malfunction of one or another CV joint, you can begin to work.
- First of all, we tear off the mounting bolts from the wheel and the hub nut, then we set the wheel chocks under the rear wheels. (To make it easier to tear off the nuts, it is better to use an extension for the wrench - approx.).
- We put the car on a jack and hang the wheel.
- We remove the wheel and, for greater reliability, place it under the car next to the jack.
- Now that this picture appears before you, all that remains is to unscrew the 2 bolts that secure the ball joint to the steering knuckle. Unscrew the bolts marked with a red marker on both sides.
- When unscrewing the ball joint, apply force and use a wrench extension.
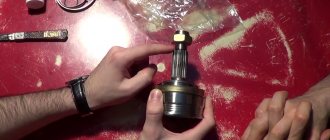
- Turn the steering wheel as far as possible to the side and slightly pull the steering knuckle with the stand and remove the outer part of the hub along with the CV joint (For convenience, you can make several gentle blows with a hammer - approx.). Dismantled CV joint
- The next step is to dismantle the old boot and clamps. You shouldn't use them again; it's better to take a set of new ones.
- Next, you need to remove the CV joint itself. If you have a special removable device, then use it. If not, then you will have to knock it out of place with a hammer. Without causing strong blows, the CV joint will move out of place
- Hit the CV joint with a hammer, rotating it along the axle shaft. After some effort, the CV joint should give way.
If the internal CV joint is supposed to be replaced, then work 1 to 6 should be performed as well, after which, using a pry bar, we remove it from the gearbox and take out the entire assembly.
We take the inner CV joint assembled with the axle shaft to a vice where we clamp it and dismantle it.
- After the “bare” axle shaft appeared before us, the work on removing the CV joint can be considered completed.
Step-by-step assembly procedure
Work on assembling all parts should be carried out in the same order as removal, however, there are some nuances in these works.
- First of all, we put the new boot on the axle shaft; this may cause some difficulties. To make the task easier, the axle shaft can be coated with lubricant.
- Then add lubricant to the CV joint. New lubricant added to CV joint
- And the remains are in the dustbin.
- Now you need to use a hammer and a block to install the grenade on the axle shaft, using gentle blows we mount it in place.
- After it is fixed, we remove the air from the boot and secure it with clamps.
- Next, when everything is installed, all that remains is to put on the steering knuckle, fix the new hub nut and put on the wheel.
- Tighten all the nuts and lower the car from the jack.
All work on changing the CV joint, if the work is carried out correctly, will not take more than 1.5-2 hours. You can check the quality of the work performed immediately after the repair. If you start driving with the wheels turned to the side and there is no crackling, squeaking or noise, it means that the repair was carried out correctly and the car can be safely operated further.
Signs of CV joint failure
The first signs of a faulty grenade are crunching sounds in the area of the front wheel on turned out wheels when starting to move. When the fault is severe, noise appears at less significant loads.
The anther begins to “repair”
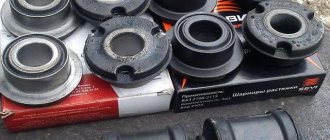
Selection of CV joints
CV joint in original packaging. Usually inside the package is a pomegranate produced by VIS
There is no consensus among car owners regarding the choice of one or another brand of constant velocity joint, but clear leaders stand out:
- VIS.
- GNK.Original packaging of GNK CV joint.Inside the GNK CV joint packaging - boot, CV joint, clamps.GNK outer CV joint installed
- GLO.
On a note!
Signs of CV joint failure
The first signs of a faulty grenade are crunching sounds in the area of the front wheel on turned out wheels when starting to move. When the fault is severe, noise appears at less significant loads.
The anther begins to crawl
In order to prevent such damage in advance, you should periodically inspect the anthers from the outside for cracks and integrity in general.
Replacing a CV joint on Kalina is an easy task
Replacing the CV joint on Kalina
The main reason for the malfunction of CV joints (constant velocity joint) on Kalina is the depressurization of the CV joint boots. Initially, incorrectly installed anthers, or rather loosely tightened clamps and leaky or worn out anthers, do not provide a normal seal to the assembly. Water and dirt begin to get under them. Gradually, the lubricant turns into a rusty mess and ceases to perform its functions. The first sign of a faulty CV joint is a crunching sound in the area of the front wheel when the wheels are turned out when starting to move. In more advanced cases, such a crunch appears with less pronounced loads on the wheel.
Replacing the outer CV joint on a viburnum
Replacing the outer CV joint on a Lada Kalina car is not a serious problem. A person who has at least a minimal understanding of car repairs with their own hands can cope with this operation.
To replace the outer CV joint on the Lada Kalina we will need:
- Ratchet or crank
- Extension for extending a wrench or ratchet (a piece of pipe of suitable diameter will do)
- Head 17
- Head 30
- Hammer
- Jack
- Replacing the inner CV joint on a viburnum
Replacing the CV joint on Kalina
First you need to hang the wheel. Before putting the car on a jack, you need to remove the wheel bolts and the wheel nut. Using a wrench and a 30mm socket, we tear off the hub nut. To do this, it is better to extend the knob (for example, with a metal pipe of a suitable diameter). We unscrew the wheel bolts with a spray bottle. After we remove the wheel and nut, the following picture appears before us:
In this photo we have the brake caliper removed. Along with the CV joint replacement procedure, we replaced the brake pads. You don't have to remove the caliper.
After we unscrew the ball from the steering knuckle, we have access to the CV joint. Now, by carefully hitting the CV joint (in the place where the hub nut was located) through the lining, so as not to damage the thread, carefully knock the CV joint out of the hub. For convenience, you can turn the wheels out.
After this, you need to remove the CV joint itself. If you have a puller, use it. If there is no puller, then knock the grenade off the axle shaft with gentle blows of a hammer. We didn't have a puller and we knocked down the CV joint with a hammer. If the CV joint is “stuck” tightly and does not budge, then the seperator will need to be broken. With gentle blows of a hammer, preferably placing a rag on the separator (it is easily chipped and fragments can scatter throughout the garage or get into your eyes), apply blows while rotating the CV joint (For those who do not understand where to apply blows, they must be applied in the place where the the “balls” of the hinge themselves, we need to break this very hinge). The inside of the cage will remain on the axle shaft. To remove it, you must first remove the retaining ring:
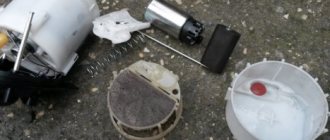
The dismantling process ends here and the process of preparing and installing a new CV joint begins. First, open the package with the new CV joint. We purchased a CV joint from GLO, but you can use another company. In our box we had the CV joint itself, a new boot, lubricant and clamps (tape clamps, without fasteners, not very comfortable)
First, put the boot on the axle shaft. This may require significant effort. You can add a little grease to the axle shaft to make the task easier.
After this, add lubricant to the CV joint itself:
And squeeze out the remains into the anther:
Now we install the CV joint in place. In order for it to sit in its place, we apply light blows with a hammer (through a board or other lining, so as not to damage the thread. After the grenade is in place, we put the boot and clamps on it. Next, we fasten them, having first released air from the boot.
New CV joint installed. All that remains is to put everything back in place and the car is ready for use again. Assembly occurs in the reverse order and there should not be any difficulties with it.
The whole job took us no more than 1.5 hours. Of these, about 30 minutes of dancing with the elimination of the separator. If you have a puller or the CV joint can be removed without breaking the cage, then it can be done in an hour.
Now you know how to replace the CV joint on the Lada Kalina. All the best and good luck on your journey!
Also read:
3 thoughts on “Replacing the CV joint on Kalina”
Hello, is it possible to remove the outer CV joint without removing the shaft with the inner CV joint from the box?
Hi. Yes it is possible. It is enough to remove the CV joint from the hub and remove the mounting clamp. Then pull the boot in the direction of the box along the drive axis. Remove the grease from the place where the CV joint is put on the shaft, inspect how it is attached, either it is the outer ring, such as for example (AZLK-2141, Daewoo Nexia) or the inner one like for example (all front wheel drive vases)
https://www.help2drivers.ru
On a note!
Constant velocity joints, which are sold in the store in sets, include grease, a boot and all the necessary clamps in their sets. Pay special attention to this fact so as not to overpay for additional spare parts and accessories.
I had to change more than one CV joint. Of course, I had to tinker with the first one for a couple of hours, since I didn’t really know all the subtleties, but I changed the subsequent ones almost with my eyes closed.
I bought a grenade for viburnum. The assembly includes the grenade itself, a finger guard and clamps. You can change it in an hour without rushing, it can be done faster. But why rush in such a matter?
"Lada Kalina" is a front-wheel drive car in which the engine and gearbox are located transversely relative to the body. The drive to the wheels is carried out through the main gear. Torque is transmitted through constant velocity joints (simply CV joints, or “grenade”). There are several of them - internal and external. Despite their reliability, these elements can fail. Well, let's look at how to replace a “grenade” on a Kalina, what tools are needed for this and what are the signs of a malfunction.
How to change the CV joint boot on a Lada-Kalina
The constant velocity joint (CV joint or “grenade”) is designed to transmit torque from the gearbox to the wheels of front-wheel drive vehicles. The hinge is protected from the influence of the external environment by a special boot made of rubber, silicone or soft plastic. Over time, the boot material loses its properties: cracks appear, through which moisture and dirt get inside the unit, wash out the lubricant, and the drive fails. Timely replacement of the boot will avoid costly repairs of CV joints.
Device
In terms of their design, the inner and outer CV joints are very similar.
- Half shaft.
- Clamp and boot.
- Clip.
- Hinge housing.
- Separator.
- Ball.
- Retaining and cone ring.
- Spring washer.
Thanks to this device, the elements are capable of transmitting torque to the wheels at an angle of up to 45 degrees (not only in the horizontal, but also in the vertical plane).
Features of the internal CV joint design
The main feature of the internal CV joint mechanisms on Kalina and most other front-wheel drive cars is that they are made from materials of increased strength, since the parts operate under significant loads and are susceptible to exposure to aggressive environments. The use of high-strength alloys significantly increases the service life of all components, however, under the influence of various factors, they can be subject to accelerated wear.
Two grenades are installed on each wheel, which is what people call CV joints. One of them is internal, the other is external. Both of them have approximately the same structure, with minor differences only in the shape and size of the parts.
Here are the main parts that make up the CV joint:
- frame;
- driving and driven shafts;
- inner race;
- a separator containing six balls located between the inner walls of the outer housing. They rotate in special grooves.
The mechanism is protected by a rubber boot that prevents debris, dust and water from getting inside.
The elements are made as accurately as possible, therefore, when assembled, they have no play when moving. When the cage rotates, it transmits force to the outer housing. As the balls move, the angle between the axes changes.
During operation of the mechanism, the materials wear out, play appears, and during rotation a sound similar to crunching occurs. This is the first sign of a mechanism failure.
How to determine a breakdown?
The grenade is a ball bearing, the cages of which have transverse grooves. Due to this, the angle between the driven and driven axle shaft changes. Thus, the CV joint not only transmits torque, but also changes the angle between the axle shafts. In view of this, over time, it develops. In places where the parts do not fit tightly, backlash and extraneous noise are formed. In fact, this is accompanied by a characteristic crunch. It occurs due to large wear on the balls that move along the grooves. The crunch can appear both during straight-line movement and when turning. In the latter case, most likely, the external grenade of the Kalina requires replacement. This sign should not be ignored, since the bearing may fall apart at high speed.
Replacement
Cars July 19, 2017
"Lada Kalina" is a front-wheel drive car in which the engine and gearbox are located transversely relative to the body. The drive to the wheels is carried out through the main gear.
Torque is transmitted through constant velocity joints (simply CV joints, or “grenade”). There are several of them - internal and external. Despite their reliability, these elements can fail.
Well, let's look at how to replace a “grenade” on a Kalina, what tools are needed for this and what are the signs of a malfunction.
Device
In terms of their design, the inner and outer CV joints are very similar. Thus, the design of the element includes:
- Half shaft.
- Clamp and boot.
- Clip.
- Hinge housing.
- Separator.
- Ball.
- Retaining and cone ring.
- Spring washer.
Thanks to this device, the elements are capable of transmitting torque to the wheels at an angle of up to 45 degrees (not only in the horizontal, but also in the vertical plane).
How to determine a breakdown?
The grenade is a ball bearing, the cages of which have transverse grooves. Due to this, the angle between the driven and driven axle shaft changes. Thus, the CV joint not only transmits torque, but also changes the angle between the axle shafts. In view of this, over time, it develops.
In places where the parts do not fit tightly, backlash and extraneous noise are formed. In fact, this is accompanied by a characteristic crunch. It occurs due to large wear on the balls that move along the grooves. The crunch can appear both during straight-line movement and when turning. In the latter case, most likely, the external grenade of the Kalina requires replacement.
Let's get to work. Dismantling the CV joint
First of all, put the car on the handbrake (or install anti-rollbacks). Then we remove the wheel bolts and hub nut. The latter may not be supplied, so we use an extension cord. Next, place the car on a jack, lift its front part and remove the wheel. Then we find two bolts that secure the grenade to the steering knuckle.
Now we twist the steering wheel to its extreme position (so that the disc looks out of the wheel arch). Pull back the steering knuckle along with the shock absorber strut. Next, remove the outer part of the hub with the external “grenade”. If it is tight, you can use a hammer. But you need to hit through a wooden block, otherwise the part will be seriously damaged.
Next (if it is an external hinge) remove the old boot and clamp. Now you need to get the “grenade” itself out of the hub. To do this, you can use a puller or hit the CV joint with a hammer. In this case, you need to rotate its axle shafts.
If it is intended to replace the internal “grenade” on the Kalina, all operations are carried out in a similar way. The only thing is that the part is removed from the box using a pry bar, without hitting it with a hammer.
Procedure
To prevent the bearing from falling apart at high speed, the CV joint must be replaced. To do this you need the following tools:
- jack or block;
- extension;
- ratchet;
- balloon;
- socket heads (17 and 30);
- hammer;
- vice;
- a small block of wood.
First you need to put the car on the handbrake and remove the wheel bolts. In the same position, you need to remove the hub nut using an extension. Then you need to place the car on a jack on one side and remove the wheel. Be careful! Even if you know how to change the boot on Kalina quickly and easily, do not limit yourself to one jack, install an additional block.
Next, you should find the two bolts that secure the CV joint to the steering knuckle. They may not give in immediately; you will need an extension cord to remove them. Now you should unscrew the steering wheel to its extreme position, pull back the steering knuckle and remove the outer part of the hub along with the outer CV joint. A hammer will come to the rescue, but you need to hit not directly on the CV joint, but on a wooden block, so as not to inadvertently damage the part.
How to replace the inner CV joint boot on Kalina? This can be done in a similar way, but the CV joint is removed from the box using a pry bar. After the old element is dismantled, a new boot is installed. When replacing the hinge, the boot must also be removed. Even if the old dust cover is still quite good, you absolutely cannot put it back. It is already worn out enough and it will not be possible to screw it with the same tension.
How to extend the resource?
Typically, these bearings travel 250-300 thousand kilometers or more. They have a very durable construction. However, there are several factors that can significantly reduce their durability. This is the condition of the anther. It is because of this that water, dust, and sand get inside. As a result, the lubricant turns into a thick abrasive, which has a destructive effect on the bearing. How to prevent this? During operation, you should periodically check the condition of the boot on the CV joint. If it has cracks or tears, it needs to be replaced immediately.
Replacing a “grenade” on a “Kalina” with your own hands: features, device and recommendations
"Lada Kalina" is a front-wheel drive car in which the engine and gearbox are located transversely relative to the body. The drive to the wheels is carried out through the main gear. Torque is transmitted through constant velocity joints (simply CV joints, or “grenade”). There are several of them - internal and external. Despite their reliability, these elements can fail. Well, let's look at how to replace a “grenade” on a Kalina, what tools are needed for this and what are the signs of a malfunction.