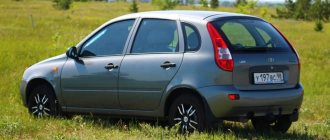
It's hard to imagine a modern car without a rear view camera. If your car does not have this option from the factory, then you can install the camera yourself. The “Lux” configurations of Lada Granta, Kalina 2, Priora cars have similar multimedia systems (MMS), so the process of connecting and setting up the camera is identical. During installation of the camera, there may be differences depending on the type of body (hatchback, station wagon, sedan, liftback), but they are insignificant.
Lada Granta - installing a rear view camera
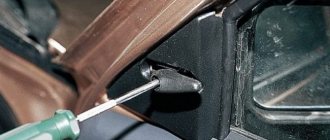
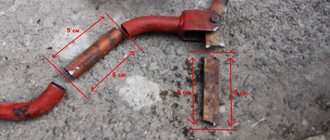
Due to the fact that a 2-DIN Chinese radio was purchased, I was honored to install a rear view camera. The radio came with a rear view camera, which had to be mounted on the outside of the trunk door. I was too lazy to run “kilometers” of wires along the trunk lid, rear pillar, disassemble the ceiling, and the sides of the trunk, so, after surfing the Internet, I found a camera that fits into the bumper, like parking sensors (much closer to the reversing lights). Installation in the bumper is the same as when installing parking sensors, instructions are here. A cutter of suitable size is included in the kit. The liftback has two reverse lights, so I connected the camera to the second one (the parking sensors are connected to the first one). The cameras came with wires. Connection diagram:
connection diagram
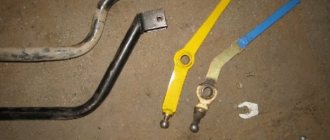
Connector P2 – red wire to + reverse lamps, black – ground.
The signal wire from the camera to the radio (which has tulip connectors) has another additional red wire P3. This is the power supply for the radio to output images from the camera. We connect one end to the + of the reverse light, the other to pin 9 of the radio connector (red dot on the ISO connector of the radio). Since birth, I had audio equipment in my car, but this wire was not in the block. I pulled the wiring out of the block that came with the radio and inserted it into the ISO block of the car. The wire was thrown under the carpet, the tulip is connected to the CAMIN connector on the radio.
connection
This is what happened on the screen
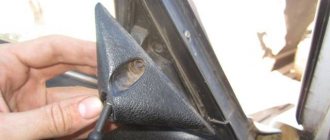
inside
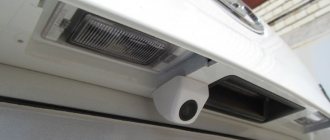
This is what it looks like from the outside
outside
outside2
The rear view camera automatically turns on when you engage reverse gear, and also turns off automatically. If music or navigation is turned on, it turns off, then, when the camera is turned off, it turns on accordingly. An unpleasant feature is that at night, when driving in a narrow space, you still need to look in the mirrors; the glowing radio screen from the camera on is blinding. I found a solution: first turn on the radio or music, while the music is running, forcefully turn off the screen with the button in the upper right corner (the radio has a function that switches to day or night brightness (there is almost no difference between them) or turns off the screen), turn on reverse - image with The cameras are not displayed and you can safely move along the mirrors. I don’t know yet how quickly the camera will get dirty in this location, but I think wiping the camera is not a big problem. But the camera is positioned exactly in the center of the car and the image is not shifted anywhere.
Installing a rear view
for Lada Granta, Kalina, Priora and Vesta
It's hard to imagine a modern car without a rear view . Not much help for people who are looking for how to install a rear view camera on. AvtoVAZ understands this, which is why it equips the “luxury” version of the Lada Vesta with such an accessory. The following describes how to install
rear view
camera on a Granta liftback and connect it to the standard radio (MMC), but similar instructions are also suitable for other Lada cars.
How to choose a good camera. Review of prices from different manufacturers
| № | Article/name | Price, rub.) |
| 1. | Kalina, Kalina-2, Granta (liftback), Vesta, Priora |
Read more: Does the transport tax expire after 3 years
*prices are current as of 09/24/18.
Technical characteristics of the rear camera of the Grant Liftback:
- Matrix type: CCD (photosensitive);
- Viewing angle: 170°;
- Resolution 800 x 600 pixels;
- Zoom level: 0.01 Lux;
- Aspect ratio: 4:3;
- Gradation: parking lines on the screen (0.5 / 1.0 / 1.5 meters);
- Moisture and dust protection: present, level IP 67;
- Brightness: 300;
- Recommended voltage for correct operation: 12V;
- Operating temperature range: - 25° - + 35°;
- Connection type: ISO connector, from the back of a 2-DIMM radio or a separate folding monitor.
The most popular gadgets are in the price category up to 1,500 rubles. Picture display quality, focusing, zoom level are at an average level. Of course, the image is grainy, pixels are visible, and the viewing angle is only 170 degrees.
The rear view camera on the Granta Liftback in the range of up to 3,000 rubles has improved characteristics, image output quality, and a viewing angle of 180°. Despite decent parameters, gadgets in this price category are beyond the means of most car owners.
Installation
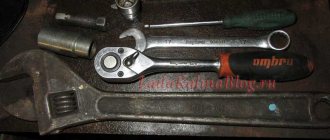
Required:
- view camera , see AliExpress catalog.
- mini ISO connector (blue block and tulip).
- several meters of wire.
Most often, the rear view camera is placed above the license plate (on an overlay called “saber”). How to install fog lights on a Lada Granta. -. This location is the most favorable from a viewing point of view; the camera is not noticeable and there is no need to remove the bumper. How to install a radio on a Priora with your own. First, remove the trunk lid trim, and then the saber, which is held on by 6 M8 screws.
We determine the most suitable place for the camera and drill a hole there. How to Connect a Rear View Camera to a TV. We secure the accessory on the reverse side with a nut.
Setting up standard MMS
No firmware required for the radio, you just need to activate the rear view camera
. To do this, download the program (To download files you need to log in to the site) and copy it to removable media (USB Flash).
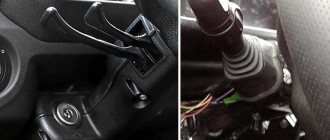
- Go to the desktop (WinCE). On the radio screen, hold down the “Settings” button, then “Exit” and “Desktop”.
- Let's launch the program. how to connect a rear view camera to a TV Connecting a rear view camera Installation of the camera should provide a good overview, parking lot markings should be visible for convenience. Rear view camera Lada Warranty on the camera is an indispensable assistant for both. How to install a turbine on a Zhiguli? My device - USB disk - Folder with the program - Run the CamOnOff file.
- We allow you to use the camera . Click on the corresponding button. We close the program, it and the flash drive will no longer be needed.
By the way, the whole process is also shown in the video:
Checking the operation of the rear view
including reverse gear.
Let us remind you that some motorists prefer to use parking sensors instead of a camera.
Rear view camera on the fret of the grant - installing the necessary accessory
LadaOnline 93 777 6 It is difficult to imagine a modern car without a rear view camera. AvtoVAZ understands this, which is why it equips the “luxury” version of the Lada Vesta with such an accessory. The following describes how to install a rear view camera on a Granta liftback and connect it to the standard radio (MMC), but similar instructions are also suitable for other Lada cars. The “Lux” configurations of Lada Granta, Kalina 2, Priora and Vesta cars have similar multimedia systems (MMS), so the process of connecting and setting up the camera is identical. During installation of the camera, there may be differences depending on the type of body (hatchback, station wagon, sedan, liftback), but they are insignificant. Installation You will need:
Device selection
When choosing a view camera for the Lada Liftback, you need to consider the following characteristics:
- Design. The camera can be installed on the rear bumper or built into the trunk lock cylinder. In rare cases, the device is placed behind the rear window. This installation method may affect the viewing quality.
- A method of connecting to a device that receives information. The rear view camera can display an image on a monitor located on the dashboard or built into the mirror.
- Signal transmission method. It can be carried out via a cable stretched through the car interior or using radio waves. The latter method does not require removing the casing, but the signal quality may decrease.
- Optical system parameters. The viewing angle should be 120…170°. At higher values, the image may be distorted.
- Matrix type. CCD devices provide better visibility at night, but they are slower to read information. CMOS matrices are fast, but they cannot function in complete darkness.
- Color system. All cameras transmit color images. At the output it is converted to PAL or NTSC color index. It is recommended to choose cameras that support both standards.
- Possibility of mirroring. This parameter ensures the correct perception of the image. The function is disabled in most devices.
- Dust and moisture protection. There are 3 degrees of protection, depending on which the device can withstand short-term or long-term immersion in water.
- Photosensitivity. This parameter reflects the ability to work in the dark, it is measured in lux.
- Availability of parking lines. A good camera should overlay a rectangular grid over the image. This helps you better navigate when reversing.
How to install a rear view camera on a grant
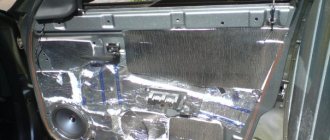
Do-it-yourself wiring and connection of wires You can run wires into the cabin to the standard multimedia system either through the headliner or along the side door trims. To work with ceiling cladding, we recommend using special “spatulas” and filling the voids under the cladding with additional pieces of foam rubber for the cable. On the A-pillar, the wire can be connected to the antenna wire, then stretch it to the glove compartment area to the radio or standard multimedia. The central panel is attached to metal clips and can be removed quite simply. To do this, you need to insert a flat-head screwdriver into the hole on top of the radio and pry it off, then disconnect several clamps. After this, remove the temperature and air direction regulators and use a screwdriver to unclip the fasteners along the perimeter of the panel from top to bottom. It is most convenient to connect the camera power wires to the reversing light.
Installing a rear view camera on a grant
If music or navigation is turned on, it turns off, then, when the camera is turned off, it turns on. An unpleasant feature is that at night, when driving in a narrow space, you still need to look in the mirrors; the glowing screen of the radio, from the turned on camera, is blinding. I found a solution: first turn on the radio or music, while the music is running, forcefully turn off the screen with the button in the upper right corner (the radio has a function that switches to day or night brightness (there is almost no difference between them) or turns off the screen), turn on reverse - image with The camera is not displayed and you can safely move along the mirrors. I don’t know yet how quickly the camera will get dirty in this location, but I think wiping the camera is not a big problem. But the camera is located exactly in the center of the car and the image is not shifted anywhere.
Checking the work
Upon completion of all installation work, it is necessary to check the correct operation of the video camera. In order to do this, you need to connect the battery, then start the car and put it in reverse. If a picture from the camera appears on the display, you can begin assembling the interior trim. Otherwise, it is worth disconnecting the battery again and checking that the wiring is connected correctly.
Even a novice motorist can cope with such a task. At the same time, self-installation will help save a lot of money and time, because you will not need to go to a repair shop and wait for auto mechanics to be free.
Lada granta - installation of a rear view camera.
Connection General diagram for connecting a rear view camera: In the trunk, connect the camera to the rear light wiring:
- +12V to green wire (reverse)
- "mass" to black
We connect the miniISO connector to the radio, the location of the wires in the blue block is as follows:
- Ground (outer part of the tulip) of the connector to pin 16.
- Plus (central part) of the connector to pin 19.
It is worth noting that if the MMC was installed on a car in the “norm” or “standard” configuration, then you will need to additionally supply +12V from reverse to pin No. 1 of connector A1 of the radio. The process is also shown in the video: Setting up a standard MMC No firmware is required for the radio, you just need to activate the rear view camera. To do this, download the program (To download files you need to log in to the site) and copy it to removable media (USB Flash).
Displaying images from the camera on the screen of the radio and navigator
If the camera is not equipped with a complete monitor, or there is a need to connect it to a radio, then it will have to be dismantled. This will give the driver access to the rear connectors of the device. The cables routed into the car interior must be connected to the appropriate connectors on the radio (if they are not there, then you need to use special adapters). To connect wireless modules you also need to use adapters. One is installed on the camera, and the other is placed on the radio.
Connecting a camera to a navigator is almost the same as connecting to a radio. Tulips are used for “connecting”.
By karpoff
Home Car repair - useful articles Lada Granta liftback - reviews, repair Lada Granta installation of a rear view camera Due to the fact that a 2-DIN Chinese radio was purchased, I was honored to install a rear view camera. The radio came with a rear view camera, which had to be mounted on the outside of the trunk door. I was too lazy to run “kilometers” of wires along the trunk lid, rear pillar, disassemble the ceiling, and the sides of the trunk, so, after surfing the Internet, I found a camera that fits into the bumper, like parking sensors (much closer to the reversing lights).
Installation in the bumper is the same as when installing parking sensors, instructions are here. A cutter of suitable size is included in the kit. The liftback has two reverse lights, so I connected the camera to the second one (the parking sensors are connected to the first one). The cameras came with wires. A rear view camera is a convenient and practical accessory that greatly helps when parking. Only luxury models are equipped with cameras at the factory; owners of other versions have to install this accessory themselves. A way to find out why the CHECK light is on! Using a universal auto scanner, you can do the diagnostics yourself in 2 minutes and find out why CHECK is on. Suitable for all cars..." Read more 1 How to choose a good camera and a convenient installation method? There are a huge number of models of rear view cameras on the market that are suitable for both the Granta and other VAZ models, including the Lada Priora and Lada Vesta models. We are talking about universal options of domestic and Chinese production. Car radio - https://got.by/ixf0h Rear view camera - https://www.citilink.ru/catalog/car_electronics/backup_cameras/374601/ Lada Granta - we are looking for a live one NOT expensive.. Resale Nizhny. Car service: 'Lada Granta or Lada Priora? how to install the rear-view camera. Detailed instructions on how to install the rear-view camera. Installation of dirt-proof plugs for the steering rod opening.
Lada Granta. Lada Kalina soundproofing and music. PI%DEC. WHAT I FOUND FOR LADA GRANT ON ALIEXPRESS! LaGranta - Rear passenger lamp. Selection and installation of car rear view cameras. Used Cars | Lada Granta | 2012. UBER on LADA GRANTA. zero, first maintenance on the Lada Granta (liftback) is it worth going to the officials? Installing Parktronic with Your Own Hands from Sergei Zaitsev. 7 Driving Habits That Destroy Your Car and Empty Your Wallet. Lada Granta and the Far East, the Chinese said the Chinese made it.