- Where are they installed?
- Fault diagnosis
- Which ones are better to put
- Replacement process
- Recommendations from experienced
Initially, CV joints were positioned as elements with a very long service life. Manufacturers even assured that they could last as long as the car itself.
Photo of CV joint for VAZ 2114
But in reality, everything is not as colorful as it is described. A grenade has a life limit. What grenades, you ask. The grenade is the CV joint. People often use the concept of “grenade”. This can be explained very simply - the CV joint looks like a grenade. That's all. Therefore, do not be confused if you hear “grenade” when talking about CV joints. It is the same.
When replacement is required
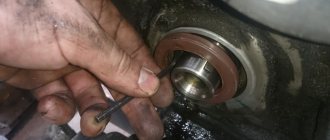
If while driving your car you hear noise coming from the front of the car, be sure to check the condition of the boot. Quite often, replacing the outer CV joint boot of a VAZ 2114 becomes a daily task for service center employees.
To check, just turn the wheels in any direction and look under it. If cracks or complete damage are detected on the boot, the outer CV joint of the VAZ 2114 will definitely need to be replaced.
The presence of damage indicates that dirt has gotten inside the element. Much or little of it is no longer so important. Contamination leads to disruption of the functionality of the device.
In such situations, when the CV joint is damaged, it is strongly not recommended to continue driving under your own power. This is dangerous for you, your car and other road users. Ignoring this recommendation entails even more expensive repairs, since by the time you get to the garage or car service center, you will damage a number of other components and elements of the car.
Replacing the inner and outer CV joints on a VAZ 2114
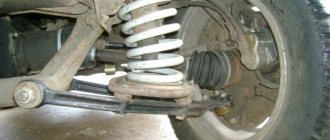
Knocks in the chassis are a frequent companion in life for VAZ 2114 owners. Many elements that can cause knocking, bad roads, and low-quality parts can cause extraneous noise in the suspension. A common source of the problem is the angular velocity distributor, or CV joint (grenade).
The process of replacing a part is simple, so you can change it yourself. The question is often asked which CV joint for the VAZ 2114 is better: regular or tripoid. Among the most common arguments: tripoid is more reliable, but it hums and vibrates at high speeds. The regular one is less reliable, but the car handles better at high speed. However, you can find opposing opinions and arguments on this matter.
There is no clear answer which type is better. Operation in harsh conditions showed that there is no fundamental difference in driving sensations and reliability. The main thing is to buy a high-quality grenade made of well-hardened metal, install it correctly and monitor the safety of the anthers.
Causes of malfunction
Among the main causes of CV joint failure:
- low quality metal and lubricant;
- insufficient amount of lubricant;
- rupture of the boot, entry of dirt.
The CV joint is a moving element, so it heats up when moving. A lack of lubricant or its lack of the necessary properties leads to wear of the hinges and the appearance of extraneous sounds. Due to the rupture of the boot, dirt gets into the grenade, solid particles harm the moving elements.
Fault diagnosis
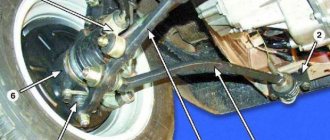
The VAZ 2114 has 2 external and 2 internal CV joints. First you need to determine which one is knocking. The optimal test would be on a suspension diagnostic stand. If this is not possible, diagnosis by ear is possible.
Two signs indicate a grenade malfunction in a VAZ 2114:
- the sound resembles a crunch;
- It usually appears when turning.
The simplest and most accurate way to do a garage check is as follows:
- Place the car on a flat surface;
- Turn the wheels to one side (to the middle position or a little further);
- Drive off with medium speed. It is worth remembering that starting too smoothly may not reveal a crunch due to insufficient load on the CV joint, and starting too abruptly may lead to the drive flying out of the wheel.
- Repeat the operation by turning the steering wheel in the other direction. The appearance of a crunch indicates a malfunction of the outer CV joint on the side in which the steering wheel is turned.
Visual detection of ruptured anthers will also be a sign of a CV joint failure. If you discover a damaged protection for any grenade, it must be immediately removed, disassembled and cleaned. If there is enough grease and there is no significant wear on the hinges yet, it is enough to replace the boot and fill it with new grease. If the wear of the balls is obvious, it is better to change the grenade.
It is more difficult to diagnose a malfunction of the internal grenade on a VAZ 2114. If it malfunctions, it crunches when starting off in a straight direction, and not when turning. But the same symptoms, for example, include play in the steering rack or wear on the engine mounts.
Sometimes the problem can be diagnosed from the pit by tugging on the drive from the gearbox side: strong play or the appearance of extraneous sounds indicate that the internal CV joint should be replaced.
Replacement
It is better to change a grenade yourself with an assistant.
- remove the wheel, remove the wheel bolts and the hub nut washer;
- unscrew the ball from the steering knuckle;
- pull out the splined end of the outer CV joint;
- pull out the drive with the internal CV joint from the gearbox;
- if you plan to remove both drives, remove the internal grenade from the drive and insert it into the gearbox so that the differential does not move after removing the second drive;
- remove or cut off the anthers, thoroughly clean all hinges with a special liquid or just gasoline;
- when filling the CV joint, use a special lubricant suitable for these purposes; ordinary lithol does not have the required temperature characteristics;
- the retaining rings of each CV joint and the hub nut must be replaced;
- The inner CV joints are inserted into the gearbox until they are completely fixed; when adjusting, you can use a hammer with a wooden spacer.
It is quite possible to diagnose and replace a CV joint with your own hands. This does not require sophisticated car mechanic skills and engineering knowledge, but it allows you to get in touch with the car, see and feel how it works. Whatever the reason for the crunching sound, you need to check the condition of the grenade as quickly as possible. Delaying this will almost certainly mean bringing the part to the point of complete wear, and timely repairs will allow you to get by with “little loss.”
What to choose?
To replace the inner or outer CV joint on a VAZ 2114, a new element will be required. To be fair, we note that the most suitable and high-quality CV joints for the VAZ 2114 model are produced by the manufacturer, that is, AvtoVAZ.
But here comes the most important disappointment - they are not for sale. The only option is to go to a specialized VAZ official car service center. But from the point of view of financial costs, it is not the most reasonable decision.
In addition, there is now a fairly wide range of analogues on the market. Judging by the reviews of VAZ 2114 owners, special attention should be paid to CV joints produced by such companies as:
Photo of GKN CV joint for VAZ 2114
Replacement
Armed with new CV joints, also collect a set of necessary tools and materials. It will include:
- Set of heads;
- Spanners;
- Shoes;
- Dry rags;
- Grease for CV joints;
- Jack;
- Anthers.
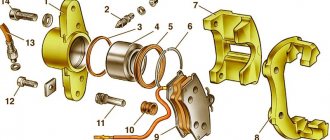
CV joint arrangement diagram
Now let's get down to work on replacing the CV joints:
- Determine the location where the repairs will be carried out. This could be an overpass, a garage with an inspection hole, or a room with a car lift.
- Stop the engine and apply the handbrake. Use chocks to block the wheels.
- Using a wheel wrench, remove the wheel bolts.
- Raise the required part of the car with a jack.
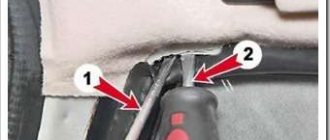
- Loosen the nut in the center of the CV joint. Keep an eye on the puck so you don't lose it. It is not included with the new CV joint.
- Armed with 13mm wrenches, unscrew the fasteners of the upper part of the ball joint. It is not necessary to perform a similar procedure with the lower part, since it will not interfere with the repair process.
- Using a pry bar, slightly rip the grooves off the support and move them aside.
- Knock the hub off the CV joint splines. To do this you will need a hammer and some kind of wooden stand.
- Remove the old damaged CV joint.
- Check for damage to the stem.
- Remove any remaining lubricant from the rod using a dry rag.
- Place a new grenade in the new location. This assembly should include a CV joint, boot, clamps, nuts, and retaining rings.
- When assembling the unit, do not forget to use high-quality lubricants. There shouldn’t be too much of it, but you shouldn’t feel too sorry either.
- Reassemble the parts in reverse order.
- By changing the CV joints, you can simultaneously check the condition of the brake pads. If they are in a sufficiently worn condition, it is advised to replace them at the same time. Anyway, you have already dismantled the knot.
- After completing the repair, check the car in action.
- It’s not uncommon for craftsmen without much experience to leave behind supposedly unnecessary parts after reassembly. Please note that everything that remains after assembly, and that is not the released elements that you replaced with new ones, has its place in the design of the car. Therefore, check where exactly these “extra” elements come from and install them in their rightful place.
Replacing CV joints
In order to replace a failed grenade, it is not at all necessary to contact a service center. The motorist himself is quite capable of performing this procedure.
Tool
In order to replace CV joints, you will need the following set of tools and accessories:
- jack;
- shoes;
- set of socket heads;
- spanners;
- special lubricant for CV joints;
- a clean cloth or rags;
- new anthers.
It's time to change the CV joint
To increase the service life of CV joints, you should regularly check the condition of their boots. Even a small crack on the boot can cause the CV joint to fail.
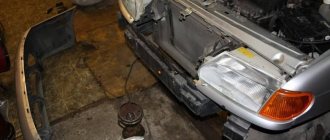
The repair itself can be carried out anywhere, but it will be much better if the car can be placed on an overpass or placed above a sufficiently deep repair pit - this will greatly facilitate the efforts of the car enthusiast and make the process itself more accurate.
Process
The entire replacement of grenades occurs as follows:
- Turn off the engine and put the car on the handbrake.
- Stop the wheels with shoes (if necessary).
- Using a bolt remover, unscrew the wheel bolts.
- Raise the front of the car.
- Remove the retaining ring in the center of the grenade.
- Using a 13mm wrench, unscrew the fasteners of the ball joint in the upper part (it is not necessary to unscrew the fasteners of the lower part - they will not interfere with the process).
- Using a pry bar, slightly move the support out of the grooves.
- Knock the hub off the CV joint splines (use a soft hammer or spacer board!).
- Remove the broken CV joint.
- Check the mounting rod for damage.
- Remove old grease from the rod using a cloth.
- Install the new CV joint in place (namely, the CV joint itself, retaining rings, nuts, clamps and a new boot).
- During assembly, the assembly should be generously, but not excessively, lubricated with a special lubricant.
CV joint arrangement
After the new CV joint is installed in its place, all that remains is to reassemble the entire assembly in the reverse order. At the same time, it is worth paying special attention to the installation and tightening of the hub lock nut - this should be done exclusively using a torque wrench and tightened strictly with the force specified in the car’s passport. But we’ll talk about which grenade is better to put on a VAZ 2114 below.
Advice from experienced motorists
There are some useful tips on this matter that are worth listening to.
- If you hear a characteristic crunch while driving in a straight line, it means the CV joint has failed. If this crunching noise is heard only when turning, then the problem lies in a faulty joint.
- Before installing a new CV joint, treat the grenade landing site with lubricant. This significantly extends its service life.
- To adjust the CV joint and seat it properly, use wooden attachments. If this is not done, the risk of damaging the new element is very high.
- The boot should be installed as tightly and efficiently as possible. If you don't do this, dirt and dust will soon get there. These components will quickly render it unusable, and repair work will have to be carried out again.
- The lock nut on the hub is tightened with a special torque tool. Moreover, tightening is carried out strictly with the parameters specified in the instruction manual for your VAZ 2114 modification.
- During a routine inspection of the technical condition of your car, be sure to pay attention to the condition of the clamps and rubber elements to ensure their integrity. Such seemingly insignificant components can lead to serious consequences and significant financial costs.
- The purchase of spare parts, including CV joints, should be made only from trusted sellers, certified distributors. If you buy a bad, low-quality part, just trying to save money, you will have to pay even more to eliminate the consequences that the use of such elements led to.
The CV joint is an important component of any car, and replacing it even on your own is not particularly difficult.
Knocking in the chassis is a frequent companion in life for owners of the VAZ 2114. Many elements that can cause knocking, bad roads, and low-quality parts can cause extraneous noise in the suspension. A common source of the problem is the angular velocity distributor, or CV joint (grenade).
The process of replacing a part is simple, so you can change it yourself. The question is often asked which CV joint for the VAZ 2114 is better: regular or tripoid. Among the most common arguments: tripoid is more reliable, but it hums and vibrates at high speeds. The regular one is less reliable, but the car handles better at high speed. However, you can find opposing opinions and arguments on this matter.
There is no clear answer which type is better. Operation in harsh conditions showed that there is no fundamental difference in driving sensations and reliability. The main thing is to buy a high-quality grenade made of well-hardened metal, install it correctly and monitor the safety of the anthers.
Installing new hinges
And the final stage remains - installing new hinges on the drive. You already know almost everything about how to change a grenade on a VAZ-2109. All that remains is to install a new element.
First, wash the shaft, get rid of dust and lubricant residues, then put on a new boot. Next, perform the following manipulations:
- Install a new retaining ring.
- Carefully, trying not to damage it, place the grenade on the shaft. To make it sit down, you need to apply several sharp blows through the wood spacer.
- Apply lubricant under the boot and on the inside of the hinge. By the way, the kit comes with a small amount, it is recommended to add a little more.
- Secure the boot with two clamps.
Once you have assembled the entire drive, you can begin installing it on the car. The work is done in reverse order. First put the inner CV joint in place, then the outer one.
Tighten the nut and secure it with a chisel. To prevent corrosion, you can apply a small amount of Litol to the nut and close it with a cap. Now you know how to change a grenade on a VAZ-2109 yourself. The procedure will not take much time, but you can save a lot of money. Workshops will charge about the same amount for repairs as a set of hinges costs (about 1,000 rubles).
Fault diagnosis
The VAZ 2114 has 2 external and 2 internal CV joints. First you need to determine which one is knocking. The optimal test would be on a suspension diagnostic stand. If this is not possible, diagnosis by ear is possible.
Two signs indicate a grenade malfunction in a VAZ 2114:
- the sound resembles a crunch;
- It usually appears when turning.
The simplest and most accurate way to do a garage check is as follows:
- Place the car on a flat surface;
- Turn the wheels to one side (to the middle position or a little further);
- Drive off with medium speed. It is worth remembering that starting too smoothly may not reveal a crunch due to insufficient load on the CV joint, and starting too abruptly may lead to the drive flying out of the wheel.
- Repeat the operation by turning the steering wheel in the other direction. The appearance of a crunch indicates a malfunction of the outer CV joint on the side in which the steering wheel is turned.
Types of CV joints
There are two types of CV joints: external and internal. The first of them is located behind the drive wheel behind the hub and ensures rotation of the wheel (up to 70°) in different planes.
It is equipped with an elastic boot that protects the mechanism from the harmful effects of moisture, dirt, and dust. The failure of this rubber part means that it is time to change the CV joint itself.
The internal constant velocity joint is located next to the gearbox, connecting it to the axle shaft. Its operating range is much smaller - up to 20°. its purpose is to dampen suspension vibrations and engine vibration.
CV joints can be:
- Tripoid.
- Ball.
- Cam.
- Cardan-coupled.
The most popular type among car manufacturers is tripoid. It is distinguished by reliable operation and long service life. Such a hinge can ensure reliable operation when the vehicle is moving at high speed.
The ball version is also popular. It uses balls instead of rollers installed in the tripoid.
The cam type is installed on vehicles operating at low speeds. Trucks and commercial vehicles are equipped with cardan joints.
Replacement
It is better to change a grenade yourself with an assistant.
- remove the wheel, remove the wheel bolts and the hub nut washer;
- unscrew the ball from the steering knuckle;
- pull out the splined end of the outer CV joint;
- pull out the drive with the internal CV joint from the gearbox;
- if you plan to remove both drives, remove the internal grenade from the drive and insert it into the gearbox so that the differential does not move after removing the second drive;
- remove or cut off the anthers, thoroughly clean all hinges with a special liquid or just gasoline;
- when filling the CV joint, use a special lubricant suitable for these purposes; ordinary lithol does not have the required temperature characteristics;
- the retaining rings of each CV joint and the hub nut must be replaced;
- The inner CV joints are inserted into the gearbox until they are completely fixed; when adjusting, you can use a hammer with a wooden spacer.
It is quite possible to diagnose and replace a CV joint with your own hands. This does not require sophisticated car mechanic skills and engineering knowledge, but it allows you to get in touch with the car, see and feel how it works. Whatever the reason for the crunching sound, you need to check the condition of the grenade as quickly as possible. Delaying this will almost certainly mean bringing the part to the point of complete wear, and timely repairs will allow you to get by with “little loss.”
In the design of modern front-wheel drive cars and all-wheel drive crossovers, CV joints (or “grenades”) are used to transmit rotational motion from the engine to the front wheels. The joints ensure a stable speed of rotation of the drive shafts, regardless of the angle of rotation of the wheels and movements of the suspension. This type of drive consists of two hinges, internal and external, which are attached to the axle shaft. The inner CV joint is inserted into the gearbox, and the outer one is fixed in the wheel hub.
The design of the internal and external CV joints is different: The internal CV joint compensates for vibrations of the engine and gearbox, as well as longitudinal movements of the axle shaft when cornering, but has a small bending angle. The external hinge device does not allow axial movements of the working parts, but provides continuous transmission of torque when the relative position of the shafts changes over a wide range (from 40 to 70 degrees).
There are two main modifications of this vehicle chassis unit: a six-ball CV joint and a tripoid constant velocity joint. To determine which CV joint is better, tripod or ball, you need to familiarize yourself with their operating properties.
List of tools that may be needed when replacing CV joints
To carry out repair and replacement of CV joints, you will need the following tools and materials:
- hammer,
- punch,
- mount,
- screwdrivers,
- powerful car lock,
- vice,
- wooden spacer,
- gasoline for washing removed components, CV joint-4 lubricant.
Replacing a CV joint on a VAZ 2109 - operating procedure
First, you should remove the handbrake handle and secure the front wheels with a stop. Then you need to unscrew the hub nut while the car is on the ground. Next, you should raise the car and support its front part. The next step is to remove the wheel and wheel hub thrust nut. Next, the tie rod end must be disassembled. Using a special puller, press the finger out of this assembly. Subsequently, you need to unscrew the ball joint mounting bolts. After the steering knuckle with the stand is moved to the side, it is necessary to remove the splined end of the outer CV joint from the wheel hub. Then, in order to squeeze out the CV joint, you need to use a pry bar.
It should be noted that if the repair work affects all CV joints on both sides of the car, then the old part should be installed instead of the removed part, otherwise during assembly you will encounter the fact that the CV joints will not be installed in their designated place.
It should also be noted that if during the operation of your vehicle you could observe oil leaks near the gearbox, then most likely you will have to replace the CV joint seal. The old part should be pulled out with a screwdriver, and the new one should be pressed into this place until it stops.
It should be understood that the entire repair process in this case is not very labor-intensive, just like repairing a steering rack, however, in this case it is necessary to take into account the recommendations of experienced motorists, which state that replacing the inner CV joint, as well as replacing the outer CV joint, should only be done with similar spare parts assembled. In this case, replacing individual elements is not recommended, unless it is possible to replace the inner CV joint boot or other similar components.
After the shaft with CV joints is removed, the following manipulations must be done: the shaft is installed in a vice, after which the cover clamps are removed. Using a drift, the inner CV joint is knocked out. A similar sequence of actions applies to the outer CV joint. But installation on the shaft is done in reverse order.
Here it should be taken into account that the right shaft is longer than the left one
Before final installation, it is necessary to check the presence of the proper amount of lubricant in the CV joints. During assembly, new clamps must be installed, and during the installation process, care should be taken to ensure that no contamination gets inside the CV joint.
Installation of the CV joint in its designated place is carried out using a hammer and a wooden spacer, and the movements should not be sharp or strong. After the CV joint is placed, the CV joint boot should be installed
During the installation process, it is very important to bend the edge of the boot with a screwdriver, thereby equalizing the pressure inside and outside this element
It should also be noted that if the described process seems too labor-intensive to you, you can always contact a car service. Since such a replacement is quite common, it will take very little time for a professional. Another operation that you can do yourself is pressing in the silent block.
CV joint with ball bearings
In general, the part is a housing with a driven shaft (trunnion), into which a holder (knuckle) is inserted. On the inner surface of the body and the outer side of the cage there are guide grooves along which six balls move, held by the separator. The splined part of the drive shaft is inserted into the central hole of the knuckle. To ensure stable operation, the installed hinge is filled with lubricant and sealed with a rubber or silicone boot. For ball CV joints, thick lubricants with molybdenum disulfide are used.
Tripod CV joint with needle bearings
A tripoid grenade design is often used as an internal hinge on modern cars:
In the body of such a hinge there is a three-beam fork, pressed onto the splines of the driven shaft. Three working rollers are attached to the ends of the fork, which can move along the guide grooves of the body when the unit is rotated or axially displaced.
To protect tripod joints from wear and metal scuffing, special synthetic compounds without solid additives are used.
Features of the tripoid joint
Due to the use of needle bearings, tripoids are more resistant to wear, and friction losses of elements in the assembly are also reduced.
Characteristics of tripoid CV joints:
- Possible bending angle up to 18 degrees,
- Maximum axial movement up to 55 mm,
- Engine and gearbox vibration compensation more than 60%.
Also, the tripoid cannot immediately fail, immobilizing the car, which is important for lovers of off-road driving. Despite the sharp crunch and vibrations that arise, the emergency tripoid CV joint will allow you to get to the repair site under your own power.