Sound insulation on the Lada Priora is of interest to many car enthusiasts, for whom not only safety is important, but also comfort during travel. Being in a car that is treated with high-quality noise-insulating materials, the driver and passengers can enjoy every trip.
Street noise, the knock of worn suspension parts, the sound of a running engine and other factors affecting acoustic comfort become much less noticeable. But in order for the result to meet expectations, and the money not to be wasted, it is necessary to entrust the soundproofing of the Lada Priora to experienced craftsmen.
The desired effect can be achieved only with the proper experience, professional skills and abilities, as well as with the proper selection of materials. If you need a decent result, contact those.
Floor
The floor of a Lada Priora car requires effective sound insulation, since noise from the wheels, transmission, engine, etc. penetrates into the cabin through it. And when driving on country dirt roads and light off-road conditions, dry grass can touch the bottom, which is why a characteristic rustling sound can be heard in the cabin.
To prevent all this from causing discomfort during trips, we use multi-layer sound insulation of the floor. The elastic and elastic material STP Profi Plus is used for the first layer. STP BlackTon is used as the second (intermediate) layer, and STP NoiseBlock is the third.
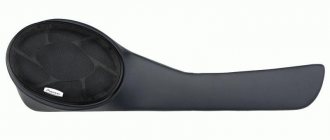
This three-component structure guarantees excellent sound absorption quality. An STP Aero+ sheet, cut along a pre-marked contour, is secured under the rear seat cushion.
Is there a need
If we talk about the need for sound insulation in a car, of course it is necessary:
- Firstly , comfort and calm communication without raising your voice
- Secondly , great sounding acoustics
- Thirdly , peace of mind for your well-being and health
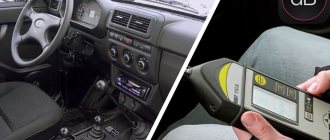
No, we are not going to scare you with non-existent dangers, just facts:
- Increased noise causes rapid fatigue and irritation, reduces the driver’s reflexes
- Leads to constriction of blood vessels in the body, which puts unnecessary strain on your heart
- Over time, such a load causes angina pectoris and even a heart attack.
Why choose us
Many car enthusiasts have already used it and are satisfied with the results. There are several reasons for this.
- We specialize exclusively in sound insulation, so we know about this better than employees of wide-profile auto repair shops.
- For our work, we use only certified materials from the premium STP line.
- The interior of each Lada Priora car remains the same, because our craftsmen carefully handle the factory upholstery, seats, plastic elements, etc.
- We complete assigned tasks without delay, informing clients in advance of specific deadlines.
Call us at our contact number or request a call back to ask all your questions.
Soundproofing doors in Priora
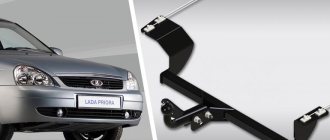
Priora. What happy owner of a car, especially a domestic one, doesn’t want it to be better than a foreign car. Patriotism is a great feeling that makes us buy our domestic cars at such a price (purely the opinion of the author of the article).
Video about soundproofing doors on Priora
First of all, we will look at an example of installing speakers in the door not of the 13th, standard radius for this model, but of the 16th. In combination with sound insulation, the sound should turn out - oh, yum. It's not complicated at all. We cut out an insert from wood, pressed cardboard, MDF, chipboard - there are a lot of materials. On the body, on the door itself, we outline the future location of the holes for the screws and the insert itself. Next we need to slightly expand the standard cell, otherwise the magnet from the column will not fit. This is done with ordinary metal scissors.
We also recommend that you read the following materials:
Next, we soundproof the door itself. We tighten everything that is inside the door, we tighten everything that rings, well, everything in this regard. Next, you need to remove the standard anti-corrosion treatment inside the Priora doors. This can be done with a regular solvent. We cut out pieces of sound insulation so that they fit into the door slots and glue them.
It is advisable to glue in warm weather, the material will bend better and have a higher quality property, taking the shapes we need. The average consumption is one and a half sheets per door.
It was worth it! About car safety in the material: Crash test of Lada Priora.
Correct sound insulation of Lada car doors
What are Lada cars famous for? First of all, they are practical, economical and inexpensive to maintain. They are also known for their poor sound insulation. Noise, hum, howl, rattling and squeaks are familiar, integral additions. However, you can make the car a little more comfortable if you install additional sound insulation on the doors.
Lada cars (Granta, Priora, Kalina, Largus, Niva 4x4, Vesta or XRAY) have similar instructions for installing noise vibration insulation (SHVI). Features may only occur when removing/installing door trims:
Why soundproof doors? This modification will allow:
- Eliminate rattles and squeaks
- Reduce road noise
- Improve the sound of acoustics
- Change the sound of doors closing for the better
General action plan:
- Install a vibration isolator (visomat, vibroplast, BiMast) on the outside of the door (we will ensure good vibration damping of the surface)
- Close the technical openings of the door using a vibration isolator.
- Place noise insulation (bitoplast, isotone, accent)/thermal insulation (splen) directly on the plastic door trim.
It is not recommended to install sound insulation and thermal insulation inside the door, because these materials only work with 100% surface coverage. The doors have slots for glass and drain holes, so sound insulators/heat insulators will be inside the door in an aggressive environment and may lose their properties.
Recommendations from manufacturers
Installation diagram for additional sound insulation in doors from Shumoff:
Here are instructions on how to properly soundproof doors from STP:
Vibration isolation
You can independently select the appropriate vibration-proofing material, for example, using this table:
Degrease the surface. Stick vibration dampers 2-3 mm thick (thicker only with a powerful audio system) onto a flat surface inside the door. To achieve maximum effectiveness, it is enough to cover 70-80% of a flat surface. We do not cover the drain holes, stiffening ribs and the end of the door. Heat the material with a hairdryer and roll it with a hard roller (roll in one direction), expelling the air.
It is recommended to cover the technological holes in the door with a single sheet, cutting out holes for rods, fasteners, etc.
Soundproofing and thermal insulation
STP recommends gluing a sound-absorbing material, for example, an accent, on top of the vibration insulation material on the “street” panel (joint to joint, it should cover the maximum area of this surface).
We cover the entire surface area of the door trim, cutting out holes for fasteners and other necessary elements. The recommended material from the Shumoff company is sound-heat-insulating material P4, from STP - Biplast.
Communities › VAZ: Repair and Improvement › Blog › Soundproofing doors (Priora)
I bought noise and vibration insulation, I took 2mm vibration insulation
based on two sheets per door, maybe this is too thin a material, but I was afraid that the doors would sag. Sound insulation - insulating tape 3004B with foil, two rolls and 3004B without foil, also two rolls.
In general, it all started with removing the casing; I won’t describe the process. Next, I wrapped foam rubber around the pull rod that goes to the “pivot” for opening and closing the door, because it rattled unrealistically.
By the way, the whole idea of gluing the doors came to me when I first got behind the wheel of my Priorik, everything just rattled terribly, my previous car (nine 2003) rattled much less. But is this a reason to refuse to buy a good car? After all, AVTOVAZ is a designer, and you don’t have to approach it without a hammer and file.
Now let’s return to the topic of this entry) after wrapping the rod, I began to clean and degrease the inside of the door. For this I used 92 gasoline, I wanted to use 646 solvent, but I was afraid that it would burn the paint. It turned out like this
After that, I began to cut the vibrating material into pieces so that they would fit into the technological holes and glue them to the inside of the door, I smoothed the air with my fingers through a rag, I did not use rollers or a hair dryer either, everything was glued well.
When I finished with the inside, I sprayed the door along the edge with some kind of black non-drying Movil (I dug it up from my father in the garage) using a syringe. About 3 syringes per door. Then, using the same syringe, I filled all the mechanisms inside with synthetic oil, coated the window lift cables and locks, tightened the nuts and proceeded to sealing the technological holes.
Next, I unscrewed the top part from the removed casing, glued everything there with anti-squeak material “Madeline”, I also placed it under each clip for fastening the casing and tightened all the screws.
I cut out soundproofing insulation tape 3004B foil along the contour of the skin, and began gluing it onto the door (also in pieces), and along the edge, where the skin had contact with the iron of the door, I glued a strip of insulation tape 3004B without foil. I cut out the places where the clips go into the door iron and mounted the trim in place.
I forgot to take a photo with the soundproofing glued on, but I think it’s not scary, everything is as simple as two fingers on the asphalt.
Actually, why I took two rolls of foil and non-foil insulation tape, because I wanted to stick it with foil on the outer part of the door, and without foil put it under the casing as a second layer, but it all fit, so I had to make do with one layer. But I didn’t dare to glue sound insulation inside the door, since it is essentially like foam rubber and will absorb all the moisture that gets into the door, which will lead to corrosion.
In many articles on pasting noise and vibration insulation they write that the vibration material must be heated with a hairdryer and rolled well onto the iron, but it is not written why! I barely got information about this. And everything is done to ensure that the vibrating material adheres well and there is as little air under it as possible. If the air remains, condensation will accumulate in the air bubbles, which will lead to what? Right! To corrosion!
That's all! I was very pleased with the result, extraneous sounds in the doors, such as rattling, whistling inside the door, disappeared, and most importantly it became quieter, and this is really noticeable! Oh yes, the doors close much quieter and better, and after anointing all the mechanisms the handles became very soft and quiet. If you decide to do the same, don’t hesitate to do it, it’s worth it!
How to muffle arches from the interior
It is much easier to insulate the arches from the car interior. To do this, you will have to disassemble the interior trim to make sound insulation for the rear wheel arches, clean them well and degrease them. There are also plenty of sheet materials - this includes Bimast, construction isolon at worst, Bitoplast, STP Accent. Here you need to try to glue the surface as completely as possible, without gaps, and then assemble the interior or trunk, depending on the type of body.
The price of sheet material can range from 200 to 500 rubles per square meter, depending on the thickness and density. This way you can dampen the wheel arches quite inexpensively with your own hands. Good luck to everyone and have a cozy, quiet salon!
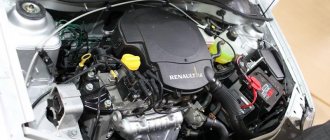
Hood and engine
Sound insulation of the engine compartment of the Lada Priora
— the front instrument panel is removed;
— we also remove the factory insulation;
— use a photograph to record the position of all wires and bearings;
— wash the surface, clean it with sandpaper, treat it with a solvent;
— heat the first layer of the vibration isolator to a sticky state and fix it;
- second layer - splen, bitoplast;
— insulate the wires with anti-squeak;
- Reassemble the panel in reverse order.
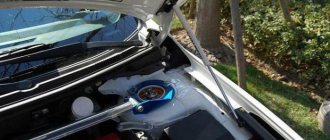
Sound insulation of the hood
In addition to the standard set of materials and tools, you will need factory insulation with clamps. Clean the surface, treat with solvent, and dry. The first vibration-isolating layer, preheated. Roll it out with a roller, then lay the splen. The next layer is standard insulation.
Source